
User Guide
Page 7
... the status of supplies from a network computer 178 Ordering supplies...179 Ordering toner cartridges ...179 Ordering imaging kits...180 Ordering a waste toner bottle ...180 Replacing supplies...181 Replacing the waste toner bottle ...181 Replacing a black imaging kit ...184 Replacing a black and ...color imaging kit...190 Replacing a toner cartridge...196 Replacing a developer unit ...198 Cleaning the...
... the status of supplies from a network computer 178 Ordering supplies...179 Ordering toner cartridges ...179 Ordering imaging kits...180 Ordering a waste toner bottle ...180 Replacing supplies...181 Replacing the waste toner bottle ...181 Replacing a black imaging kit ...184 Replacing a black and ...color imaging kit...190 Replacing a toner cartridge...196 Replacing a developer unit ...198 Cleaning the...

User Guide
Page 122
... * indicates it easy for you to make it is the current default setting. Supplies Menu Cyan Cartridge Magenta Cartridge Yellow Cartridge Black Cartridge Imaging Kit Waste Toner Bottle Paper Menu Default Source Size/Type Paper Texture Paper Weight Paper Loading Custom Type Custom Scan Sizes Universal Setup Reports Menu Settings Page Device...
... * indicates it easy for you to make it is the current default setting. Supplies Menu Cyan Cartridge Magenta Cartridge Yellow Cartridge Black Cartridge Imaging Kit Waste Toner Bottle Paper Menu Default Source Size/Type Paper Texture Paper Weight Paper Loading Custom Type Custom Scan Sizes Universal Setup Reports Menu Settings Page Device...

User Guide
Page 123
...Missing or Defective OK Unsupported Imaging Kit OK Replace Black Imaging Kit Replace Black and Color Imaging Kit Waste Toner Box Near Full Replace Missing OK Description Shows the status of the toner cartridges Note: 88 Replace Cartridge indicates the cartridge is empty, the job prints using the linked tray.... Shows the status of the imaging kit Shows the status of the waste toner bottle Paper menu Default Source menu Menu item Default Source Tray MP Feeder Manual Paper Manual Env Description Sets a default paper source for ...
...Missing or Defective OK Unsupported Imaging Kit OK Replace Black Imaging Kit Replace Black and Color Imaging Kit Waste Toner Box Near Full Replace Missing OK Description Shows the status of the toner cartridges Note: 88 Replace Cartridge indicates the cartridge is empty, the job prints using the linked tray.... Shows the status of the imaging kit Shows the status of the waste toner bottle Paper menu Default Source menu Menu item Default Source Tray MP Feeder Manual Paper Manual Env Description Sets a default paper source for ...

User Guide
Page 173
.... 3 Remove and re‑configure the additional trays. Try one or more information, see "Replacing the waste toner bottle" on page 181. 82.yy Waste toner box missing Replace the waste toner bottle, and then press to clear the message and continue printing. 88.yy Cartridge is low Press to... clear the message and continue printing. 88.yy Replace Cartridge Replace the toner cartridge. Understanding printer messages 173 58...
.... 3 Remove and re‑configure the additional trays. Try one or more information, see "Replacing the waste toner bottle" on page 181. 82.yy Waste toner box missing Replace the waste toner bottle, and then press to clear the message and continue printing. 88.yy Cartridge is low Press to... clear the message and continue printing. 88.yy Replace Cartridge Replace the toner cartridge. Understanding printer messages 173 58...

User Guide
Page 180
..., and X543 series C544, X544, and X546 series Not supported Not supported Not supported Not supported Not supported Not supported Not supported Not supported Ordering imaging kits When Replace black and color imaging kit or Replace black imaging kit appears, order a replacement imaging kit. The waste toner bottle must be replaced when 82...
..., and X543 series C544, X544, and X546 series Not supported Not supported Not supported Not supported Not supported Not supported Not supported Not supported Ordering imaging kits When Replace black and color imaging kit or Replace black imaging kit appears, order a replacement imaging kit. The waste toner bottle must be replaced when 82...

User Guide
Page 181
To reduce the risk of the printer might be hot. The printer will not continue printing until the waste toner bottle is replaced. 1 Unpack the replacement waste toner bottle. 2 Grasp the front door at the side handholds, and then pull it toward you. CAUTION-HOT SURFACE: The inside of injury from a hot ...to cool before touching. 3 Open the top door. 1@!. 4 GHI 2 ABC 5 JKL 3 DEF 7 PQRS 8 TUV 6 MNO * 9 WXYZ 0 # K M C Y K M C Y Maintaining the printer 181 Replacing supplies Replacing the waste toner bottle Replace the waste toner bottle when 82 Replace waste toner appears.
To reduce the risk of the printer might be hot. The printer will not continue printing until the waste toner bottle is replaced. 1 Unpack the replacement waste toner bottle. 2 Grasp the front door at the side handholds, and then pull it toward you. CAUTION-HOT SURFACE: The inside of injury from a hot ...to cool before touching. 3 Open the top door. 1@!. 4 GHI 2 ABC 5 JKL 3 DEF 7 PQRS 8 TUV 6 MNO * 9 WXYZ 0 # K M C Y K M C Y Maintaining the printer 181 Replacing supplies Replacing the waste toner bottle Replace the waste toner bottle when 82 Replace waste toner appears.
User Guide
Page 182
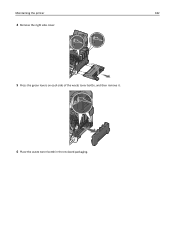
Maintaining the printer 182 4 Remove the right side cover. 5 Press the green levers on each side of the waste toner bottle, and then remove it. 6 Place the waste toner bottle in the enclosed packaging.
Maintaining the printer 182 4 Remove the right side cover. 5 Press the green levers on each side of the waste toner bottle, and then remove it. 6 Place the waste toner bottle in the enclosed packaging.
User Guide
Page 183
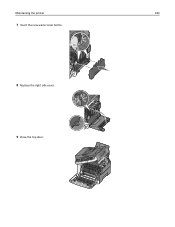
Maintaining the printer 183 7 Insert the new waste toner bottle. 8 Replace the right side cover. 9 Close the top door. K M C Y K M C Y
Maintaining the printer 183 7 Insert the new waste toner bottle. 8 Replace the right side cover. 9 Close the top door. K M C Y K M C Y
User Guide
Page 186
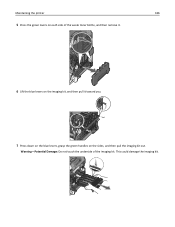
Maintaining the printer 186 5 Press the green levers on the sides, and then pull the imaging kit out. This could damage the imaging kit. Warning-Potential Damage: Do not touch the underside of the waste toner bottle, and then remove it. 6 Lift the blue levers on the imaging kit, and then pull it toward you. 7 Press down on the blue levers, grasp the green handles on each side of the imaging kit.
Maintaining the printer 186 5 Press the green levers on the sides, and then pull the imaging kit out. This could damage the imaging kit. Warning-Potential Damage: Do not touch the underside of the waste toner bottle, and then remove it. 6 Lift the blue levers on the imaging kit, and then pull it toward you. 7 Press down on the blue levers, grasp the green handles on each side of the imaging kit.

User Guide
Page 189
Maintaining the printer 189 17 Replace the waste toner bottle. 18 Replace the right side cover. 19 Replace the toner cartridges.
Maintaining the printer 189 17 Replace the waste toner bottle. 18 Replace the right side cover. 19 Replace the toner cartridges.

User Guide
Page 192
This could damage the imaging kit. Maintaining the printer 192 4 Remove the right side cover. 5 Press the green levers on the sides, and then pull the imaging kit out. Warning-Potential Damage: Do not touch the underside of the waste toner bottle, and remove it. 6 Lift the blue levers on the imaging kit, and then pull it toward you. 7 Press down on the blue levers, grasp the green handles on each side of the imaging kit.
This could damage the imaging kit. Maintaining the printer 192 4 Remove the right side cover. 5 Press the green levers on the sides, and then pull the imaging kit out. Warning-Potential Damage: Do not touch the underside of the waste toner bottle, and remove it. 6 Lift the blue levers on the imaging kit, and then pull it toward you. 7 Press down on the blue levers, grasp the green handles on each side of the imaging kit.

User Guide
Page 194
Maintaining the printer 194 13 Align and insert the imaging kit. 14 Replace the waste toner bottle.
Maintaining the printer 194 13 Align and insert the imaging kit. 14 Replace the waste toner bottle.

User Guide
Page 200
Warning-Potential Damage: Do not touch the underside of the waste toner bottle, and then remove it. 6 Lift the blue levers on the imaging kit, and then pull it toward you. 7 Press down on the blue levers, grasp the handles on the sides, and then pull the imaging kit out. This could damage the imaging kit. Maintaining the printer 200 5 Press the green levers on each side of the imaging kit.
Warning-Potential Damage: Do not touch the underside of the waste toner bottle, and then remove it. 6 Lift the blue levers on the imaging kit, and then pull it toward you. 7 Press down on the blue levers, grasp the handles on the sides, and then pull the imaging kit out. This could damage the imaging kit. Maintaining the printer 200 5 Press the green levers on each side of the imaging kit.

User Guide
Page 202
Maintaining the printer 202 14 Align and insert the imaging kit. 15 Replace the waste toner bottle.
Maintaining the printer 202 14 Align and insert the imaging kit. 15 Replace the waste toner bottle.

User Guide
Page 255
... installed 172 58 Too many trays attached 173 59 Incompatible tray 173 650‑sheet duo drawer installing 29 loading 52 82 Replace waste toner box 173 82.yy Waste toner box missing 173 840.01 Scanner Disabled 176 840.02 Scanner Auto Disabled 176 88.yy Cartridge is low 173 88.yy Replace...
... installed 172 58 Too many trays attached 173 59 Incompatible tray 173 650‑sheet duo drawer installing 29 loading 52 82 Replace waste toner box 173 82.yy Waste toner box missing 173 840.01 Scanner Disabled 176 840.02 Scanner Auto Disabled 176 88.yy Cartridge is low 173 88.yy Replace...
User Guide
Page 257
... drawer 29 fax 105, 106 flash memory card 26 internal 22 memory card 22 memory cards 22 scan to computer 112 ordering imaging kits 180 toner cartridges 179 waste toner bottle 180 P paper capacities 63 characteristics 57 letterhead 58 preprinted forms 58 recycled 42
... drawer 29 fax 105, 106 flash memory card 26 internal 22 memory card 22 memory cards 22 scan to computer 112 ordering imaging kits 180 toner cartridges 179 waste toner bottle 180 P paper capacities 63 characteristics 57 letterhead 58 preprinted forms 58 recycled 42

User Guide
Page 258
...72 canceling from Windows 72 print quality cleaning the scanner glass 205 replacing developer unit 198 replacing imaging kits 184, 190 replacing the waste toner bottle 181 print quality test pages, printing 71 print quality troubleshooting blank pages 223 characters have jagged edges 224 clipped images 224 color... 58 Too many flash options installed 172 58 Too many trays attached 173 59 Incompatible tray 173 82 Replace waste toner bottle 181 82 Replace waste toner box 173 82.yy Waste toner box missing 173 840.01 Scanner Disabled 176 840.02 Scanner Auto Disabled 176 88 Replace Cartridge 196 88...
...72 canceling from Windows 72 print quality cleaning the scanner glass 205 replacing developer unit 198 replacing imaging kits 184, 190 replacing the waste toner bottle 181 print quality test pages, printing 71 print quality troubleshooting blank pages 223 characters have jagged edges 224 clipped images 224 color... 58 Too many flash options installed 172 58 Too many trays attached 173 59 Incompatible tray 173 82 Replace waste toner bottle 181 82 Replace waste toner box 173 82.yy Waste toner box missing 173 840.01 Scanner Disabled 176 840.02 Scanner Auto Disabled 176 88 Replace Cartridge 196 88...
User Guide
Page 260
... paper 59 supplies 178 supplies conserving 43 status of 178 storing 178 Supplies menu 123 supplies, ordering imaging kits 180 toner cartridges 179 waste toner bottle 180 T telecommunication notices 242, 243, 244, 245 toner cartridges ordering 179 recycling 46 replacing 196 transparencies copying to 75 loading 53 tips on using 66 Tray Empty 169... quality 232 print irregularities 226 print is too dark 229 print is too light 228 repeating defects 227 skewed print 227 solid color pages 230 toner fog or background shading 231 toner rubs off 231 toner specks 232 uneven print density 232
... paper 59 supplies 178 supplies conserving 43 status of 178 storing 178 Supplies menu 123 supplies, ordering imaging kits 180 toner cartridges 179 waste toner bottle 180 T telecommunication notices 242, 243, 244, 245 toner cartridges ordering 179 recycling 46 replacing 196 transparencies copying to 75 loading 53 tips on using 66 Tray Empty 169... quality 232 print irregularities 226 print is too dark 229 print is too light 228 repeating defects 227 skewed print 227 solid color pages 230 toner fog or background shading 231 toner rubs off 231 toner specks 232 uneven print density 232
User Guide
Page 261
... USB menu 135 USB port 31 Use camera controls to print 170 Utilities menu 155 V viewing reports 208 W Waiting 170 Waiting, too many events 170 waste toner bottle ordering 180 replacing 181 Windows wireless network installation 35 wired network setup using Windows 39 wired networking using Macintosh 39 Wireless menu 135 wireless...
... USB menu 135 USB port 31 Use camera controls to print 170 Utilities menu 155 V viewing reports 208 W Waiting 170 Waiting, too many events 170 waste toner bottle ordering 180 replacing 181 Windows wireless network installation 35 wired network setup using Windows 39 wired networking using Macintosh 39 Wireless menu 135 wireless...

Maintenance Manual
Page 2
... control panel 3 Checking the status of supplies from a network computer 3 Ordering supplies...4 Ordering toner cartridges...4 Ordering imaging kits...5 Ordering a waste toner bottle...5 Replacing supplies...6 Replacing the waste toner bottle...6 Replacing a black imaging kit...9 Replacing a black and color imaging kit...15 Replacing a toner cartridge...21 Replacing a developer unit...22 Cleaning the exterior of the printer...28 Cleaning...
... control panel 3 Checking the status of supplies from a network computer 3 Ordering supplies...4 Ordering toner cartridges...4 Ordering imaging kits...5 Ordering a waste toner bottle...5 Replacing supplies...6 Replacing the waste toner bottle...6 Replacing a black imaging kit...9 Replacing a black and color imaging kit...15 Replacing a toner cartridge...21 Replacing a developer unit...22 Cleaning the exterior of the printer...28 Cleaning...


