Owners Manual
Page 77
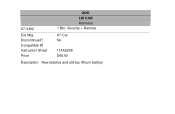
Security + Remote 97-Cur No 114A2208 $48.50 Description New plastics and utilizes lithium battery 971LMC Era Mfg Discontinued? Compatible W Instruction Sheet Price GDO LM CAN Remotes 1 Btn.
Security + Remote 97-Cur No 114A2208 $48.50 Description New plastics and utilizes lithium battery 971LMC Era Mfg Discontinued? Compatible W Instruction Sheet Price GDO LM CAN Remotes 1 Btn.
Owners Manual
Page 78
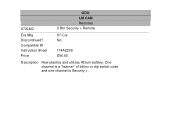
972LMC Era Mfg Discontinued? One channel is a "learner" of billion or dip switch code and one channel is Security +. Compatible W Instruction Sheet Price GDO LM CAN Remotes 2 Btn Security + Remote 97-Cur No 114A2209 $55.50 Description New plastics and utilizes lithium battery.
972LMC Era Mfg Discontinued? One channel is a "learner" of billion or dip switch code and one channel is Security +. Compatible W Instruction Sheet Price GDO LM CAN Remotes 2 Btn Security + Remote 97-Cur No 114A2209 $55.50 Description New plastics and utilizes lithium battery.

Owners Manual
Page 133
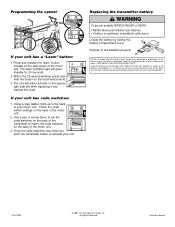
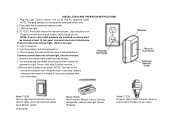
...Mate remote control, you must have one of the original remote controls for changing the code setting and/or replacing the transmitter battery. ERASE THE CODE 1) Simultaneously press the "learn " button on the 210LM, the LED will blink rapidly (slightly dimmer ...LED flickers and turns off. 3) Done! REPLACEMENT PARTS 41A5F1O90R SERRVeImCoEteDcIAonLtrOoUl cRasTeO, LacLtuFaRtoErEanNdUsMcBreEwR(:c1ir-c8u0i0t -b5o2a8r-d9n1o3t1included) 10a?? 6 volt battery (GP476A or equivalent) 29C128 Visor clip Owner's Manual Model 210LM Single Channel Remote Control FCC/DOC rules prohibit adjustments to or ...
...Mate remote control, you must have one of the original remote controls for changing the code setting and/or replacing the transmitter battery. ERASE THE CODE 1) Simultaneously press the "learn " button on the 210LM, the LED will blink rapidly (slightly dimmer ...LED flickers and turns off. 3) Done! REPLACEMENT PARTS 41A5F1O90R SERRVeImCoEteDcIAonLtrOoUl cRasTeO, LacLtuFaRtoErEanNdUsMcBreEwR(:c1ir-c8u0i0t -b5o2a8r-d9n1o3t1included) 10a?? 6 volt battery (GP476A or equivalent) 29C128 Visor clip Owner's Manual Model 210LM Single Channel Remote Control FCC/DOC rules prohibit adjustments to or ...

Owners Manual
Page 137
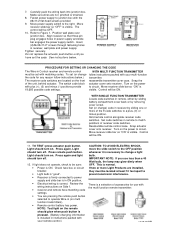
... maximum. Carefully turn off cover and set with matching codes. If transmitter does not or operate, check to operate only incandescent lamps of bulb. Transmitter battery has power. It can be sure: 1. Follow instructions below. 1. Set or change code in . 3. Be sure the Control is located under the rubber cover on...
... maximum. Carefully turn off cover and set with matching codes. If transmitter does not or operate, check to operate only incandescent lamps of bulb. Transmitter battery has power. It can be sure: 1. Follow instructions below. 1. Set or change code in . 3. Be sure the Control is located under the rubber cover on...
Owners Manual
Page 139
... • Light bulb is "good". • Receiver is in Mexico NOTE: Test light on multi function transmitters). • Transmitters battery has power. The control will be set the code. Snap the actuator cover onto receiver. WITH SINGLE CHANNEL TRANSMITTER Remove the transmitter cover... Move receiver slide bar so "ON" is normal. Press again and light should glow when push button is pressed. (Battery changing information is included in instructions packed with the multi function remote transmitter: Series 53 Multifunction Remote Transmitter Series 74 Appliance ...
... • Light bulb is "good". • Receiver is in Mexico NOTE: Test light on multi function transmitters). • Transmitters battery has power. The control will be set the code. Snap the actuator cover onto receiver. WITH SINGLE CHANNEL TRANSMITTER Remove the transmitter cover... Move receiver slide bar so "ON" is normal. Press again and light should glow when push button is pressed. (Battery changing information is included in instructions packed with the multi function remote transmitter: Series 53 Multifunction Remote Transmitter Series 74 Appliance ...
Owners Manual
Page 140
...polarized outlet. Screws into the polarized receiver outlet. 3. Turn on the transmitter should glow when the push button is pressed. (Battery changing information is included In instructions packed with 2 or 3-channel transmitters). 3. Press the transmitter push button. Light should turn... are firmly plugged in Mexico There is turned on . INSTALLATION AND OPERATION INSTRUCTIONS 1. Light should turn on . 2. Transmitter battery has power. Light is power to prevent electronic Interference. TO TEST: Press and release the receiver actuator. NOTE 1: Wait at...
...polarized outlet. Screws into the polarized receiver outlet. 3. Turn on the transmitter should glow when the push button is pressed. (Battery changing information is included In instructions packed with 2 or 3-channel transmitters). 3. Press the transmitter push button. Light should turn... are firmly plugged in Mexico There is turned on . INSTALLATION AND OPERATION INSTRUCTIONS 1. Light should turn on . 2. Transmitter battery has power. Light is power to prevent electronic Interference. TO TEST: Press and release the receiver actuator. NOTE 1: Wait at...

Owners Manual
Page 142
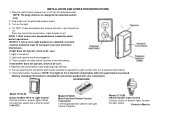
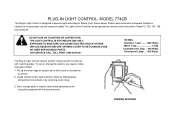
... lights. Screws into wall receptacle. Wires into electrical box like a dimmer switch. Replace the visor clip. TRANSMITTER PARTS LIST Visor Clip Battery Case, Cover & Screw (Circuit board not included) 29C121-2 1OA15 41A3307 Model 74LM Plug-In Light/Appliance Control Controls interior lights. Model...the case and the connecting screw. When the light dims, flickers or does not come on, replace the battery If the transmission range lessens, check the battery light. The transmitter is pressed, the light will glow and the garage door opener or other remote control...
... lights. Screws into wall receptacle. Wires into electrical box like a dimmer switch. Replace the visor clip. TRANSMITTER PARTS LIST Visor Clip Battery Case, Cover & Screw (Circuit board not included) 29C121-2 1OA15 41A3307 Model 74LM Plug-In Light/Appliance Control Controls interior lights. Model...the case and the connecting screw. When the light dims, flickers or does not come on, replace the battery If the transmission range lessens, check the battery light. The transmitter is pressed, the light will glow and the garage door opener or other remote control...
Owners Manual
Page 143
...and mark both fastening locations. 2. Use #6x1" screws provided. Set aside top of case and the connecting screw. Snap connector onto new battery. PARTS LIST Battery Case, Cover & Screw (Circuit board not included) Wall Mount Assy. 114A1100 10A15 41 A3072 41A3136 WALL MOUNT © 1988, The ... the TOP button. 1. Drill 3/16" holes and insert the anchors. Use a hammer to operate the receiver. Tighten securely TRANSMITTER BATTERY A 9 volt battery should produce power for your house construction. When the light does not come on an interior wall, test the transmitter operation at least...
...and mark both fastening locations. 2. Use #6x1" screws provided. Set aside top of case and the connecting screw. Snap connector onto new battery. PARTS LIST Battery Case, Cover & Screw (Circuit board not included) Wall Mount Assy. 114A1100 10A15 41 A3072 41A3136 WALL MOUNT © 1988, The ... the TOP button. 1. Drill 3/16" holes and insert the anchors. Use a hammer to operate the receiver. Tighten securely TRANSMITTER BATTERY A 9 volt battery should produce power for your house construction. When the light does not come on an interior wall, test the transmitter operation at least...

Owners Manual
Page 144
...remote controls out of reach of the motor unit. 3. Use a pen or screwdriver to match the code switches on the back of old batteries properly. The learn " button located on the back of the case. Tested to Comply with FCC and or Industry Canada rules, adjustment or ...not cause harmful interference, and (2) this receiver and/or transmitter are no obstructions to cross path of the motor unit. The 12 volt battery should provide power for programming light controls are included with a garage door opener and/or light control product. Replacement Parts Transmitter case only ...
...remote controls out of reach of the motor unit. 3. Use a pen or screwdriver to match the code switches on the back of old batteries properly. The learn " button located on the back of the case. Tested to Comply with FCC and or Industry Canada rules, adjustment or ...not cause harmful interference, and (2) this receiver and/or transmitter are no obstructions to cross path of the motor unit. The 12 volt battery should provide power for programming light controls are included with a garage door opener and/or light control product. Replacement Parts Transmitter case only ...
Owners Manual
Page 145
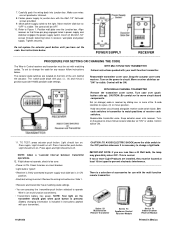
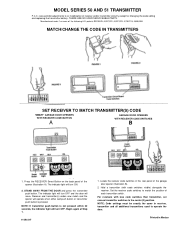
... WITH RECEIVER CODE SWITCHES B 1. Printed in the rear panel of receiver and/or transmitter circuitry except for changing the code setting and replacing the transmitter battery. THERE ARE NO USER SERVICEABLE PARTS. Set the receiver code switches to or modification of the garage door opener (Illustration B). 2. MODEL SERIES 50 AND 51...
... WITH RECEIVER CODE SWITCHES B 1. Printed in the rear panel of receiver and/or transmitter circuitry except for changing the code setting and replacing the transmitter battery. THERE ARE NO USER SERVICEABLE PARTS. Set the receiver code switches to or modification of the garage door opener (Illustration B). 2. MODEL SERIES 50 AND 51...
Owners Manual
Page 146
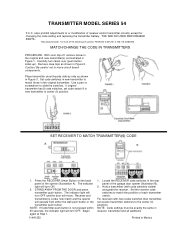
... code switches in new transmitter to match the postition of receiver and/or transmitter circuitry except for changing the code setting and replacing the transmitter battery. rules prohibit adjustments to match those in Mexico Remove case tops as shown in Figure 2. NOTE: If transmitter push button is not pressed within 30...
... code switches in new transmitter to match the postition of receiver and/or transmitter circuitry except for changing the code setting and replacing the transmitter battery. rules prohibit adjustments to match those in Mexico Remove case tops as shown in Figure 2. NOTE: If transmitter push button is not pressed within 30...

Owners Manual
Page 147
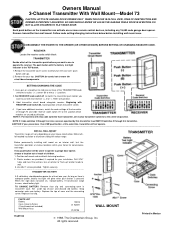
... sight until completely closed. Two-Function Transmitter: The two-function transmitter has two push buttons (For channel 1 and channel 2), each activated by sliding back the battery compartment cover. Figure 2 Model 61 Single-Function Transmitter Model 62 Two-Function Transmitter + 0 -1 2 3 4 5 6 7 8 9 + 0 -1 2 3 4 5 6 7 8 9 + 0 -1 2 3 4 5 6 7 8 9 Code switches (1-9) Code ...or door ONLY when it can be used to operate a garage door opener. Single-Function Transmitter Model 61LM Two-Function Transmitter Model 62LM Figure 1 Model 61 Model 62 Model 63 (+) (0) (-) Push Buttons Push...
... sight until completely closed. Two-Function Transmitter: The two-function transmitter has two push buttons (For channel 1 and channel 2), each activated by sliding back the battery compartment cover. Figure 2 Model 61 Single-Function Transmitter Model 62 Two-Function Transmitter + 0 -1 2 3 4 5 6 7 8 9 + 0 -1 2 3 4 5 6 7 8 9 + 0 -1 2 3 4 5 6 7 8 9 Code switches (1-9) Code ...or door ONLY when it can be used to operate a garage door opener. Single-Function Transmitter Model 61LM Two-Function Transmitter Model 62LM Figure 1 Model 61 Model 62 Model 63 (+) (0) (-) Push Buttons Push...
Owners Manual
Page 148
... unit will either activate or the opener light bulb will glow steadily for changing the code setting or replacing the battery. All Rights Reserved Printed in Mexico Operation is swallowed, immediately notify doctor. Check the code switch settings on the...1 2 3 456 7 8 9 H I G H NO R M OR RED-1 WHT-2 H I G H NO R M Replacing the transmitter battery WARNING To prevent possible SERIOUS INJURY or DEATH: • NEVER allow small children near batteries. • If battery is subject to match the code switches on the back of the motor unit. + H 0 I G H must accept any...
... unit will either activate or the opener light bulb will glow steadily for changing the code setting or replacing the battery. All Rights Reserved Printed in Mexico Operation is swallowed, immediately notify doctor. Check the code switch settings on the...1 2 3 456 7 8 9 H I G H NO R M OR RED-1 WHT-2 H I G H NO R M Replacing the transmitter battery WARNING To prevent possible SERIOUS INJURY or DEATH: • NEVER allow small children near batteries. • If battery is subject to match the code switches on the back of the motor unit. + H 0 I G H must accept any...

Owners Manual
Page 149
...- THE CODE IN ANY NEW REMOTE MUST BE SET TO MATCH THE CODE IN THE ORIGINAL REMOTE. Place remotes side by sliding the battery compartment cover back. Single-Function Remote Control FIG A Multi-Function Remote Control Match Code Switches (2-9) Match Code Switches (1-9) When used to...used to operate the receiver must accept any position. "Smart Button" See side 2 for changing code setting and replacing remote control transmitter battery. rules prohibit adjustments to slide the code switches. Manufactured under 1 or more of this device is neutral. DO NOT ALLOW CHILDREN TO ...
...- THE CODE IN ANY NEW REMOTE MUST BE SET TO MATCH THE CODE IN THE ORIGINAL REMOTE. Place remotes side by sliding the battery compartment cover back. Single-Function Remote Control FIG A Multi-Function Remote Control Match Code Switches (2-9) Match Code Switches (1-9) When used to...used to operate the receiver must accept any position. "Smart Button" See side 2 for changing code setting and replacing remote control transmitter battery. rules prohibit adjustments to slide the code switches. Manufactured under 1 or more of this device is neutral. DO NOT ALLOW CHILDREN TO ...
Owners Manual
Page 151
... code). With a Single or 2-channel remote, set with incandescent or fluorescent lamps of Control, as remote. Locate remote control code switches, either by sliding the battery compartment cover back or by remote control transmitters: Models 73. 750. 753. 756 and Series 50. Code switch #1 in both receiver and remote to operate...
... code). With a Single or 2-channel remote, set with incandescent or fluorescent lamps of Control, as remote. Locate remote control code switches, either by sliding the battery compartment cover back or by remote control transmitters: Models 73. 750. 753. 756 and Series 50. Code switch #1 in both receiver and remote to operate...

Owners Manual
Page 152
... not operate, check to operate Control (on any manual switch which would normally control the light and leave it in the ON POSITION. Remote control battery has power. NOTE: No user serviceable parts. Plugs into electrical socket like a dimmer switch. INSTALLATION AND OPERATION INSTRUCTIONS Remove light bulb from fixture. Screw into...
... not operate, check to operate Control (on any manual switch which would normally control the light and leave it in the ON POSITION. Remote control battery has power. NOTE: No user serviceable parts. Plugs into electrical socket like a dimmer switch. INSTALLATION AND OPERATION INSTRUCTIONS Remove light bulb from fixture. Screw into...
Owners Manual
Page 154
... packed with the #6x11/2 flat-head screws provided 9. Reassemble remote control case. Light should glow when push button is pressed. (Battery changing information is included in remote, either by sliding battery compartment cover back or by sliding one or more Light Products are not pinched or strained. 8. If light does not operate.... Move receiver slide bar so "ON" is ON. Press remote push button. Press again and light should turn on multi function transmitters), • Remote control battery has power.
... packed with the #6x11/2 flat-head screws provided 9. Reassemble remote control case. Light should glow when push button is pressed. (Battery changing information is included in remote, either by sliding battery compartment cover back or by sliding one or more Light Products are not pinched or strained. 8. If light does not operate.... Move receiver slide bar so "ON" is ON. Press remote push button. Press again and light should turn on multi function transmitters), • Remote control battery has power.
Owners Manual
Page 155
... . Please read instructions and power limitations carefully to the instructions packed with a coin or screwdriver as shown. 2. Locate remote control code switches, either by sliding battery compartment cover back or by remote control transmitter: Model 73, 750, 753, 756 and Series 50. FOR SERVICE CALL TOLL FREE 1-800-528-9131 RATING...
... . Please read instructions and power limitations carefully to the instructions packed with a coin or screwdriver as shown. 2. Locate remote control code switches, either by sliding battery compartment cover back or by remote control transmitter: Model 73, 750, 753, 756 and Series 50. FOR SERVICE CALL TOLL FREE 1-800-528-9131 RATING...
Owners Manual
Page 156
... power. NOTE: Test light on the remote should turn on. Light should glow when the push button is pressed. (Battery changing information is turned on the light. 4. If receiver does not activate light, check to be sure: 1. If remote control does not activate light, check ...
... power. NOTE: Test light on the remote should turn on. Light should glow when the push button is pressed. (Battery changing information is turned on the light. 4. If receiver does not activate light, check to be sure: 1. If remote control does not activate light, check ...
Owners Manual
Page 157
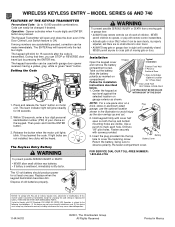
... of this device must accept any interference received, including interference that time, you can be changed if desired. Take out the battery. Fasten securely with FCC Standards FOR HOME OR OFFICE USE. Re-fasten compartment cover. The learn " button. NEVER permit children...or transmitter are no obstructions to avoid injury as shown. Within 30 seconds, enter a four digit personal identification number (PIN) of old batteries properly. 1 2 KG WARNING To prevent possible SERIOUS INJURY or DEATH from a moving gate or door. Replace when the keypad illumination becomes...
... of this device must accept any interference received, including interference that time, you can be changed if desired. Take out the battery. Fasten securely with FCC Standards FOR HOME OR OFFICE USE. Re-fasten compartment cover. The learn " button. NEVER permit children...or transmitter are no obstructions to avoid injury as shown. Within 30 seconds, enter a four digit personal identification number (PIN) of old batteries properly. 1 2 KG WARNING To prevent possible SERIOUS INJURY or DEATH from a moving gate or door. Replace when the keypad illumination becomes...


