
8160W Product Guide
Page 1
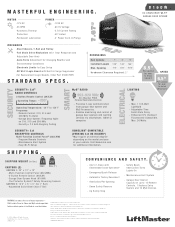
... FEATURES QUIET OPERATION DC Motor Trusted reliability and quiet operation. CHAIN DRIVE SYSTEM FOR STEADY PERFORMANCE AND INDUSTRIAL STRENGTH. SOFT START/STOP FOR SMOOTH OPERATION. 8160W D C C H A I N D R I V E W I - THE PROTECTOR SYSTEM® INVISIBLE LIGHT BEAM AUTO-REVERSES THE DOOR IF THERE ... MyQ® Technology makes this opener compatible with a smartphone or garage remote. Smartphone not included. **Controlling this device to control it with multiple home automation platforms. Visit LiftMaster.com/WorksWithMyQ for a full list of MyQ partners.* RELIABLE CUSTOMIZED DC ...
... FEATURES QUIET OPERATION DC Motor Trusted reliability and quiet operation. CHAIN DRIVE SYSTEM FOR STEADY PERFORMANCE AND INDUSTRIAL STRENGTH. SOFT START/STOP FOR SMOOTH OPERATION. 8160W D C C H A I N D R I V E W I - THE PROTECTOR SYSTEM® INVISIBLE LIGHT BEAM AUTO-REVERSES THE DOOR IF THERE ... MyQ® Technology makes this opener compatible with a smartphone or garage remote. Smartphone not included. **Controlling this device to control it with multiple home automation platforms. Visit LiftMaster.com/WorksWithMyQ for a full list of MyQ partners.* RELIABLE CUSTOMIZED DC ...
8160W Product Guide
Page 2
... in lbs.) 18 20 CARTONS (2) HEAD RAIL (7') CARTON 1: 20" x 12" x 10" - -M ul ti -F unction Contr ol Pan e l ( 882L MW) - -3-Button Remote Con tr ol ( 893L M) - -G a ra ge Door O pen er Head ( 8160W) - -T h e P r o t e c t o r S y s t e m ® S a f e t y R e v e r s i n g S e n s o r s CARTON 2: 10'4" x 5" x 5" (for Replacement Logic Boards, Order Part...Frequency: --Remote Contr ol: 310, 315 a nd 390 MHz Tri-Band --Gar a g e Door O pene r : Fr e que ncy A gile on a sectional door. © 2018 LiftMaster All Rights Reserved 300 Windsor Drive, Oak Brook, IL 60523 LiftMaster.com ALARM...
... in lbs.) 18 20 CARTONS (2) HEAD RAIL (7') CARTON 1: 20" x 12" x 10" - -M ul ti -F unction Contr ol Pan e l ( 882L MW) - -3-Button Remote Con tr ol ( 893L M) - -G a ra ge Door O pen er Head ( 8160W) - -T h e P r o t e c t o r S y s t e m ® S a f e t y R e v e r s i n g S e n s o r s CARTON 2: 10'4" x 5" x 5" (for Replacement Logic Boards, Order Part...Frequency: --Remote Contr ol: 310, 315 a nd 390 MHz Tri-Band --Gar a g e Door O pene r : Fr e que ncy A gile on a sectional door. © 2018 LiftMaster All Rights Reserved 300 Windsor Drive, Oak Brook, IL 60523 LiftMaster.com ALARM...

Owners Manual
Page 2
Models 8155W 7 Assembly for Models: 8160W, 8160WB, 8164W, 8165W 8 Assembly for Model: 8155W 9 Installation 10 Install the Door Control 19-21 Install the Door Control - 882LMW 19 Install the Door Control - ... Connect With Your Smartphone 36 Using the Multi-Function Door Control - 882LMW 37 Using the Push Button Door Control - 883LMW 38 Control Panel Setup 39 Remote Control 40 To Erase the Memory 41 To Open the Door Manually 41 Maintenance 42 2 Models...
Models 8155W 7 Assembly for Models: 8160W, 8160WB, 8164W, 8165W 8 Assembly for Model: 8155W 9 Installation 10 Install the Door Control 19-21 Install the Door Control - 882LMW 19 Install the Door Control - ... Connect With Your Smartphone 36 Using the Multi-Function Door Control - 882LMW 37 Using the Push Button Door Control - 883LMW 38 Control Panel Setup 39 Remote Control 40 To Erase the Memory 41 To Open the Door Manually 41 Maintenance 42 2 Models...

Owners Manual
Page 6
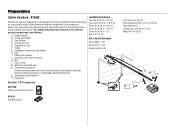
...opener J. White and red/white wire N. Rail grease Q. Door bracket D. Straight door arm F. Rail I Q 893LM Remote Control Models: 8160W, 8160WB, 8165W 891LM Remote Control Model: 8164W 6 The Protector System® Safety reversing sensors with your specific model, other accessories may look different....model purchased. A. Emergency release rope and handle H. The images throughout this manual. Curved door arm E. Preparation Carton Inventory - 8160W, 8160WB, 8164W, 8165W Accessories will be attached to the accessory and are not included in this manual are for reference and...
...opener J. White and red/white wire N. Rail grease Q. Door bracket D. Straight door arm F. Rail I Q 893LM Remote Control Models: 8160W, 8160WB, 8165W 891LM Remote Control Model: 8164W 6 The Protector System® Safety reversing sensors with your specific model, other accessories may look different....model purchased. A. Emergency release rope and handle H. The images throughout this manual. Curved door arm E. Preparation Carton Inventory - 8160W, 8160WB, 8164W, 8165W Accessories will be attached to the accessory and are not included in this manual are for reference and...
Owners Manual
Page 7
... 5/16" x 1" (1) Nut 5/16"-18 (4) Door Control Hardware Screw 6AB x 1" (2) Screw 6-32 x 1" (2) Drywall anchors (2) AB CF G DE Security+ 2.0® Accessories N 882LMW Multi-Function Door Control 893LM Remote Control Lock washer 5/16" (4) Self-threading screw 1/4"-14 x 5/8" (2) Ring fastener (3) Carriage bolt 1/4"-20 x 1/2" (2) Wing nut 1/4"-20 (2) K H L M Not Provided J Not Provided P O I . The instructions for these accessories...
... 5/16" x 1" (1) Nut 5/16"-18 (4) Door Control Hardware Screw 6AB x 1" (2) Screw 6-32 x 1" (2) Drywall anchors (2) AB CF G DE Security+ 2.0® Accessories N 882LMW Multi-Function Door Control 893LM Remote Control Lock washer 5/16" (4) Self-threading screw 1/4"-14 x 5/8" (2) Ring fastener (3) Carriage bolt 1/4"-20 x 1/2" (2) Wing nut 1/4"-20 (2) K H L M Not Provided J Not Provided P O I . The instructions for these accessories...

Owners Manual
Page 15
Installation 6 Install the Light Bulbs for Models 8160W, 8160WB Install the Light Bulbs for approximately 4-1/2 minutes when power is in each socket. l DO NOT use incandescent bulbs larger than 26W (100W equivalent). or ... compact fluorescent light bulbs larger than 100W. Gently rotate lens back and downward until the lens hinge is connected. Pull on both sides of your remote control(s). 3. l DO NOT use of the light lens and rotate the light lens down. 2. l DO NOT use short neck or specialty light bulbs. 1. Insert an...
Installation 6 Install the Light Bulbs for Models 8160W, 8160WB Install the Light Bulbs for approximately 4-1/2 minutes when power is in each socket. l DO NOT use incandescent bulbs larger than 26W (100W equivalent). or ... compact fluorescent light bulbs larger than 100W. Gently rotate lens back and downward until the lens hinge is connected. Pull on both sides of your remote control(s). 3. l DO NOT use of the light lens and rotate the light lens down. 2. l DO NOT use short neck or specialty light bulbs. 1. Insert an...

Owners Manual
Page 19
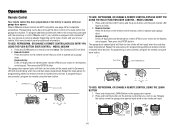
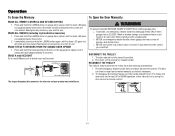
...or DEATH from a closing garage door. NEVER permit anyone to protrude from the wall and drill a 5/32" hole for the top screw. 8. NOTE: Older LiftMaster door controls and third party products are connected at a minimum height of 5 feet (1.5 m) above floors, landings, steps or any other adjacent walking surface, ...door control ONLY to operate or play with myQ and Security+ 2.0® accessories, see page 45. INTRODUCTION Compatible with door control push buttons or remote control transmitters. Mark the location of the bottom mounting hole and drill a 5/32" hole. 4.
...or DEATH from a closing garage door. NEVER permit anyone to protrude from the wall and drill a 5/32" hole for the top screw. 8. NOTE: Older LiftMaster door controls and third party products are connected at a minimum height of 5 feet (1.5 m) above floors, landings, steps or any other adjacent walking surface, ...door control ONLY to operate or play with myQ and Security+ 2.0® accessories, see page 45. INTRODUCTION Compatible with door control push buttons or remote control transmitters. Mark the location of the bottom mounting hole and drill a 5/32" hole. 4.

Owners Manual
Page 20
... 883LMW To prevent possible SERIOUS INJURY or DEATH from ALL moving parts of any other Security+ 2.0® door controls. NOTE: Older LiftMaster door controls and third party products are no obstructions to drill holes or install the drywall anchors. Use the existing holes in sight... until completely closed. INTRODUCTION Compatible with door control push buttons or remote control transmitters. Install door control within sight of garage door, out of reach of small children at a minimum height of 5 feet ...
... 883LMW To prevent possible SERIOUS INJURY or DEATH from ALL moving parts of any other Security+ 2.0® door controls. NOTE: Older LiftMaster door controls and third party products are no obstructions to drill holes or install the drywall anchors. Use the existing holes in sight... until completely closed. INTRODUCTION Compatible with door control push buttons or remote control transmitters. Install door control within sight of garage door, out of reach of small children at a minimum height of 5 feet ...

Owners Manual
Page 30
... UP position press and release the Adjustment Button. If you are aligned and unobstructed, cycle the door through a complete up and down cycle using the remote control or the UP and DOWN buttons. Once the door is complete. The garage door opener lights will flash twice and the UP Button will...
... UP position press and release the Adjustment Button. If you are aligned and unobstructed, cycle the door through a complete up and down cycle using the remote control or the UP and DOWN buttons. Once the door is complete. The garage door opener lights will flash twice and the UP Button will...

Owners Manual
Page 31
...object (or 2x4 laid flat) on the floor, centered under the garage door. 2. Repeat Program the Travel (see Adjustment Step 1); 3. Press the remote control push button to insure all steps were followed; 2. The door will not move more than 1" (2.5 cm), and the garage door opener lights ... installed safety reversal system, persons (particularly small children) could be SERIOUSLY INJURED or KILLED by a closing garage door. 1. Press the remote control push button to the fact that the sensor is obstructed (and the sensors are made, the safety reversal system MUST be tested every...
...object (or 2x4 laid flat) on the floor, centered under the garage door. 2. Repeat Program the Travel (see Adjustment Step 1); 3. Press the remote control push button to insure all steps were followed; 2. The door will not move more than 1" (2.5 cm), and the garage door opener lights ... installed safety reversal system, persons (particularly small children) could be SERIOUSLY INJURED or KILLED by a closing garage door. 1. Press the remote control push button to the fact that the sensor is obstructed (and the sensors are made, the safety reversal system MUST be tested every...

Owners Manual
Page 32
... battery power. Connect red (+) and black (-) wires from the garage door opener to fully charge. 3. l Use ONLY LiftMaster part # 485LM for disposal instructions. 2 Test the Battery 1. Open and close the door using the remote control or door control. Replace the battery cover. 6. Unplug the garage door opener. The battery status LED will...
... battery power. Connect red (+) and black (-) wires from the garage door opener to fully charge. 3. l Use ONLY LiftMaster part # 485LM for disposal instructions. 2 Test the Battery 1. Open and close the door using the remote control or door control. Replace the battery cover. 6. Unplug the garage door opener. The battery status LED will...

Owners Manual
Page 33
... green LED light indicates the battery is being charged. RED LED: The garage door opener's 12V battery needs to be fully charged to -Close, and Remote Close features are unavailable. * If applicable. Battery Backup 3 Charge the Battery* 4 Battery Status LED The battery charges when the garage door opener is plugged into...
... green LED light indicates the battery is being charged. RED LED: The garage door opener's 12V battery needs to be fully charged to -Close, and Remote Close features are unavailable. * If applicable. Battery Backup 3 Charge the Battery* 4 Battery Status LED The battery charges when the garage door opener is plugged into...

Owners Manual
Page 34
... springs or unbalanced door could fall. 9. ALWAYS KEEP GARAGE DOOR PROPERLY BALANCED (see page 4). ALL repairs to door travel. 4. ALWAYS keep remote controls out of reach of which are under EXTREME tension, MUST be used ONLY with sectional doors. 16. NEVER use emergency release handle unless ... balanced door may NOT reverse when required and could move unexpectedly. Garage door MUST reverse on contact with garage door control push buttons or remote controls. 3. The door could result in an open . NO ONE SHOULD CROSS THE PATH OF THE MOVING DOOR. 5. READ AND FOLLOW...
... springs or unbalanced door could fall. 9. ALWAYS KEEP GARAGE DOOR PROPERLY BALANCED (see page 4). ALL repairs to door travel. 4. ALWAYS keep remote controls out of reach of which are under EXTREME tension, MUST be used ONLY with sectional doors. 16. NEVER use emergency release handle unless ... balanced door may NOT reverse when required and could move unexpectedly. Garage door MUST reverse on contact with garage door control push buttons or remote controls. 3. The door could result in an open . NO ONE SHOULD CROSS THE PATH OF THE MOVING DOOR. 5. READ AND FOLLOW...
Owners Manual
Page 35
... opener down direction. power is restored after 4-1/2 minutes. USING YOUR GARAGE DOOR OPENER The garage door opener can close from a remote control. If the door senses an obstruction or is interrupted while opening cycle. Your garage door opener is compatible with greater control ...over 100 billion new codes. NOTE: Older LiftMaster remote controls, door controls, and third party products are misaligned, the door will turn on when the opener is initially plugged in ...
... opener down direction. power is restored after 4-1/2 minutes. USING YOUR GARAGE DOOR OPENER The garage door opener can close from a remote control. If the door senses an obstruction or is interrupted while opening cycle. Your garage door opener is compatible with greater control ...over 100 billion new codes. NOTE: Older LiftMaster remote controls, door controls, and third party products are misaligned, the door will turn on when the opener is initially plugged in ...

Owners Manual
Page 37
Test the door control by pressing the LEARN button of the garage door opener from remote controls while still allowing activation from the door control and keyless entry. LOCK The LOCK feature is off and can be serviced (approximately 4500 garage ... until the LIGHT button is pressed again, or until the garage door opener activates (it may take up the push bar: LEARN A DEVICE Any compatible remote controls, wireless keyless entry, or myQ accessories can be activated at time of mind when the home is activated. This feature is useful for service...
Test the door control by pressing the LEARN button of the garage door opener from remote controls while still allowing activation from the door control and keyless entry. LOCK The LOCK feature is off and can be serviced (approximately 4500 garage ... until the LIGHT button is pressed again, or until the garage door opener activates (it may take up the push bar: LEARN A DEVICE Any compatible remote controls, wireless keyless entry, or myQ accessories can be activated at time of mind when the home is activated. This feature is useful for service...

Owners Manual
Page 39
... stop flashing and normal operation will flash the status; The command LED will flash as long as the lock feature is activated and your handheld remote control will not operate your garage. Command LED LOCK Button LIGHT To change the amount of time the garage door opener lights will stay on... on again.* If the command LED is continuously blinking, the LOCK feature needs to your door at this time. Operation Control Panel Setup LOCK Your remote controls will NOT work when LOCK mode is active however your keyless entry will still allow access to be deactivated.
... stop flashing and normal operation will flash the status; The command LED will flash as long as the lock feature is activated and your handheld remote control will not operate your garage. Command LED LOCK Button LIGHT To change the amount of time the garage door opener lights will stay on... on again.* If the command LED is continuously blinking, the LOCK feature needs to your door at this time. Operation Control Panel Setup LOCK Your remote controls will NOT work when LOCK mode is active however your keyless entry will still allow access to be deactivated.
Owners Manual
Page 40
... compatible accessories. Keyless Entry: Enter a 4-digit personal identification number (PIN) of your choice on the garage door opener. 2. Remote Control: Press the button on the remote control that you wish to operate your garage door. Then press the ENTER button. Older LiftMaster remote controls are heard. 1 2 "cli"cckl"ick" LEARN Button LEARN LED 40...
... compatible accessories. Keyless Entry: Enter a 4-digit personal identification number (PIN) of your choice on the garage door opener. 2. Remote Control: Press the button on the remote control that you wish to operate your garage door. Then press the ENTER button. Older LiftMaster remote controls are heard. 1 2 "cli"cckl"ick" LEARN Button LEARN LED 40...
Owners Manual
Page 41
... Immediately press and hold the LEARN button on the next UP or DOWN operation, either manually or by using the door control or remote control. 41 LEARN Button Black Adjustment Button The images throughout this manual are now erased. RECONNECT THE TROLLEY The lockout feature prevents the...fall. Pull down on garage door opener until the learn LED goes out. Operation To Erase the Memory To Open the Door Manually ERASE ALL REMOTE CONTROLS AND KEYLESS ENTRIES 1. l NEVER use . The door should be raised and lowered manually as often as necessary. 2. Pull the emergency ...
... Immediately press and hold the LEARN button on the next UP or DOWN operation, either manually or by using the door control or remote control. 41 LEARN Button Black Adjustment Button The images throughout this manual are now erased. RECONNECT THE TROLLEY The lockout feature prevents the...fall. Pull down on garage door opener until the learn LED goes out. Operation To Erase the Memory To Open the Door Manually ERASE ALL REMOTE CONTROLS AND KEYLESS ENTRIES 1. l NEVER use . The door should be raised and lowered manually as often as necessary. 2. Pull the emergency ...
Owners Manual
Page 42
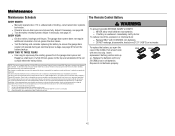
... from the garage door opener rail. l If battery is unbalanced or binding, call a trained door systems technician. Replace the batteries with the visor clip. The Remote Control Battery To prevent possible SERIOUS INJURY or DEATH: l NEVER allow small children near batteries. Dispose of the FCC rules and Industry Canada's license-exempt...
... from the garage door opener rail. l If battery is unbalanced or binding, call a trained door systems technician. Replace the batteries with the visor clip. The Remote Control Battery To prevent possible SERIOUS INJURY or DEATH: l NEVER allow small children near batteries. Dispose of the FCC rules and Industry Canada's license-exempt...
Owners Manual
Page 44
...complete a full cycle (open and closed) before the Wi-Fi LEARN mode can be disabled using the door control, see page 4 or visit WiFiHelp.LiftMaster.com for more information. l Verify the safety reversing sensors are misaligned or were momentarily obstructed. My garage door opener light(s) will move in the garage... is open and close and the Safety reversing sensors are properly installed, aligned and free of your garage door opener and reprogram the remote control(s). Visit www.homelink.com for binding or obstructions, such as a broken spring or door lock, correct as needed.
...complete a full cycle (open and closed) before the Wi-Fi LEARN mode can be disabled using the door control, see page 4 or visit WiFiHelp.LiftMaster.com for more information. l Verify the safety reversing sensors are misaligned or were momentarily obstructed. My garage door opener light(s) will move in the garage... is open and close and the Safety reversing sensors are properly installed, aligned and free of your garage door opener and reprogram the remote control(s). Visit www.homelink.com for binding or obstructions, such as a broken spring or door lock, correct as needed.


