
User Guide
Page 8
... History ii Technical Support ii Safety Instructions iii FCC-B Radio Frequency Interference Statement iv WEEE (Waste Electrical and Electronic Equipment) Statement v Chapter 1 Getting Started 1-1 Mainboard Specifications 1-2 Mainboard Layout 1-4 Packing Checklist 1-5 Chapter 2 Hardware Setup 2-1 Quick Components Guide 2-2 CPU (Central Processing Unit 2-3 Memory 2-6 Power Supply 2-8 Back Panel 2-9 Connectors 2-11 Jumpers 2-19 Switch 2-20...
... History ii Technical Support ii Safety Instructions iii FCC-B Radio Frequency Interference Statement iv WEEE (Waste Electrical and Electronic Equipment) Statement v Chapter 1 Getting Started 1-1 Mainboard Specifications 1-2 Mainboard Layout 1-4 Packing Checklist 1-5 Chapter 2 Hardware Setup 2-1 Quick Components Guide 2-2 CPU (Central Processing Unit 2-3 Memory 2-6 Power Supply 2-8 Back Panel 2-9 Connectors 2-11 Jumpers 2-19 Switch 2-20...
User Guide
Page 11
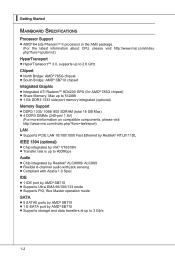
▍ Getting Started Mainboard Specifications Processor Support ■ AMD® 64 bits PhenomTM II processor in the AM3 package. (For the latest information about CPU, please visit http://www.msi.com/index. php?func=cpuform2) HyperTransport ■ HyperTransport™ 3.0, supports up to 2.6 GHz Chipset ■ North...(total 16 GB Max) ■ 4 DDR3 DIMMs (240-pin/ 1.5V) (For more information on compatible components, please visit http://www.msi.com/index.php?func=testreport) LAN ■ Supports PCIE LAN 10/100/1000 Fast Ethernet by Realtek® RTL8111DL IEEE 1394 (optional) ■...
▍ Getting Started Mainboard Specifications Processor Support ■ AMD® 64 bits PhenomTM II processor in the AM3 package. (For the latest information about CPU, please visit http://www.msi.com/index. php?func=cpuform2) HyperTransport ■ HyperTransport™ 3.0, supports up to 2.6 GHz Chipset ■ North...(total 16 GB Max) ■ 4 DDR3 DIMMs (240-pin/ 1.5V) (For more information on compatible components, please visit http://www.msi.com/index.php?func=testreport) LAN ■ Supports PCIE LAN 10/100/1000 Fast Ethernet by Realtek® RTL8111DL IEEE 1394 (optional) ■...

User Guide
Page 17
...turning on the computer. For the latest information about CPU, please visit http://www.msi.com/index. Always make sure to install the cooler to ensure the safety of thermal...and the heatsink to support overclocking. Replacing the CPU While replacing the CPU, always turn off the ATX power supply or unplug the power supply's power cord from overheating. MS-7596 CPU (Central Processing...or risks caused by inadequate operation or beyond product specifications is designed to enhance heat dissipation. Overclocking This mainboard is not recommended. Any attempt to operate...
...turning on the computer. For the latest information about CPU, please visit http://www.msi.com/index. Always make sure to install the cooler to ensure the safety of thermal...and the heatsink to support overclocking. Replacing the CPU While replacing the CPU, always turn off the ATX power supply or unplug the power supply's power cord from overheating. MS-7596 CPU (Central Processing...or risks caused by inadequate operation or beyond product specifications is designed to enhance heat dissipation. Overclocking This mainboard is not recommended. Any attempt to operate...
User Guide
Page 37
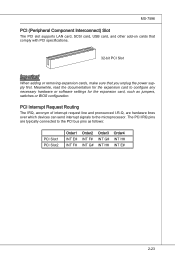
...-7596 PCI (Peripheral Component Interconnect) Slot The PCI slot supports LAN card, SCSI card, USB card, and other add-on cards that comply with PCI specifications. 32-bit PCI Slot Important When adding or removing expansion cards, make sure that you unplug the power supply first. The PCI IRQ pins are...
...-7596 PCI (Peripheral Component Interconnect) Slot The PCI slot supports LAN card, SCSI card, USB card, and other add-on cards that comply with PCI specifications. 32-bit PCI Slot Important When adding or removing expansion cards, make sure that you unplug the power supply first. The PCI IRQ pins are...

User Guide
Page 43
MS-7596 Load Fail-Safe Defaults Use this menu to load the default values set by the BIOS vendor for stable system performance. ▶ Load Optimized Defaults Use this menu to load the default values set by the mainboard manufacturer specifically for optimal performance of the mainboard. ▶ Save & Exit Setup Save changes to CMOS and exit setup. ▶ Exit Without Saving Abandon all changes and exit setup. 3-5
MS-7596 Load Fail-Safe Defaults Use this menu to load the default values set by the BIOS vendor for stable system performance. ▶ Load Optimized Defaults Use this menu to load the default values set by the mainboard manufacturer specifically for optimal performance of the mainboard. ▶ Save & Exit Setup Save changes to CMOS and exit setup. ▶ Exit Without Saving Abandon all changes and exit setup. 3-5

User Guide
Page 48
... following screen appears: ▶ C1E Support To enable this item to use, consult the vendor of the chipset. To find out which MPS (Multi-Processor Specification) version to be used to it via the various ACPI methods. 3-10 ▍ BIOS Setup ▶ IOAPIC Function This field is used for a longer time...
... following screen appears: ▶ C1E Support To enable this item to use, consult the vendor of the chipset. To find out which MPS (Multi-Processor Specification) version to be used to it via the various ACPI methods. 3-10 ▍ BIOS Setup ▶ IOAPIC Function This field is used for a longer time...
User Guide
Page 54
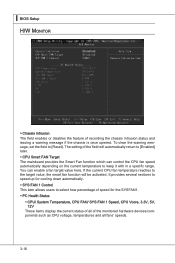
... once opened. If the current CPU fan temperature reaches to the target value, the smart fan function will automatically return to keep it with in a specific range. The setting of the field will be activated. It provides several sections to speed up for cooling down automatically. ▶ SYS FAN 1 Control This...
... once opened. If the current CPU fan temperature reaches to the target value, the smart fan function will automatically return to keep it with in a specific range. The setting of the field will be activated. It provides several sections to speed up for cooling down automatically. ▶ SYS FAN 1 Control This...

User Guide
Page 56
Read-only. ▶ CPU Specifications Press to enter the sub-menu and the following screen appears. This submenu shows the information of CPU and Memory speed. ▍ BIOS Setup Cell Menu Important Change these settings only if you are familiar with the chipset. ▶ Current CPU / DRAM Frequency These items show the current clocks of installed CPU. 3-18
Read-only. ▶ CPU Specifications Press to enter the sub-menu and the following screen appears. This submenu shows the information of CPU and Memory speed. ▍ BIOS Setup Cell Menu Important Change these settings only if you are familiar with the chipset. ▶ Current CPU / DRAM Frequency These items show the current clocks of installed CPU. 3-18

User Guide
Page 63
... this item is selectable. Note: we suggest you using the official name as the default name. ▶ Save Extend File name as Please setup a specific name for the BIOS file, which will be saved into the USB drive/ storage drive. MS-7596 ▶ Load BIOS source file from BIOS ROM ...chip data. Note: it to USB drive/ storage drive. ▶ Save File to Selected Device Please setup a specific folder in specific USB drive/ storage drive to save BIOS file from When the M-Flash function as default name. ▶ Start to save file Press "Enter" and...
... this item is selectable. Note: we suggest you using the official name as the default name. ▶ Save Extend File name as Please setup a specific name for the BIOS file, which will be saved into the USB drive/ storage drive. MS-7596 ▶ Load BIOS source file from BIOS ROM ...chip data. Note: it to USB drive/ storage drive. ▶ Save File to Selected Device Please setup a specific folder in specific USB drive/ storage drive to save BIOS file from When the M-Flash function as default name. ▶ Start to save file Press "Enter" and...

User Guide
Page 64
... loads the default factory settings for the most stable, minimal system performance. The Fail-Safe Defaults are the default values set by the mainboard manufacturer specifically for stable system performance.
... loads the default factory settings for the most stable, minimal system performance. The Fail-Safe Defaults are the default values set by the mainboard manufacturer specifically for stable system performance.