
User Guide
Page 23
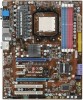
.... Important eSATA port only supports RAID and AHCI mode (does not support IDE mode) 2-9 It provides a high-speed digital interconnection between the computer and its display device. DVI-D Port The DVI-D (Digital Visual Interface) connector allows you to IEEE1394 devices. Hardware Setup Back Panel Optical S/PDIF-Out VGA Port 1394 Port...
.... Important eSATA port only supports RAID and AHCI mode (does not support IDE mode) 2-9 It provides a high-speed digital interconnection between the computer and its display device. DVI-D Port The DVI-D (Digital Visual Interface) connector allows you to IEEE1394 devices. Hardware Setup Back Panel Optical S/PDIF-Out VGA Port 1394 Port...

User Guide
Page 33
...djus t oc sw itc h to increase the processor frequency by changing the switch. DOC1 1:ON 1:ON 1:OFF 1:OFF DOC2 2:ON 2:OFF 2:ON 2:OFF CPU Frequency Default Increase 10% speed of FSB Increase 15% speed of FSB Increase 20% speed of s wi t c h . When overclocking cause system instability or... crash during POST. And then,please set the FSB. Try aga in! 2-19 This section will display during boot, the following switch for you power off the system before setting the switch. 2. Overclock FSB Switch: OCSWITCH1 You can overclock the ...
...djus t oc sw itc h to increase the processor frequency by changing the switch. DOC1 1:ON 1:ON 1:OFF 1:OFF DOC2 2:ON 2:OFF 2:ON 2:OFF CPU Frequency Default Increase 10% speed of FSB Increase 15% speed of FSB Increase 20% speed of s wi t c h . When overclocking cause system instability or... crash during POST. And then,please set the FSB. Try aga in! 2-19 This section will display during boot, the following switch for you power off the system before setting the switch. 2. Overclock FSB Switch: OCSWITCH1 You can overclock the ...
User Guide
Page 36
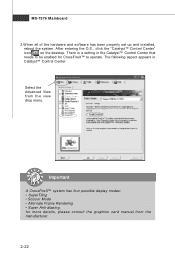
... Mainboard 3.W hen all of the hardware and software has been properly set up and installed, reboot the system. Important A CrossFireX™ system has four possible display modes: • SuperTiling • Scissor Mode • Alternate Frame Rendering • Super Anti-aliasing. There is a setting in Catalyst™ Control Center: Select the Advanced...
... Mainboard 3.W hen all of the hardware and software has been properly set up and installed, reboot the system. Important A CrossFireX™ system has four possible display modes: • SuperTiling • Scissor Mode • Alternate Frame Rendering • Super Anti-aliasing. There is a setting in Catalyst™ Control Center: Select the Advanced...

User Guide
Page 37
...processor. 3. Graphic card based on the system and install the driver that supports Hybrid CrossFireX technology. Mainboard based on an AMD 780 integrated chipset. Click the icon and then the following aspect appears in the System Tray. System Request 1. Enabling Hybrid... frame rates. Hardware Setup Hybrid CrossFireXTM Technology (for 780G) Hybrid CrossFireXTM technology brings multi-GPU performance capabilities by enabling an AMD 780 integrated graphics processor and a discrete graphics processor to operate simultaneously with the Vista operating system. 2. Hybrid CrossFireXTM is ...
...processor. 3. Graphic card based on the system and install the driver that supports Hybrid CrossFireX technology. Mainboard based on an AMD 780 integrated chipset. Click the icon and then the following aspect appears in the System Tray. System Request 1. Enabling Hybrid... frame rates. Hardware Setup Hybrid CrossFireXTM Technology (for 780G) Hybrid CrossFireXTM technology brings multi-GPU performance capabilities by enabling an AMD 780 integrated graphics processor and a discrete graphics processor to operate simultaneously with the Vista operating system. 2. Hybrid CrossFireXTM is ...
User Guide
Page 38
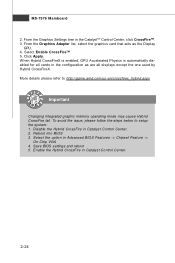
... Control Center, click CrossFireTM. 3. From the Graphics Settings tree in Catalyst Control Center. 2-24 Disable the Hybrid CrossFire in the configuration as the Display GPU. 4. More details please refer to setup the system: 1. To avoid the issue, please follow the steps below to http://game....amd.com/us-en/crossfirex_hybrid.aspx Important Changing integrated graphic memory operating mode may cause Hybrid CrossFire fail. W hen Hybrid CrossFireX is enabled, GPU ...
... Control Center, click CrossFireTM. 3. From the Graphics Settings tree in Catalyst Control Center. 2-24 Disable the Hybrid CrossFire in the configuration as the Display GPU. 4. More details please refer to setup the system: 1. To avoid the issue, please follow the steps below to http://game....amd.com/us-en/crossfirex_hybrid.aspx Important Changing integrated graphic memory operating mode may cause Hybrid CrossFire fail. W hen Hybrid CrossFireX is enabled, GPU ...

User Guide
Page 42
... a General Help screen. You can use the arrow keys ( ↑↓ ) to select the item. The on-line description of the highlighted setup function is displayed at the bottom of certain fields that means a sub-menu can make changes Load Optimized Defaults Save configuration changes and exit setup Getting Help After...
... a General Help screen. You can use the arrow keys ( ↑↓ ) to select the item. The on-line description of the highlighted setup function is displayed at the bottom of certain fields that means a sub-menu can make changes Load Optimized Defaults Save configuration changes and exit setup Getting Help After...

User Guide
Page 48
... or computer viruses. Settings are: [Enabled] Shows a still image (logo) on the bootup screen. You should immediately re-enable it against viruses. Full Screen Logo Display This item enables this function at boot. W hen enabled, the BIOS' data cannot be changed when attempting to update the BIOS with PC2001 design guide...
... or computer viruses. Settings are: [Enabled] Shows a still image (logo) on the bootup screen. You should immediately re-enable it against viruses. Full Screen Logo Display This item enables this function at boot. W hen enabled, the BIOS' data cannot be changed when attempting to update the BIOS with PC2001 design guide...

User Guide
Page 56
... issuing a warning message if the chassis is once opened. PC Health Status CPU/ System Temperature, CPU FAN/ SYS FAN1/ SYS FAN2 Speed, CPU Vcore, 3.3V, 5V, 12V These items display the current status of all fans' speeds. 3-17 You can control the CPU fan speed automatically depending on the current temperature to speed up for...
... issuing a warning message if the chassis is once opened. PC Health Status CPU/ System Temperature, CPU FAN/ SYS FAN1/ SYS FAN2 Speed, CPU Vcore, 3.3V, 5V, 12V These items display the current status of all fans' speeds. 3-17 You can control the CPU fan speed automatically depending on the current temperature to speed up for...

User Guide
Page 75
... simultaneously. And this function, you freely decide which ports to output the sound. Show the following volume controls This is to let you will be displayed. - Advanced controls - Enable playback multi-streaming W ith this is to let you can have music (stream 2 from back panel) in play. a A-10 Playback control Tool...
... simultaneously. And this function, you freely decide which ports to output the sound. Show the following volume controls This is to let you will be displayed. - Advanced controls - Enable playback multi-streaming W ith this is to let you can have music (stream 2 from back panel) in play. a A-10 Playback control Tool...

User Guide
Page 76
..., Line, Mic and Stereo Mix channels simultaneously, frees you freely decide which volume control items to record. A-11 Tool - 4. Show the following 4 channels to be displayed. - At any given period, you may choose to mute single or multiple volume controls or to let you from mixing efforts. Recording control Realtek Audio...
..., Line, Mic and Stereo Mix channels simultaneously, frees you freely decide which volume control items to record. A-11 Tool - 4. Show the following 4 channels to be displayed. - At any given period, you may choose to mute single or multiple volume controls or to let you from mixing efforts. Recording control Realtek Audio...

User Guide
Page 98
SATA RAID View Drives Assignments This window displays the model number, capacities and assignment of the drives physically attached to the SATA host adapter. C-3
SATA RAID View Drives Assignments This window displays the model number, capacities and assignment of the drives physically attached to the SATA host adapter. C-3

User Guide
Page 101
Are You Sure?" C-6 Press ESC key to exit the utility, a message "System is done, the screen shows the LD information as below. will display, answer "Y" to REBOOT! The LD creation is going to exit it and the system will reboot. Press ESC key to the main screen. 7. MS-7576 Mainboard 6.
Are You Sure?" C-6 Press ESC key to exit the utility, a message "System is done, the screen shows the LD information as below. will display, answer "Y" to REBOOT! The LD creation is going to exit it and the system will reboot. Press ESC key to the main screen. 7. MS-7576 Mainboard 6.

User Guide
Page 102
Press "Ctrl+Y" to delete and press "Del" or "Alt+D" delete the RAID set or other key to abort it. C-7 Choose a LD No you , press "Ctrl+Y" to delete the RAID set . 3. SATA RAID Delete LD (Deleting RAID) 1. Select "Delete LD" on the main screen. 2. On the next screen, a message will display to inform you want to complete the deletion.
Press "Ctrl+Y" to delete and press "Del" or "Alt+D" delete the RAID set or other key to abort it. C-7 Choose a LD No you , press "Ctrl+Y" to delete the RAID set . 3. SATA RAID Delete LD (Deleting RAID) 1. Select "Delete LD" on the main screen. 2. On the next screen, a message will display to inform you want to complete the deletion.


