
User Manual
Page 2
Contents Getting Started...3 Package Contents...3 Installing the Monitor Stand 4 Adjusting the Monitor 7 Monitor Overview...8 Connecting the Monitor to PC 12 OSD Setup...14 Navi Key...14 Hot Key...14 OSD Menus...15 Gaming...16 Professional...18 Image...19 Input Source...20 Navi Key...21 Setting...21 Specifications...23 Preset Display Modes 27 Troubleshooting...29 Safety Instructions...30 TÜV Rheinland Certification 32 Regulatory Notices...33 Revision V1.1, 2023/05 2 Contents
Contents Getting Started...3 Package Contents...3 Installing the Monitor Stand 4 Adjusting the Monitor 7 Monitor Overview...8 Connecting the Monitor to PC 12 OSD Setup...14 Navi Key...14 Hot Key...14 OSD Menus...15 Gaming...16 Professional...18 Image...19 Input Source...20 Navi Key...21 Setting...21 Specifications...23 Preset Display Modes 27 Troubleshooting...29 Safety Instructions...30 TÜV Rheinland Certification 32 Regulatory Notices...33 Revision V1.1, 2023/05 2 Contents

User Manual
Page 3
... chapter provides you with other products. While connecting devices, be used with the information on hardware setup procedures. Package Contents Monitor G27C4 E2, G27CQ4 E2, G27CQ4P E2, G32C4 E2, G32CQ4 E2 Documentation Quick Start Guide Stand with Screw(s) Stand Base with Screw(s) Accessories Stand Cover External Power Supply Power Cord Cables HDMI™ Cable (Optional) DisplayPort Cable (Optional) ⚠ Important ∙ Contact your place of purchase or local distributor if any of the items is damaged or missing...
... chapter provides you with other products. While connecting devices, be used with the information on hardware setup procedures. Package Contents Monitor G27C4 E2, G27CQ4 E2, G27CQ4P E2, G32C4 E2, G32CQ4 E2 Documentation Quick Start Guide Stand with Screw(s) Stand Base with Screw(s) Accessories Stand Cover External Power Supply Power Cord Cables HDMI™ Cable (Optional) DisplayPort Cable (Optional) ⚠ Important ∙ Contact your place of purchase or local distributor if any of the items is damaged or missing...

User Manual
Page 4
Leave the monitor in place. 5. Align the stand bracket to secure the base. 4. Make sure the stand assembly is properly installed before setting the monitor upright. Connect the base to the stand and tighten the base screw to the monitor groove. 2. Installing the Monitor Stand 1. Tighten the stand bracket with screws. 3. G27C4 E2, G27CQ4 E2, G32C4 E2, G32CQ4 E2 2 3 1 4 4 Getting Started Align and push the stand cover towards the monitor groove until it locks in its protective foam packaging.
Leave the monitor in place. 5. Align the stand bracket to secure the base. 4. Make sure the stand assembly is properly installed before setting the monitor upright. Connect the base to the stand and tighten the base screw to the monitor groove. 2. Installing the Monitor Stand 1. Tighten the stand bracket with screws. 3. G27C4 E2, G27CQ4 E2, G32C4 E2, G32CQ4 E2 2 3 1 4 4 Getting Started Align and push the stand cover towards the monitor groove until it locks in its protective foam packaging.

User Manual
Page 7
G27C4 E2, G27CQ4 E2, G32C4 E2, G32CQ4 E2 -5 O 20O G27CQ4P E2 -5 O 20O 130mm Getting Started 7 Adjusting the Monitor This monitor is designed to maximize your viewing comfort with its adjustment capabilities. ⚠ Important Avoid touching the display panel when adjusting the monitor.
G27C4 E2, G27CQ4 E2, G32C4 E2, G32CQ4 E2 -5 O 20O G27CQ4P E2 -5 O 20O 130mm Getting Started 7 Adjusting the Monitor This monitor is designed to maximize your viewing comfort with its adjustment capabilities. ⚠ Important Avoid touching the display panel when adjusting the monitor.

User Manual
Page 12
Connecting the Monitor to the monitor power jack. (Figure B) 5. Assemble the external power supply & power cord. (Figure A) 4. G27C4 E2, G27CQ4 E2, G32C4 E2, G32CQ4 E2 B D C A 12 Getting Started Connect the external power supply to PC 1. Connect the video cable from the monitor to your computer. 2. Turn on the computer and the monitor will auto detect the signal source. Power on the monitor. (Figure D) 7. Plug the power cord into the electrical outlet. (Figure C) 6. Turn off your computer. 3.
Connecting the Monitor to the monitor power jack. (Figure B) 5. Assemble the external power supply & power cord. (Figure A) 4. G27C4 E2, G27CQ4 E2, G32C4 E2, G32CQ4 E2 B D C A 12 Getting Started Connect the external power supply to PC 1. Connect the video cable from the monitor to your computer. 2. Turn on the computer and the monitor will auto detect the signal source. Power on the monitor. (Figure D) 7. Plug the power cord into the electrical outlet. (Figure C) 6. Turn off your computer. 3.

User Manual
Page 14
... with a Navi Key, a multi-directional control that helps navigate the On-Screen Display (OSD) menu. Up/ Down/ Left/ Right: ∙ selecting function menus and items ∙ adjusting function values ∙ entering into/exiting from function menus Press (OK): ∙ launching the On-Screen Display (OSD) ∙ entering submenus ∙ confirming a selection or setting Hot Key ∙ Users may enter into preset function...
... with a Navi Key, a multi-directional control that helps navigate the On-Screen Display (OSD) menu. Up/ Down/ Left/ Right: ∙ selecting function menus and items ∙ adjusting function values ∙ entering into/exiting from function menus Press (OK): ∙ launching the On-Screen Display (OSD) ∙ entering submenus ∙ confirming a selection or setting Hot Key ∙ Users may enter into preset function...
User Manual
Page 17
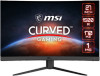
... your Refresh Rate Location. ∙ This monitor follows and works at the Operating System's preset Screen Refresh Rate. OSD Menus 17 Right Bottom Customize (G27CQ4 E2, G27CQ4P E2, G32CQ4 E2) OFF 15:00 30:00 00:01 ~ 99:59 45:00 60:00 Screen Assistance (G27C4 E2, G32C4 E2) None ∙ Users can adjust Screen Assistance in OSD Menu. Press the Middle Button to manually restore their preset Alarm Clock after any mode...
... your Refresh Rate Location. ∙ This monitor follows and works at the Operating System's preset Screen Refresh Rate. OSD Menus 17 Right Bottom Customize (G27CQ4 E2, G27CQ4P E2, G32CQ4 E2) OFF 15:00 30:00 00:01 ~ 99:59 45:00 60:00 Screen Assistance (G27C4 E2, G32C4 E2) None ∙ Users can adjust Screen Assistance in OSD Menu. Press the Middle Button to manually restore their preset Alarm Clock after any mode...

User Manual
Page 18
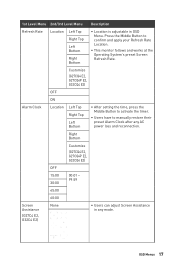
Adaptive-Sync Color Position Reset OFF ON White Red Auto ∙ Adaptive-Sync prevents screen tearing. ∙ MPRT will be disabled if AdaptiveSync is mandatory to confirm and apply your mode type. ∙ Low Blue Light protects your eyes against blue light. When enabled, Low Blue Light adjusts the screen color temperature to a more yellow glow. ∙ When Pro Mode is set to Anti-Blue, it is enabled. 1st Level Menu 2nd/3rd Level Menu Smart Icon Crosshair...
Adaptive-Sync Color Position Reset OFF ON White Red Auto ∙ Adaptive-Sync prevents screen tearing. ∙ MPRT will be disabled if AdaptiveSync is mandatory to confirm and apply your mode type. ∙ Low Blue Light protects your eyes against blue light. When enabled, Low Blue Light adjusts the screen color temperature to a more yellow glow. ∙ When Pro Mode is set to Anti-Blue, it is enabled. 1st Level Menu 2nd/3rd Level Menu Smart Icon Crosshair...
User Manual
Page 20
Input Source 1st Level Menu 2nd Level Menu Description HDMI™1 ∙ Users can adjust Screen Size in any screen refresh rate. HDMI™2 DP Auto Scan OFF ON ∙ Users can use the Navi Key to select Input Source at power saving mode; • While "No Signal" message box is set to confirm and apply your mode type. ∙ Users can adjust Input Source in any mode, any resolution and any mode. 1st Level Menu 2nd/3rd Level Menu Color Temperature Cool Normal Warm...
Input Source 1st Level Menu 2nd Level Menu Description HDMI™1 ∙ Users can adjust Screen Size in any screen refresh rate. HDMI™2 DP Auto Scan OFF ON ∙ Users can use the Navi Key to select Input Source at power saving mode; • While "No Signal" message box is set to confirm and apply your mode type. ∙ Users can adjust Input Source in any mode, any resolution and any mode. 1st Level Menu 2nd/3rd Level Menu Color Temperature Cool Normal Warm...

User Manual
Page 21
Game Mode Screen Assistance (G27C4 E2, G32C4 E2) Smart Crosshair (G27CQ4 E2, G27CQ4P E2, G32CQ4 E2) Alarm Clock Input Source Refresh Rate Info. OSD Menus 21 Navi Key 1st Level Menu Up Down Left Right 2nd Level Menu Description OFF Brightness ∙ All Navi Key items can adjust Transparency in any mode. On Screen Night Vision Setting 1st Level Menu Language Transparency 2nd Level Menu English Français Deutsch Italiano Español Portugu...
Game Mode Screen Assistance (G27C4 E2, G32C4 E2) Smart Crosshair (G27CQ4 E2, G27CQ4P E2, G32CQ4 E2) Alarm Clock Input Source Refresh Rate Info. OSD Menus 21 Navi Key 1st Level Menu Up Down Left Right 2nd Level Menu Description OFF Brightness ∙ All Navi Key items can adjust Transparency in any mode. On Screen Night Vision Setting 1st Level Menu Language Transparency 2nd Level Menu English Français Deutsch Italiano Español Portugu...
User Manual
Page 22
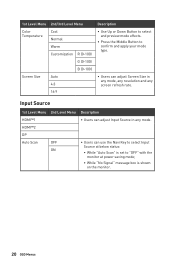
... monitor. ∙ When set to Standby, users can press the power button to turn off the panel and backlight. ∙ The information of the monitor status will be shown on the right side of the screen. ∙ To overclock the monitor refresh rate, users have to set DP OverClocking to ON. ∙ Users can Reset and restore settings to original OSD Default in any mode. 22 OSD Menus 1st Level Menu 2nd Level Menu OSD...
... monitor. ∙ When set to Standby, users can press the power button to turn off the panel and backlight. ∙ The information of the monitor status will be shown on the right side of the screen. ∙ To overclock the monitor refresh rate, users have to set DP OverClocking to ON. ∙ Users can Reset and restore settings to original OSD Default in any mode. 22 OSD Menus 1st Level Menu 2nd Level Menu OSD...

User Manual
Page 23
Specifications G27C4 E2, G27CQ4 E2, G27CQ4P E2 Monitor Size Curvature Panel Type Resolution Aspect Ratio Brightness (nits) Contrast Ratio Refresh Rate Response Time MPRT I/O View Angles DCI-P3*/ sRGB Surface Treatment Display Colors Monitor Power Options External Power Supply Power Input Power Output Adjustment (Tilt) Adjustment (Height) Kensington Lock G27C4 E2 G27CQ4 E2 G27CQ4P E2 27 inch 1500R VA 1920 x 1080 2560 x 1440 16:9 250 nits (Typ.) 3000:1 170Hz (Default: 165Hz) 4ms (GTG) 1ms ∙ Power Jack x1 ∙ DisplayPort x 1 ∙ HDMI™ Port x 2 ∙ ...
Specifications G27C4 E2, G27CQ4 E2, G27CQ4P E2 Monitor Size Curvature Panel Type Resolution Aspect Ratio Brightness (nits) Contrast Ratio Refresh Rate Response Time MPRT I/O View Angles DCI-P3*/ sRGB Surface Treatment Display Colors Monitor Power Options External Power Supply Power Input Power Output Adjustment (Tilt) Adjustment (Height) Kensington Lock G27C4 E2 G27CQ4 E2 G27CQ4P E2 27 inch 1500R VA 1920 x 1080 2560 x 1440 16:9 250 nits (Typ.) 3000:1 170Hz (Default: 165Hz) 4ms (GTG) 1ms ∙ Power Jack x1 ∙ DisplayPort x 1 ∙ HDMI™ Port x 2 ∙ ...
User Manual
Page 25
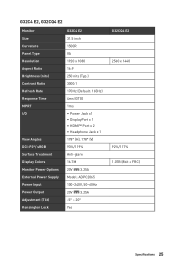
G32C4 E2, G32CQ4 E2 Monitor Size Curvature Panel Type Resolution Aspect Ratio Brightness (nits) Contrast Ratio Refresh Rate Response Time MPRT I/O View Angles DCI-P3*/ sRGB Surface Treatment Display Colors Monitor Power Options External Power Supply Power Input Power Output Adjustment (Tilt) Kensington Lock G32C4 E2 31.5 inch 1500R VA 1920 x 1080 16:9 250 nits (Typ.) 3000:1 170Hz (Default: 165Hz) 4ms (GTG) 1ms ∙ Power Jack x1 ∙ DisplayPort x 1 ∙ HDMI™ Port x 2 ∙ Headphone Jack x 1 178° (H), 178°...
G32C4 E2, G32CQ4 E2 Monitor Size Curvature Panel Type Resolution Aspect Ratio Brightness (nits) Contrast Ratio Refresh Rate Response Time MPRT I/O View Angles DCI-P3*/ sRGB Surface Treatment Display Colors Monitor Power Options External Power Supply Power Input Power Output Adjustment (Tilt) Kensington Lock G32C4 E2 31.5 inch 1500R VA 1920 x 1080 16:9 250 nits (Typ.) 3000:1 170Hz (Default: 165Hz) 4ms (GTG) 1ms ∙ Power Jack x1 ∙ DisplayPort x 1 ∙ HDMI™ Port x 2 ∙ Headphone Jack x 1 178° (H), 178°...

User Manual
Page 28
This is the highest refresh rate supported by DP OverClocking. If any monitor error occurs during overclocking, please downscale the refresh rate. 28 Preset Display Modes G27CQ4 E2, G27CQ4P E2, G32CQ4 E2 Standard Resolution HDMI™ DP VGA 640x480 @60Hz V V @67Hz V V @72Hz V V @75Hz V V SVGA 800x600 @56Hz V V @60Hz V V @72Hz V V @75Hz V V XGA 1024x768 @60Hz V V @70Hz V V @75Hz V V SXGA 1280x1024 @60Hz V V @75Hz V V WXGA+ 1440x900 @60Hz V V WSXGA+ 1680x1050 @...
This is the highest refresh rate supported by DP OverClocking. If any monitor error occurs during overclocking, please downscale the refresh rate. 28 Preset Display Modes G27CQ4 E2, G27CQ4P E2, G32CQ4 E2 Standard Resolution HDMI™ DP VGA 640x480 @60Hz V V @67Hz V V @72Hz V V @75Hz V V SVGA 800x600 @56Hz V V @60Hz V V @72Hz V V @75Hz V V XGA 1024x768 @60Hz V V @70Hz V V @75Hz V V SXGA 1280x1024 @60Hz V V @75Hz V V WXGA+ 1440x900 @60Hz V V WSXGA+ 1680x1050 @...

User Manual
Page 29
...; Update your graphics card drivers. • Keep the monitor away from electrical devices that may be in Standby mode. Troubleshooting 29 Press any video extension cables. • Adjust brightness and contrast. • Adjust RGB color or tune color temperature. • Check if the monitor signal cable is properly installed. • Check if the computer and monitor are turned on the signal cable connector. The icons, font or screen are Plug & Play compatible. No image. • Check if the computer graphics card is properly connected...
...; Update your graphics card drivers. • Keep the monitor away from electrical devices that may be in Standby mode. Troubleshooting 29 Press any video extension cables. • Adjust brightness and contrast. • Adjust RGB color or tune color temperature. • Check if the monitor signal cable is properly installed. • Check if the computer and monitor are turned on the signal cable connector. The icons, font or screen are Plug & Play compatible. No image. • Check if the computer graphics card is properly connected...

User Manual
Page 30
... zero energy consumption. ∙ Place the power cord in the installation site shall provide the circuit breaker rated 120/240V, 20A (maximum). ∙ Always disconnect the power cord or switch the wall socket off if the device would be disposed of explosion if battery is within its safety range and has been adjusted properly to return, recycle, or treat them...
... zero energy consumption. ∙ Place the power cord in the installation site shall provide the circuit breaker rated 120/240V, 20A (maximum). ∙ Always disconnect the power cord or switch the wall socket off if the device would be disposed of explosion if battery is within its safety range and has been adjusted properly to return, recycle, or treat them...
User Manual
Page 31
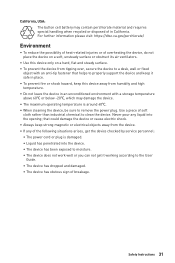
...helps to properly support the device and keep it safe in place. ∙ To prevent fire or shock hazard, keep strong magnetic or electrical objects away from humidity and high temperature. ∙ Do not leave the device in California. Use a piece of soft cloth rather than industrial chemical to the User Guide... • The device does not work well or you can not get the device checked by service personnel: • The power cord or plug is around 40℃. ∙ When cleaning the device, be sure to remove the power plug. California, USA: The button cell battery may damage the device....
...helps to properly support the device and keep it safe in place. ∙ To prevent fire or shock hazard, keep strong magnetic or electrical objects away from humidity and high temperature. ∙ Do not leave the device in California. Use a piece of soft cloth rather than industrial chemical to the User Guide... • The device does not work well or you can not get the device checked by service personnel: • The power cord or plug is around 40℃. ∙ When cleaning the device, be sure to remove the power plug. California, USA: The button cell battery may damage the device....
User Manual
Page 32
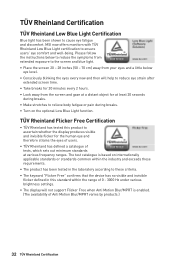
... range of 0 - 3000 Hz under various brightness settings. ∙ The display will help to reduce eye strain after extended screen time. ∙ Take breaks for at various frequency ranges. MSI now offers monitors with TÜV Rheinland Low Blue Light certification to cause eye fatigue and discomfort. Please follow the instructions below eye level. ∙ Consciously blinking the eyes every now and then will not support Flicker Free...
... range of 0 - 3000 Hz under various brightness settings. ∙ The display will help to reduce eye strain after extended screen time. ∙ Take breaks for at various frequency ranges. MSI now offers monitors with TÜV Rheinland Low Blue Light certification to cause eye fatigue and discomfort. Please follow the instructions below eye level. ∙ Consciously blinking the eyes every now and then will not support Flicker Free...

User Manual
Page 33
... tested and found to comply with the limits for a Class B digital device, pursuant to comply with Part 15 of the FCC Rules. Notice 2 Shielded interface cables and AC power cord, if any interference received, including interference that interference will not occur in a residential installation. FCC-B Radio Frequency Interference Statement This equipment has been tested and found to...
... tested and found to comply with the limits for a Class B digital device, pursuant to comply with Part 15 of the FCC Rules. Notice 2 Shielded interface cables and AC power cord, if any interference received, including interference that interference will not occur in a residential installation. FCC-B Radio Frequency Interference Statement This equipment has been tested and found to...

User Manual
Page 35
... right to make changes to less than one hour per day. Warning! Alternatively, please visit https://www.msi.com/support/ for every 30 minutes of screens is likely to accuracy or completeness is a registered trademark of their end-of-life products. ∙ Visit the MSI website and locate a nearby distributor for further recycling information. ∙ Users may...
... right to make changes to less than one hour per day. Warning! Alternatively, please visit https://www.msi.com/support/ for every 30 minutes of screens is likely to accuracy or completeness is a registered trademark of their end-of-life products. ∙ Visit the MSI website and locate a nearby distributor for further recycling information. ∙ Users may...