
User Guide
Page 8
Getting Started 1-1 Mainboard Specifications 1-2 Mainboard Layout 1-4 Packing Checklist 1-5 Chapter 2. CONTENTS Copyright Notice ...ii Trademarks ...ii Revision History ...ii Technical Support ...ii Safety Instructions ...iii FCC-B Radio Frequency Interference Statement iv W ...
Getting Started 1-1 Mainboard Specifications 1-2 Mainboard Layout 1-4 Packing Checklist 1-5 Chapter 2. CONTENTS Copyright Notice ...ii Trademarks ...ii Revision History ...ii Technical Support ...ii Safety Instructions ...iii FCC-B Radio Frequency Interference Statement iv W ...

User Guide
Page 10
Designed to fit the advanced AM D® Athlon 64 X2/ Athlon 64 / Sempron AM2 processor, the K9AG Neo2-Digital Series deliver a high performance and professional desktop platform solution. 1-1 The K9AG Neo2-Digital Series mainboards are based on AMD® 690G & SB600 chipsets for choosing the K9AG Neo2-Digital Series (MS-7368v1.X) ATX mainboard. Getting Started Chapter 1 Getting Started Thank you for optimal system efficiency.
Designed to fit the advanced AM D® Athlon 64 X2/ Athlon 64 / Sempron AM2 processor, the K9AG Neo2-Digital Series deliver a high performance and professional desktop platform solution. 1-1 The K9AG Neo2-Digital Series mainboards are based on AMD® 690G & SB600 chipsets for choosing the K9AG Neo2-Digital Series (MS-7368v1.X) ATX mainboard. Getting Started Chapter 1 Getting Started Thank you for optimal system efficiency.

User Guide
Page 11
...® ALC888 - DDR2 800/667/533 DRAM (8GB Max) - 4 DDR2 DIMMs (240pin / 1.8V) (For more information on compatible components, please visit ht t p: / / global. MS-7368 Mainboard Mainboard Specifications Processor Support - Chip integrated by AMD® SB600 -
...® ALC888 - DDR2 800/667/533 DRAM (8GB Max) - 4 DDR2 DIMMs (240pin / 1.8V) (For more information on compatible components, please visit ht t p: / / global. MS-7368 Mainboard Mainboard Specifications Processor Support - Chip integrated by AMD® SB600 -

User Guide
Page 13
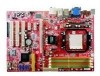
MS-7368 Mainboard Mainboard Layout Top: M ou se Bottom : Key board HDMI Port J1 J2 To p: VGA Port Bottom : DVI Port CPUFAN 1 To p: IEEE13 94 Port (optional) Bo ttom : ... JSPD1 PCI3 JCOM 1 SYSFAN2 BATT + JBAT1 AMD SB600 SATA1 IDE1 SATA4 SATA2 SATA3 FDD1 VIA VT6308P (optional) J 13 94_1 (optional) JUSB2 JUSB3 JUSB1 JFP 2 JFP 1 K9AG Neo2-Digital Series (MS-7368 v1.X) ATX Mainboard 1-4
MS-7368 Mainboard Mainboard Layout Top: M ou se Bottom : Key board HDMI Port J1 J2 To p: VGA Port Bottom : DVI Port CPUFAN 1 To p: IEEE13 94 Port (optional) Bo ttom : ... JSPD1 PCI3 JCOM 1 SYSFAN2 BATT + JBAT1 AMD SB600 SATA1 IDE1 SATA4 SATA2 SATA3 FDD1 VIA VT6308P (optional) J 13 94_1 (optional) JUSB2 JUSB3 JUSB1 JFP 2 JFP 1 K9AG Neo2-Digital Series (MS-7368 v1.X) ATX Mainboard 1-4

User Guide
Page 18
...them before turning on the top to prevent overheating. While replacing the CPU, always turn off the ATX power supply or unplug the power supply's power cord from overheating. 2. The mainboard uses a CPU socket called Socket AM2 (940-pin) for easy CPU installation. For the latest information... about CPU, please visit http://global.msi.com.tw/index.php?func=cpuform Important 1. Overheating will seriously damage the...
...them before turning on the top to prevent overheating. While replacing the CPU, always turn off the ATX power supply or unplug the power supply's power cord from overheating. 2. The mainboard uses a CPU socket called Socket AM2 (940-pin) for easy CPU installation. For the latest information... about CPU, please visit http://global.msi.com.tw/index.php?func=cpuform Important 1. Overheating will seriously damage the...

User Guide
Page 19
.... If the CPU is properly and completely embedded into the socket and close the lever with your mainboard. Please turn off the power and unplug the power cord before installing the CPU. 2. MS-7368 Mainboard CPU Installation Procedures for the gold arrow of the CPU to a 90-degree angle. Please note that...
.... If the CPU is properly and completely embedded into the socket and close the lever with your mainboard. Please turn off the power and unplug the power cord before installing the CPU. 2. MS-7368 Mainboard CPU Installation Procedures for the gold arrow of the CPU to a 90-degree angle. Please note that...

User Guide
Page 20
...Fasten down the other end of the clip to the CPU fan connector on the mainboard. * While disconnecting the Safety Hook from the fixed bolt, it . Attach the CPU Fan cable to hook ...first. 2. Important Mainboard photos shown in this section are installing the CPU, make sure the CPU has a ... heat sink and cooling fan, contact your dealer to purchase and install them before turning on your mainboard may vary depending on the top to fasten the cooling set onto the retention mechanism. Hardware Setup...
...Fasten down the other end of the clip to the CPU fan connector on the mainboard. * While disconnecting the Safety Hook from the fixed bolt, it . Attach the CPU Fan cable to hook ...first. 2. Important Mainboard photos shown in this section are installing the CPU, make sure the CPU has a ... heat sink and cooling fan, contact your dealer to purchase and install them before turning on your mainboard may vary depending on the top to fasten the cooling set onto the retention mechanism. Hardware Setup...

User Guide
Page 21
Please refer to the following illustrations for installing memory modules. MS-7368 Mainboard Memory These DIMM slots are used for population rules under Dual-Channel mode. 1 DIMM2 DIMM1 DIMM4 DIMM3 2 DIMM2 DIMM1 DIMM4 DIMM3 3 DIMM2 DIMM1 DIMM4 ...DIMM3 Installed Empty 2-6 Channel B in GREEN; For more information on compatible components, please visit http://global.msi.com.tw/index.php?func=testreport DDR2 240-pin, 1.8V 64x2=128 pin 56x2=112 pin Single-Channel: All DIMMs in GREEN Dual-Channel: Channel...
Please refer to the following illustrations for installing memory modules. MS-7368 Mainboard Memory These DIMM slots are used for population rules under Dual-Channel mode. 1 DIMM2 DIMM1 DIMM4 DIMM3 2 DIMM2 DIMM1 DIMM4 DIMM3 3 DIMM2 DIMM1 DIMM4 ...DIMM3 Installed Empty 2-6 Channel B in GREEN; For more information on compatible components, please visit http://global.msi.com.tw/index.php?func=testreport DDR2 240-pin, 1.8V 64x2=128 pin 56x2=112 pin Single-Channel: All DIMMs in GREEN Dual-Channel: Channel...

User Guide
Page 23
... inserted in the proper orientation and the pins are connected to proper ATX power supplies to connect an ATX 24-pin power supply. Maker sure that all the connectors are aligned. MS-7368 Mainboard Power Supply ATX 24-Pin Power Connector: ATX1 This connector allows you to ensure stable... operation of the mainboard. 2. If you'd like . You may use the 20-pin ATX power supply, please plug your power sup- There is ...
... inserted in the proper orientation and the pins are connected to proper ATX power supplies to connect an ATX 24-pin power supply. Maker sure that all the connectors are aligned. MS-7368 Mainboard Power Supply ATX 24-Pin Power Connector: ATX1 This connector allows you to ensure stable... operation of the mainboard. 2. If you'd like . You may use the 20-pin ATX power supply, please plug your power sup- There is ...

User Guide
Page 25
... audio devices. CS-Out (Orange) - Line-Out (Green) - Line Out, is for attaching USB devices such as keyboard, mouse, or other audio devices. MS-7368 Mainboard USB Port The USB (Universal Serial Bus) port is a connector for speakers or headphones. Line-In (Blue) -
... audio devices. CS-Out (Orange) - Line-Out (Green) - Line Out, is for attaching USB devices such as keyboard, mouse, or other audio devices. MS-7368 Mainboard USB Port The USB (Universal Serial Bus) port is a connector for speakers or headphones. Line-In (Blue) -

User Guide
Page 27
... the record. 1 CINTRU 2 GND JCI1 CD-In Connector: JCD1 This connector is a high-speed Serial ATA interface port. The system will be activated. MS-7368 Mainboard Serial ATA Connector: SATA1/ SATA2/ SATA3/ SATA4 This connector is provided for external audio input. 2-12 L GND R JCD1 SATA1 SATA2 SATA3 SATA4 Important Please do...
... the record. 1 CINTRU 2 GND JCI1 CD-In Connector: JCD1 This connector is a high-speed Serial ATA interface port. The system will be activated. MS-7368 Mainboard Serial ATA Connector: SATA1/ SATA2/ SATA3/ SATA4 This connector is provided for external audio input. 2-12 L GND R JCD1 SATA1 SATA2 SATA3 SATA4 Important Please do...

User Guide
Page 28
... The fan power connectors support system cooling fan with speed sensor to take advantage of the CPU fan control. Left channel Ground Microphone - If the mainboard has a System Hardware Monitor chipset on-board, you to connect the front panel audio and is connected to the analog header. PIN SIGNAL 1 MIC_L 2 GND...
... The fan power connectors support system cooling fan with speed sensor to take advantage of the CPU fan control. Left channel Ground Microphone - If the mainboard has a System Hardware Monitor chipset on-board, you to connect the front panel audio and is connected to the analog header. PIN SIGNAL 1 MIC_L 2 GND...

User Guide
Page 29
... LED Buzzer+ Power LED BuzzerNo connection Speaker+ 2-14 The JFP1 is compliant with Intel® Front Panel I/O Connectivity Design Guide. Do not use. MS-7368 Mainboard Front Panel Connectors: JFP1, JFP2 These connectors are for electrical connection to GND Reserved. Power LED JFP2 7 1 8 2 -+ + -
... LED Buzzer+ Power LED BuzzerNo connection Speaker+ 2-14 The JFP1 is compliant with Intel® Front Panel I/O Connectivity Design Guide. Do not use. MS-7368 Mainboard Front Panel Connectors: JFP1, JFP2 These connectors are for electrical connection to GND Reserved. Power LED JFP2 7 1 8 2 -+ + -

User Guide
Page 31
... Transmit Data Data Terminal Ready Ground Data Set Ready Request To Send Clear To Send Ring Indicate 2-16 You can attach a serial device. MS-7368 Mainboard IEEE1394 Connector: J1394_1(Optional) This connector allows you to connect the IEEE1394 device via an optional IEEE1394 bracket. 9 1 10 2 J1394_1 Pin Definition PIN SIGNAL PIN...
... Transmit Data Data Terminal Ready Ground Data Set Ready Request To Send Clear To Send Ring Indicate 2-16 You can attach a serial device. MS-7368 Mainboard IEEE1394 Connector: J1394_1(Optional) This connector allows you to connect the IEEE1394 device via an optional IEEE1394 bracket. 9 1 10 2 J1394_1 Pin Definition PIN SIGNAL PIN...

User Guide
Page 33
... system configuration. Disable the DVI port. JBAT1 1 1 3 Keep Data 1 3 Clear Data Important You can automatically boot OS every time it is on; it . MS-7368 Mainboard Jumpers Clear CMOS Jumper: JBAT1 There is off. Select DVI Port / HDMI Port Jumper: J1, J2 The DVI port shares the same controller with the... to enable the deivce installed on . If you to clear data. Avoid clearing the CMOS while the system is turned on it will damage the mainboard. C1 J1 A1 B1 Enable the DVI port. C1 J2 A1 B1 2-18 C1 J2 AB11 C1 J1 A1 B1 Enable the HDMI port. W ith...
... system configuration. Disable the DVI port. JBAT1 1 1 3 Keep Data 1 3 Clear Data Important You can automatically boot OS every time it is on; it . MS-7368 Mainboard Jumpers Clear CMOS Jumper: JBAT1 There is off. Select DVI Port / HDMI Port Jumper: J1, J2 The DVI port shares the same controller with the... to enable the deivce installed on . If you to clear data. Avoid clearing the CMOS while the system is turned on it will damage the mainboard. C1 J1 A1 B1 Enable the DVI port. C1 J2 A1 B1 2-18 C1 J2 AB11 C1 J1 A1 B1 Enable the HDMI port. W ith...

User Guide
Page 37
... the RESET button. Upon boot-up, the 1st line appearing after the memory count is usually in this BIOS was released. 3-2 MS-7368 Mainboard Entering Setup Power on the screen, press key to enter Setup, restart the system by simultaneously pressing , , and keys. Press DEL to ... the date this chapter are under each BIOS category described in the format: A7368AMS V1.0 041607 where: 1st digit refers to BIOS maker as A = AMI, W = AWARD, and P = PHOENIX. 2nd - 5th digit refers to the model number. 6th digit refers to the chipset as I = Intel, N = nVidia, and A = AMD. 7th - 8th...
... the RESET button. Upon boot-up, the 1st line appearing after the memory count is usually in this BIOS was released. 3-2 MS-7368 Mainboard Entering Setup Power on the screen, press key to enter Setup, restart the system by simultaneously pressing , , and keys. Press DEL to ... the date this chapter are under each BIOS category described in the format: A7368AMS V1.0 041607 where: 1st digit refers to BIOS maker as A = AMI, W = AWARD, and P = PHOENIX. 2nd - 5th digit refers to the model number. 6th digit refers to the chipset as I = Intel, N = nVidia, and A = AMD. 7th - 8th...

User Guide
Page 39
... Optimized Defaults Use this menu for basic system configurations, such as time, date etc. MS-7368 Mainboard The Main Menu Standard CMOS Features Use this menu to load the default values set by the mainboard manufacturer specifically for optimal performance of AMI® special enhanced features. Power Management Setup Use this menu...
... Optimized Defaults Use this menu for basic system configurations, such as time, date etc. MS-7368 Mainboard The Main Menu Standard CMOS Features Use this menu to load the default values set by the mainboard manufacturer specifically for optimal performance of AMI® special enhanced features. Power Management Setup Use this menu...

User Guide
Page 41
.... Read-only. The time format is . month The month from 1 to enter the sub-menu, and the following screen appears. 3-6 The format is . MS-7368 Mainboard Standard CMOS Features The items in each item. date The date from Jan.
.... Read-only. The time format is . month The month from 1 to enter the sub-menu, and the following screen appears. 3-6 The format is . MS-7368 Mainboard Standard CMOS Features The items in each item. date The date from Jan.

User Guide
Page 42
... z e These 3 items show the information about the specified item. Read-only. LBA/Large M ode This item allows you to the IDE/ SATA connector on the mainboard.
... z e These 3 items show the information about the specified item. Read-only. LBA/Large M ode This item allows you to the IDE/ SATA connector on the mainboard.

User Guide
Page 43
MS-7368 Mainboard System Information Press to enter the sub-menu, and the following screen appears. CPU Type, CPUID/MicroCode, CPU Frequency, BIOS Version, Physical Memory, Usage Memory, Cache Size This sub-menu shows the CPU information, BIOS version and memory status of your system (read only). 3-8
MS-7368 Mainboard System Information Press to enter the sub-menu, and the following screen appears. CPU Type, CPUID/MicroCode, CPU Frequency, BIOS Version, Physical Memory, Usage Memory, Cache Size This sub-menu shows the CPU information, BIOS version and memory status of your system (read only). 3-8


