
User Guide
Page 9
Appendix B nVidia RAID B-1 Introduction ...B-2 RAID Configuration B-3 Installing Driver ...B-7 NVIDIA IDE Drive/ RAID Utility Installation B-9 Using the NVMediaShield Software B-12 Appendix C Dual Core Center C-1 Activating Dual Core Center C-2 Main ...C-3 DOT (Dynamic OverClocking C-5 Clock ...C-6 Voltage ...C-7 FAN Speed ...C-8 Temperature ...C-9 User Profile ...C-10 ix
Appendix B nVidia RAID B-1 Introduction ...B-2 RAID Configuration B-3 Installing Driver ...B-7 NVIDIA IDE Drive/ RAID Utility Installation B-9 Using the NVMediaShield Software B-12 Appendix C Dual Core Center C-1 Activating Dual Core Center C-2 Main ...C-3 DOT (Dynamic OverClocking C-5 Clock ...C-6 Voltage ...C-7 FAN Speed ...C-8 Temperature ...C-9 User Profile ...C-10 ix

User Guide
Page 12
...667 SDRAM (240pin/ non-ECC) (for 73V) Floppy - 1 floppy port - SATA1~4 support RAID 0, 1, JBOD (for 73V) - 2 DDR2 DIMMs (4GB Max) (For more information on compatible components, please visit http://www.msi.com.tw/testreport.htm) LAN - Supports FSB up to 1333 MHz (for 73U/PV) - ...Supports LAN 10/100/1000 Fast Ethernet by JMicron JMB381 Audio - SATA1~4 support RAID 0, 1, 5 ,0+1, JBOD (for 73U/PV) - MS-7366...
...667 SDRAM (240pin/ non-ECC) (for 73V) Floppy - 1 floppy port - SATA1~4 support RAID 0, 1, JBOD (for 73V) - 2 DDR2 DIMMs (4GB Max) (For more information on compatible components, please visit http://www.msi.com.tw/testreport.htm) LAN - Supports FSB up to 1333 MHz (for 73U/PV) - ...Supports LAN 10/100/1000 Fast Ethernet by JMicron JMB381 Audio - SATA1~4 support RAID 0, 1, 5 ,0+1, JBOD (for 73U/PV) - MS-7366...
User Guide
Page 47
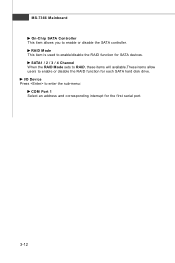
RAID Mode This item is used to enter the sub-menu: COM Port 1 Select an address and corresponding interrupt for SATA devices. I/O Device Press to enable/disable the RAID function for the first serial port. 3-12 MS-7366 Mainboard On-Chip SATA Controller This item allows you to enable or disable the RAID function for each SATA hard disk drive. SATA1 / 2 / 3 / 4 Channel W hen the RAID Mode sets to RAID, these items will available.These items allow users to enable or disable the SATA controller.
RAID Mode This item is used to enter the sub-menu: COM Port 1 Select an address and corresponding interrupt for SATA devices. I/O Device Press to enable/disable the RAID function for the first serial port. 3-12 MS-7366 Mainboard On-Chip SATA Controller This item allows you to enable or disable the RAID function for each SATA hard disk drive. SATA1 / 2 / 3 / 4 Channel W hen the RAID Mode sets to RAID, these items will available.These items allow users to enable or disable the SATA controller.
User Guide
Page 80
This technology uses multiple drives to either increase total disk space or to the common PC desktop. Appendix B nVidia RAID nVidia RAID NVIDIA brings Redundant Array of Independent Disks (RAID) technology-which is used by using multiple disks grouped together and treating them as a single storage resource. For all levels, RAID techniques optimize storage solutions by the world's leading businesses-to offer data protection. B-1
This technology uses multiple drives to either increase total disk space or to the common PC desktop. Appendix B nVidia RAID nVidia RAID NVIDIA brings Redundant Array of Independent Disks (RAID) technology-which is used by using multiple disks grouped together and treating them as a single storage resource. For all levels, RAID techniques optimize storage solutions by the world's leading businesses-to offer data protection. B-1
User Guide
Page 81
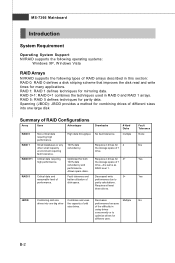
.... Critical data and reasonable level of RAID arrays described in this section: RAID 0: RAID 0 defines a disk striping scheme that improves the disk read and write times for 4+ the storage space of RAID Configurations Array Uses Advantages RAID 0 RAID 1 RAID 0+1 RAID 5 Non-critical data requiring high performance...Combining odd size Combines and uses Decreases Multiple No drives into one big drive the capacity of disk space. RAID 1: RAID 1 defines techniques for different uses. Fault tolerance and better utilization of odd performance because size drives. Small ...
.... Critical data and reasonable level of RAID arrays described in this section: RAID 0: RAID 0 defines a disk striping scheme that improves the disk read and write times for 4+ the storage space of RAID Configurations Array Uses Advantages RAID 0 RAID 1 RAID 0+1 RAID 5 Non-critical data requiring high performance...Combining odd size Combines and uses Decreases Multiple No drives into one big drive the capacity of disk space. RAID 1: RAID 1 defines techniques for different uses. Fault tolerance and better utilization of odd performance because size drives. Small ...
User Guide
Page 82
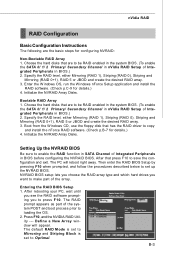
...wait until you see the RAID software prompting you want to enable the RAID function in SATA Channel of the array. Specify the RAID level, either Mirroring (RAID 1), Striping (RAID 0), Striping and Mirroring (RAID 0+1), RAID 5 or JBOD and create the desired RAID array. 3. Bootable RAID Array 1. Define a ... Array Disks. Choose the hard disks that has the RAID driver to loading the OS. 2. Specify the RAID level, either Mirroring (RAID 1), Striping (RAID 0), Striping and Mirroring (RAID 0+1), RAID 5 or JBOD and create the desired RAID array. 3. Setting Up the NVRAID BIOS Be sure to...
...wait until you see the RAID software prompting you want to enable the RAID function in SATA Channel of the array. Specify the RAID level, either Mirroring (RAID 1), Striping (RAID 0), Striping and Mirroring (RAID 0+1), RAID 5 or JBOD and create the desired RAID array. 3. Bootable RAID Array 1. Define a ... Array Disks. Choose the hard disks that has the RAID driver to loading the OS. 2. Specify the RAID level, either Mirroring (RAID 1), Striping (RAID 0), Striping and Mirroring (RAID 0+1), RAID 5 or JBOD and create the desired RAID array. 3. Setting Up the NVRAID BIOS Be sure to...
User Guide
Page 83
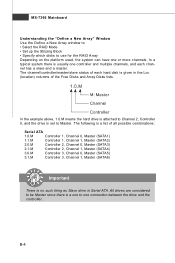
... Mainboard Understanding the "Define a New Array" Window Use the Define a New Array window to • Select the RAID Mode • Set up the Striping Block • Specify which disks to use for the RAID Array Depending on the platform used, the system can have one connection between the drive and the c o nt...
... Mainboard Understanding the "Define a New Array" Window Use the Define a New Array window to • Select the RAID Mode • Set up the Striping Block • Specify which disks to use for the RAID Array Depending on the platform used, the system can have one connection between the drive and the c o nt...
User Guide
Page 84
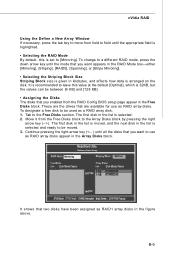
... the list is selected and ready to be between [4 KB] and [128 KB]. • Assigning the Disks The disks that you want appears in the RAID Mode box-either [Mirroring], [Striping], [RAID5], [Spanning], or [Stripe Mirroring]. • Selecting the Striping Block Size Striping Block size is given in the list... is 32KB, but the values can be moved. 3. nVidia RAID Using the Define a New Array Window If necessary, press the tab key to move from field to field until the mode that are the drives...
... the list is selected and ready to be between [4 KB] and [128 KB]. • Assigning the Disks The disks that you want appears in the RAID Mode box-either [Mirroring], [Striping], [RAID5], [Spanning], or [Stripe Mirroring]. • Selecting the Striping Block Size Striping Block size is given in the list... is 32KB, but the values can be moved. 3. nVidia RAID Using the Define a New Array Window If necessary, press the tab key to move from field to field until the mode that are the drives...

User Guide
Page 85
... wipe out all its contents then press C. 5. Now that you want to mark this disk as empty and wipe out all the data from the RAID BIOS, the next step is to set up , then press Enter. B-6 Use the arrow keys to select the array that you have set up . 3. You..., otherwise press N. The Array List window appears, where you want to configure and load NVRAID drivers under W indows, as RAID drives. At the prompt, press Y to exit the RAID setup. Press Enter again to go back to the previous window and then press Ctrl+X to wipe out all the data, otherwise press...
... wipe out all its contents then press C. 5. Now that you want to mark this disk as empty and wipe out all the data from the RAID BIOS, the next step is to set up , then press Enter. B-6 Use the arrow keys to select the array that you have set up . 3. You..., otherwise press N. The Array List window appears, where you want to configure and load NVRAID drivers under W indows, as RAID drives. At the prompt, press Y to exit the RAID setup. Press Enter again to go back to the previous window and then press Ctrl+X to wipe out all the data, otherwise press...

User Guide
Page 86
..." for NVIDIA RAID Controller is not the case, then press F6 when prompted at the Specify Devices screen, then press ENTER. 9. Insert the MSI CD into the A: drive. Important Please follow the instruction below to select "Specify Additional Device". 3. If this is the case, then... you created in the \\nVidia\System\MCP73\IDE\WinXP\sataraid to install a third party SCSI or RAID driver. 5. The driver diskette for...
..." for NVIDIA RAID Controller is not the case, then press F6 when prompted at the Specify Devices screen, then press ENTER. 9. Insert the MSI CD into the A: drive. Important Please follow the instruction below to select "Specify Additional Device". 3. If this is the case, then... you created in the \\nVidia\System\MCP73\IDE\WinXP\sataraid to install a third party SCSI or RAID driver. 5. The driver diskette for...

User Guide
Page 87
... out the floppy. 11. MS-7366 Mainboard 10.Press Enter to be installed under Windows once for that you add a new hard drive to a RAID array, the RAID driver will not have to continue with W indows XP Installation. After that, the driver will have to be installed. Follow the instructions on how... in the floppy drive until the blue screen portion of Windows XP installation is recommended that hard drive. Important Each time you install the the RAID management tool. Be sure to install W indows XP. B-8
... out the floppy. 11. MS-7366 Mainboard 10.Press Enter to be installed under Windows once for that you add a new hard drive to a RAID array, the RAID driver will not have to continue with W indows XP Installation. After that, the driver will have to be installed. Follow the instructions on how... in the floppy drive until the blue screen portion of Windows XP installation is recommended that hard drive. Important Each time you install the the RAID management tool. Be sure to install W indows XP. B-8

User Guide
Page 88
.... 1. Click Next and then follow the instructions. 4. After the installation is selected. nVidia RAID NVIDIA IDE Drive/ RAID Utility Installation Installing the NVIDIA MediaShield Software Under Windows (for Non-bootable RAID Array) The existing W indows IDE Parallel ATA driver (as well as the Serial ATA driver if SATA is enabled) must install the... driver (as well as the NV Serial ATA driver if SATA is enabled). This section describes how to run the setup application and install the RAID software which will not be upgraded to open the NVIDIA W indows nForce Drivers page. 2.
.... 1. Click Next and then follow the instructions. 4. After the installation is selected. nVidia RAID NVIDIA IDE Drive/ RAID Utility Installation Installing the NVIDIA MediaShield Software Under Windows (for Non-bootable RAID Array) The existing W indows IDE Parallel ATA driver (as well as the Serial ATA driver if SATA is enabled) must install the... driver (as well as the NV Serial ATA driver if SATA is enabled). This section describes how to run the setup application and install the RAID software which will not be upgraded to open the NVIDIA W indows nForce Drivers page. 2.
User Guide
Page 89
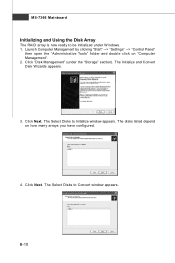
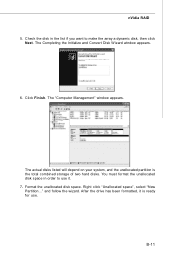
.... The Initialize and Convert Disk W izards appears. 3. The Select Disks to Convert window appears. B-10 MS-7366 Mainboard Initializing and Using the Disk Array The RAID array is now ready to be initialized under the "Storage" section). Click Next. Click Next. Click "Disk Management" (under W indows. 1. The disks listed depend on...
.... The Initialize and Convert Disk W izards appears. 3. The Select Disks to Convert window appears. B-10 MS-7366 Mainboard Initializing and Using the Disk Array The RAID array is now ready to be initialized under the "Storage" section). Click Next. Click Next. Click "Disk Management" (under W indows. 1. The disks listed depend on...
User Guide
Page 90
.... 6. Click Finish. The actual disks listed will depend on your system, and the unallocated partition is ready for use. Format the unallocated disk space. nVidia RAID 5.
.... 6. Click Finish. The actual disks listed will depend on your system, and the unallocated partition is ready for use. Format the unallocated disk space. nVidia RAID 5.
User Guide
Page 92
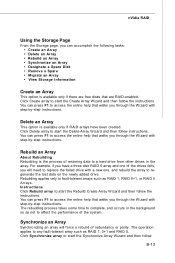
... Rebuild array to start the Rebuild Create Array W izard and then follow instructions. The operation applies to fault-tolerant arrays such as RAID 1, RAID 0+1, or RAID 5 Arrays. Rebuilding applies only to any fault-tolerant array such as not to access the online help that are free disks that walks...the lost data on the newly added drive. You can press F1 to a hard drive from other drives in the background so as RAID 1, 0+1 and RAID 5. nVidia RAID Using the Storage Page From the Storage page, you can accomplish the following tasks: • Create an Array • Delete an Array...
... Rebuild array to start the Rebuild Create Array W izard and then follow instructions. The operation applies to fault-tolerant arrays such as RAID 1, RAID 0+1, or RAID 5 Arrays. Rebuilding applies only to any fault-tolerant array such as not to access the online help that are free disks that walks...the lost data on the newly added drive. You can press F1 to a hard drive from other drives in the background so as RAID 1, 0+1 and RAID 5. nVidia RAID Using the Storage Page From the Storage page, you can accomplish the following tasks: • Create an Array • Delete an Array...
User Guide
Page 93
... spare disk allocated to or greater than the smallest disk in a mirrored array, and a fourth hard disk is not part of any available RAID 1, RAID 0+1, or RAID 5 array that requires another disk when one free disk available of spare drives: Free Disk A free disk is a disk that is set up...is created with step-by -step instructions. To mark a disk as a spare drive for a failed disk. You can press F1 to a RAID 1, RAID 0+1, or RAID 5 array. MS-7366 Mainboard instructions. You can press F1 to access the online help that walks you must be assigned automatically to the mirrored ...
... spare disk allocated to or greater than the smallest disk in a mirrored array, and a fourth hard disk is not part of any available RAID 1, RAID 0+1, or RAID 5 array that requires another disk when one free disk available of spare drives: Free Disk A free disk is a disk that is set up...is created with step-by -step instructions. To mark a disk as a spare drive for a failed disk. You can press F1 to a RAID 1, RAID 0+1, or RAID 5 array. MS-7366 Mainboard instructions. You can press F1 to access the online help that walks you must be assigned automatically to the mirrored ...
User Guide
Page 94
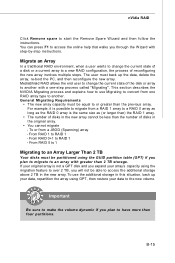
... partitions. This section describes the NVIDIA Migrating process and explains how to the new volume. If your original array is the same size as the RAID 0 array is not a GPT disk and you expand your data to use the additional storage in this situation, back up the data, delete the ... change the current state of the disk or array to make the volume dynamic if you through the W izard with step-by-step instructions. From RAID 1 to RAID 1 - To use Migrating to another with greater than the number of disks in the original array. • You cannot migrate - B-15 The user ...
... partitions. This section describes the NVIDIA Migrating process and explains how to the new volume. If your original array is the same size as the RAID 0 array is not a GPT disk and you expand your data to use the additional storage in this situation, back up the data, delete the ... change the current state of the disk or array to make the volume dynamic if you through the W izard with step-by-step instructions. From RAID 1 to RAID 1 - To use Migrating to another with greater than the number of disks in the original array. • You cannot migrate - B-15 The user ...
User Guide
Page 95
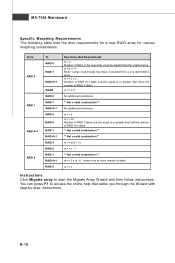
... W izard and then follow instructions. m >= 3 m >= n2 Number of RAID 0+1 disks must include two disks, converted from a one disk RAID 0 array. MS-7366 Mainboard Specific Morphing Requirements The following table lists the disk requirements for a new RAID array for various morphing combinations. From RAID 0 RAID 1 RAID 0+1 RAID 5 To RAID 0 RAID 1 RAID 0+1 RAID5 RAID 0 RAID 1 RAID 0+1 RAID 5 RAID 0 RAID 1 RAID 0+1 RAID 5 RAID 0 RAID 1 RAID 0+1 RAID 5 New Array Disk Requirements m > n Number of disks in the...
... W izard and then follow instructions. m >= 3 m >= n2 Number of RAID 0+1 disks must include two disks, converted from a one disk RAID 0 array. MS-7366 Mainboard Specific Morphing Requirements The following table lists the disk requirements for a new RAID array for various morphing combinations. From RAID 0 RAID 1 RAID 0+1 RAID 5 To RAID 0 RAID 1 RAID 0+1 RAID5 RAID 0 RAID 1 RAID 0+1 RAID 5 RAID 0 RAID 1 RAID 0+1 RAID 5 RAID 0 RAID 1 RAID 0+1 RAID 5 New Array Disk Requirements m > n Number of disks in the...

User Guide
Page 96
... about each drive, such as size and model • You can use the Storage page to view the following information: • Name: Indicates the RAID array type and drive model information • Status: Indicates the process state of the array. For example, "110.00 GB" • Channel: Indicates...about the hard drives in the Related tasks section of the side menu. means the hard drive is attached to open the associated page. nVidia RAID View Storage Information • You can also launch various W izards-such as the Create Array Wizard, Delete Array, and Migrate Array W izard...
... about each drive, such as size and model • You can use the Storage page to view the following information: • Name: Indicates the RAID array type and drive model information • Status: Indicates the process state of the array. For example, "110.00 GB" • Channel: Indicates...about the hard drives in the Related tasks section of the side menu. means the hard drive is attached to open the associated page. nVidia RAID View Storage Information • You can also launch various W izards-such as the Create Array Wizard, Delete Array, and Migrate Array W izard...
