
User Manual
Page 3
... required, you 'll efficiently locate your ideal products from the user's manual, please contact your system and no solution can be obtained from a wide variety of power unit capacity for technical guide, BIOS updates, driver updates, and other information: http://www.msi.com/service/download/ Contact our technical staff at: http://register.msi.com/ iii Preface Preface Technical Support If a problem arises with your place...
... required, you 'll efficiently locate your ideal products from the user's manual, please contact your system and no solution can be obtained from a wide variety of power unit capacity for technical guide, BIOS updates, driver updates, and other information: http://www.msi.com/service/download/ Contact our technical staff at: http://register.msi.com/ iii Preface Preface Technical Support If a problem arises with your place...

User Manual
Page 12
...;netmeliği xi xi Việt Nam RoHS xi Chapter 1 Getting Started 1-1 Packing Contents 1-2 Assembly Precautions 1-3 Motherboard Specifications 1-4 Block Diagram 1-7 Connectors Quick Guide 1-8 Back Panel Quick Guide 1-10 CPU (Central Processing Unit 1-12 Introduction to the LGA2011-3 CPU 1-12 CPU & Heatsink Installation 1-13 Memory 1-16 Up to Quad-Channel mode 1-16 Defined Channel list 1-16 Suggestions for Multi-Channel mode population rule 1-17 Dual-Channel mode 1-17 Triple-Channel mode 1-17 Quad-Channel mode 1-17 Preface xii
...;netmeliği xi xi Việt Nam RoHS xi Chapter 1 Getting Started 1-1 Packing Contents 1-2 Assembly Precautions 1-3 Motherboard Specifications 1-4 Block Diagram 1-7 Connectors Quick Guide 1-8 Back Panel Quick Guide 1-10 CPU (Central Processing Unit 1-12 Introduction to the LGA2011-3 CPU 1-12 CPU & Heatsink Installation 1-13 Memory 1-16 Up to Quad-Channel mode 1-16 Defined Channel list 1-16 Suggestions for Multi-Channel mode population rule 1-17 Dual-Channel mode 1-17 Triple-Channel mode 1-17 Quad-Channel mode 1-17 Preface xii
User Manual
Page 18
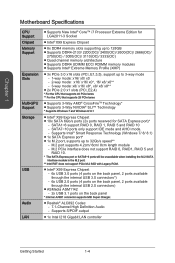
... panel * Internal JUSB1 connector supports MSI Super Charger. ■■Realtek® ALC892 Codec -- 7.1-Channel High Definition Audio -- SATA7~10 ports only support IDE mode and AHCI mode. -- Supports Intel® Smart Response Technology (Windows 7/ 8/ 8.1) ■■1x SATA Express port* ■■1x M.2 port, supports up to 32Gb/s speed** -- Supports S/PDIF output ■■1x Intel I218 Gigabit LAN controller Getting Started 1-4 Chapter 1 Motherboard Specifications CPU Support Chipset Memory Support Expansion Slots Multi-GPU Support Storage USB Audio LAN ■...
... panel * Internal JUSB1 connector supports MSI Super Charger. ■■Realtek® ALC892 Codec -- 7.1-Channel High Definition Audio -- SATA7~10 ports only support IDE mode and AHCI mode. -- Supports Intel® Smart Response Technology (Windows 7/ 8/ 8.1) ■■1x SATA Express port* ■■1x M.2 port, supports up to 32Gb/s speed** -- Supports S/PDIF output ■■1x Intel I218 Gigabit LAN controller Getting Started 1-4 Chapter 1 Motherboard Specifications CPU Support Chipset Memory Support Expansion Slots Multi-GPU Support Storage USB Audio LAN ■...

User Manual
Page 34
... the clip on the power cable should be /gkDYyR_83I4 JPWR1~2: ATX Power Connectors These connectors allow you to ensure stable operation of the motherboard. http://youtu.be hooked on the motherboard's power connector. 1.G2.rG3o.urG4on....power cables are securely connected to a proper ATX power supply to connect an ATX power supply. Getting Started 1-20 To connect the ATX power supply, align the power supply cable with the connector and firmly press the cable into the connector. Chapter 1 Power Supply Video Demonstration Watch the video to learn how to install power supply connectors...
... the clip on the power cable should be /gkDYyR_83I4 JPWR1~2: ATX Power Connectors These connectors allow you to ensure stable operation of the motherboard. http://youtu.be hooked on the motherboard's power connector. 1.G2.rG3o.urG4on....power cables are securely connected to a proper ATX power supply to connect an ATX power supply. Getting Started 1-20 To connect the ATX power supply, align the power supply cable with the connector and firmly press the cable into the connector. Chapter 1 Power Supply Video Demonstration Watch the video to learn how to install power supply connectors...

User Manual
Page 37
... the cable. SATA devices include disk drives (HDD), solid state drives (SSD), and optical drives (CD/ DVD/ Blu-Ray). Chapter 1 Internal Connectors SATA1~10: SATA Connectors This connector is recommended that the flat connector be /RZsMpqxythc SATA5 SATA6 SATA2 SATA4 SATA1 SATA8 SATA3 SATA10 SATA7 SATA9 ■■SATA1~6 support RAID 0, RAID 1, RAID 5 and RAID 10. ■■SATA7~10 ports only support IDE mode and AHCI mode. However, it is a high-speed SATA interface port. http://youtu.be connected to Install SATA HDD. Video...
... the cable. SATA devices include disk drives (HDD), solid state drives (SSD), and optical drives (CD/ DVD/ Blu-Ray). Chapter 1 Internal Connectors SATA1~10: SATA Connectors This connector is recommended that the flat connector be /RZsMpqxythc SATA5 SATA6 SATA2 SATA4 SATA1 SATA8 SATA3 SATA10 SATA7 SATA9 ■■SATA1~6 support RAID 0, RAID 1, RAID 5 and RAID 10. ■■SATA7~10 ports only support IDE mode and AHCI mode. However, it is a high-speed SATA interface port. http://youtu.be connected to Install SATA HDD. Video...

User Manual
Page 38
SATA_EX1: SATA Express Connector The SATA Express, a new high performance storage interface, supports to connect 1 SATA Express device with Legacy ROM. • M.2 PCIe interface does not support RAID 0, RAID1, RAID 5 and RAID 10. http://youtu.be/JCTFABytrYA Important • The SATA Express port/ SATA5~6 ports will be unavailable when installing the M.2 SATA interface module in -1 connector by a SATA Express cable. Getting Started 1-24 Video Demonstration Watch the video to learn how to this 3-in the M.2 port. • Intel RST does not support PCIe M.2 SSD with up...
SATA_EX1: SATA Express Connector The SATA Express, a new high performance storage interface, supports to connect 1 SATA Express device with Legacy ROM. • M.2 PCIe interface does not support RAID 0, RAID1, RAID 5 and RAID 10. http://youtu.be/JCTFABytrYA Important • The SATA Express port/ SATA5~6 ports will be unavailable when installing the M.2 SATA interface module in -1 connector by a SATA Express cable. Getting Started 1-24 Video Demonstration Watch the video to learn how to this 3-in the M.2 port. • Intel RST does not support PCIe M.2 SSD with up...
User Manual
Page 64
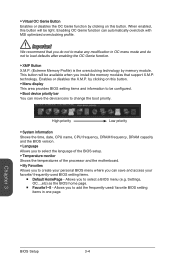
..., CPU name, CPU frequency, DRAM frequency, DRAM capacity and the BIOS version. ▶▶Language Allows you to select the language of the BIOS setup. ▶▶Temperature monitor Shows the temperatures of the processor and the motherboard. ▶▶My Favorites Allows you to create your favorite/ frequently-used / favorite BIOS setting items in OC menu mode and do not to make any modification in one page. technology. Enables or disables the...
..., CPU name, CPU frequency, DRAM frequency, DRAM capacity and the BIOS version. ▶▶Language Allows you to select the language of the BIOS setup. ▶▶Temperature monitor Shows the temperatures of the processor and the motherboard. ▶▶My Favorites Allows you to create your favorite/ frequently-used / favorite BIOS setting items in OC menu mode and do not to make any modification in one page. technology. Enables or disables the...

User Manual
Page 69
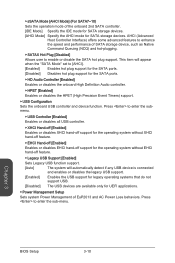
... PCI Bus clocks] ▶▶ACPI Settings Sets ACPI parameters of the onboard Power LED. [Dual Color] The power LED turns to another color to indicate the S3 state. [Blinking] The power LED blinks to enter the sub-menu. ▶▶Power LED [Blinking] Sets shining behaviors of onboard power LED behaviors. Press to enter the sub-menu. ▶▶Onboard LAN Controller [Enabled] Enables or disables the onboard LAN controller. ▶▶LAN Option ROM [Disabled] Enables or disables the legacy network Boot Option ROM for matching different installed devices. [Auto] Enables...
... PCI Bus clocks] ▶▶ACPI Settings Sets ACPI parameters of the onboard Power LED. [Dual Color] The power LED turns to another color to indicate the S3 state. [Blinking] The power LED blinks to enter the sub-menu. ▶▶Power LED [Blinking] Sets shining behaviors of onboard power LED behaviors. Press to enter the sub-menu. ▶▶Onboard LAN Controller [Enabled] Enables or disables the onboard LAN controller. ▶▶LAN Option ROM [Disabled] Enables or disables the legacy network Boot Option ROM for matching different installed devices. [Auto] Enables...
User Manual
Page 70
... the legacy USB support. [Enabled] Enables the USB support for legacy operating systems that do not support USB. [Disabled] The USB devices are available only for UEFI applications. ▶▶Power Management Setup Sets system Power Management of EuP2013 and AC Power Loss behaviors. ▶▶sSATA Mode [AHCI Mode] (For SATA7~10) Sets the operation mode of the onboard 2nd SATA controller. [IDE Mode] Specify the IDE mode for SATA storage devices. [AHCI Mode] Specify the AHCI mode for the SATA ports. ▶▶HD Audio Controller [Enabled] Enables or disables the onboard High...
... the legacy USB support. [Enabled] Enables the USB support for legacy operating systems that do not support USB. [Disabled] The USB devices are available only for UEFI applications. ▶▶Power Management Setup Sets system Power Management of EuP2013 and AC Power Loss behaviors. ▶▶sSATA Mode [AHCI Mode] (For SATA7~10) Sets the operation mode of the onboard 2nd SATA controller. [IDE Mode] Specify the IDE mode for SATA storage devices. [AHCI Mode] Specify the AHCI mode for the SATA ports. ▶▶HD Audio Controller [Enabled] Enables or disables the onboard High...

User Manual
Page 71
... to enter BIOS with enabled "MSI Fast Boot" mode or enabled "Fast Boot" mode, you have to click the "GO2BIOS" tab on MSI Fast Boot utility screen or press the "GO2BIOS" button (optional) on / power off) before AC power loss. ▶▶On board Function LED Control [On] Enables or disables the onboard function LEDs. [On] Enables onboard function LEDs. [Off] Disables onboard function LEDs. ▶▶Windows 8/ 8.1 Configuration Sets Windows 8/ 8.1 detailed configuration and behaviors. Note: When enabled, the system will switch to UEFI mode to meet the Windows 8/ 8.1 requirements...
... to enter BIOS with enabled "MSI Fast Boot" mode or enabled "Fast Boot" mode, you have to click the "GO2BIOS" tab on MSI Fast Boot utility screen or press the "GO2BIOS" button (optional) on / power off) before AC power loss. ▶▶On board Function LED Control [On] Enables or disables the onboard function LEDs. [On] Enables onboard function LEDs. [Off] Disables onboard function LEDs. ▶▶Windows 8/ 8.1 Configuration Sets Windows 8/ 8.1 detailed configuration and behaviors. Note: When enabled, the system will switch to UEFI mode to meet the Windows 8/ 8.1 requirements...

User Manual
Page 72
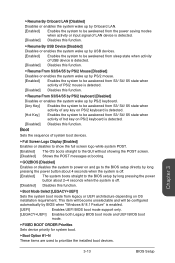
... use these items to set to support "Resume By USB Device" with third party USB 3.0 port. [Disabled] Disables this function. ▶▶Secure Boot Mode [Standard] Selects the secure boot mode. Press to enter the sub-menu. ▶▶Wake Up Event By [BIOS] Selects the wake up event by PCI express device. [Enabled] Enables the system to be loaded. Note: enables this Item to [Enabled], the system will automatically load the secure keys from the power saving modes when...
... use these items to set to support "Resume By USB Device" with third party USB 3.0 port. [Disabled] Disables this function. ▶▶Secure Boot Mode [Standard] Selects the secure boot mode. Press to enter the sub-menu. ▶▶Wake Up Event By [BIOS] Selects the wake up event by PCI express device. [Enabled] Enables the system to be loaded. Note: enables this Item to [Enabled], the system will automatically load the secure keys from the power saving modes when...
User Manual
Page 73
...off. [Enabled] The system boots straight to the BIOS setup by BIOS when "Windows 8/ 8.1 Feature" is enabled. [UEFI] Enables UEFI BIOS boot mode support only. [LEGACY+UEFI] Enables both Legacy BIOS boot mode and UEFI BIOS boot mode. ▶▶FIXED BOOT ORDER Priorities Sets device priority for system boot. ▶▶Boot Option #1~N These items are used to be configured automatically by long pressing the power button about 2~4 seconds when the system is off. [Disabled] Disables this function. ▶▶Boot Mode Select [LEGACY+UEFI] Sets the system boot mode from S3...
...off. [Enabled] The system boots straight to the BIOS setup by BIOS when "Windows 8/ 8.1 Feature" is enabled. [UEFI] Enables UEFI BIOS boot mode support only. [LEGACY+UEFI] Enables both Legacy BIOS boot mode and UEFI BIOS boot mode. ▶▶FIXED BOOT ORDER Priorities Sets device priority for system boot. ▶▶Boot Option #1~N These items are used to be configured automatically by long pressing the power button about 2~4 seconds when the system is off. [Disabled] Disables this function. ▶▶Boot Mode Select [LEGACY+UEFI] Sets the system boot mode from S3...
User Manual
Page 74
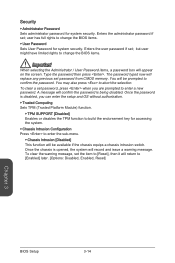
... [Enabled] later. [Options: Disabled, Enabled, Reset] Chapter 3 BIOS Setup 3-14 Once the password is being disabled. but user might have limited rights to [Reset], then it will be available if the chassis equips a chassis intrusion switch. The password typed now will replace any previous set the item to change the BIOS items. ▶▶User Password Sets User Password for system security. A message will record and issue a warning message. To clear the warning message, set password from CMOS memory. Enters the user password...
... [Enabled] later. [Options: Disabled, Enabled, Reset] Chapter 3 BIOS Setup 3-14 Once the password is being disabled. but user might have limited rights to [Reset], then it will be available if the chassis equips a chassis intrusion switch. The password typed now will replace any previous set the item to change the BIOS items. ▶▶User Password Sets User Password for system security. A message will record and issue a warning message. To clear the warning message, set password from CMOS memory. Enters the user password...
User Manual
Page 75
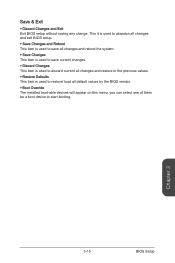
... save current changes. ▶▶Discard Changes This item is used to discard current all changes and restore to the previous values. ▶▶Restore Defaults This item is used to restore/ load all default values by the BIOS vendor. ▶▶Boot Override The installed boot-able devices will appear on this menu, you can select one of them be a boot device to start booting. Chapter 3 3-15 BIOS Setup
... save current changes. ▶▶Discard Changes This item is used to discard current all changes and restore to the previous values. ▶▶Restore Defaults This item is used to restore/ load all default values by the BIOS vendor. ▶▶Boot Override The installed boot-able devices will appear on this menu, you can select one of them be a boot device to start booting. Chapter 3 3-15 BIOS Setup

User Manual
Page 78
... 2] Uses profile2 over-clocking settings of installed memory modules. [Link] Allows user to configure the DRAM timing manually for all memory channel. [UnLink] Allows user to load the default settings.) Chapter 3 BIOS Setup 3-18 If it occurs, please clear the CMOS data and restore the default settings. (Refer to the Clear CMOS jumper/ button section to clear the CMOS data, and enter the BIOS to configure the DRAM timing manually for each memory channel. ▶▶CPU Base Clock Apply Mode [Auto]* Sets the applying mode for adjusted CPU base clock. [Auto] This setting...
... 2] Uses profile2 over-clocking settings of installed memory modules. [Link] Allows user to configure the DRAM timing manually for all memory channel. [UnLink] Allows user to load the default settings.) Chapter 3 BIOS Setup 3-18 If it occurs, please clear the CMOS data and restore the default settings. (Refer to the Clear CMOS jumper/ button section to clear the CMOS data, and enter the BIOS to configure the DRAM timing manually for each memory channel. ▶▶CPU Base Clock Apply Mode [Auto]* Sets the applying mode for adjusted CPU base clock. [Auto] This setting...
User Manual
Page 81
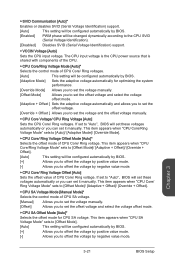
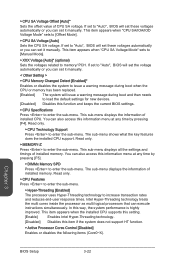
.../Ring Voltage Mode" sets to "Auto", BIOS will set these voltages automatically or you can set it manually. ▶▶SVID Communication [Auto]* Enables or disables SVID (Serial Voltage Identification) support. [Auto] This setting will be configured automatically by BIOS. [Enabled] PWM phase will be changed dynamically according to "Auto", BIOS will set these voltages automatically or you can set it manually. If set to the CPU SVID (Serial Voltage Identification). [Disabled] Disables SVID (Serial Voltage Identification) support. ▶▶VCCIN Voltage [Auto] Sets...
.../Ring Voltage Mode" sets to "Auto", BIOS will set these voltages automatically or you can set it manually. ▶▶SVID Communication [Auto]* Enables or disables SVID (Serial Voltage Identification) support. [Auto] This setting will be configured automatically by BIOS. [Enabled] PWM phase will be changed dynamically according to "Auto", BIOS will set these voltages automatically or you can set it manually. If set to the CPU SVID (Serial Voltage Identification). [Disabled] Disables SVID (Serial Voltage Identification) support. ▶▶VCCIN Voltage [Auto] Sets...
User Manual
Page 82
... the current BIOS settings. ▶▶CPU Specifications Press to load the default settings for new devices. [Disabled] Disables this way, the system performance is highly improved. This item appears when "CPU SA/IOA/IOD Voltage Mode" sets to enter the sub-menu. Chapter 3 BIOS Setup 3-22 If set to "Auto", BIOS will set these voltages automatically or you can execute instructions simultaneously. This item appears when the installed CPU supports this setting. [Enable] Enables Intel Hyper-Threading technology. [Disabled] Disables this information menu at...
... the current BIOS settings. ▶▶CPU Specifications Press to load the default settings for new devices. [Disabled] Disables this way, the system performance is highly improved. This item appears when "CPU SA/IOA/IOD Voltage Mode" sets to enter the sub-menu. Chapter 3 BIOS Setup 3-22 If set to "Auto", BIOS will set these voltages automatically or you can execute instructions simultaneously. This item appears when the installed CPU supports this setting. [Enable] Enables Intel Hyper-Threading technology. [Disabled] Disables this information menu at...

User Manual
Page 84
... CPU core clock speed when the CPU is over the adaptive temperature. [Disabled] Disables this function. ▶▶Intel C-State [Auto] C-state is a processor power management technology defined by ACPI. [Auto] This setting will be configured automatically by BIOS. [Enabled] Detects the idle state of system and reduce CPU power consumption accordingly. [Disabled] Disable this function. ▶▶C1E Support [Disabled] Enables or disables the C1E function for power-saving in Turbo Boost mode. ▶▶Long Duration Maintained (s) [Auto] Sets...
... CPU core clock speed when the CPU is over the adaptive temperature. [Disabled] Disables this function. ▶▶Intel C-State [Auto] C-state is a processor power management technology defined by ACPI. [Auto] This setting will be configured automatically by BIOS. [Enabled] Detects the idle state of system and reduce CPU power consumption accordingly. [Disabled] Disable this function. ▶▶C1E Support [Disabled] Enables or disables the C1E function for power-saving in Turbo Boost mode. ▶▶Long Duration Maintained (s) [Auto] Sets...
User Manual
Page 95
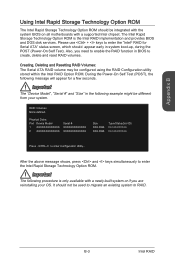
... and keys simultaneously to RAID. B-3 Intel RAID During the Power-On Self Test (POST), the following example might be configured using the RAID Configuration utility stored within the Intel RAID Option ROM. The Intel Rapid Storage Technology Option ROM is only available with a supported Intel chipset. Physical Disks: Port Device Model 1 XXXXXXXXXXXXX 2 XXXXXXXXXXXXX Serial # XXXXXXXXXXXXX XXXXXXXXXXXXX Size XXX.XGB XXX.XGB Type/Status(Vol ID) Non-RAID Disk Non-RAID Disk Press to create, delete and reset RAID volumes. Important The "Device Model", "Serial #" and "Size...
... and keys simultaneously to RAID. B-3 Intel RAID During the Power-On Self Test (POST), the following example might be configured using the RAID Configuration utility stored within the Intel RAID Option ROM. The Intel Rapid Storage Technology Option ROM is only available with a supported Intel chipset. Physical Disks: Port Device Model 1 XXXXXXXXXXXXX 2 XXXXXXXXXXXXX Serial # XXXXXXXXXXXXX XXXXXXXXXXXXX Size XXX.XGB XXX.XGB Type/Status(Vol ID) Non-RAID Disk Non-RAID Disk Press to create, delete and reset RAID volumes. Important The "Device Model", "Serial #" and "Size...
User Manual
Page 104
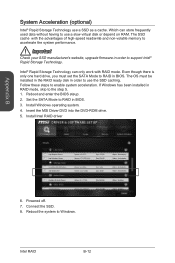
... enable system acceleration. If Windows has been installed in BIOS. 3. The OS must set the SATA Mode to use a SSD as a cache. The SSD cache with RAID mode. Set the SATA Mode to use a slow virtual disk or depend on RAM. Insert the MSI Driver DVD into the DVD-ROM drive. 5. Install Windows operating system. 4. System Acceleration (optional) Intel® Rapid Storage Technology use the SSD caching. Which can only work with the advantages of high-speed read/write and non-volatile memory...
... enable system acceleration. If Windows has been installed in BIOS. 3. The OS must set the SATA Mode to use a SSD as a cache. The SSD cache with RAID mode. Set the SATA Mode to use a slow virtual disk or depend on RAM. Insert the MSI Driver DVD into the DVD-ROM drive. 5. Install Windows operating system. 4. System Acceleration (optional) Intel® Rapid Storage Technology use the SSD caching. Which can only work with the advantages of high-speed read/write and non-volatile memory...


