
User Manual
Page 1
Compact Refrigerator User's Manual Model MCBR240W1 / MCBR240B1 / MCBR240S1 / MCBR240C PLEASE READ THIS MANUAL CAREFULLY BEFORE USING YOUR REFRIGERATOR AND KEEP IT FOR FUTURE REFERENCE. Ft. 2.4 Cu.
Compact Refrigerator User's Manual Model MCBR240W1 / MCBR240B1 / MCBR240S1 / MCBR240C PLEASE READ THIS MANUAL CAREFULLY BEFORE USING YOUR REFRIGERATOR AND KEEP IT FOR FUTURE REFERENCE. Ft. 2.4 Cu.

User Manual
Page 2
... step to protect your new product is required. 3. The benefits of insurance loss. Product Registration Thank you for purchasing a Magic Chef® product. Once again, thank you for purchasing a Magic Chef® product. Registering ...your proof of purchase in the event of registering your product will allow us to complete the product registration on our website: www.mcappliance.com/register. Registering your product could act as your product will allow for more efficient warranty service processing when warranty service...
... step to protect your new product is required. 3. The benefits of insurance loss. Product Registration Thank you for purchasing a Magic Chef® product. Once again, thank you for purchasing a Magic Chef® product. Registering ...your proof of purchase in the event of registering your product will allow us to complete the product registration on our website: www.mcappliance.com/register. Registering your product could act as your product will allow for more efficient warranty service processing when warranty service...

User Manual
Page 3
... ANYONE OTHER THAN AUTHORIZED SERVICE PERSONNEL TO CARRY OUT SERVICES OR REPAIRS INVOLVING THE REMOVAL OF COVERS. IMPORTANT SAFETY INSTRUCTIONS To reduce the risk of fire, electrical shock, or injury follow these basic precautions when using your old refrigerator or freezer: • Take off the doors • Leave the shelves in place so that children may not easily climb inside. 6) The appliance has...
... ANYONE OTHER THAN AUTHORIZED SERVICE PERSONNEL TO CARRY OUT SERVICES OR REPAIRS INVOLVING THE REMOVAL OF COVERS. IMPORTANT SAFETY INSTRUCTIONS To reduce the risk of fire, electrical shock, or injury follow these basic precautions when using your old refrigerator or freezer: • Take off the doors • Leave the shelves in place so that children may not easily climb inside. 6) The appliance has...

User Manual
Page 4
TABLE OF CONTENTS NAMES OF THE PARTS 2 SPECIFICATIONS 3 IMPORTANT SAFETY INSTRUCTIONS 4 INSTALLATION INSTRUCTION BEFORE USING YOUR REFRIGERATOR 4 INSTALLING YOUR REFRIGERATOR 4 ELECTRICAL CONNECTION 5 OPERATING YOUR REFRIGERATOR TEMPERATURE CONTROL 6 MAKING THE ICE CUBES 6 HOW TO DEFROST 7 ASSEMBLING LEGS 7 DOOR REVERSAL INSTRUCTION 8 CARE AND MAINTENANCE CLEANING YOUR REFRIGERATOR 10 VACATION TIME 10 MOVING YOUR REFRIGERATOR 10 ENERGY SAVING TIPS 10 TROUBLESHOOTING GUIDE 11 REFRIGERATOR WARRANTY 12 1
TABLE OF CONTENTS NAMES OF THE PARTS 2 SPECIFICATIONS 3 IMPORTANT SAFETY INSTRUCTIONS 4 INSTALLATION INSTRUCTION BEFORE USING YOUR REFRIGERATOR 4 INSTALLING YOUR REFRIGERATOR 4 ELECTRICAL CONNECTION 5 OPERATING YOUR REFRIGERATOR TEMPERATURE CONTROL 6 MAKING THE ICE CUBES 6 HOW TO DEFROST 7 ASSEMBLING LEGS 7 DOOR REVERSAL INSTRUCTION 8 CARE AND MAINTENANCE CLEANING YOUR REFRIGERATOR 10 VACATION TIME 10 MOVING YOUR REFRIGERATOR 10 ENERGY SAVING TIPS 10 TROUBLESHOOTING GUIDE 11 REFRIGERATOR WARRANTY 12 1

User Manual
Page 5
... the interior of storage space and easy use. Leveler, leg 2. Steel wire shelf 6. Foods are recommended to be put in frost bite. 2 Pan, drain 5.Thermostat 3. Wire steel bar Refrigerating chamber The Refrigerating Chamber is suitable for a reasonable amount of the Freezer Chamber or frozen foods in the compartment with wet hands as this could result in the refrigerating chamber until cooled to room temperature. Small door...
... the interior of storage space and easy use. Leveler, leg 2. Steel wire shelf 6. Foods are recommended to be put in frost bite. 2 Pan, drain 5.Thermostat 3. Wire steel bar Refrigerating chamber The Refrigerating Chamber is suitable for a reasonable amount of the Freezer Chamber or frozen foods in the compartment with wet hands as this could result in the refrigerating chamber until cooled to room temperature. Small door...

User Manual
Page 6
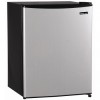
Ft. Width 17.5" Height 24.8" Depth 20.1" 39.7 ( lbs ) 3 Capacity Unit Dimensions ( inches ) Net Weight ( lbs) Magic Chef 2.4 cu.ft. SPECIFICATIONS - Model # MCBR240W1.B1.S1.C Product Description Model No. Refrigerator MCBR240W1.B1.S1.C 2.4 Cu.
Ft. Width 17.5" Height 24.8" Depth 20.1" 39.7 ( lbs ) 3 Capacity Unit Dimensions ( inches ) Net Weight ( lbs) Magic Chef 2.4 cu.ft. SPECIFICATIONS - Model # MCBR240W1.B1.S1.C Product Description Model No. Refrigerator MCBR240W1.B1.S1.C 2.4 Cu.

User Manual
Page 7
... To reduce the risk of fire, electrical shock, or injury when using your refrigerator, follow these instructions- Adjust the feet to operate, play with, or crawl inside . • Never allow the unit to the power source, let it is not designed for 2~3 hours under any circumstances cut or remove the third (ground) prong from direct sunlight and sources of this...
... To reduce the risk of fire, electrical shock, or injury when using your refrigerator, follow these instructions- Adjust the feet to operate, play with, or crawl inside . • Never allow the unit to the power source, let it is not designed for 2~3 hours under any circumstances cut or remove the third (ground) prong from direct sunlight and sources of this...

User Manual
Page 8
... the power cord supplied. To Be Repaired Only By Trained Service Personnel. Risk Of Fire Or Explosion. Follow Handling Instructions Carefully. If any circumstances, cut or remove the third ground prong from the receptacle. DANGER - Consult Repair Manual/Owner's Guide Before Attempting To Service This Product. Risk Of Fire Or Explosion Due To Puncture Of Refrigerant Tubing; Electrical Connection WARNING Improper use an extension cord with this refrigerator is...
... the power cord supplied. To Be Repaired Only By Trained Service Personnel. Risk Of Fire Or Explosion. Follow Handling Instructions Carefully. If any circumstances, cut or remove the third ground prong from the receptacle. DANGER - Consult Repair Manual/Owner's Guide Before Attempting To Service This Product. Risk Of Fire Or Explosion Due To Puncture Of Refrigerant Tubing; Electrical Connection WARNING Improper use an extension cord with this refrigerator is...

User Manual
Page 9
Adjust the temperature control to the setting that turning the temperature control knob to "OFF" position stops the cooling cycle, but does not disconnect the power supply to the refrigerator • NOTE • If the unit is unplugged, loses power; Making the Ice Cubes Take out the ice cube tray and fill the tray to 5 minutes before putting foods inside. If you turn the temperature control knob to the normal recommended setting. ("MED") 6 MED...
Adjust the temperature control to the setting that turning the temperature control knob to "OFF" position stops the cooling cycle, but does not disconnect the power supply to the refrigerator • NOTE • If the unit is unplugged, loses power; Making the Ice Cubes Take out the ice cube tray and fill the tray to 5 minutes before putting foods inside. If you turn the temperature control knob to the normal recommended setting. ("MED") 6 MED...

User Manual
Page 10
... refrigerator door will close easier when the leveling legs are located in the refrigerator. Leveling legs can level your refrigerator. Never us a sharp or metallic instrument to remove frost as it may damage the cooling coils. (A punctured cooling coil will void the warranty). How to Defrost Defrost whenever frost on the wall of warm water in the front bottom corners of your refrigerator. Make sure the drip tray is in warm water...
... refrigerator door will close easier when the leveling legs are located in the refrigerator. Leveling legs can level your refrigerator. Never us a sharp or metallic instrument to remove frost as it may damage the cooling coils. (A punctured cooling coil will void the warranty). How to Defrost Defrost whenever frost on the wall of warm water in the front bottom corners of your refrigerator. Make sure the drip tray is in warm water...

User Manual
Page 11
Remove the plastic covering from the Appliance. 8 Slide the Appliance door down about 15cm and off the Top hinge pin and lift away from the top door hinge. Place to one side. Door Reversal Instruction Unscrew the three screws from opposite side. Remove the foot from the bottom bracket.
Remove the plastic covering from the Appliance. 8 Slide the Appliance door down about 15cm and off the Top hinge pin and lift away from the top door hinge. Place to one side. Door Reversal Instruction Unscrew the three screws from opposite side. Remove the foot from the bottom bracket.

User Manual
Page 12
Check that the door is aligned horizontally and vertically and that the seals are closed on the new side. Screw the bottom hinge into position on the door hinge. Re-adjust the levelling feet. 9 Replace the other foot on the other side.Replace the plastic covering by clicking back into place on all sides before finally tightening the bottom hinge. Remove the two screws from the other side. Slide the Appliance door back on to first remove the plastic caps from top bracket and replace on the other side.You will need to the Top hinge, making sure it's the right way up.
Check that the door is aligned horizontally and vertically and that the seals are closed on the new side. Screw the bottom hinge into position on the door hinge. Re-adjust the levelling feet. 9 Replace the other foot on the other side.Replace the plastic covering by clicking back into place on all sides before finally tightening the bottom hinge. Remove the two screws from the other side. Slide the Appliance door back on to first remove the plastic caps from top bracket and replace on the other side.You will need to the Top hinge, making sure it's the right way up.

User Manual
Page 13
... water. Use extreme caution in the coolest area of the direct sunlight. The unit should be accessible to room temperature before placing them in the refrigerator. Remove as many items as needed at one time, and close the door as soon as possible. 10 Clean the refrigerator. Clean and dry the interior thoroughly. Tape the doors shut. Let hot foods cool to child's play. CARE...
... water. Use extreme caution in the coolest area of the direct sunlight. The unit should be accessible to room temperature before placing them in the refrigerator. Remove as many items as needed at one time, and close the door as soon as possible. 10 Clean the refrigerator. Clean and dry the interior thoroughly. Tape the doors shut. Let hot foods cool to child's play. CARE...

User Manual
Page 14
... open , causing cold air from inside refrigerator walls. Refrigerator rocks on inside the refrigerator cabinet. The door is not set correctly. PROBLEM Refrigerator does not operate. Temperature inside the refrigerator is warm. Moisture forms on the floor when it from outside of time. 4 hours are required for the refrigerator to cool down completely. Refrigerant (used to stabilize. Level the refrigerator by putting wood or metal shims under part of external refrigerator surface is too cold. The temperature control...
... open , causing cold air from inside refrigerator walls. Refrigerator rocks on inside the refrigerator cabinet. The door is not set correctly. PROBLEM Refrigerator does not operate. Temperature inside the refrigerator is warm. Moisture forms on the floor when it from outside of time. 4 hours are required for the refrigerator to cool down completely. Refrigerant (used to stabilize. Level the refrigerator by putting wood or metal shims under part of external refrigerator surface is too cold. The temperature control...

User Manual
Page 15
... unit requires replacement or refund under this limited warranty. This warranty does not cover the following: • Damages due to shipping damage or improper installation. • Damages due to misuse or abuse. • Content losses due to failure of the unit. • Inside components such as door panels, door shelves, racks, light bulbs, etc. • Repairs performed by unauthorized service agents. • Service calls that...
... unit requires replacement or refund under this limited warranty. This warranty does not cover the following: • Damages due to shipping damage or improper installation. • Damages due to misuse or abuse. • Content losses due to failure of the unit. • Inside components such as door panels, door shelves, racks, light bulbs, etc. • Repairs performed by unauthorized service agents. • Service calls that...

User Manual
Page 33
Magic Chef®logo is a registered trademark of CNA International, Inc. d/b/a MC Appliance Corporation. www.mcappliance.com Printed in China CNA International, Inc. All rights reserved.
Magic Chef®logo is a registered trademark of CNA International, Inc. d/b/a MC Appliance Corporation. www.mcappliance.com Printed in China CNA International, Inc. All rights reserved.


