User Manual
Page 1
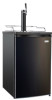
4.9 CU.FT. BEER KEG COOLER INSTRUCTION MANUAL Model No.: MCKC490B To ensure proper use of this appliance and your safety, please read the following instructions completely before operating this appliance. 1
4.9 CU.FT. BEER KEG COOLER INSTRUCTION MANUAL Model No.: MCKC490B To ensure proper use of this appliance and your safety, please read the following instructions completely before operating this appliance. 1
User Manual
Page 2
TABLE OF CONTENTS Names of the Parts 3 Important Safety Instructions 4 Installation Instructions 4 Before Using Your Beer Dispenser 4 Installation of Your Beer Dispenser 4 - 5 Electrical Connection 5 Installation Instructions for Beer Keg 6 - 9 Dispensing of Beer 9 Operating Your Beer Dispenser 10 Setting the Temperature 10 Automatic Defrosting 10 Converting to an All Refrigerator 10 Changing the Reversible Door 11 Care and Maintenance 12 Troubleshooting Guide 12 Warranty 13 2
TABLE OF CONTENTS Names of the Parts 3 Important Safety Instructions 4 Installation Instructions 4 Before Using Your Beer Dispenser 4 Installation of Your Beer Dispenser 4 - 5 Electrical Connection 5 Installation Instructions for Beer Keg 6 - 9 Dispensing of Beer 9 Operating Your Beer Dispenser 10 Setting the Temperature 10 Automatic Defrosting 10 Converting to an All Refrigerator 10 Changing the Reversible Door 11 Care and Maintenance 12 Troubleshooting Guide 12 Warranty 13 2
User Manual
Page 3
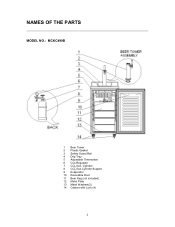
NAMES OF THE PARTS MODEL NO.: MCKC490B 1 Beer Tower 2 Plastic Gasket 3 Safety Guard Rail 4 Drip Tray 5 Adjustable Thermostat 6 CO2 Regulator 7 CO2 Gas Cylinder 8 CO2 Gas Cylinder Support 9 Evaporator 10 Reversible Door 11 Beer Keg (not included) 12 Metal Plate 13 Metal Washers(2) 14 Castors with Lock (4) 3
NAMES OF THE PARTS MODEL NO.: MCKC490B 1 Beer Tower 2 Plastic Gasket 3 Safety Guard Rail 4 Drip Tray 5 Adjustable Thermostat 6 CO2 Regulator 7 CO2 Gas Cylinder 8 CO2 Gas Cylinder Support 9 Evaporator 10 Reversible Door 11 Beer Keg (not included) 12 Metal Plate 13 Metal Washers(2) 14 Castors with Lock (4) 3

User Manual
Page 4
... • Before plugging in the vicinity of this product. • Never clean unit parts with , or crawl inside the unit. • Refrigerants: All refrigeration products contain refrigerants, which allows the proper air circulation to cool the compressor. • Locate the Beer Dispenser away from the unit. - The fumes can create a fire hazard or explosion. • Do not store or use gasoline or any...
... • Before plugging in the vicinity of this product. • Never clean unit parts with , or crawl inside the unit. • Refrigerants: All refrigeration products contain refrigerants, which allows the proper air circulation to cool the compressor. • Locate the Beer Dispenser away from the unit. - The fumes can create a fire hazard or explosion. • Do not store or use gasoline or any...

User Manual
Page 5
... handled properly. NEVER connect the CO2 cylinder directly to gas supplier. 9. ALWAYS keep a CO2 cylinder away from the power cord supplied. If over five (5) years, do so could result in the Beer Dispenser compartment. Extreme cold ambient temperatures may increase electrical consumption. Do not under any circumstances cut or remove the third (ground) prong from the receptacle. Electrical Connection Warning Improper use...
... handled properly. NEVER connect the CO2 cylinder directly to gas supplier. 9. ALWAYS keep a CO2 cylinder away from the power cord supplied. If over five (5) years, do so could result in the Beer Dispenser compartment. Extreme cold ambient temperatures may increase electrical consumption. Do not under any circumstances cut or remove the third (ground) prong from the receptacle. Electrical Connection Warning Improper use...

User Manual
Page 6
Figure (II) is the final version. INSTALLATION INSTRUCTIONS FOR BEER KEG Keg Installation Sketch · Install the four castors with lock provided into the unit's bottom (four screw holes pre-supplied) The two metal gaskets are used for the front two Castors. Metal Washers (I) (II) 6 Figure (1) before installation.
Figure (II) is the final version. INSTALLATION INSTRUCTIONS FOR BEER KEG Keg Installation Sketch · Install the four castors with lock provided into the unit's bottom (four screw holes pre-supplied) The two metal gaskets are used for the front two Castors. Metal Washers (I) (II) 6 Figure (1) before installation.

User Manual
Page 7
... a refrigerator. • Insert the open end of the beer tower to the 3 grooves on the regulator • Secure hose by using an adjustable wrench (not supplied) and assure there are no leaks. (See Figure 2) Fig. 1 Fig. 2 Fig. 3 Installation Of CO2 Air Line Outside Cabinet • Remove plug located at the exterior back (top left hand corner). • Save it for later use . • Install your...
... a refrigerator. • Insert the open end of the beer tower to the 3 grooves on the regulator • Secure hose by using an adjustable wrench (not supplied) and assure there are no leaks. (See Figure 2) Fig. 1 Fig. 2 Fig. 3 Installation Of CO2 Air Line Outside Cabinet • Remove plug located at the exterior back (top left hand corner). • Save it for later use . • Install your...

User Manual
Page 8
... tapped. To open the main CO2 cylinder valve, slowly turn screw clockwise. Using keg handles only, carefully lift the beer keg. (See Figure 5) • To place the beer keg inside the cabinet, ...Adjusting The CO2 Regulator The gauge monitors low internal keg pressure and should be adjusted as needed. • Release adjustment lock nut marked 2. • Using a flat screwdriver, turn screw counter - Lift the front of the keg just enough so the front edge of the coupler turning until fully open door. Opening the CO2 Cylinder Main Valve • Make sure the secondary shut-off valve...
... tapped. To open the main CO2 cylinder valve, slowly turn screw clockwise. Using keg handles only, carefully lift the beer keg. (See Figure 5) • To place the beer keg inside the cabinet, ...Adjusting The CO2 Regulator The gauge monitors low internal keg pressure and should be adjusted as needed. • Release adjustment lock nut marked 2. • Using a flat screwdriver, turn screw counter - Lift the front of the keg just enough so the front edge of the coupler turning until fully open door. Opening the CO2 Cylinder Main Valve • Make sure the secondary shut-off valve...
User Manual
Page 9
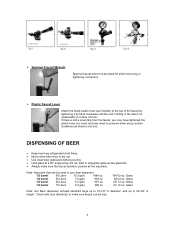
... correct size. 9 Glass 55/ 12-oz. Note: Keg sizes that can be used in your distributor to make sure the faucet handle is pushed all the way back. Spanner Faucet Wrench Spanner faucet wrench is provided for either removing or tightening connection Plastic Faucet Lever Attach the black plastic lever (pull handle) to 23-3/8" in height. Glass Note: Our Beer dispenser accepts...
... correct size. 9 Glass 55/ 12-oz. Note: Keg sizes that can be used in your distributor to make sure the faucet handle is pushed all the way back. Spanner Faucet Wrench Spanner faucet wrench is provided for either removing or tightening connection Plastic Faucet Lever Attach the black plastic lever (pull handle) to 23-3/8" in height. Glass Note: Our Beer dispenser accepts...
User Manual
Page 10
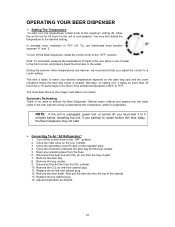
... pull the beer line thru the top of 6, it evaporates. Replace the top cabinet plug 14. To turn the temperature control knob to the desired setting. If you attempt to the "OFF" position. Close the main valve on the regulator pipe. 4. Close the connection between "4" and "5. Defrost water collects and passes thru the drain outlet in the water. OPERATING YOUR BEER DISPENSER Setting The Temperature To start . You...
... pull the beer line thru the top of 6, it evaporates. Replace the top cabinet plug 14. To turn the temperature control knob to the desired setting. If you attempt to the "OFF" position. Close the main valve on the regulator pipe. 4. Close the connection between "4" and "5. Defrost water collects and passes thru the drain outlet in the water. OPERATING YOUR BEER DISPENSER Setting The Temperature To start . You...
User Manual
Page 11
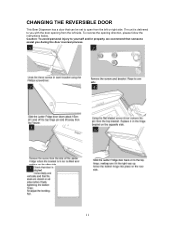
CHANGING THE REVERSIBLE DOOR This Beer Dispenser has a door that someone assist you with the door opening direction, please follow the instructions below. The unit is delivered to open from the left or right side. To reverse the opening from the left side. Caution: To avoid personal injury to yourself and/or property, we ecommend that can be set to you during the door reversal process. 11
CHANGING THE REVERSIBLE DOOR This Beer Dispenser has a door that someone assist you with the door opening direction, please follow the instructions below. The unit is delivered to open from the left or right side. To reverse the opening from the left side. Caution: To avoid personal injury to yourself and/or property, we ecommend that can be set to you during the door reversal process. 11
User Manual
Page 12
... a warm water and baking soda solution. Clean and dry the interior thoroughly. Rinse well and wipe dry with a blanket or similar item. 12 To prevent odor and mold growth, leave the door open slightly. CARE AND MAINTENANCE Cleaning Your Beer Dispenser • Turn the temperature control to "OFF", unplug the Beer Dispenser, and remove the contents. • Wash the inside your Beer Dispenser. • Tape the door shut...
... a warm water and baking soda solution. Clean and dry the interior thoroughly. Rinse well and wipe dry with a blanket or similar item. 12 To prevent odor and mold growth, leave the door open slightly. CARE AND MAINTENANCE Cleaning Your Beer Dispenser • Turn the temperature control to "OFF", unplug the Beer Dispenser, and remove the contents. • Wash the inside your Beer Dispenser. • Tape the door shut...
User Manual
Page 13
... proper clearance. TROUBLESHOOTING GUIDE You can solve many common Beer Dispenser problems easily, saving you can solve the problem before calling the servicer. PROBLEM Beer Dispenser does not operate. The room temperature is normal. The temperature control is not level. The door was reversed and not properly installed. Vibrations. The Beer Dispenser is not set correctly. The gasket is open too often. The Castors are out of position. Turns on and...
... proper clearance. TROUBLESHOOTING GUIDE You can solve many common Beer Dispenser problems easily, saving you can solve the problem before calling the servicer. PROBLEM Beer Dispenser does not operate. The room temperature is normal. The temperature control is not level. The door was reversed and not properly installed. Vibrations. The Beer Dispenser is not set correctly. The gasket is open too often. The Castors are out of position. Turns on and...

User Manual
Page 14
... such as door panels, door shelves, racks, light bulbs, etc. This warranty is not installed in accordance with the sale of this product if used for other liability in connection with published installation instructions. Parts and labor expenses are covered on the web at the company's option) for any such defect or to furnish a new part(s) (at www.mcappliance.com to request warranty service or order parts. 14 Expenses...
... such as door panels, door shelves, racks, light bulbs, etc. This warranty is not installed in accordance with the sale of this product if used for other liability in connection with published installation instructions. Parts and labor expenses are covered on the web at the company's option) for any such defect or to furnish a new part(s) (at www.mcappliance.com to request warranty service or order parts. 14 Expenses...


