
User manual, English (US)
Page 1
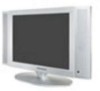
MAGNAVOX REPRESENTATIVES ARE READY TO HELP YOU WITH ANY QUESTIONS ABOUT YOUR NEW PRODUCT. See why inside. OWNER'S MANUAL LCD TV Monitor 15MF200V/37 NEED HELP? CALL US! Return your Warranty Registration Card within 10 days. CALL US BEFORE YOU CONSIDER RETURNING THE PRODUCT. 1-800-705-2000 OR VISIT US ON THE WEB AT WWW.MAGNAVOX.COM Important! WE WANT YOU TO START ENJOYING YOUR NEW PRODUCT RIGHT AWAY. IB8452E001 WE CAN GUIDE YOU THROUGH CONNECTIONS, FIRST-TIME SETUP, AND ANY OF THE FEATURES.
MAGNAVOX REPRESENTATIVES ARE READY TO HELP YOU WITH ANY QUESTIONS ABOUT YOUR NEW PRODUCT. See why inside. OWNER'S MANUAL LCD TV Monitor 15MF200V/37 NEED HELP? CALL US! Return your Warranty Registration Card within 10 days. CALL US BEFORE YOU CONSIDER RETURNING THE PRODUCT. 1-800-705-2000 OR VISIT US ON THE WEB AT WWW.MAGNAVOX.COM Important! WE WANT YOU TO START ENJOYING YOUR NEW PRODUCT RIGHT AWAY. IB8452E001 WE CAN GUIDE YOU THROUGH CONNECTIONS, FIRST-TIME SETUP, AND ANY OF THE FEATURES.

User manual, English (US)
Page 4
...Tuner Mode Control 12 How to Auto Program TV Channels 13 How to Add or Delete Channels (Store 14 How to use SmartSurf (Alternate Channel 15 Fine Tune 16 Picture Menu How to use the Picture Adjustment Controls . . . . .17 Sound Menu How to use the Language Control ... 26 How to use the Sound Adjustment Controls . . . . . .18 Here are a few of the special features of your new LCD Monitor. Copyright © 2003 Magnavox. Closed Captioning: Allows the viewer to your old television, batteries, and packing materials. Not all features described in and disposed of reusable materials...
...Tuner Mode Control 12 How to Auto Program TV Channels 13 How to Add or Delete Channels (Store 14 How to use SmartSurf (Alternate Channel 15 Fine Tune 16 Picture Menu How to use the Picture Adjustment Controls . . . . .17 Sound Menu How to use the Language Control ... 26 How to use the Sound Adjustment Controls . . . . . .18 Here are a few of the special features of your new LCD Monitor. Copyright © 2003 Magnavox. Closed Captioning: Allows the viewer to your old television, batteries, and packing materials. Not all features described in and disposed of reusable materials...
User manual, English (US)
Page 5
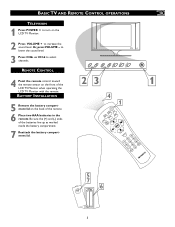
... battery compartment lid. 5 7 6 5 to lower the sound level. 3 Press CH3 or CH2 to increase the sound level. Be sure the (+) and (-) ends of the 23 1 LCD TV Monitor when operating the LCD TV Monitor with the remote. BASIC TV AND REMOTE CONTROL OPERATIONS TELEVISION 1 Press POWER y to turn on the...
... battery compartment lid. 5 7 6 5 to lower the sound level. 3 Press CH3 or CH2 to increase the sound level. Be sure the (+) and (-) ends of the 23 1 LCD TV Monitor when operating the LCD TV Monitor with the remote. BASIC TV AND REMOTE CONTROL OPERATIONS TELEVISION 1 Press POWER y to turn on the...
User manual, English (US)
Page 6
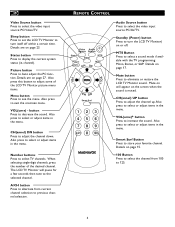
...the channel down. CH(annel) DN button Press to select or adjust items in the menu. Number buttons Press to eliminate or restore the LCD TV Monitor sound. Mute button Press to select TV channels. Details on page 27. When selecting single-digit channels, press the number of the...125. 6 Status button Press to turn itself off . Standby (Power) button Press to display the current system status (ie, channel). Details are on page 15. 100 Button Press to select the channel from current channel selection to increase the sound. Details are on page 17. Also press this button to...
...the channel down. CH(annel) DN button Press to select or adjust items in the menu. Number buttons Press to eliminate or restore the LCD TV Monitor sound. Mute button Press to select TV channels. Details on page 27. When selecting single-digit channels, press the number of the...125. 6 Status button Press to turn itself off . Standby (Power) button Press to display the current system status (ie, channel). Details are on page 15. 100 Button Press to select the channel from current channel selection to increase the sound. Details are on page 17. Also press this button to...
User manual, English (US)
Page 7
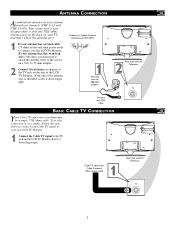
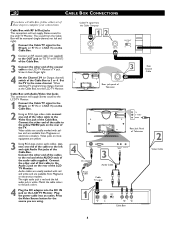
...back of 2 Television TV OR BASIC CABLE TV CONNECTION Your Cable TV signal into your antenna has a round cable (75 ohm) on the LCD TV Monitor. If the end of Television TV 7 If so, this connection is threaded, screw it down finger tight. ANTENNA CONNECTION Acombination ...antenna receives normal broadcast channels (VHF 2-13 and UHF 14-69). Outdoor or Indoor Antenna (Combination VHF/UHF) 1 Twin-lead wire to the LCD TV Monitor. TV S-VIDEO VIDEO DC IN ANALOG 1 2 AUDIO OUT AUDIO Cable TV signal from Cable Company (75Ω coaxial cable) 1 Rear...
...back of 2 Television TV OR BASIC CABLE TV CONNECTION Your Cable TV signal into your antenna has a round cable (75 ohm) on the LCD TV Monitor. If the end of Television TV 7 If so, this connection is threaded, screw it down finger tight. ANTENNA CONNECTION Acombination ...antenna receives normal broadcast channels (VHF 2-13 and UHF 14-69). Outdoor or Indoor Antenna (Combination VHF/UHF) 1 Twin-lead wire to the LCD TV Monitor. TV S-VIDEO VIDEO DC IN ANALOG 1 2 AUDIO OUT AUDIO Cable TV signal from Cable Company (75Ω coaxial cable) 1 Rear...
User manual, English (US)
Page 8
Set the TV to 3 or 4. Cable Box with yellow and are available from Magnavox or electronics retailers. The right audio jack is white. Match the cable colors to the LCD TV Monitor's TV jack. Cable TV signal from the Cable Box will be monaural (single-channel, not left and right). 1 ...the rear of the Cable Box. When watching TV programming, change channels at the Cable Box, not the LCD TV Monitor. Cable Box with red and white and are available from Magnavox or electronics retailers. Audio cables are usually marked with RF In/Out Jacks This connection will supply Stereo ...
Set the TV to 3 or 4. Cable Box with yellow and are available from Magnavox or electronics retailers. The right audio jack is white. Match the cable colors to the LCD TV Monitor's TV jack. Cable TV signal from the Cable Box will be monaural (single-channel, not left and right). 1 ...the rear of the Cable Box. When watching TV programming, change channels at the Cable Box, not the LCD TV Monitor. Cable Box with red and white and are available from Magnavox or electronics retailers. Audio cables are usually marked with RF In/Out Jacks This connection will supply Stereo ...
User manual, English (US)
Page 9
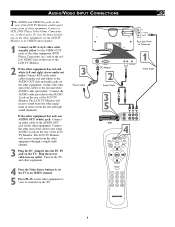
... yellow) to the VIDEO OUT jacks of the other equipment (DVD Player, Camcorder, etc.) and to the yellow VIDEO jack on the rear of the LCD TV Monitor. Connect the other equipment in stereo (from the left and right) jacks on the other equipment. If the other equipment has only one... an audio cable to the white AUDIO 2 jack on the TV. Plug the power cable into the DC IN jack on the rear of the LCD TV Monitor. 2 If the other equipment has red and white, left and right, stereo audio out jacks: Connect RCA-style audio cables (usually red and...
... yellow) to the VIDEO OUT jacks of the other equipment (DVD Player, Camcorder, etc.) and to the yellow VIDEO jack on the rear of the LCD TV Monitor. Connect the other equipment in stereo (from the left and right) jacks on the other equipment. If the other equipment has only one... an audio cable to the white AUDIO 2 jack on the TV. Plug the power cable into the DC IN jack on the rear of the LCD TV Monitor. 2 If the other equipment has red and white, left and right, stereo audio out jacks: Connect RCA-style audio cables (usually red and...
User manual, English (US)
Page 10
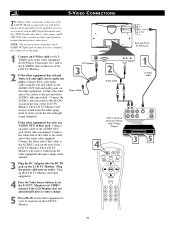
... audio cable to the red and white AUDIO cable (provided). VIDEO VIDEO Rear Jack Panel of the cables to the AUDIO OUT jack on the LCD TV Monitor. If the other equipment in order for the playback of accessory sources such as DBS (digital broadcast satellite), DVD (digital video discs), video...) OUT R AUDIO L IN OUT S-VHS OUT VIDEO ANTENNA IN ANTENNA IN OUT 4 35 10 S-VIDEO CONNECTIONS The S(uper)-Video connection on the rear of the LCD TV Monitor. NOTE: The accessory device must have an SVIDEO OUT(put) jack in stereo (from the other equipment. Connect the white end of the...
... audio cable to the red and white AUDIO cable (provided). VIDEO VIDEO Rear Jack Panel of the cables to the AUDIO OUT jack on the LCD TV Monitor. If the other equipment in order for the playback of accessory sources such as DBS (digital broadcast satellite), DVD (digital video discs), video...) OUT R AUDIO L IN OUT S-VHS OUT VIDEO ANTENNA IN ANTENNA IN OUT 4 35 10 S-VIDEO CONNECTIONS The S(uper)-Video connection on the rear of the LCD TV Monitor. NOTE: The accessory device must have an SVIDEO OUT(put) jack in stereo (from the other equipment. Connect the white end of the...
User manual, English (US)
Page 11
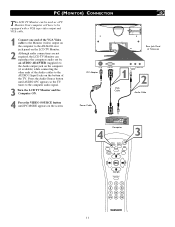
... of the VGA Video cable to the Monitor (video) output on the computer to the ANALOG rear jack panel on the LCD TV Monitor. 2 Although audio connections are not required, the LCD TV Monitor can reproduce the computers audio out by an AUDIO ADAPTER (supplied) to the Audio output jack on the... computer (if available) while connecting the other ends of the Audio cables to the computer audio signal. 3 Turn the LCD TV Monitor and the Computer ON. 4 Press the VIDEO SOURCE button until PC MODE appears on the bottom of Television DC IN DC Adapter ANALOG...
... of the VGA Video cable to the Monitor (video) output on the computer to the ANALOG rear jack panel on the LCD TV Monitor. 2 Although audio connections are not required, the LCD TV Monitor can reproduce the computers audio out by an AUDIO ADAPTER (supplied) to the Audio output jack on the... computer (if available) while connecting the other ends of the Audio cables to the computer audio signal. 3 Turn the LCD TV Monitor and the Computer ON. 4 Press the VIDEO SOURCE button until PC MODE appears on the bottom of Television DC IN DC Adapter ANALOG...

User manual, English (US)
Page 12
... Monitor to know if you to change the LCD TV Monitor's signal input to clear the menu from the screen. When AIR (antenna) is selected, channels 1-125 are 2-69. 12 TV INSTALL SMART SURF ...
... Monitor to know if you to change the LCD TV Monitor's signal input to clear the menu from the screen. When AIR (antenna) is selected, channels 1-125 are 2-69. 12 TV INSTALL SMART SURF ...
User manual, English (US)
Page 13
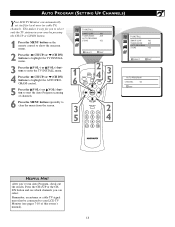
... CH+/UP or the CHDN button and see pages 7-10 of channels. 6 Press the MENU button repeatedly to select only the TV stations in your LCD TV Monitor (see which channels you 've run Auto Program, check out the results. Remember, an antenna or cable TV signal must first be connected... MENU :EXIT HELPFUL HINT After you can automatically set itself for you to clear the menu from the screen. AUTO PROGRAM (SETTING UP CHANNELS) Your LCD TV Monitor can select.
... CH+/UP or the CHDN button and see pages 7-10 of channels. 6 Press the MENU button repeatedly to select only the TV stations in your LCD TV Monitor (see which channels you 've run Auto Program, check out the results. Remember, an antenna or cable TV signal must first be connected... MENU :EXIT HELPFUL HINT After you can automatically set itself for you to clear the menu from the screen. AUTO PROGRAM (SETTING UP CHANNELS) Your LCD TV Monitor can select.
User manual, English (US)
Page 14
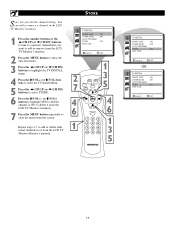
... TUNE :SELECT MENU :EXIT 14 Repeat steps 1-7 to add or delete additional channels to clear the menu from the LCD TV Monitor Monitor's memory. You can add or remove a channel in the LCD TV Monitor's memory. 1 Press the number buttons or the ł(CH UP) or Ń(CH DN) buttons to tune... to a specific channel that you edit the channel listing. Store lets you want to add or remove from the LCD TV Monitor's memory. 2 Press the MENU button to show the onscreen menu. 3 Press the ł(CH UP) or Ń(CH DN) buttons to highlight the...
... TUNE :SELECT MENU :EXIT 14 Repeat steps 1-7 to add or delete additional channels to clear the menu from the LCD TV Monitor Monitor's memory. You can add or remove a channel in the LCD TV Monitor's memory. 1 Press the number buttons or the ł(CH UP) or Ń(CH DN) buttons to tune... to a specific channel that you edit the channel listing. Store lets you want to add or remove from the LCD TV Monitor's memory. 2 Press the MENU button to show the onscreen menu. 3 Press the ł(CH UP) or Ń(CH DN) buttons to highlight the...
User manual, English (US)
Page 16
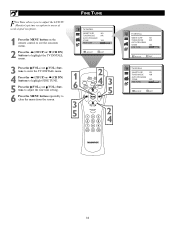
Fine Tune allows you to adjust the LCD TV Monitor's picture reception in areas of weak signal reception. 1 Press the MENU button on the remote control to see the onscreen menu. 2 Press the &#...
Fine Tune allows you to adjust the LCD TV Monitor's picture reception in areas of weak signal reception. 1 Press the MENU button on the remote control to see the onscreen menu. 2 Press the &#...
User manual, English (US)
Page 17
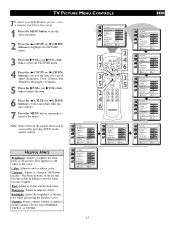
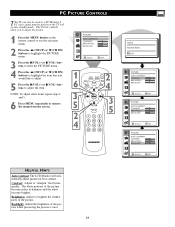
... PICTURE BRIGHTNESS COLOR CONTRAST TINT SHARPNESS BACKLIGHT GAMMA VIVID1 :SELECT MENU :EXIT Choose from NORMAL, VIVID1, or VIVID2. TV PICTURE MENU CONTROLS To adjust your LCD Monitor picture, select a channel and follow these steps. 1 Press the MENU button to see the onscreen menu. 2 Press the ł(CH UP) or Ń(CH...
... PICTURE BRIGHTNESS COLOR CONTRAST TINT SHARPNESS BACKLIGHT GAMMA VIVID1 :SELECT MENU :EXIT Choose from NORMAL, VIVID1, or VIVID2. TV PICTURE MENU CONTROLS To adjust your LCD Monitor picture, select a channel and follow these steps. 1 Press the MENU button to see the onscreen menu. 2 Press the ł(CH UP) or Ń(CH...

User manual, English (US)
Page 18
... the TV is placed in Stereo mode, the sound coming from the TV will remain in Mono mode. TV SOUND MENU CONTROLS To adjust your LCD TV Monitor Sound, select a channel and follow these steps. 1 Press the MENU button to see the menu. 2 Press the ł(CH UP) or Ń(CH...
... the TV is placed in Stereo mode, the sound coming from the TV will remain in Mono mode. TV SOUND MENU CONTROLS To adjust your LCD TV Monitor Sound, select a channel and follow these steps. 1 Press the MENU button to see the menu. 2 Press the ł(CH UP) or Ń(CH...
User manual, English (US)
Page 20
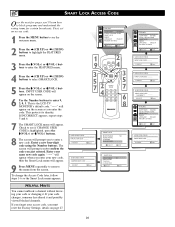
... a new four-digit code using the Number buttons. First, set an access code. 1 Press the MENU button to see if CHANGE USER CODE is the LCD TV MONITOR's default code. INPUT USER CODE will appear. 9 Press MENU repeatedly to enter a new code. The screen will appear. To change the Access Code...
... a new four-digit code using the Number buttons. First, set an access code. 1 Press the MENU button to see if CHANGE USER CODE is the LCD TV MONITOR's default code. INPUT USER CODE will appear. 9 Press MENU repeatedly to enter a new code. The screen will appear. To change the Access Code...

User manual, English (US)
Page 26
...+) or ŀ(VOL-) buttons to turn FREEZE ON or OFF. 6 Press the MENU button repeatedly to write down telephone number or an address? Your new LCD TV Monitor will be shown at present time.
...+) or ŀ(VOL-) buttons to turn FREEZE ON or OFF. 6 Press the MENU button repeatedly to write down telephone number or an address? Your new LCD TV Monitor will be shown at present time.
User manual, English (US)
Page 29
... MENU :EXIT PICTURE AUTO CONTRAST CONTRAST BRIGHTNESS BACKLIGHT :ADJUST MENU :EXIT PICTURE AUTO CONTRAST CONTRAST BRIGHTNESS BACKLIGHT :ADJUST MENU :EXIT HELPFUL HINTS Auto Contrast: The LCD Monitor will go into standby mode. Backlight: Adjust the brightness of the picture become richer in darkness and the white become brighter. The Picture controls...
... MENU :EXIT PICTURE AUTO CONTRAST CONTRAST BRIGHTNESS BACKLIGHT :ADJUST MENU :EXIT PICTURE AUTO CONTRAST CONTRAST BRIGHTNESS BACKLIGHT :ADJUST MENU :EXIT HELPFUL HINTS Auto Contrast: The LCD Monitor will go into standby mode. Backlight: Adjust the brightness of the picture become richer in darkness and the white become brighter. The Picture controls...

User manual, English (US)
Page 30
... HORIZONTAL VERTICAL CLOCK PHASE SHARPNESS : ADJUST MENU :EXIT IMAGE ADJUST AUTO ADJUST HORIZONTAL VERTICAL CLOCK PHASE SHARPNESS : ADJUST MENU :EXIT HELPFUL HINTS Auto Adjust: The LCD Monitor will go into standby mode.
... HORIZONTAL VERTICAL CLOCK PHASE SHARPNESS : ADJUST MENU :EXIT IMAGE ADJUST AUTO ADJUST HORIZONTAL VERTICAL CLOCK PHASE SHARPNESS : ADJUST MENU :EXIT HELPFUL HINTS Auto Adjust: The LCD Monitor will go into standby mode.
User manual, English (US)
Page 33
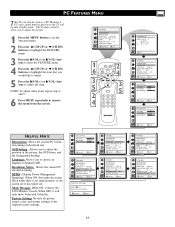
...MENU :EXIT FEATURES INFORMATION OSD SETTING LANGUAGE ENGLISH RESOLUTION NOTICE ON DPMS ON MODE MESSAGE ON FACTORY SETTINGS :SELECT MENU :EXIT INFORMATION MODE : PRESET 15 1024X768 H : + 60.02 KHZ V : + 75 HZ MENU :EXIT FEATURES INFORMATION OSD SETTING LANGUAGE ENGLISH RESOLUTION NOTICE ON DPMS ON ...Factory Settings: Reverts all picture, sound, color, and feature settings to remove the menu from the screen. When OFF, it shows the LCD Monitor's mode. DPMS: (Display Power Management Signaling) When ON, this make the screen black when there is no signal present, or ...
...MENU :EXIT FEATURES INFORMATION OSD SETTING LANGUAGE ENGLISH RESOLUTION NOTICE ON DPMS ON MODE MESSAGE ON FACTORY SETTINGS :SELECT MENU :EXIT INFORMATION MODE : PRESET 15 1024X768 H : + 60.02 KHZ V : + 75 HZ MENU :EXIT FEATURES INFORMATION OSD SETTING LANGUAGE ENGLISH RESOLUTION NOTICE ON DPMS ON ...Factory Settings: Reverts all picture, sound, color, and feature settings to remove the menu from the screen. When OFF, it shows the LCD Monitor's mode. DPMS: (Display Power Management Signaling) When ON, this make the screen black when there is no signal present, or ...


