User manual, English (US)
Page 2
... comprehensive warranties and outstanding service networks in your household, please do everything in the event of product theft or loss. t This "bolt of your MAGNAVOX warranty. Model No Serial No Visit our World Wide Web Site at once. For Customer Use Enter below the Serial No. ATTENTION: Pour éviter les choc électriques, introduire la lame la plus easy access...
... comprehensive warranties and outstanding service networks in your household, please do everything in the event of product theft or loss. t This "bolt of your MAGNAVOX warranty. Model No Serial No Visit our World Wide Web Site at once. For Customer Use Enter below the Serial No. ATTENTION: Pour éviter les choc électriques, introduire la lame la plus easy access...
User manual, English (US)
Page 3
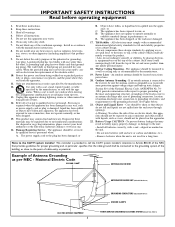
... combination to the unit: • Install all servicing to rain or moisture, does not operate normally, or has been dropped. 15. Do not use attachments/accessories specified by qualified service personnel when: A. Only use this apparatus during lightning storms or when unused for replacement of the obsolete outlet. 10. The power supply cord or the plug has been damaged; The appliance does...
... combination to the unit: • Install all servicing to rain or moisture, does not operate normally, or has been dropped. 15. Do not use attachments/accessories specified by qualified service personnel when: A. Only use this apparatus during lightning storms or when unused for replacement of the obsolete outlet. 10. The power supply cord or the plug has been damaged; The appliance does...

User manual, English (US)
Page 4
... and Remote Control Operations 5 Description of Remote Control Buttons 6 Antenna Connection 7 Basic Cable TV Connection 7 Cable Box Connections 8 Using the Audio/Video Input Connections 9 S-Video Jack Connections 10 PC (Monitor) Connections 11 Install Menu How to use the Tuner Mode Control 12 How to Auto Program TV Channels 13 How to Add or Delete Channels (Store 14 How to use SmartSurf (Alternate Channel 15 Fine Tune 16 Picture Menu How to use the Picture Adjustment Controls . . . . .17 Sound Menu How to use the Language Control 27 Resetting the Factory Settings 28 PC Mode PC...
... and Remote Control Operations 5 Description of Remote Control Buttons 6 Antenna Connection 7 Basic Cable TV Connection 7 Cable Box Connections 8 Using the Audio/Video Input Connections 9 S-Video Jack Connections 10 PC (Monitor) Connections 11 Install Menu How to use the Tuner Mode Control 12 How to Auto Program TV Channels 13 How to Add or Delete Channels (Store 14 How to use SmartSurf (Alternate Channel 15 Fine Tune 16 Picture Menu How to use the Picture Adjustment Controls . . . . .17 Sound Menu How to use the Language Control 27 Resetting the Factory Settings 28 PC Mode PC...
User manual, English (US)
Page 5
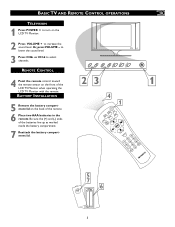
REMOTE CONTROL MENU AUDIO INPU T VOL. CH. 4 Point the remote control toward the remote sensor on the front of the remote. 1 6 Place two AAA batteries in the remote. BATTERY INSTALLATION 4 5 Remove the battery compartment lid on the back of the 23 1 LCD TV Monitor when operating the LCD TV Monitor with the remote. BASIC TV AND REMOTE CONTROL OPERATIONS TELEVISION 1 Press POWER y to turn on the LCD TV Monitor. 2 Press VOLUME + to select channels. Or, press VOLUME - Be sure the...
REMOTE CONTROL MENU AUDIO INPU T VOL. CH. 4 Point the remote control toward the remote sensor on the front of the remote. 1 6 Place two AAA batteries in the remote. BATTERY INSTALLATION 4 5 Remove the battery compartment lid on the back of the 23 1 LCD TV Monitor when operating the LCD TV Monitor with the remote. BASIC TV AND REMOTE CONTROL OPERATIONS TELEVISION 1 Press POWER y to turn on the LCD TV Monitor. 2 Press VOLUME + to select channels. Or, press VOLUME - Be sure the...
User manual, English (US)
Page 6
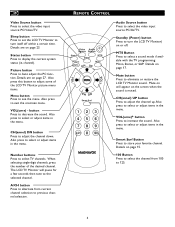
... a sound mode if available with the TV programming: Mono, Stereo, or SAP. Status button Press to exit the onscreen menu. Details are on page 27. Also press this button to see the menu. Also press to turn itself off . Also press to display the current system status (ie, channel). Number buttons Press to select the video input source: PC/AV/TV. REMOTE CONTROL Audio Source button Press to select TV channels. Standby (Power) button...
... a sound mode if available with the TV programming: Mono, Stereo, or SAP. Status button Press to exit the onscreen menu. Details are on page 27. Also press this button to see the menu. Also press to turn itself off . Also press to display the current system status (ie, channel). Number buttons Press to select the video input source: PC/AV/TV. REMOTE CONTROL Audio Source button Press to select TV channels. Standby (Power) button...
User manual, English (US)
Page 7
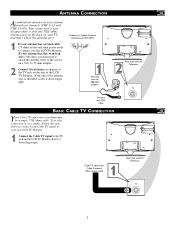
... new LCD TV Monitor. 1 Connect the Cable TV signal to 300-75Ω adapter Antenna with 75Ω cable TV S-VIDEO VIDEO DC IN ANALOG 1 2 AUDIO OUT AUDIO Rear Jack panel of your TV, and that's where the antenna goes. 1 If your antenna has a round cable (75 ohm) on the rear of Television TV 7 to 75-ohm adapter. 2 Connect the antenna (or adapter) to the TV jack on the end, then you first need to...
... new LCD TV Monitor. 1 Connect the Cable TV signal to 300-75Ω adapter Antenna with 75Ω cable TV S-VIDEO VIDEO DC IN ANALOG 1 2 AUDIO OUT AUDIO Rear Jack panel of your TV, and that's where the antenna goes. 1 If your antenna has a round cable (75 ohm) on the rear of Television TV 7 to 75-ohm adapter. 2 Connect the antenna (or adapter) to the TV jack on the end, then you first need to...
User manual, English (US)
Page 8
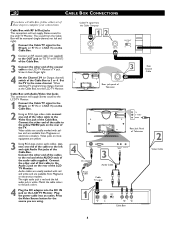
CABLE BOX CONNECTIONS If you are available from the Cable Box will not supply Stereo sound to the same channel. Connect the other end of the cables to the red and white AUDIO ends of Television 4 DC IN DC Adapter ANALOG 3 1 2 AUDIO AUDIO OUT Audio Cable Power Cable Cable TV signal 2 Video Cable 1 OUTPUT CH 3 4 CABLE TO IN TV L R AUDIO VIDEO OUT OUT Cable Box 8 Video cables are usually marked with red and white and are yellow. 3 Using RCA-type, stereo audio cables, connect one end of the video cable to the jack colors. 4 Plug the...
CABLE BOX CONNECTIONS If you are available from the Cable Box will not supply Stereo sound to the same channel. Connect the other end of the cables to the red and white AUDIO ends of Television 4 DC IN DC Adapter ANALOG 3 1 2 AUDIO AUDIO OUT Audio Cable Power Cable Cable TV signal 2 Video Cable 1 OUTPUT CH 3 4 CABLE TO IN TV L R AUDIO VIDEO OUT OUT Cable Box 8 Video cables are usually marked with red and white and are yellow. 3 Using RCA-type, stereo audio cables, connect one end of the video cable to the jack colors. 4 Plug the...
User manual, English (US)
Page 9
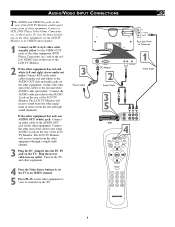
..., stereo audio out jacks: Connect RCA-style audio cables (usually red and white) to the AUDIO OUT (left and right sound channels). VIDEO VIDEO Rear Jack Panel of Television DC IN ANALOG DC Adapter 2 Audio Cable 3 5 1 2 AUDIO OUT AUDIO 1 Video Cable DVD 4 4 Press the Video Source buttons to set the LCD TV Monitor to these jacks. AUDIO/VIDEO INPUT CONNECTIONS The AUDIO and VIDEO In jacks on the rear of the LCD TV Monitor enable quick connections of the LCD TV Monitor. Turn on the other equipment. 3 Power Cable TV S-VIDEO VIDEO DC IN ANALOG 1 2 AUDIO OUT AUDIO TV...
..., stereo audio out jacks: Connect RCA-style audio cables (usually red and white) to the AUDIO OUT (left and right sound channels). VIDEO VIDEO Rear Jack Panel of Television DC IN ANALOG DC Adapter 2 Audio Cable 3 5 1 2 AUDIO OUT AUDIO 1 Video Cable DVD 4 4 Press the Video Source buttons to set the LCD TV Monitor to these jacks. AUDIO/VIDEO INPUT CONNECTIONS The AUDIO and VIDEO In jacks on the rear of the LCD TV Monitor enable quick connections of the LCD TV Monitor. Turn on the other equipment. 3 Power Cable TV S-VIDEO VIDEO DC IN ANALOG 1 2 AUDIO OUT AUDIO TV...
User manual, English (US)
Page 10
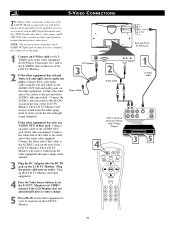
... a source change. 5 Press PLAY on the other equipment to view its material on the other equipment. VIDEO VIDEO Rear Jack Panel of accessory sources such as DBS (digital broadcast satellite), DVD (digital video discs), video games, and SVHS VCR (video cassette recorder) tapes than the normal antenna picture connections. Video Cable Power Cable VCR or External Accessory Device (with better picture detail and clarity for the playback of Television DC IN DC Adapter 3 ANALOG 2 1 2 AUDIO OUT AUDIO Audio Cable 1 S- The LCD TV Monitor will receive sound...
... a source change. 5 Press PLAY on the other equipment to view its material on the other equipment. VIDEO VIDEO Rear Jack Panel of accessory sources such as DBS (digital broadcast satellite), DVD (digital video discs), video games, and SVHS VCR (video cassette recorder) tapes than the normal antenna picture connections. Video Cable Power Cable VCR or External Accessory Device (with better picture detail and clarity for the playback of Television DC IN DC Adapter 3 ANALOG 2 1 2 AUDIO OUT AUDIO Audio Cable 1 S- The LCD TV Monitor will receive sound...
User manual, English (US)
Page 11
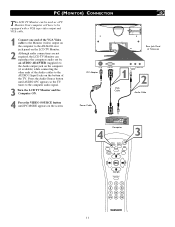
... connecting the other ends of the Audio cables to the AUDIO 1 Input Jacks on the screen. Your computer will have to the computer audio signal. 3 Turn the LCD TV Monitor and the Computer ON. 4 Press the VIDEO SOURCE button until PC MODE appears on the bottom of Television DC IN DC Adapter ANALOG 1 1 2 AUDIO OUT AUDIO 2 VGA Cable Audio Cable Power Cable Computer 4 3 11 TV S-VIDEO VIDEO DC IN ANALOG 1 2 AUDIO OUT AUDIO Rear Jack Panel of the TV. Press the Audio Source button until...
... connecting the other ends of the Audio cables to the AUDIO 1 Input Jacks on the screen. Your computer will have to the computer audio signal. 3 Turn the LCD TV Monitor and the Computer ON. 4 Press the VIDEO SOURCE button until PC MODE appears on the bottom of Television DC IN DC Adapter ANALOG 1 1 2 AUDIO OUT AUDIO 2 VGA Cable Audio Cable Power Cable Computer 4 3 11 TV S-VIDEO VIDEO DC IN ANALOG 1 2 AUDIO OUT AUDIO Rear Jack Panel of the TV. Press the Audio Source button until...

User manual, English (US)
Page 12
... for the LCD TV Monitor to know if you to change the LCD TV Monitor's signal input to clear the menu from the screen. HOW TO USE THE TUNER MODE The TUNER MODE allows you want to receive channels from a cable TV signal or an antenna signal. 1 Press the MENU button on the remote control to see the onscreen menu. 2 Press the ł(CH UP) or Ń(CH DN) buttons to highlight the TV INSTALL menu. 3 Press the...
... for the LCD TV Monitor to know if you to change the LCD TV Monitor's signal input to clear the menu from the screen. HOW TO USE THE TUNER MODE The TUNER MODE allows you want to receive channels from a cable TV signal or an antenna signal. 1 Press the MENU button on the remote control to see the onscreen menu. 2 Press the ł(CH UP) or Ń(CH DN) buttons to highlight the TV INSTALL menu. 3 Press the...
User manual, English (US)
Page 13
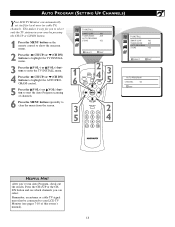
... (or cable TV) channels. AUTO PROGRAM (SETTING UP CHANNELS) Your LCD TV Monitor can select. Press the CH+/UP or the CHDN button and see pages 7-10 of channels. 6 Press the MENU button repeatedly to clear the menu from the screen. Remember, an antenna or cable TV signal must first be connected to your area by pressing the CH UP or CH DN button. 1 Press the MENU button on the remote control to...
... (or cable TV) channels. AUTO PROGRAM (SETTING UP CHANNELS) Your LCD TV Monitor can select. Press the CH+/UP or the CHDN button and see pages 7-10 of channels. 6 Press the MENU button repeatedly to clear the menu from the screen. Remember, an antenna or cable TV signal must first be connected to your area by pressing the CH UP or CH DN button. 1 Press the MENU button on the remote control to...
User manual, English (US)
Page 15
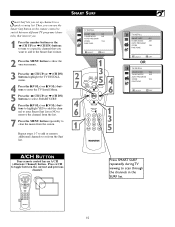
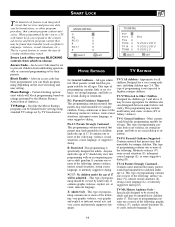
... TV INSTALL SMART SURF YES TUNER MODE AIR AUTO PROGRAM STORE YES FINE TUNE :SELECT MENU :EXIT A/CH BUTTON Your remote control has an A/CH (Alternate Channel) button. Press A/CH to toggle between different TV programs (channels) that interest you. 1 Press the number buttons or the ł(CH UP) or Ń(CH DN) buttons to tune to a specific channel that you can use the Smart Surf button on the remote control to switch...
... TV INSTALL SMART SURF YES TUNER MODE AIR AUTO PROGRAM STORE YES FINE TUNE :SELECT MENU :EXIT A/CH BUTTON Your remote control has an A/CH (Alternate Channel) button. Press A/CH to toggle between different TV programs (channels) that interest you. 1 Press the number buttons or the ł(CH UP) or Ń(CH DN) buttons to tune to a specific channel that you can use the Smart Surf button on the remote control to switch...

User manual, English (US)
Page 18
... item. 6 Press the ł(CH UP) or Ń(CH DN) buttons to select and adjust other sound controls. 7 Press MENU to enhance the high frequency sounds. SOUND TREBLE BASS BALANCE SOUND MODE MONO :ADJUST MENU :EXIT 1 7 2 4 6 3 3 5 5 2 4 6 HELPFUL HINTS Treble: Adjust to remove the menu. Balance: Adjusts the level of sounds coming from the left and right speakers. NOTE: If stereo is not present on a selected show and the...
... item. 6 Press the ł(CH UP) or Ń(CH DN) buttons to select and adjust other sound controls. 7 Press MENU to enhance the high frequency sounds. SOUND TREBLE BASS BALANCE SOUND MODE MONO :ADJUST MENU :EXIT 1 7 2 4 6 3 3 5 5 2 4 6 HELPFUL HINTS Treble: Adjust to remove the menu. Balance: Adjusts the level of sounds coming from the left and right speakers. NOTE: If stereo is not present on a selected show and the...
User manual, English (US)
Page 19
... 17 will block programming based on the received rating and user setting. X: Adults Only - This type of programming con- Most parents would find unsuitable for younger children. This type of programming con- under the age of the following : intense violence, TV-14 Parents Strongly Cautioned - It contains graphic violence, explicit sex, or crude, indecent language. An Access Code must be set to frighten younger...
... 17 will block programming based on the received rating and user setting. X: Adults Only - This type of programming con- Most parents would find unsuitable for younger children. This type of programming con- under the age of the following : intense violence, TV-14 Parents Strongly Cautioned - It contains graphic violence, explicit sex, or crude, indecent language. An Access Code must be set to frighten younger...
User manual, English (US)
Page 20
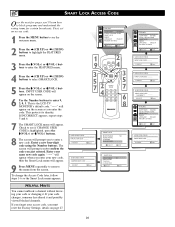
... SMART LOCK ACCESS CODE Over the next few pages you must reset the Factory Settings, details on page 27. First, set an access code. 1 Press the MENU button to enter a new code. "----" will appear. This protects its identity. Enter your code changes, someone has altered it . FEATURES SLEEP TIMER 00 MINS CLOSED CAPTION NONE SMART LOCK FREEZE LANGUAGE ENGLISH FACTORY SETTINGS :SELECT MENU :EXIT 1 2 9 4 3 3 5 7 2 4 5 7 6 8 USER CODE CHECK INPUT USER CODE : _ _ _ _ 0-9:INPUT MENU :EXIT USER CODE CHECK CONFIRM NEW CODE : _ _ _ _ 0-9:INPUT MENU :EXIT SMART LOCK...
... SMART LOCK ACCESS CODE Over the next few pages you must reset the Factory Settings, details on page 27. First, set an access code. 1 Press the MENU button to enter a new code. "----" will appear. This protects its identity. Enter your code changes, someone has altered it . FEATURES SLEEP TIMER 00 MINS CLOSED CAPTION NONE SMART LOCK FREEZE LANGUAGE ENGLISH FACTORY SETTINGS :SELECT MENU :EXIT 1 2 9 4 3 3 5 7 2 4 5 7 6 8 USER CODE CHECK INPUT USER CODE : _ _ _ _ 0-9:INPUT MENU :EXIT USER CODE CHECK CONFIRM NEW CODE : _ _ _ _ 0-9:INPUT MENU :EXIT SMART LOCK...

User manual, English (US)
Page 23
SMART LOCK - FEATURES SLEEP TIMER 00 MINS CLOSE CAPTION NONE SMART LOCK FREEZE LANGUAGE ENGLISH FACTORY SETTINGS :SELECT MENU :EXIT 3 Press the Ł(VOL+) or ŀ(VOL-) buttons to enter the FEATURES menu. 4 Press the ł(CH UP) or Ń(CH DN) buttons to highlight Smart Lock. 5 Press the Ł(VOL+) or ŀ(VOL-) buttons buttons, INPUT USER CODE 1 9 will appear on the screen. 6 Use the Number buttons to enter your access code and the...
SMART LOCK - FEATURES SLEEP TIMER 00 MINS CLOSE CAPTION NONE SMART LOCK FREEZE LANGUAGE ENGLISH FACTORY SETTINGS :SELECT MENU :EXIT 3 Press the Ł(VOL+) or ŀ(VOL-) buttons to enter the FEATURES menu. 4 Press the ł(CH UP) or Ń(CH DN) buttons to highlight Smart Lock. 5 Press the Ł(VOL+) or ŀ(VOL-) buttons buttons, INPUT USER CODE 1 9 will appear on the screen. 6 Use the Number buttons to enter your access code and the...
User manual, English (US)
Page 28
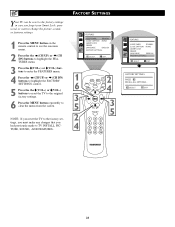
...highlight the FACTORY SETTINGS control. 5 Press the the Ł(VOL+) or ŀ(VOL-) buttons to reset the TV to the original factory settings. 6 Press the MENU button repeatedly to TV INSTALL, PICTURE, SOUND, AND FEATURES. FACTORY SETTINGS FEATURES SLEEP TIMER 00 MINS CLOSE CAPTION NONE SMART LOCK FREEZE LANGUAGE ENGLISH FACTORY SETTINGS :SELECT MENU :EXIT 1 2 6 4 3 5 2 3 5 4 FEATURES SLEEP TIMER 00 MINS CLOSE CAPTION NONE SMART LOCK FREEZE LANGUAGE ENGLISH FACTORY SETTINGS :SELECT MENU :EXIT FACTORY SETTINGS PRESS RECALL ALL SETTINGS... :SELECT MENU :EXIT 28...
...highlight the FACTORY SETTINGS control. 5 Press the the Ł(VOL+) or ŀ(VOL-) buttons to reset the TV to the original factory settings. 6 Press the MENU button repeatedly to TV INSTALL, PICTURE, SOUND, AND FEATURES. FACTORY SETTINGS FEATURES SLEEP TIMER 00 MINS CLOSE CAPTION NONE SMART LOCK FREEZE LANGUAGE ENGLISH FACTORY SETTINGS :SELECT MENU :EXIT 1 2 6 4 3 5 2 3 5 4 FEATURES SLEEP TIMER 00 MINS CLOSE CAPTION NONE SMART LOCK FREEZE LANGUAGE ENGLISH FACTORY SETTINGS :SELECT MENU :EXIT FACTORY SETTINGS PRESS RECALL ALL SETTINGS... :SELECT MENU :EXIT 28...
User manual, English (US)
Page 35
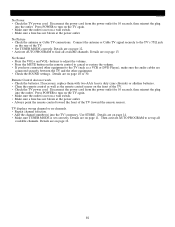
... a wall switch. • Make sure a fuse has not blown at the power outlet. • Always point the remote control toward the remote sensor). Details are on page 13. Details are on page 14. • Make sure TUNER MODE is not on the remote control to cancel or restore the volume. • If you have connected other equipment to set correctly. Connect the antenna or Cable TV signal securely...
... a wall switch. • Make sure a fuse has not blown at the power outlet. • Always point the remote control toward the remote sensor). Details are on page 13. Details are on page 14. • Make sure TUNER MODE is not on the remote control to cancel or restore the volume. • If you have connected other equipment to set correctly. Connect the antenna or Cable TV signal securely...
User manual, English (US)
Page 37
... Video In jack 8-9 Warranty 40 Welcome 2 Cable Box Connections 8 Cable TV Connection 7 Care and Cleaning 36 Channel Edit (Store 14 Closed Captions 25 Color 17, 32 Color Temperature 17 Factory Service Information 39-40 Factory Settings 28, 33 Fine Tune 16 Freeze 26 Index 37 Language 27, 33 Limited Warranty 40 Mono 18 No Rating 19 PC (Monitor) Connection 11 Picture Adjustments 17 Registration 2 Remote Control Buttons 6 Remote Control Operation (Basic 5 Safety Instructions 3 Sharpness 17, 30 Sleep Timer 24 SmartLock Access Code...
... Video In jack 8-9 Warranty 40 Welcome 2 Cable Box Connections 8 Cable TV Connection 7 Care and Cleaning 36 Channel Edit (Store 14 Closed Captions 25 Color 17, 32 Color Temperature 17 Factory Service Information 39-40 Factory Settings 28, 33 Fine Tune 16 Freeze 26 Index 37 Language 27, 33 Limited Warranty 40 Mono 18 No Rating 19 PC (Monitor) Connection 11 Picture Adjustments 17 Registration 2 Remote Control Buttons 6 Remote Control Operation (Basic 5 Safety Instructions 3 Sharpness 17, 30 Sleep Timer 24 SmartLock Access Code...


