
User manual, English (US)
Page 1
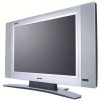
Owner`s Manual 26MF605W/32MF605W Series LCD TV NEED HELP?CALL US! CALL US BEFORE YOU CONSIDER RETURNING THE PRODUCT. 1- 80 0 -705 -20 0 0 OR VISIT US ON THE WEB AT WWW.MAGNAVOX.COM MAG-26_eng 0104.indd 1 Important! MAGNAVOX REPRESENTATIVES ARE READY TO HELP YOU WITH ANY QUESTIONS ABOUT YOUR NEW PRODUCT. Return your Warranty Registration Card within 10 days. 3138 155 23442 1/6/2005 10:30:32 WE WANT YOU TO START ENJOYING YOUR NEW PRODUCT RIGHT AWAY. WE CAN GUIDE YOU THROUGH CONNECTIONS, FIRST-TIME SETUP, AND ANY OF THE FEATURES.
Owner`s Manual 26MF605W/32MF605W Series LCD TV NEED HELP?CALL US! CALL US BEFORE YOU CONSIDER RETURNING THE PRODUCT. 1- 80 0 -705 -20 0 0 OR VISIT US ON THE WEB AT WWW.MAGNAVOX.COM MAG-26_eng 0104.indd 1 Important! MAGNAVOX REPRESENTATIVES ARE READY TO HELP YOU WITH ANY QUESTIONS ABOUT YOUR NEW PRODUCT. Return your Warranty Registration Card within 10 days. 3138 155 23442 1/6/2005 10:30:32 WE WANT YOU TO START ENJOYING YOUR NEW PRODUCT RIGHT AWAY. WE CAN GUIDE YOU THROUGH CONNECTIONS, FIRST-TIME SETUP, AND ANY OF THE FEATURES.
User manual, English (US)
Page 4
... new LCD TV. On-screen Menus: Helpful messages (in and disposed of available channels. Remote Control: Works your children viewing inappropriate material. Audio/Video In Jacks: Use to quickly connect other Video Devices with Component Video Connectors 12 Digital TV Receiver, or a Digital Satellite Receiver with HD (High...and Smart Sound Smart Picture Control 22 Smart Sound Control 22 Picture Menu TV Picture Menu Controls 23 Sound Menu TV Sound Menu Controls 24 Features Menu Auto Lock 25 Auto Lock Access Code 26 Auto Lock Program 27 Auto Lock - This is normal and does not...
... new LCD TV. On-screen Menus: Helpful messages (in and disposed of available channels. Remote Control: Works your children viewing inappropriate material. Audio/Video In Jacks: Use to quickly connect other Video Devices with Component Video Connectors 12 Digital TV Receiver, or a Digital Satellite Receiver with HD (High...and Smart Sound Smart Picture Control 22 Smart Sound Control 22 Picture Menu TV Picture Menu Controls 23 Sound Menu TV Sound Menu Controls 24 Features Menu Auto Lock 25 Auto Lock Access Code 26 Auto Lock Program 27 Auto Lock - This is normal and does not...

User manual, English (US)
Page 5
... jacks Connects to the component video connectors of heat. .Do not place the LCD TV where it can be exposed to your DVD player or other video equipments that supports YPbPr HD (High Definition) video equipment. Place the LCD TV on a solid, stable surface. IDENTIFYING ALL CONNECTORS (BACKSIDE) 7 89 10 6 3 1 2 5 4 1 AV IN 1 Connects...
... jacks Connects to the component video connectors of heat. .Do not place the LCD TV where it can be exposed to your DVD player or other video equipments that supports YPbPr HD (High Definition) video equipment. Place the LCD TV on a solid, stable surface. IDENTIFYING ALL CONNECTORS (BACKSIDE) 7 89 10 6 3 1 2 5 4 1 AV IN 1 Connects...

User manual, English (US)
Page 6
...Place the set facing down on the wall, please consult a professional technician for proper installing. Your LCD TV is now ready for installations not performed by professional technician. 100x100mm 200x100mm 26" MAG-26_eng 0104.indd 6 32" 6 1/6/2005 10:30:36 The manufacture accepts no liability for... wall mounting. Grasp the base and pull it out. 4 Attach the supplied base cover. When installing the LCD TV on a flat surface ...
...Place the set facing down on the wall, please consult a professional technician for proper installing. Your LCD TV is now ready for installations not performed by professional technician. 100x100mm 200x100mm 26" MAG-26_eng 0104.indd 6 32" 6 1/6/2005 10:30:36 The manufacture accepts no liability for... wall mounting. Grasp the base and pull it out. 4 Attach the supplied base cover. When installing the LCD TV on a flat surface ...

User manual, English (US)
Page 7
to select channels. 4 Point the remote control toward on the front of the LCD TV when operating the LCD TV with the remote. 2 3 1 4 BATTERY INSTALLATION 5 Remove the battery compartment lid on the LCD TV. 2 Press VOLUME + to increase the sound level. Be sure the (+) and (-) ends of the batteries line up as marked inside the battery compartment...
to select channels. 4 Point the remote control toward on the front of the LCD TV when operating the LCD TV with the remote. 2 3 1 4 BATTERY INSTALLATION 5 Remove the battery compartment lid on the LCD TV. 2 Press VOLUME + to increase the sound level. Be sure the (+) and (-) ends of the batteries line up as marked inside the battery compartment...

User manual, English (US)
Page 8
...go to eliminate or restore the LCD TV sound. Mute will pause for a few seconds then tune to the selected channel. Mute button Press to previously selected channel. Source button Press to select the video input source: PC, DV1, AV1, AV2, AV3, S-V1, S-V2, Component, HD OK button Press to select either..., Stereo, or SAP. 8 MAG-26_eng 0104.indd 8 1/6/2005 10:30:37 SAP button Press to adjust the channel up /down . The LCD TV will appear on or off. Picture Format button Press the FORMAT button repeatedly to turn itself off . REMOTE CONTROL MENU OK SOURCE PIP CC Standby ...
...go to eliminate or restore the LCD TV sound. Mute will pause for a few seconds then tune to the selected channel. Mute button Press to previously selected channel. Source button Press to select the video input source: PC, DV1, AV1, AV2, AV3, S-V1, S-V2, Component, HD OK button Press to select either..., Stereo, or SAP. 8 MAG-26_eng 0104.indd 8 1/6/2005 10:30:37 SAP button Press to adjust the channel up /down . The LCD TV will appear on or off. Picture Format button Press the FORMAT button repeatedly to turn itself off . REMOTE CONTROL MENU OK SOURCE PIP CC Standby ...
User manual, English (US)
Page 9
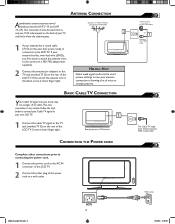
... POWER CORD Complete other connections prior to connecting the power cord. 1 Connect the power cord to the AC IN connector of the LCD TV. 2 Connect the other plug of the LCD TV. If the end of the antenna wire is only one 75 Ω antenna jack on the rear of the power cord to... Acombination antenna receives normal broadcast channels (VHF 2-13 and UHF 14-69). Follow the step below to connect your Cable TV signal to your new LCD TV. 1 Connect the cable TV signal to the TV jack (marked 75 Ω) on the end, then you first need to attach the antenna wires to the screws...
... POWER CORD Complete other connections prior to connecting the power cord. 1 Connect the power cord to the AC IN connector of the LCD TV. 2 Connect the other plug of the LCD TV. If the end of the antenna wire is only one 75 Ω antenna jack on the rear of the power cord to... Acombination antenna receives normal broadcast channels (VHF 2-13 and UHF 14-69). Follow the step below to connect your Cable TV signal to your new LCD TV. 1 Connect the cable TV signal to the TV jack (marked 75 Ω) on the end, then you first need to attach the antenna wires to the screws...

User manual, English (US)
Page 10
... connections. Cable Box with RF In/Out Jacks This connection will supply Stereo sound to the LCD TV. 1 Connect the Cable TV signal to the IN jack (or RF IN or CABLE IN) on the rear of the LCD TV. 4 Set the Channel (or Output channel) switch of the Cable Box to 3 or 4. Set the... these steps to complete your Cable Box is equipped with AV (Audio/Video) Out Jacks This connection will not supply Stereo sound to the LCD TV. 1 Connect the Cable TV signal to the IN jack (or RF IN or CABLE IN) on the Cable Box. 2 Connect an RF coaxial cable (not supplied) to...
... connections. Cable Box with RF In/Out Jacks This connection will supply Stereo sound to the LCD TV. 1 Connect the Cable TV signal to the IN jack (or RF IN or CABLE IN) on the rear of the LCD TV. 4 Set the Channel (or Output channel) switch of the Cable Box to 3 or 4. Set the... these steps to complete your Cable Box is equipped with AV (Audio/Video) Out Jacks This connection will not supply Stereo sound to the LCD TV. 1 Connect the Cable TV signal to the IN jack (or RF IN or CABLE IN) on the Cable Box. 2 Connect an RF coaxial cable (not supplied) to...
User manual, English (US)
Page 11
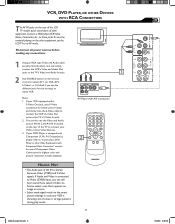
...RCA-type Video and Audio cable (usually marked yellow, red, and white), connect the VCR's Video and Audio Out jacks to the TV's Video and Audio In jacks. 2 Use SOURCE button on the remote control to select AV 1 (or AV2, AV3, S-Video1,...a DVD player,VCR Video Game, Camcorder, etc., to these jacks.To view the material playing on the rear of the LCD TV enable quick connections of noise or strange patterns during play mode. 11 MAG-26_eng 0104.indd 11 1/6/2005 10:30:39 ... OTHER DEVICES WITH RCA CONNECTORS T he AV IN jacks on the other equipment, set the LCD TV to the TV's S-Video In jacks. 2.
...RCA-type Video and Audio cable (usually marked yellow, red, and white), connect the VCR's Video and Audio Out jacks to the TV's Video and Audio In jacks. 2 Use SOURCE button on the remote control to select AV 1 (or AV2, AV3, S-Video1,...a DVD player,VCR Video Game, Camcorder, etc., to these jacks.To view the material playing on the rear of the LCD TV enable quick connections of noise or strange patterns during play mode. 11 MAG-26_eng 0104.indd 11 1/6/2005 10:30:39 ... OTHER DEVICES WITH RCA CONNECTORS T he AV IN jacks on the other equipment, set the LCD TV to the TV's S-Video In jacks. 2.

User manual, English (US)
Page 14
... supported by Hollywood, satellite providers, and most of your PC to LCD TV via DVI connection, since the LCD TV may cause difficulties for the consumer to utilize the full bandwidth of your HD device (e.g. DVI HDCP technology allows content providers the ability to view high... is not recommended to connect your HD device and to watch the programs. Note: 1. Disconnect all power sources before making any connections. 1 Connect the digital DVI output of high definition signals. DIGITAL SATELLITE RECEIVER WITH DVI CONNECTOR Your LCD TV offers Digital Video Interface (DVI)...
... supported by Hollywood, satellite providers, and most of your PC to LCD TV via DVI connection, since the LCD TV may cause difficulties for the consumer to utilize the full bandwidth of your HD device (e.g. DVI HDCP technology allows content providers the ability to view high... is not recommended to connect your HD device and to watch the programs. Note: 1. Disconnect all power sources before making any connections. 1 Connect the digital DVI output of high definition signals. DIGITAL SATELLITE RECEIVER WITH DVI CONNECTOR Your LCD TV offers Digital Video Interface (DVI)...

User manual, English (US)
Page 15
If possible, use your LCD TV as a PC monitor. Use the PC IN connections. 2 Using a MINI-JACK type AUDIO cable (not supplied), connect the PC's AUDIO OUT connector to equipped with a VGA type video output and VGA cable. Your computer will have to the AUDIO connector on the TV. Please refer to "Setting Up... connections. 3 Use Source button on the remote control to select PC to use the 1280 x 720@60Hz video mode to the VGA connector on the TV. Note: 1. Disconnect all the supported PC display modes. PC (MONITOR) CONNECTION T his LCD TV can be used as a PC monitor.
If possible, use your LCD TV as a PC monitor. Use the PC IN connections. 2 Using a MINI-JACK type AUDIO cable (not supplied), connect the PC's AUDIO OUT connector to equipped with a VGA type video output and VGA cable. Your computer will have to the AUDIO connector on the TV. Please refer to "Setting Up... connections. 3 Use Source button on the remote control to select PC to use the 1280 x 720@60Hz video mode to the VGA connector on the TV. Note: 1. Disconnect all the supported PC display modes. PC (MONITOR) CONNECTION T his LCD TV can be used as a PC monitor.

User manual, English (US)
Page 18
...;When CABLE is selected, channels 1-125 are available. •When ANTENNA is selected, channels 2-69 are available. •When AUTO is selected, your LCD TV to the TV MODE. 1 Press the Menu MENU button to see the onscreen menu. � 2 Press the (CH-) INSTALL menu. button to highlight the �...indd 18 1/6/2005 10:30:43 Before making adjustment, press SOURCE button on your remote control to switch your LCD TV will search automatically for the LCD TV to know if you to change the LCD TV's signal input to Cable or Air (antenna). button to enter the 4 Press the (CH-) button to...
...;When CABLE is selected, channels 1-125 are available. •When ANTENNA is selected, channels 2-69 are available. •When AUTO is selected, your LCD TV to the TV MODE. 1 Press the Menu MENU button to see the onscreen menu. � 2 Press the (CH-) INSTALL menu. button to highlight the �...indd 18 1/6/2005 10:30:43 Before making adjustment, press SOURCE button on your remote control to switch your LCD TV will search automatically for the LCD TV to know if you to change the LCD TV's signal input to Cable or Air (antenna). button to enter the 4 Press the (CH-) button to...

User manual, English (US)
Page 19
...START? 0 3 19 MAG-26_eng 0104.indd 19 1/6/2005 10:30:44 AUTO PROGRAM (SETTING UP CHANNELS) Your LCD TV can select. HELPFUL HINT After you to select only the TV stations in your LCD TV (see pages 9-10 of channels. 6 Press the MENU MENU button repeatedly to start the AUTO PROGRAM scanning of this... owner's manual). Remember, an antenna or cable TV signal must first be connected to your area...
...START? 0 3 19 MAG-26_eng 0104.indd 19 1/6/2005 10:30:44 AUTO PROGRAM (SETTING UP CHANNELS) Your LCD TV can select. HELPFUL HINT After you to select only the TV stations in your LCD TV (see pages 9-10 of channels. 6 Press the MENU MENU button repeatedly to start the AUTO PROGRAM scanning of this... owner's manual). Remember, an antenna or cable TV signal must first be connected to your area...

User manual, English (US)
Page 20
You can add or remove a channel in the LCD TV's memory. 1 Press the Menu MENU button to highlight the CHANNEL EDIT menu. button to highlight the MAIN CONTROLS PICTURE AUDIO FEATURES INSTALL LANGUAGE TUNER MODE ... add or delete additional channels to or from the screen. CHANNEL EDIT CONTROL Channel Edit control lets you wish to clear the menu from the LCD TV's memory. 20 MAG-26_eng 0104.indd 20 1/6/2005 10:30:45
You can add or remove a channel in the LCD TV's memory. 1 Press the Menu MENU button to highlight the CHANNEL EDIT menu. button to highlight the MAIN CONTROLS PICTURE AUDIO FEATURES INSTALL LANGUAGE TUNER MODE ... add or delete additional channels to or from the screen. CHANNEL EDIT CONTROL Channel Edit control lets you wish to clear the menu from the LCD TV's memory. 20 MAG-26_eng 0104.indd 20 1/6/2005 10:30:45
User manual, English (US)
Page 22
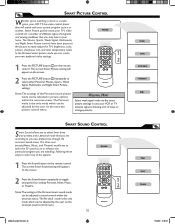
...the screen. Note: The settings of noise or strange patterns. SMART PICTURE CONTROL Whether you're watching a movie or a video game, your LCD TV has video control preset that will match with your own preferred video settings. 1 Press the PICTURE button on the remote control. In the ...color temperature levels. The Personal mode is the only mode which can create your current program source or content. Smart Picture quickly resets your TV's video controls for a number of different types of the options. The Movies, Sports, Weak Signal, Multimedia, and Night Smart Picture controls ...
...the screen. Note: The settings of noise or strange patterns. SMART PICTURE CONTROL Whether you're watching a movie or a video game, your LCD TV has video control preset that will match with your own preferred video settings. 1 Press the PICTURE button on the remote control. In the ...color temperature levels. The Personal mode is the only mode which can create your current program source or content. Smart Picture quickly resets your TV's video controls for a number of different types of the options. The Movies, Sports, Weak Signal, Multimedia, and Night Smart Picture controls ...
User manual, English (US)
Page 23
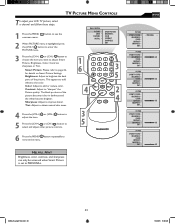
... CONTROLS T o adjust your LCD TV picture, select a channel and follow these steps. 1 Press the MENU MENU button to see the onscreen menu. 2 When PICTURE menu is set to PERSONAL. Contrast: ...
... CONTROLS T o adjust your LCD TV picture, select a channel and follow these steps. 1 Press the MENU MENU button to see the onscreen menu. 2 When PICTURE menu is set to PERSONAL. Contrast: ...
User manual, English (US)
Page 24
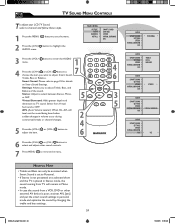
button to page 22 for details MENU on a selected show and the TV is placed in Stereo mode, the sound coming from TV will level out the sound being heard when sudden changes in personal mode and optimize the sound by changing the treble and bass ...CH-) AUDIO menu. OK 5 SOURCE Virtual Surround: Adds greater depth and dimension to select between Stereo, Mono, or SAP. Stereo: Adjust to TV sound. TV SOUND MENU CONTROLS T o adjust your LCD TV Sound, select a channel and follow these steps. 1 Press the MENU MENU button to adjust Treble, Bass, and Balance of the sound.
button to page 22 for details MENU on a selected show and the TV is placed in Stereo mode, the sound coming from TV will level out the sound being heard when sudden changes in personal mode and optimize the sound by changing the treble and bass ...CH-) AUDIO menu. OK 5 SOURCE Virtual Surround: Adds greater depth and dimension to select between Stereo, Mono, or SAP. Stereo: Adjust to TV sound. TV SOUND MENU CONTROLS T o adjust your LCD TV Sound, select a channel and follow these steps. 1 Press the MENU MENU button to adjust Treble, Bass, and Balance of the sound.

User manual, English (US)
Page 36
...outlet. • Always point the remote control toward the remote sensor). • Make sure that you use the supplied Magnavox Remote control, only the supplied Magnavox Remote control can be used with two AAA heavy duty (zinc chloride) or alkaline batteries. • Clean the remote ...• Check the batteries. Details are on page 19. Disconnect the power cord from bad quality video signals will be heared in this LCD-TV set up all available channels. Press POWER to find all available channels. Noisy Picture • Select the Weak signal Smart Picture ...
...outlet. • Always point the remote control toward the remote sensor). • Make sure that you use the supplied Magnavox Remote control, only the supplied Magnavox Remote control can be used with two AAA heavy duty (zinc chloride) or alkaline batteries. • Clean the remote ...• Check the batteries. Details are on page 19. Disconnect the power cord from bad quality video signals will be heared in this LCD-TV set up all available channels. Press POWER to find all available channels. Noisy Picture • Select the Weak signal Smart Picture ...

User manual, English
Page 1
WE WANT YOU TO START ENJOYING YOUR NEW PRODUCT RIGHT AWAY. CALL US BEFORE YOU CONSIDER RETURNING THE PRODUCT. 1- 80 0 -705 -20 0 0 OR VISIT US ON THE WEB AT WWW.USASUPPORT.MAGNAVOX.COM Important! MAGNAVOX REPRESENTATIVES ARE READY TO HELP YOU WITH ANY QUESTIONS ABOUT YOUR NEW PRODUCT. WE CAN GUIDE YOU THROUGH CONNECTIONS, FIRST-TIME SETUP, AND ANY OF THE FEATURES. Owner`s Manual 26MF605W/32MF605W Series LCD TV NEED HELP?CALL US! Return your Warranty Registration Card within 10 days. 3138 155 23445
WE WANT YOU TO START ENJOYING YOUR NEW PRODUCT RIGHT AWAY. CALL US BEFORE YOU CONSIDER RETURNING THE PRODUCT. 1- 80 0 -705 -20 0 0 OR VISIT US ON THE WEB AT WWW.USASUPPORT.MAGNAVOX.COM Important! MAGNAVOX REPRESENTATIVES ARE READY TO HELP YOU WITH ANY QUESTIONS ABOUT YOUR NEW PRODUCT. WE CAN GUIDE YOU THROUGH CONNECTIONS, FIRST-TIME SETUP, AND ANY OF THE FEATURES. Owner`s Manual 26MF605W/32MF605W Series LCD TV NEED HELP?CALL US! Return your Warranty Registration Card within 10 days. 3138 155 23445

User manual, English
Page 4
... with HD (High Definition) Output 13 Digital Satellite Receiver with RCA Connectors 11 DVD Player or other equipment to read TV program dialog or voice conversations as small chemical waste. Closed Captioning: Allows the viewer to your LCD TV features. END-OF-LIFE DISPOSAL Your new LCD TV and ... Control 22 Smart Sound Control 22 Picture Menu TV Picture Menu Controls 23 Sound Menu TV Sound Menu Controls 24 Features Menu Auto Lock 25 Auto Lock Access Code 26 Auto Lock Program 27 Auto Lock - Sleep Timer: Turns off the LCD TV within an amount of time you replace your...
... with HD (High Definition) Output 13 Digital Satellite Receiver with RCA Connectors 11 DVD Player or other equipment to read TV program dialog or voice conversations as small chemical waste. Closed Captioning: Allows the viewer to your LCD TV features. END-OF-LIFE DISPOSAL Your new LCD TV and ... Control 22 Smart Sound Control 22 Picture Menu TV Picture Menu Controls 23 Sound Menu TV Sound Menu Controls 24 Features Menu Auto Lock 25 Auto Lock Access Code 26 Auto Lock Program 27 Auto Lock - Sleep Timer: Turns off the LCD TV within an amount of time you replace your...


