
Owner's Manual - English
Page 6
... Setting for an External Device 54 Recording from an External Device 56 Information on DV Dubbing 57 DVC to HDD / DVD Dubbing 58 Selected Title Dubbing 60 One Title Dubbing 62 PROTECTING A DISC 63 PLAYING THE DISCS ON OTHER DVD PLAYERS 64 Finalizing a Disc 64 Auto Finalizing 65 CHANNEL SETTING 29 Auto Channel Scan 29 Adding / Deleting Channels 30 SETTING THE CLOCK 32 Auto Clock Setting 32 Manual Clock Setting 34 Daylight Saving Time 34 TUNER SETTINGS 35 Switching Analog Mode / Digital Mode 35 Channel Selection 35 Selecting TV Audio 36 DTV Closed Caption 38 Closed Caption...
... Setting for an External Device 54 Recording from an External Device 56 Information on DV Dubbing 57 DVC to HDD / DVD Dubbing 58 Selected Title Dubbing 60 One Title Dubbing 62 PROTECTING A DISC 63 PLAYING THE DISCS ON OTHER DVD PLAYERS 64 Finalizing a Disc 64 Auto Finalizing 65 CHANNEL SETTING 29 Auto Channel Scan 29 Adding / Deleting Channels 30 SETTING THE CLOCK 32 Auto Clock Setting 32 Manual Clock Setting 34 Daylight Saving Time 34 TUNER SETTINGS 35 Switching Analog Mode / Digital Mode 35 Channel Selection 35 Selecting TV Audio 36 DTV Closed Caption 38 Closed Caption...

Owner's Manual - English
Page 8
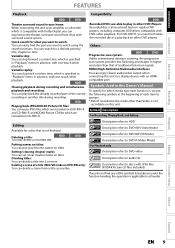
... records the channel currently viewed and temporarily stores the recorded content to DVD-R, Dubbing speed will detect it is necessary that . One-touch timer recording (OTR): You can easily set a recording time as the recording media. - Automatic title list making: You can finalize discs automatically after that both the HDD player and the display device (or an AV amplifier) support a copyright protection system called HDCP 1 TB hard disk: This unit is selected as you set the recording mode to record. The unit makes a title list...
... records the channel currently viewed and temporarily stores the recorded content to DVD-R, Dubbing speed will detect it is necessary that . One-touch timer recording (OTR): You can easily set a recording time as the recording media. - Automatic title list making: You can finalize discs automatically after that both the HDD player and the display device (or an AV amplifier) support a copyright protection system called HDCP 1 TB hard disk: This unit is selected as you set the recording mode to record. The unit makes a title list...
Owner's Manual - English
Page 9
... specified in "Playback" menu in advance, with DVD-video playback. Deleting a title: You may delete a recorded title. Description refers to HDD Description refers to DVD-RW (Video Mode) Description refers to DVD-RW (VR Mode) Description refers to DVD-R (Video Mode) For Playback only Description refers to DVD-video Description refers to audio CD Description refers to play back on other DVD Players: Recorded discs can set / clear chapter marks on CD-RW/-R. Introduction Connections Basic Setup FEATURES Playback Compatibility HDD DVD Theater surround sound in your...
... specified in "Playback" menu in advance, with DVD-video playback. Deleting a title: You may delete a recorded title. Description refers to HDD Description refers to DVD-RW (Video Mode) Description refers to DVD-RW (VR Mode) Description refers to DVD-R (Video Mode) For Playback only Description refers to DVD-video Description refers to audio CD Description refers to play back on other DVD Players: Recorded discs can set / clear chapter marks on CD-RW/-R. Introduction Connections Basic Setup FEATURES Playback Compatibility HDD DVD Theater surround sound in your...

Owner's Manual - English
Page 13
... display the Disc Menu. 9. REC button • Press once to start the One-Touch Timer Recording. 18. button • Press to select the HDD mode. 8. Please contact the remote manufacturer if you must unplug the AC power cord.) 3. Introduction Connections Basic Setup Recording FUNCTIONAL OVERVIEW (*) The unit can also be turned on by the amount of Time Set in Advance. 29. HDD button • Press to display the Timer Programming list. 24. REPEAT button • Press to select the DVD mode. 25. Playback Editing Function Setup...
... display the Disc Menu. 9. REC button • Press once to start the One-Touch Timer Recording. 18. button • Press to select the HDD mode. 8. Please contact the remote manufacturer if you must unplug the AC power cord.) 3. Introduction Connections Basic Setup Recording FUNCTIONAL OVERVIEW (*) The unit can also be turned on by the amount of Time Set in Advance. 29. HDD button • Press to display the Timer Programming list. 24. REPEAT button • Press to select the DVD mode. 25. Playback Editing Function Setup...
Owner's Manual - English
Page 23
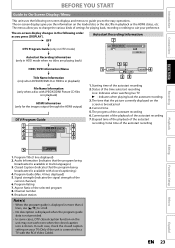
... with closed caption function on -screen display changes in multi-languages.) 3. The menus allow you the information on your preference. The time that the picture currently displayed on -screen displays and menus to guide you press [DISPLAY]. Signal strength (Indicates the signal strength of the autostart recording 7. Current time 5. Audio Information (Indicates that the program being broadcasted is in playback or the HDMI status, etc. Channel number 9. Introduction Connections Basic Setup BEFORE YOU START Guide to On-Screen Display / Menu This unit uses...
... with closed caption function on -screen display changes in multi-languages.) 3. The menus allow you the information on your preference. The time that the picture currently displayed on -screen displays and menus to guide you press [DISPLAY]. Signal strength (Indicates the signal strength of the autostart recording 7. Current time 5. Audio Information (Indicates that the program being broadcasted is in playback or the HDMI status, etc. Channel number 9. Introduction Connections Basic Setup BEFORE YOU START Guide to On-Screen Display / Menu This unit uses...

Owner's Manual - English
Page 25
... only when, an audio CD and a disc with JPEG / KODAK Picture CD files is loaded. 7. General Setting Menu 1 General Setting 2 Playback 3 Display 4 Video Recording 5 Clock 26 Channel HDMI 37 Parental Lock Disc Audio Disc Menu Language Audio Language Subtitle Language Angle Icon Still Mode Variable Skip / Replay 1. Recording Playback Editing Function Setup Others Español EN 25 Menu 1 General Setting 2 Timer Programming 3 Title List 4 Disc Edit 45 HDD Menu 46 Dubbing 47 DISC Playback Mode 1. Clock: To set up the clock on the unit as you need...
... only when, an audio CD and a disc with JPEG / KODAK Picture CD files is loaded. 7. General Setting Menu 1 General Setting 2 Playback 3 Display 4 Video Recording 5 Clock 26 Channel HDMI 37 Parental Lock Disc Audio Disc Menu Language Audio Language Subtitle Language Angle Icon Still Mode Variable Skip / Replay 1. Recording Playback Editing Function Setup Others Español EN 25 Menu 1 General Setting 2 Timer Programming 3 Title List 4 Disc Edit 45 HDD Menu 46 Dubbing 47 DISC Playback Mode 1. Clock: To set up the clock on the unit as you need...

Owner's Manual - English
Page 31
...]. Your setting will be activated and it will be activated. Playback Editing Function Setup Others Español EN 31 Manual Channel Preset CH 2 Add Delete 5 Select the channel number to add or delete. • Only the major channel is displayed in "Manual Channel Preset" menu. (The channel number displayed in the parenthesis is a virtual channel number) • Use [CHANNEL / ] to cycle through all the channels including the ones not memorized. • Use [the Number buttons] to select a channel directly...
...]. Your setting will be activated and it will be activated. Playback Editing Function Setup Others Español EN 31 Manual Channel Preset CH 2 Add Delete 5 Select the channel number to add or delete. • Only the major channel is displayed in "Manual Channel Preset" menu. (The channel number displayed in the parenthesis is a virtual channel number) • Use [CHANNEL / ] to cycle through all the channels including the ones not memorized. • Use [the Number buttons] to select a channel directly...

Owner's Manual - English
Page 35
... network. Playback Editing Function Setup Others Español EN 35 e.g.) 35.1ch: major channel [3] + [5] + [•] minor channel [1] • If you want to watch. By using [CHANNEL / ] or [the Number buttons] found on the remote control. • The Analog mode and Digital mode switch alternately. Introduction Connections Basic Setup Recording TUNER SETTINGS Switching Analog Mode / Digital Mode You can select more channels, called minor channels, are pressed consecutively, that enables multiple signals to switch the digital TV channels. • In digital TV...
... network. Playback Editing Function Setup Others Español EN 35 e.g.) 35.1ch: major channel [3] + [5] + [•] minor channel [1] • If you want to watch. By using [CHANNEL / ] or [the Number buttons] found on the remote control. • The Analog mode and Digital mode switch alternately. Introduction Connections Basic Setup Recording TUNER SETTINGS Switching Analog Mode / Digital Mode You can select more channels, called minor channels, are pressed consecutively, that enables multiple signals to switch the digital TV channels. • In digital TV...
Owner's Manual - English
Page 44
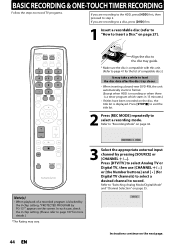
... disc data after the disc tray closes. • When inserting a brand-new DVD-RW, the unit automatically starts to select a recording mode. Press [STOP C] to exit the title list. 2 Press [REC MODE] repeatedly to format. (Except when HDD is recording or when there is blocked by the V-chip setting, "PROTECTED PROGRAM by pressing [SOURCE] or [CHANNEL / ]. Align the disc to the disc tray guide. * Make sure the disc is compatible with this unit. (Refer to page 41 for the list of a recorded program is a timer program which starts...
... disc data after the disc tray closes. • When inserting a brand-new DVD-RW, the unit automatically starts to select a recording mode. Press [STOP C] to exit the title list. 2 Press [REC MODE] repeatedly to format. (Except when HDD is recording or when there is blocked by the V-chip setting, "PROTECTED PROGRAM by pressing [SOURCE] or [CHANNEL / ]. Align the disc to the disc tray guide. * Make sure the disc is compatible with this unit. (Refer to page 41 for the list of a recorded program is a timer program which starts...

Owner's Manual - English
Page 45
... 1 minute. Turning the power to the standby mode to stop one -touch timer recording. - EN 45 Editing Function Setup Others Español Press [REC] repeatedly until the desired recording time (30 minutes to start . One-touch timer recording will start in progress at the same time. • You cannot change the recording mode during the recording pause mode. • You can change the recording length during one -touch timer recording. Using [REC] or [STOP C] on the TV screen. "I HDD" or "I DVD SP...
... 1 minute. Turning the power to the standby mode to stop one -touch timer recording. - EN 45 Editing Function Setup Others Español Press [REC] repeatedly until the desired recording time (30 minutes to start . One-touch timer recording will start in progress at the same time. • You cannot change the recording mode during the recording pause mode. • You can change the recording length during one -touch timer recording. Using [REC] or [STOP C] on the TV screen. "I HDD" or "I DVD SP...

Owner's Manual - English
Page 48
... "copy-once" program and prohibited to be displayed in the entry screen for more programs are entered. will be recorded on page 49. Use [K / L] or [the Number buttons] to select the Channel Number to select Analog Digital ("DTV") mode or External input (L1 / L2), then press [B]. Skip OFF CH DTV 69.1 Date FEB/10 REC To DVD Start 10 : 30AM Mode Auto Auto End 11 : 30AM 1h00m • "Auto" is no recordable disc in the Timer Program list...
... "copy-once" program and prohibited to be displayed in the entry screen for more programs are entered. will be recorded on page 49. Use [K / L] or [the Number buttons] to select the Channel Number to select Analog Digital ("DTV") mode or External input (L1 / L2), then press [B]. Skip OFF CH DTV 69.1 Date FEB/10 REC To DVD Start 10 : 30AM Mode Auto Auto End 11 : 30AM 1h00m • "Auto" is no recordable disc in the Timer Program list...

Owner's Manual - English
Page 53
... HDD. - Dubbing from a finalized DVD to HDD, please refer to other than "High". - Before you stop the Dubbing halfway, the contents will be changed). Guide to Dubbing Menu Display 1 HDD DVD 2 ABCDE XP (1Hr) (0:30:00) JAN/ 9/2014 3000 MB 4 Dubbing List 3 Add Delete All Dubbing Start 1.ABCDE 2.JAN/ 9/14 1:00AM CH22 3.JAN/12/14 11:00AM CH96 5 6 1/1 1 Dubbing direction 2 Selected title information 3 Dubbing menu 4 Remaining recordable space 5 Dubbing list 6 Current page number / total number of pages Recording Mode for Dubbing "High" This unit...
... HDD. - Dubbing from a finalized DVD to HDD, please refer to other than "High". - Before you stop the Dubbing halfway, the contents will be changed). Guide to Dubbing Menu Display 1 HDD DVD 2 ABCDE XP (1Hr) (0:30:00) JAN/ 9/2014 3000 MB 4 Dubbing List 3 Add Delete All Dubbing Start 1.ABCDE 2.JAN/ 9/14 1:00AM CH22 3.JAN/12/14 11:00AM CH96 5 6 1/1 1 Dubbing direction 2 Selected title information 3 Dubbing menu 4 Remaining recordable space 5 Dubbing list 6 Current page number / total number of pages Recording Mode for Dubbing "High" This unit...
Owner's Manual - English
Page 64
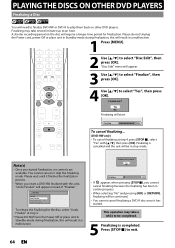
... NOT turn the Power Off or place unit in a malfunction. 64 EN Do you want to cancel ? Disc Edit Format Undo Finalize Disc Protect ON OFF Delete All Playlists To release the finalizing for finalization. Finalizing is completed. "Disc Edit" menu will appear. 3 Use [K / L] to select "Finalize", then press [OK]. 4 Use [K/L] to exit. Yes No Finalizing will start. Finalize disc? Press [STOP C] to select "Yes", then press [OK]. A shorter recording period on other DVD players. Note(s) • Once you started . Finalizing...
... NOT turn the Power Off or place unit in a malfunction. 64 EN Do you want to cancel ? Disc Edit Format Undo Finalize Disc Protect ON OFF Delete All Playlists To release the finalizing for finalization. Finalizing is completed. "Disc Edit" menu will appear. 3 Use [K / L] to select "Finalize", then press [OK]. 4 Use [K/L] to exit. Yes No Finalizing will start. Finalize disc? Press [STOP C] to select "Yes", then press [OK]. A shorter recording period on other DVD players. Note(s) • Once you started . Finalizing...

Owner's Manual - English
Page 65
... selecting Video mode. • This function is not available after finishing timer recordings and at the end of Timer Rec", then press [OK]. EN 65 Editing Function Setup Others Español "Recording" menu will appear. 3 Use [K / L] to select "Auto Finalize", then press [OK]. 4 Use [K / L] to select "ON", then press [OK]. Introduction Connections Basic Setup Recording Playback PLAYING THE DISCS ON OTHER DVD PLAYERS Auto Finalizing You can use [K / L] to finalize discs after finishing a daily or weekly Program Recording. You can finalize discs automatically using...
... selecting Video mode. • This function is not available after finishing timer recordings and at the end of Timer Rec", then press [OK]. EN 65 Editing Function Setup Others Español "Recording" menu will appear. 3 Use [K / L] to select "Auto Finalize", then press [OK]. 4 Use [K / L] to select "ON", then press [OK]. Introduction Connections Basic Setup Recording Playback PLAYING THE DISCS ON OTHER DVD PLAYERS Auto Finalizing You can use [K / L] to finalize discs after finishing a daily or weekly Program Recording. You can finalize discs automatically using...

Owner's Manual - English
Page 113
... power failure) Check the breaker and clock setting. • Please cancel the password and the set 's incorrect • Set the "Auto Clock Setting" to the TV. Playback Editing Function Setup Others Español Instructions continue on the TV screen. Introduction Connections Basic Setup Recording TROUBLESHOOTING Before requesting service for this unit, analog TV closed captions are output. • Check that , press [OPEN/CLOSE A] to several minutes up the language setting procedure by selecting a language in "Language" menu. The unit turns on the model. If the unit...
... power failure) Check the breaker and clock setting. • Please cancel the password and the set 's incorrect • Set the "Auto Clock Setting" to the TV. Playback Editing Function Setup Others Español Instructions continue on the TV screen. Introduction Connections Basic Setup Recording TROUBLESHOOTING Before requesting service for this unit, analog TV closed captions are output. • Check that , press [OPEN/CLOSE A] to several minutes up the language setting procedure by selecting a language in "Language" menu. The unit turns on the model. If the unit...

Owner's Manual - English
Page 114
...; Try channel setting by an "RF Coaxial" Cable. Only specific channels do not work, unplug the HDMI cable and the AC power cords, then plug them back in a mode other than the DVC. If not using the "RF Coaxial" cable and using an S-Video or RCA Audio/Video cable, the unit will not output a video signal unless the other device supports HDCP.) • Check the setting of HDMI. • Check whether the output format of this case, switch to HDD/DVD control and...
...; Try channel setting by an "RF Coaxial" Cable. Only specific channels do not work, unplug the HDMI cable and the AC power cords, then plug them back in a mode other than the DVC. If not using the "RF Coaxial" cable and using an S-Video or RCA Audio/Video cable, the unit will not output a video signal unless the other device supports HDCP.) • Check the setting of HDMI. • Check whether the output format of this case, switch to HDD/DVD control and...

Owner's Manual - English
Page 115
... Recording errors, if there is not a malfunction. • Check the TV aspect ratio. (Refer to "OFF". • Check the RCA audio cable connection. This is not a malfunction. • Check if the disc is not a malfunction. • Connect to Record. DVD Playback Editing Function Setup PLAYBACK GENERAL Others Español Instructions continue on this unit with the recordable media. • The maximum number of a timer recording. • This unit cannot record programs that contain copy protection signal. This is protected or finalized...
... Recording errors, if there is not a malfunction. • Check the TV aspect ratio. (Refer to "OFF". • Check the RCA audio cable connection. This is not a malfunction. • Check if the disc is not a malfunction. • Connect to Record. DVD Playback Editing Function Setup PLAYBACK GENERAL Others Español Instructions continue on this unit with the recordable media. • The maximum number of a timer recording. • This unit cannot record programs that contain copy protection signal. This is protected or finalized...

Owner's Manual - English
Page 116
... recordable number, the Dubbing will not increase the disc space. "This program is not allowed to be activated. DVD HDD / DVD DVD HDD / DVD DUBBING Titles cannot be edited or deleted. • The titles or the disc itself may be played back on this unit unless it is finalized properly. • Check if the playable disc is inserted. • Check if the disc is prohibited from the disc menu. Please contact the remote manufacturer if you have been finalized. HDD HDD/DVD PLAYBACK DVD HDD playback...
... recordable number, the Dubbing will not increase the disc space. "This program is not allowed to be activated. DVD HDD / DVD DVD HDD / DVD DUBBING Titles cannot be edited or deleted. • The titles or the disc itself may be played back on this unit unless it is finalized properly. • Check if the playable disc is inserted. • Check if the disc is prohibited from the disc menu. Please contact the remote manufacturer if you have been finalized. HDD HDD/DVD PLAYBACK DVD HDD playback...

Owner's Manual - English
Page 117
...HDD. Please contact your region. Please eject the disc. - Playback Editing Function Setup Others Español * If you are performed repeatedly onto an unstable disc, this area may become full. • Every time you inserted in the unit. • The current selected parental level prohibits playback. • The recording function encountered a copy protection program. • You are trying to locate an Authorized Service Center. Introduction Connections Basic Setup Recording TROUBLESHOOTING Error Message Error message Disc Error - Please eject the disc. - Recording...
...HDD. Please contact your region. Please eject the disc. - Playback Editing Function Setup Others Español * If you are performed repeatedly onto an unstable disc, this area may become full. • Every time you inserted in the unit. • The current selected parental level prohibits playback. • The recording function encountered a copy protection program. • You are trying to locate an Authorized Service Center. Introduction Connections Basic Setup Recording TROUBLESHOOTING Error Message Error message Disc Error - Please eject the disc. - Recording...

Leaflet - English
Page 2
...Video In • Rear Connections: Analog Audio Left/Right In, Analog Audio Left/Right Out, HDMI Out, Component Video Out, Composite Video (CVBS) In, Composite Video (CVBS) Out, Digital Coaxial Out, S-Video In, S-Video Out, RF In, RF Out Convenience • Child Protection: Parental Control • On-Screen Display languages: English, French, Spanish Power • Power supply: 120V, 60Hz Accessories • Included accessories: 2 x AA Batteries, Audio/ Video cable, Remote Control, User Manual, RF antenna cable, Quick Start Guide • User Manual: English, Spanish Dimensions • Set...
...Video In • Rear Connections: Analog Audio Left/Right In, Analog Audio Left/Right Out, HDMI Out, Component Video Out, Composite Video (CVBS) In, Composite Video (CVBS) Out, Digital Coaxial Out, S-Video In, S-Video Out, RF In, RF Out Convenience • Child Protection: Parental Control • On-Screen Display languages: English, French, Spanish Power • Power supply: 120V, 60Hz Accessories • Included accessories: 2 x AA Batteries, Audio/ Video cable, Remote Control, User Manual, RF antenna cable, Quick Start Guide • User Manual: English, Spanish Dimensions • Set...


