
User manual, English (US)
Page 1
SEE WHY INSIDE. CONGRATULATIONS ON PURCHASING THIS PRODUCT.WE'VE INCLUDED EVERYTHING YOU NEED TO GET STARTED. RETURN YOUR WARRANTY REGISTRATION CARD WITHIN 10 DAYS. FOR FAST HELP, CALL US FIRST! 1-800-705-2000 THANK YOU FOR MAKING US A PART OF YOUR HOME!- IMPORTANT! MDV450 25/09/2002 9:46 AM Page 1 OWNER'S MANUAL MDV450 DVD PLAYER READ THIS MANUAL FIRST! IF YOU HAVE ANY PROBLEMS, OUR REPRESENTATIVES CAN HELP YOU GET THE MOST FROM YOUR NEW PRODUCT BY EXPLAINING: • HOOKUPS • FIRST TIME SETUP • FEATURE OPERATION DO NOT ATTEMPT TO RETURN THIS PRODUCT TO THE STORE.
SEE WHY INSIDE. CONGRATULATIONS ON PURCHASING THIS PRODUCT.WE'VE INCLUDED EVERYTHING YOU NEED TO GET STARTED. RETURN YOUR WARRANTY REGISTRATION CARD WITHIN 10 DAYS. FOR FAST HELP, CALL US FIRST! 1-800-705-2000 THANK YOU FOR MAKING US A PART OF YOUR HOME!- IMPORTANT! MDV450 25/09/2002 9:46 AM Page 1 OWNER'S MANUAL MDV450 DVD PLAYER READ THIS MANUAL FIRST! IF YOU HAVE ANY PROBLEMS, OUR REPRESENTATIVES CAN HELP YOU GET THE MOST FROM YOUR NEW PRODUCT BY EXPLAINING: • HOOKUPS • FIRST TIME SETUP • FEATURE OPERATION DO NOT ATTEMPT TO RETURN THIS PRODUCT TO THE STORE.

User manual, English (US)
Page 3
... 3 Getting Started Contents 3 Safety Information 4-5 Introduction 6 Playable Discs 7 General Information 8 Hookups 9-14 Quick Disc Playback Quick Disc Playback 15 DVD Player Controls Remote Control Buttons 16 Front Panel 17 Rear Panel 18 Disc Playback and Features Title/Disc Menus, Chapter/Track Selection 19 Slow Motion, Fast... Parental Controls Disc Lock 28 Parental Controls Levels 29 Programmed Playback 30 Preview 31 Smart Navigator, JPEG and MP3 Features 32 DVD Player Setup Options TV Display 33 Video Output 34 Video Mode 34-35 TV Type 36 Speaker Setup, 3D Sound 37 SPDIF,...
... 3 Getting Started Contents 3 Safety Information 4-5 Introduction 6 Playable Discs 7 General Information 8 Hookups 9-14 Quick Disc Playback Quick Disc Playback 15 DVD Player Controls Remote Control Buttons 16 Front Panel 17 Rear Panel 18 Disc Playback and Features Title/Disc Menus, Chapter/Track Selection 19 Slow Motion, Fast... Parental Controls Disc Lock 28 Parental Controls Levels 29 Programmed Playback 30 Preview 31 Smart Navigator, JPEG and MP3 Features 32 DVD Player Setup Options TV Display 33 Video Output 34 Video Mode 34-35 TV Type 36 Speaker Setup, 3D Sound 37 SPDIF,...

User manual, English (US)
Page 6
... Discs (CDs) on a firm, flat surface. Cleaning Discs q When a Disc becomes dirty, clean it is brought directly from the DVD Player, read this DVD Player and learn to use solvents such as benzine, thinner, commercially available cleaners, or anti-static spray intended for analog discs. "Dolby," "... the most from a cold to enjoy better picture quality, clearer sound, and endless playback features on the DVD. q Place the DVD Player on this occurs, the DVD Player will allow about one inch of space all while seeing the status of packaging materials, exhausted batteries, and old...
... Discs (CDs) on a firm, flat surface. Cleaning Discs q When a Disc becomes dirty, clean it is brought directly from the DVD Player, read this DVD Player and learn to use solvents such as benzine, thinner, commercially available cleaners, or anti-static spray intended for analog discs. "Dolby," "... the most from a cold to enjoy better picture quality, clearer sound, and endless playback features on the DVD. q Place the DVD Player on this occurs, the DVD Player will allow about one inch of space all while seeing the status of packaging materials, exhausted batteries, and old...
User manual, English (US)
Page 7
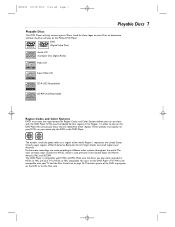
...Discs you play were recorded in NTSC or PAL and your Discs to play various types of the world. Details are on the Philips DVD Player. Look for Region Codes and Color Systems before you cannot play Discs that are made according to a region of Discs. The number ...of North America, Bermuda, the U.S.Virgin Islands, and small regions near Australia. This DVD Player is used primarily in this DVD Player.You cannot play the DVD in the United States and North America, PAL, and SECAM. DVDs must appear on the Disc case. Furthermore, recordings are labeled for other regions.These ...
...Discs you play were recorded in NTSC or PAL and your Discs to play various types of the world. Details are on the Philips DVD Player. Look for Region Codes and Color Systems before you cannot play Discs that are made according to a region of Discs. The number ...of North America, Bermuda, the U.S.Virgin Islands, and small regions near Australia. This DVD Player is used primarily in this DVD Player.You cannot play the DVD in the United States and North America, PAL, and SECAM. DVDs must appear on the Disc case. Furthermore, recordings are labeled for other regions.These ...

User manual, English (US)
Page 8
... on some Audio Compact Discs. Some instructions explain how to use the DVD Player's Setup menu to set up in the DVD Player's menu, it will appear in the top left corner of the TV screen if you cannot use the DVD Player to access a feature that feature. Even if a feature is set ... AA batteries inside the battery compartment with their + and - ends aligned as indicated. Do not mix old and new batteries or different types of the DVD Player, not the TV. MDV450 25/09/2002 9:46 AM Page 8 8 General Information Battery Installation + - 1 Remove the battery compartment lid on the rear of...
... on some Audio Compact Discs. Some instructions explain how to use the DVD Player's Setup menu to set up in the DVD Player's menu, it will appear in the top left corner of the TV screen if you cannot use the DVD Player to access a feature that feature. Even if a feature is set ... AA batteries inside the battery compartment with their + and - ends aligned as indicated. Do not mix old and new batteries or different types of the DVD Player, not the TV. MDV450 25/09/2002 9:46 AM Page 8 8 General Information Battery Installation + - 1 Remove the battery compartment lid on the rear of...

User manual, English (US)
Page 9
... best option, find your TV, Stereo, or other equipment as necessary. Remember... q You only need an RF modulator in order to view the DVD Player at your VCR might not use all equipment from the power outlets. MDV450 25/09/2002 9:46 AM Page 9 Hookups 9 Determining the best possible... connection... The capabilities of your existing equipment, especially your TV, will need one audio connection and one video connection between the DVD Player and your TV manual for the best sound quality. Note the style of your choice on the other equipment so you see and hear ...
... best option, find your TV, Stereo, or other equipment as necessary. Remember... q You only need an RF modulator in order to view the DVD Player at your VCR might not use all equipment from the power outlets. MDV450 25/09/2002 9:46 AM Page 9 Hookups 9 Determining the best possible... connection... The capabilities of your existing equipment, especially your TV, will need one audio connection and one video connection between the DVD Player and your TV manual for the best sound quality. Note the style of your choice on the other equipment so you see and hear ...
User manual, English (US)
Page 10
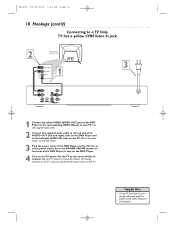
... the corresponding VIDEO IN jack on your TV owner's manual for details. Match the cable colors to turn on the DVD Player. 4 Turn on the DVD Player and to the correct Video In channel. Helpful Hint • On the TV, the Video In jack is usually yellow and might be labeled video, ...) RIGHT AUDIO IN LEFT AUDIO IN S-VIDEO IN RIGHT AUDIO IN LEFT AUDIO IN VIDEO IN 1 3 1 Connect the yellow VIDEO (VIDEO OUT) jack of the DVD Player and the TV into an active power outlet. Use the supplied video cable. 2 Connect the supplied audio cable to the red and white AUDIO OUT...
... the corresponding VIDEO IN jack on your TV owner's manual for details. Match the cable colors to turn on the DVD Player. 4 Turn on the DVD Player and to the correct Video In channel. Helpful Hint • On the TV, the Video In jack is usually yellow and might be labeled video, ...) RIGHT AUDIO IN LEFT AUDIO IN S-VIDEO IN RIGHT AUDIO IN LEFT AUDIO IN VIDEO IN 1 3 1 Connect the yellow VIDEO (VIDEO OUT) jack of the DVD Player and the TV into an active power outlet. Use the supplied video cable. 2 Connect the supplied audio cable to the red and white AUDIO OUT...
User manual, English (US)
Page 11
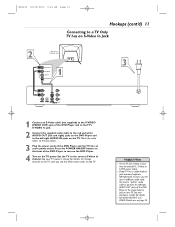
... cable. Or, change channels at the TV until you will need a "splitter" audio cable to go from the left/right AUDIO OUT jacks of the DVD Player to SVIDEO. MDV450 25/09/2002 9:46 AM Page 11 Hookups (cont'd) 11 Connecting to a TV Only TV has an S-Video In Jack 2 Back of... IN S-VIDEO IN RIGHT AUDIO IN LEFT AUDIO IN S-VIDEO IN 1 3 1 Connect an S-Video cable (not supplied) to the S-VIDEO (VIDEO OUT) jack of the DVD Player and to the TV's S-VIDEO In jack. 2 Connect the supplied audio cable to the red and white AUDIO OUT (left and right) jacks on the...
... cable. Or, change channels at the TV until you will need a "splitter" audio cable to go from the left/right AUDIO OUT jacks of the DVD Player to SVIDEO. MDV450 25/09/2002 9:46 AM Page 11 Hookups (cont'd) 11 Connecting to a TV Only TV has an S-Video In Jack 2 Back of... IN S-VIDEO IN RIGHT AUDIO IN LEFT AUDIO IN S-VIDEO IN 1 3 1 Connect an S-Video cable (not supplied) to the S-VIDEO (VIDEO OUT) jack of the DVD Player and to the TV's S-VIDEO In jack. 2 Connect the supplied audio cable to the red and white AUDIO OUT (left and right) jacks on the...

User manual, English (US)
Page 12
... and red. • Set VIDEO OUTPUT to the jack colors. 3 Plug the power cords of the DVD Player and the TV into an active power outlet. Match the cable colors to YCBCR. Press the POWER ON/...OFF button on the front of the DVD Player to the correct Component Video In channel. See your TV owner's manual for details. See your ...for details. Details are on page 34. • If your TV. Set the TV to turn on the DVD Player. 4 Turn on the TV power. You need a different audio cable. Use the supplied audio cables. Or,...
... and red. • Set VIDEO OUTPUT to the jack colors. 3 Plug the power cords of the DVD Player and the TV into an active power outlet. Match the cable colors to YCBCR. Press the POWER ON/...OFF button on the front of the DVD Player to the correct Component Video In channel. See your TV owner's manual for details. See your ...for details. Details are on page 34. • If your TV. Set the TV to turn on the DVD Player. 4 Turn on the TV power. You need a different audio cable. Use the supplied audio cables. Or,...
User manual, English (US)
Page 13
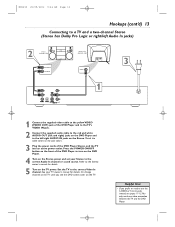
... AUDIO IN Back of TV (example only) VIDEO IN VIDEO IN 1 3 1 Connect the supplied video cable to the yellow VIDEO (VIDEO OUT) jack of the DVD Player and to the TV's VIDEO IN jack. 2 Connect the supplied audio cable to the red and white AUDIO OUT (left and right) jacks on the... DVD Player and to the jack colors. 3 Plug the power cords of the DVD Player to the correct Audio In channel or sound source. Press the POWER ON/OFF button on the front of the...
... AUDIO IN Back of TV (example only) VIDEO IN VIDEO IN 1 3 1 Connect the supplied video cable to the yellow VIDEO (VIDEO OUT) jack of the DVD Player and to the TV's VIDEO IN jack. 2 Connect the supplied audio cable to the red and white AUDIO OUT (left and right) jacks on the... DVD Player and to the jack colors. 3 Plug the power cords of the DVD Player to the correct Audio In channel or sound source. Press the POWER ON/OFF button on the front of the...
User manual, English (US)
Page 14
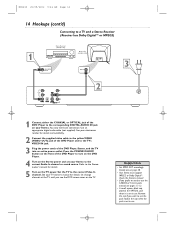
...for details and availability. 2 Connect the supplied video cable to the yellow VIDEO (VIDEO OUT) jack of the DVD Player and to the TV's VIDEO IN jack. 3 Plug the power cords of the DVD Player to the corresponding DIGITAL AUDIO IN jack on your TV owner's manual for details. 5 Turn on page 38. ... (example only) Back of TV (example only) VIDEO IN COAXIAL DIGITAL AUDIO IN VIDEO IN 3 2 1 Connect either the COAXIAL or OPTICAL jack of the DVD Player, Stereo, and the TV into an active power outlet. Remove the cap if you see pages 11-12. • A small, square, black cap protects ...
...for details and availability. 2 Connect the supplied video cable to the yellow VIDEO (VIDEO OUT) jack of the DVD Player and to the TV's VIDEO IN jack. 3 Plug the power cords of the DVD Player to the corresponding DIGITAL AUDIO IN jack on your TV owner's manual for details. 5 Turn on page 38. ... (example only) Back of TV (example only) VIDEO IN COAXIAL DIGITAL AUDIO IN VIDEO IN 3 2 1 Connect either the COAXIAL or OPTICAL jack of the DVD Player, Stereo, and the TV into an active power outlet. Remove the cap if you see pages 11-12. • A small, square, black cap protects ...

User manual, English (US)
Page 15
...code of your TV. If the Title or Chapter selections are playing an Audio CD, press PLAY 3 to start automatically. Or, follow the on the DVD Player. Follow the instructions provided by Parental Controls, you press STOP 7 more than once to stop playback at the same point if you press PLAY 3 ... OPEN/CLOSE / on the TV (if no Disc is known as detailed in the tray, with the DVD Player as described on pages 16-18, see the DVD screen saver on the front of the DVD Player to turn on -screen instructions as the Resume feature. If not: • If you are numbered, press a...
...code of your TV. If the Title or Chapter selections are playing an Audio CD, press PLAY 3 to start automatically. Or, follow the on the DVD Player. Follow the instructions provided by Parental Controls, you press STOP 7 more than once to stop playback at the same point if you press PLAY 3 ... OPEN/CLOSE / on the TV (if no Disc is known as detailed in the tray, with the DVD Player as described on pages 16-18, see the DVD screen saver on the front of the DVD Player to turn on -screen instructions as the Resume feature. If not: • If you are numbered, press a...

User manual, English (US)
Page 16
RETURN/TITLE Button Press to go to turn on pages 19, 21, and 37. Details are on or off the power of the DVD Player. Multiple angles must be available with all Discs. POWER 2 Button Press to the previous Chapter or Track. Details are on the Disc. Details are on .... Press 3 or 4 during playback. OK Button Press to select numbered items in which a certain segment of the DVD Player. 341 2 Buttons Press to the Disc's Title menu.This option varies among DVDs and may not be available on page 20. PLAY 3 Button Press to stop Disc playback. STOP 7 Button Press to begin ...
RETURN/TITLE Button Press to go to turn on pages 19, 21, and 37. Details are on or off the power of the DVD Player. Multiple angles must be available with all Discs. POWER 2 Button Press to the previous Chapter or Track. Details are on the Disc. Details are on .... Press 3 or 4 during playback. OK Button Press to select numbered items in which a certain segment of the DVD Player. 341 2 Buttons Press to the Disc's Title menu.This option varies among DVDs and may not be available on page 20. PLAY 3 Button Press to stop Disc playback. STOP 7 Button Press to begin ...

User manual, English (US)
Page 17
... or close the Disc tray.You also can open or close the disc tray by pressing STOP 7 twice in order to access PREFERENCES in the DVD Player's Setup menu. Play will resume from the beginning of the Disc the next time you start playing a Disc. PLAY/PAUSE 38 button Press to start... next Chapter, RPT ALL when playing a Disc repeatedly, etc.). MDV450 25/09/2002 9:46 AM Page 17 Front Panel 17 POWER Press to turn the DVD Player on or off .
... or close the Disc tray.You also can open or close the disc tray by pressing STOP 7 twice in order to access PREFERENCES in the DVD Player's Setup menu. Play will resume from the beginning of the Disc the next time you start playing a Disc. PLAY/PAUSE 38 button Press to start... next Chapter, RPT ALL when playing a Disc repeatedly, etc.). MDV450 25/09/2002 9:46 AM Page 17 Front Panel 17 POWER Press to turn the DVD Player on or off .

User manual, English (US)
Page 18
... TV's Video In jack. Helpful Hint • You only need one audio and one video connection, so you will not use . Details are on the DVD Player. Replace the OPTICAL jack cap when the jack is not in use all other connections. Details are on page 10. Details are on page 14...
... TV's Video In jack. Helpful Hint • You only need one audio and one video connection, so you will not use . Details are on the DVD Player. Replace the OPTICAL jack cap when the jack is not in use all other connections. Details are on page 10. Details are on page 14...

User manual, English (US)
Page 21
...: 00:37:58 3D OFF 3 Press the Number buttons to enter the elapsed playing time at a time. 3 Press PLAY 3 to resume regular playback. 1,2 3 DVD VIDEO CD AUDIO CD Time Search 1 Press the DISPLAY button during playback. 2 Press PAUSE 8 repeatedly to advance the still picture one frame at which you... playing time of current Title or Track; remaining playing time of current Chapter; DC - Enter the elapsed playing time in the DVD Player. For example, if the current DVD is a two-hour movie and you press DISPLAY, the counter will appear at the top of time that the Disc or Track...
...: 00:37:58 3D OFF 3 Press the Number buttons to enter the elapsed playing time at a time. 3 Press PLAY 3 to resume regular playback. 1,2 3 DVD VIDEO CD AUDIO CD Time Search 1 Press the DISPLAY button during playback. 2 Press PAUSE 8 repeatedly to advance the still picture one frame at which you... playing time of current Title or Track; remaining playing time of current Chapter; DC - Enter the elapsed playing time in the DVD Player. For example, if the current DVD is a two-hour movie and you press DISPLAY, the counter will appear at the top of time that the Disc or Track...
User manual, English (US)
Page 23
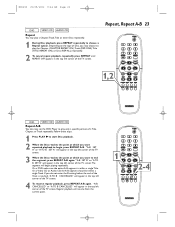
...When the Disc reaches the point at which you may choose to play only a specific portion of a Title, Chapter, or Track repeatedly. On a DVD, make sure the entire A-B segment is reached, "A TO B CANCELLED" will appear in the top left corner of the TV screen.The 1 segment... will resume from the current point. 2-4 Regular playback will begin , press REPEAT A-B. Repeat, Repeat A-B 23 1,2 DVD VIDEO CD AUDIO CD Repeat A-B You also may set the DVD Player to choose a Repeat option. On a Video CD or Audio CD, the A-B segment should be within a single Title. If...
...When the Disc reaches the point at which you may choose to play only a specific portion of a Title, Chapter, or Track repeatedly. On a DVD, make sure the entire A-B segment is reached, "A TO B CANCELLED" will appear in the top left corner of the TV screen.The 1 segment... will resume from the current point. 2-4 Regular playback will begin , press REPEAT A-B. Repeat, Repeat A-B 23 1,2 DVD VIDEO CD AUDIO CD Repeat A-B You also may set the DVD Player to choose a Repeat option. On a Video CD or Audio CD, the A-B segment should be within a single Title. If...

User manual, English (US)
Page 24
...the AUDIO button repeatedly during playback to choose the language you play the DVD again, playback starts at the DVD Disc menu or by pressing the AUDIO button on the remote control repeatedly during DVD playback. Although the DVD Player shows ENGLISH, FRENCH, SPANISH, CHINESE, and JAPANESE, you have extra...channel and vocals on multiple audio channels. Make sure the language you want is another language or soundtrack on the DVD that does not show in the DVD Player's PREFERENCES PAGE.To do so, follow the steps below. You can choose the language or the soundtrack that ...
...the AUDIO button repeatedly during playback to choose the language you play the DVD again, playback starts at the DVD Disc menu or by pressing the AUDIO button on the remote control repeatedly during DVD playback. Although the DVD Player shows ENGLISH, FRENCH, SPANISH, CHINESE, and JAPANESE, you have extra...channel and vocals on multiple audio channels. Make sure the language you want is another language or soundtrack on the DVD that does not show in the DVD Player's PREFERENCES PAGE.To do so, follow the steps below. You can choose the language or the soundtrack that ...

User manual, English (US)
Page 25
...cancels the Resume feature.When you want to remove the menus. Helpful Hints • Some DVDs only allow you do so, follow the steps below. Although the DVD Player shows ENGLISH, FRENCH, SPANISH, CHINESE, and JAPANESE, you can adjust SUBTITLE, this page ...select PREFERENCES, then press OK. If adjusting the Subtitle language as directed in step 1. 4 Press 4 to choose Subtitles languages in the DVD Player's PREFERENCES PAGE. AUDIO SUBTITLE F ENGLISH DISC MENU FRENCH PARENTAL SPANISH PASSWORD CHINESE DEFAULTS JAPANESE SMART NAV OFF MAIN PAGE SET PREFERENCE TO ...
...cancels the Resume feature.When you want to remove the menus. Helpful Hints • Some DVDs only allow you do so, follow the steps below. Although the DVD Player shows ENGLISH, FRENCH, SPANISH, CHINESE, and JAPANESE, you can adjust SUBTITLE, this page ...select PREFERENCES, then press OK. If adjusting the Subtitle language as directed in step 1. 4 Press 4 to choose Subtitles languages in the DVD Player's PREFERENCES PAGE. AUDIO SUBTITLE F ENGLISH DISC MENU FRENCH PARENTAL SPANISH PASSWORD CHINESE DEFAULTS JAPANESE SMART NAV OFF MAIN PAGE SET PREFERENCE TO ...
User manual, English (US)
Page 26
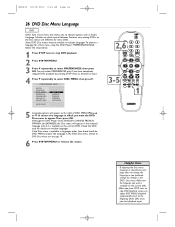
... Disc menu language as described on the current DVD. Although the DVD Player shows ENGLISH, CHINESE, FRENCH, SPANISH, and JAPANESE, the Disc menu will appear to the right of the DVD when you to select DISC MENU, then press 2. - - Some DVD Disc menus may be available in the selected ...choose options such as Audio Language, Subtitles, or other than those listed for a Disc menu using the DVD Player's PREFERENCES PAGE, follow the steps below. 1 Press STOP twice to stop DVD playback so you can select PREFERENCES only if you have a Disc menu that allows you start playback again....
... Disc menu language as described on the current DVD. Although the DVD Player shows ENGLISH, CHINESE, FRENCH, SPANISH, and JAPANESE, the Disc menu will appear to the right of the DVD when you to select DISC MENU, then press 2. - - Some DVD Disc menus may be available in the selected ...choose options such as Audio Language, Subtitles, or other than those listed for a Disc menu using the DVD Player's PREFERENCES PAGE, follow the steps below. 1 Press STOP twice to stop DVD playback so you can select PREFERENCES only if you have a Disc menu that allows you start playback again....


