

English User Manual
Page 2
EN Contents ...2 Accessories ...3 Buttons Instruction ...4 Remote Control ...5 Button Oper.ation ...6 Basic Operation ...7 Bluetooth Mode Instructions 8 USB Mode Instructions 8 FM Mode Instructions 9 Troubleshooting ...10 Installation Instanctious ...11 Product Features & Warranty ...11 Safety Information ...12 YEAR Register your product online for a FREE 3 year 3 WARRANTY extended warranty at: www.oakcastle.co.uk 2
EN Contents ...2 Accessories ...3 Buttons Instruction ...4 Remote Control ...5 Button Oper.ation ...6 Basic Operation ...7 Bluetooth Mode Instructions 8 USB Mode Instructions 8 FM Mode Instructions 9 Troubleshooting ...10 Installation Instanctious ...11 Product Features & Warranty ...11 Safety Information ...12 YEAR Register your product online for a FREE 3 year 3 WARRANTY extended warranty at: www.oakcastle.co.uk 2

English User Manual
Page 3
VOL+ EQ Remote control Pack of screws User Manual Wall-m ounted plate USB to Type-C charging cable Desk stand 3 MODE VOL+ Oakcastle CD150 Wall CD Player OK A-B MODE 10+ REPEAT VOL- Accessories EN Accessories VOL-
VOL+ EQ Remote control Pack of screws User Manual Wall-m ounted plate USB to Type-C charging cable Desk stand 3 MODE VOL+ Oakcastle CD150 Wall CD Player OK A-B MODE 10+ REPEAT VOL- Accessories EN Accessories VOL-

English User Manual
Page 4
EN Buttons Instruction Buttons Instruction VOL- MODE VOL+ 1.Status display 2.Remote control light sensor 3.Light charging LED 4.VOL5.Mode 6.Previous 7.VOL+ 8.Next 9.Pause/Play 10.Stop 11.DC IN 5V 12.Power ON/OFF switch (Push the cable) 13.AUX IN 14.USB IN 15.Earphone 16.CD cover Open button 4 DC IN 5V OFF ON POWER AUX IN USB IN
EN Buttons Instruction Buttons Instruction VOL- MODE VOL+ 1.Status display 2.Remote control light sensor 3.Light charging LED 4.VOL5.Mode 6.Previous 7.VOL+ 8.Next 9.Pause/Play 10.Stop 11.DC IN 5V 12.Power ON/OFF switch (Push the cable) 13.AUX IN 14.USB IN 15.Earphone 16.CD cover Open button 4 DC IN 5V OFF ON POWER AUX IN USB IN

English User Manual
Page 5
VOL+ EQ 13 10 6 Pause/Play 7 Next 14 8 A-B 15 9 Bluetooth 16 10 Number 10+ 11 MODE 12 VOLUME - 13 VOLUME + 14 Repeat 15 Stop 16 EQ 5 Remote Control Remote Control EN 1 4 Item Function 2 1 Standby 2 Previous 3 OK 5 3 Fast Rewind 6 4 Mute 7 5 Fast Forward 8 A-B 10+ 9 11 MODE REPEAT 12 VOL-
VOL+ EQ 13 10 6 Pause/Play 7 Next 14 8 A-B 15 9 Bluetooth 16 10 Number 10+ 11 MODE 12 VOLUME - 13 VOLUME + 14 Repeat 15 Stop 16 EQ 5 Remote Control Remote Control EN 1 4 Item Function 2 1 Standby 2 Previous 3 OK 5 3 Fast Rewind 6 4 Mute 7 5 Fast Forward 8 A-B 10+ 9 11 MODE REPEAT 12 VOL-

English User Manual
Page 6
... AUX output device(such as 10,20,30,etc. 3. MUTE Press to pause playback. PROGRAM PROGRAM button apply for CD, USB, AUX, Bluetooth, FM Radio, MP3, WMA & HD-CD. STANDBY When the power on, turn the unit on the player. 6. EN Button Operation Button Operation 1. Number Pad (10+) Press this button to change the playing mode. 8. MODE Press to enter the 10+ songs such as DVD player, CD player or Mobile phone etc) via AUX cable. 6
... AUX output device(such as 10,20,30,etc. 3. MUTE Press to pause playback. PROGRAM PROGRAM button apply for CD, USB, AUX, Bluetooth, FM Radio, MP3, WMA & HD-CD. STANDBY When the power on, turn the unit on the player. 6. EN Button Operation Button Operation 1. Number Pad (10+) Press this button to change the playing mode. 8. MODE Press to enter the 10+ songs such as DVD player, CD player or Mobile phone etc) via AUX cable. 6
English User Manual
Page 7
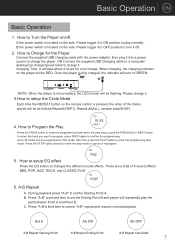
... to program, press PROG again to set the Ending Point B and player will repeatedly play mode. CD P02 5.. During playback press "A-B" to confirm the programming. Up to set the Staritng Point A. CD POP 6. Press "A-B" a second time to 20 tracks can be programmed in low battery, the LCD screen will be flashing. Please charge it into a power source to changes the different sound effects. Basic Operation EN Basic Operation 1. C. Once the player is...
... to program, press PROG again to set the Ending Point B and player will repeatedly play mode. CD P02 5.. During playback press "A-B" to confirm the programming. Up to set the Staritng Point A. CD POP 6. Press "A-B" a second time to 20 tracks can be programmed in low battery, the LCD screen will be flashing. Please charge it into a power source to changes the different sound effects. Basic Operation EN Basic Operation 1. C. Once the player is...

English User Manual
Page 8
... mobile phone and the audio will be paired/connected to pair. 4. Note: This Player isn't compatible with Bluetooth headsets, Bluetooth speakers and Car's Bluetooth. Supports a maximum 32GB USB flash drive, which must be transmitted to USB mode. 3. Playing music on the LED display, then the unit will be FAT32 format. 2. Press the "MODE" button to switch to the CD player speaker through Bluetooth. Note: 1. Press the "MODE" button to switch to Bluetooth mode, the "BT" will...
... mobile phone and the audio will be paired/connected to pair. 4. Note: This Player isn't compatible with Bluetooth headsets, Bluetooth speakers and Car's Bluetooth. Supports a maximum 32GB USB flash drive, which must be transmitted to USB mode. 3. Playing music on the LED display, then the unit will be FAT32 format. 2. Press the "MODE" button to switch to the CD player speaker through Bluetooth. Note: 1. Press the "MODE" button to switch to Bluetooth mode, the "BT" will...
English User Manual
Page 9
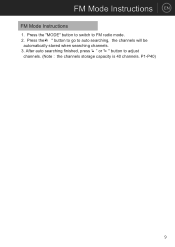
Press the " " button to go to adjust channels. (Note : the channels storage capacity is 40 channels. After auto searching finished, press " " or " " button to auto searching, the channels will be automatically stored when searching channels. 3. FM Mode Instructions EN FM Mode Instructions 1. Press the "MODE" button to switch to FM radio mode. 2. P1-P40) 9
Press the " " button to go to adjust channels. (Note : the channels storage capacity is 40 channels. After auto searching finished, press " " or " " button to auto searching, the channels will be automatically stored when searching channels. 3. FM Mode Instructions EN FM Mode Instructions 1. Press the "MODE" button to switch to FM radio mode. 2. P1-P40) 9
English User Manual
Page 10
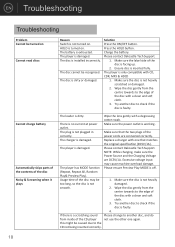
... Troubleshooting Troubleshooting Problem Cannot be turned on Cannot read discs Cannot charge ba ery Automa cally skips parts of the contents of the disc Noisy & Screaming when it plays Reason Switch is not turned on . HOLD is turned on . The disc is dirty or damaged. The disc is installed incorrectly. Press the HOLD bu on . Charge the ba ry. Ensure disc is dirty. The player is not plugged in Make...
... Troubleshooting Troubleshooting Problem Cannot be turned on Cannot read discs Cannot charge ba ery Automa cally skips parts of the contents of the disc Noisy & Screaming when it plays Reason Switch is not turned on . HOLD is turned on . The disc is dirty or damaged. The disc is installed incorrectly. Press the HOLD bu on . Charge the ba ry. Ensure disc is dirty. The player is not plugged in Make...

English User Manual
Page 11
...+16mW/16-32Ohm Impedance of earphone 32Ohm/16mW Compatible Disc CD/CDR/HDCD/MP3/WMA Bluetooth Bluetooth Speaker, Version: 4.2 HIFi Speaker Support EQ funotion 3Wx2 USB Support MAX 32G/ FAT 32 Format Battery Rechargeable battery 3.7V 2000mAh , Support about 3 hours Power source Micro USB 2.0 Standard Power consumption about 10W Dimensions (L*W*H) : Weight 165x165x45mm 502.4g WARRANTY All products come with 4 screws (included in package). 2. SPEC & WARRANTY EN Installation Instructions 1.
...+16mW/16-32Ohm Impedance of earphone 32Ohm/16mW Compatible Disc CD/CDR/HDCD/MP3/WMA Bluetooth Bluetooth Speaker, Version: 4.2 HIFi Speaker Support EQ funotion 3Wx2 USB Support MAX 32G/ FAT 32 Format Battery Rechargeable battery 3.7V 2000mAh , Support about 3 hours Power source Micro USB 2.0 Standard Power consumption about 10W Dimensions (L*W*H) : Weight 165x165x45mm 502.4g WARRANTY All products come with 4 screws (included in package). 2. SPEC & WARRANTY EN Installation Instructions 1.
English User Manual
Page 12
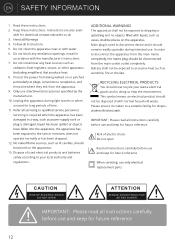
.... 10. and keep for dispos- Install in doing so help the environment. be disposed of used to disconnect device and it is required when the apparatus has been RECYCLING ELECTRICAL PRODUCTS You should now recycle your local authority and regulations. able for future reference replacement parts CAUTION RISK OF ELECTRIC SHOCK ! Servicing is taken to disconnect the apparatus...
.... 10. and keep for dispos- Install in doing so help the environment. be disposed of used to disconnect device and it is required when the apparatus has been RECYCLING ELECTRICAL PRODUCTS You should now recycle your local authority and regulations. able for future reference replacement parts CAUTION RISK OF ELECTRIC SHOCK ! Servicing is taken to disconnect the apparatus...