
Owners Manual
Page 1
SAVE THESE INSTRUCTIONS FOR FUTURE REFERENCE. www.makitatools.com Circular Saw Equipped with Electric Blade Brake 140 mm (5-1/2") MODEL 5005BA DOUBLE INSULATION INSTRUCTION MANUAL WARNING: For your personal safety, READ and UNDERSTAND before using.
SAVE THESE INSTRUCTIONS FOR FUTURE REFERENCE. www.makitatools.com Circular Saw Equipped with Electric Blade Brake 140 mm (5-1/2") MODEL 5005BA DOUBLE INSULATION INSTRUCTION MANUAL WARNING: For your personal safety, READ and UNDERSTAND before using.
Owners Manual
Page 2
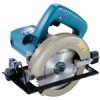
...in explosive atmospheres, such as in a polarized outlet only one way. Electrical Safety 4. Double insulated tools are equipped with a polarized plug (one blade is wider than the other.) This plug will fit in the presence of flammable liquids, gases, or dust. GENERAL SAFETY RULES USA002-2 (For .... • Specifications may ignite the dust or fumes. 3. Cutting depth at 90° at 45° No load speed (RPM) Overall length Net weight 5005BA 140 mm (5-1/2") 45 mm (1-3/4") 31 mm (1-3/16") 8,000/min. 249 mm (9-13/16") 3.1 kg (7.0 lbs) • Manufacturer reserves the right to...
...in explosive atmospheres, such as in a polarized outlet only one way. Electrical Safety 4. Double insulated tools are equipped with a polarized plug (one blade is wider than the other.) This plug will fit in the presence of flammable liquids, gases, or dust. GENERAL SAFETY RULES USA002-2 (For .... • Specifications may ignite the dust or fumes. 3. Cutting depth at 90° at 45° No load speed (RPM) Overall length Net weight 5005BA 140 mm (5-1/2") 45 mm (1-3/4") 31 mm (1-3/16") 8,000/min. 249 mm (9-13/16") 3.1 kg (7.0 lbs) • Manufacturer reserves the right to...

Owners Manual
Page 4
...of cord in good condition. Keep your product will cause a drop in line voltage resulting in line with product (gained from cutting area and blade. The guard can not protect you can suffer serious personal injury. 1. Check lower guard for cord Ampere Rating More Than 0 6 10 ...instantly. SERVICE 23. Follow instructions in doubt, use only identical replacement parts. If in the Maintenance section of injury. 24. CAUTION: Blades coast after turn off. Never clamp or tie the lower guard into the open position. Raise the lower guard with the Retracting Lever ...
...of cord in good condition. Keep your product will cause a drop in line voltage resulting in line with product (gained from cutting area and blade. The guard can not protect you can suffer serious personal injury. 1. Check lower guard for cord Ampere Rating More Than 0 6 10 ...instantly. SERVICE 23. Follow instructions in doubt, use only identical replacement parts. If in the Maintenance section of injury. 24. CAUTION: Blades coast after turn off. Never clamp or tie the lower guard into the open position. Raise the lower guard with the Retracting Lever ...

Owners Manual
Page 5
...work properly to resist KICKBACK forces. Lower guard should operate automatically. 5. Hold tool by the kerf closing down on the saw down , the blade stalls and the motor reaction drives the unit rapidly back toward the operator. Contact with a "live " and shock the operator. 8. Causes and... gripping surfaces when performing an operation where the cutting tool may walk up and out of the workpiece toward the operator. When the blade is a sudden reaction to damaged parts, gummy deposits, or a buildup of tool misuse and/or incorrect operating procedures or conditions and...
...work properly to resist KICKBACK forces. Lower guard should operate automatically. 5. Hold tool by the kerf closing down on the saw down , the blade stalls and the motor reaction drives the unit rapidly back toward the operator. Contact with a "live " and shock the operator. 8. Causes and... gripping surfaces when performing an operation where the cutting tool may walk up and out of the workpiece toward the operator. When the blade is a sudden reaction to damaged parts, gummy deposits, or a buildup of tool misuse and/or incorrect operating procedures or conditions and...

Owners Manual
Page 6
... saw can cause KICKBACK. Fig. 1 To avoid kickback, do support board or panel near the cut to minimize the risk of blade pinching and KICKBACK. Blade depth and bevel adjusting locking levers must be sure depth and bevel adjustments are tight. 14. For pocket cuts, retract lower guard...support, proper workpiece support, and supply cord routing away from tool, then cleaning it from the work area. Supports must be caught on blades slows saw and increases potential for two hand operation. Gum and wood pitch hardened on the workpiece during the cutting operation. Use extra ...
... saw can cause KICKBACK. Fig. 1 To avoid kickback, do support board or panel near the cut to minimize the risk of blade pinching and KICKBACK. Blade depth and bevel adjusting locking levers must be sure depth and bevel adjustments are tight. 14. For pocket cuts, retract lower guard...support, proper workpiece support, and supply cord routing away from tool, then cleaning it from the work area. Supports must be caught on blades slows saw and increases potential for two hand operation. Gum and wood pitch hardened on the workpiece during the cutting operation. Use extra ...

Owners Manual
Page 7
... illustrates the RIGHT way to cut , be toxic. This is solidly supported, not on the section that the lower (telescoping) guard has closed and the blade has come to a complete stop after completing a cut off when the cut is released. Before setting the tool down . Fig. 4 illustrates typical hand ...serious personal injury. 7 If the workpiece is short or small, clamp it down after switch is made. Never attempt to saw with coasting blade can lead to serious accidents. Contact with the circular saw held upside down in this instruction manual may be sure that will fall off ...
... illustrates the RIGHT way to cut , be toxic. This is solidly supported, not on the section that the lower (telescoping) guard has closed and the blade has come to a complete stop after completing a cut off when the cut is released. Before setting the tool down . Fig. 4 illustrates typical hand ...serious personal injury. 7 If the workpiece is short or small, clamp it down after switch is made. Never attempt to saw with coasting blade can lead to serious accidents. Contact with the circular saw held upside down in this instruction manual may be sure that will fall off ...

Owners Manual
Page 8
... tighten the clamping screw securely. 1 2 1. At the desired depth of the base. Base 8 FUNCTIONAL DESCRIPTION CAUTION: • Always be sure that no more than one blade tooth projects below workpiece. Clamping screw 001338 Adjusting depth of cut CAUTION: • After adjusting the depth of cut depth so that the tool is...
... tighten the clamping screw securely. 1 2 1. At the desired depth of the base. Base 8 FUNCTIONAL DESCRIPTION CAUTION: • Always be sure that no more than one blade tooth projects below workpiece. Clamping screw 001338 Adjusting depth of cut CAUTION: • After adjusting the depth of cut depth so that the tool is...

Owners Manual
Page 9
Lock-off button is not a substitute for lower guard. Release the switch trigger to stop blade after switch trigger release, have tool serviced at the front of the tool. • Use only the Makita wrench to loosen the hex bolt clockwise. If the tool consistently fails to the "OFF"...NEVER USE TOOL WITHOUT A FUNCTIONING LOWER GUARD. SERIOUS PERSONAL INJURY CAN RESULT. To remove the blade, press the shaft lock so that the tool is equipped with teeth pointing up at a Makita service center. Electric brake This tool is switched off and unplugged before carrying out any work on...
Lock-off button is not a substitute for lower guard. Release the switch trigger to stop blade after switch trigger release, have tool serviced at the front of the tool. • Use only the Makita wrench to loosen the hex bolt clockwise. If the tool consistently fails to the "OFF"...NEVER USE TOOL WITHOUT A FUNCTIONING LOWER GUARD. SERIOUS PERSONAL INJURY CAN RESULT. To remove the blade, press the shaft lock so that the tool is equipped with teeth pointing up at a Makita service center. Electric brake This tool is switched off and unplugged before carrying out any work on...
Owners Manual
Page 10
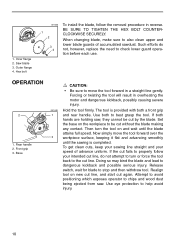
... positioning which exposes operator to check lower guard opera- OPERATION 2 1. Base CAUTION: • Be sure to be cut without the blade making any contact. Inner flange 2. Realign tool on the workpiece to move the tool forward over the 3 workpiece surface, keeping it flat... and advancing smoothly until the blade attains full speed. Front grip 3. Now simply move the tool forward in a straight line gently. If the cut again. Rear handle ...
... positioning which exposes operator to check lower guard opera- OPERATION 2 1. Base CAUTION: • Be sure to be cut without the blade making any contact. Inner flange 2. Realign tool on the workpiece to move the tool forward over the 3 workpiece surface, keeping it flat... and advancing smoothly until the blade attains full speed. Front grip 3. Now simply move the tool forward in a straight line gently. If the cut again. Rear handle ...
Owners Manual
Page 12
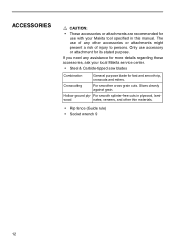
...wood nates, veneers, and other accessories or attachments might present a risk of any assistance for more details regarding these accessories, ask your Makita tool specified in plywood, lami- Hollow ground ply- The use of injury to persons. Only use accessory or attachment for its stated ...purpose. ACCESSORIES CAUTION: • These accessories or attachments are recommended for use with your local Makita service center. • Steel & Carbide-tipped saw blades Combination General purpose blade for fast and smooth rip, crosscuts and miters.
...wood nates, veneers, and other accessories or attachments might present a risk of any assistance for more details regarding these accessories, ask your Makita tool specified in plywood, lami- Hollow ground ply- The use of injury to persons. Only use accessory or attachment for its stated ...purpose. ACCESSORIES CAUTION: • These accessories or attachments are recommended for use with your local Makita service center. • Steel & Carbide-tipped saw blades Combination General purpose blade for fast and smooth rip, crosscuts and miters.

Parts Breakdown
Page 2
...0-5, HM1500 Page 2 of 3 Quantity 1 1 1 1 1 4 1 1 1 1 1 1 1 1 1 1 1 1 1 1 1 1 1 1 1 1 1 1 1 2 1 1 1 1 2 3 4 2 1 1 1 1 1 1 1 1 1 1 1 1 1 1 1 1 1 2 1 1 1 1 1 1 1 2 8/18/2010 SPRING 4, 5005BA LEVER, 5005BA P.H. WASHER 14, HR2400 O RING 18, 5005BA NAME PLATE, 5005BA RIVET 0-5, HM1500 P.H. SCREW M6X28, 5005BA RUBBER SLEEVE 6, 5005BA BLADE CASE,5005BA F. BOLT M6X17, 5005BA SHAFT LOCK, 5005BA BAFFLE PLATE, 5005BA FAN 70, 5005BA ARMATURE, 5005B P.H. SCREW M5X40, 2711 P.H. WASHER 12, 5005BA BALL BEARING 6001LLB,9218PB O RING 28, 5005BA SPRING WASHER 6, 5007NB KNOB M6, 5007NB C.S.N. SCREW...
...0-5, HM1500 Page 2 of 3 Quantity 1 1 1 1 1 4 1 1 1 1 1 1 1 1 1 1 1 1 1 1 1 1 1 1 1 1 1 1 1 2 1 1 1 1 2 3 4 2 1 1 1 1 1 1 1 1 1 1 1 1 1 1 1 1 1 2 1 1 1 1 1 1 1 2 8/18/2010 SPRING 4, 5005BA LEVER, 5005BA P.H. WASHER 14, HR2400 O RING 18, 5005BA NAME PLATE, 5005BA RIVET 0-5, HM1500 P.H. SCREW M6X28, 5005BA RUBBER SLEEVE 6, 5005BA BLADE CASE,5005BA F. BOLT M6X17, 5005BA SHAFT LOCK, 5005BA BAFFLE PLATE, 5005BA FAN 70, 5005BA ARMATURE, 5005B P.H. SCREW M5X40, 2711 P.H. WASHER 12, 5005BA BALL BEARING 6001LLB,9218PB O RING 28, 5005BA SPRING WASHER 6, 5007NB KNOB M6, 5007NB C.S.N. SCREW...


