
Owners Manual
Page 1
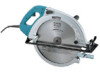
SAVE THESE INSTRUCTIONS FOR FUTURE REFERENCE. www.makitatools.com Circular Saw Equipped with Electric Blade Brake 415 mm (16 - 5/16") MODEL 5402NA 001963 INSTRUCTION MANUAL WARNING: For your personal safety, READ and UNDERSTAND before using.
SAVE THESE INSTRUCTIONS FOR FUTURE REFERENCE. www.makitatools.com Circular Saw Equipped with Electric Blade Brake 415 mm (16 - 5/16") MODEL 5402NA 001963 INSTRUCTION MANUAL WARNING: For your personal safety, READ and UNDERSTAND before using.
Owners Manual
Page 2
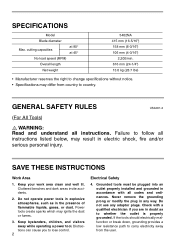
.../or serious personal injury. Do not use any way. cutting capacities at 90° at 45° No load speed (RPM) Overall length Net weight 5402NA 415 mm (16-5/16") 158 mm (6-3/16") 106 mm (4-3/16") 2,200/min. 616 mm (24-1/4") 13.0 kg (28.7 lbs) • Manufacturer reserves the right to... the user. Keep bystanders, children, and visitors away while operating a power tool. Failure to lose control. 2 Electrical Safety 4. SAVE THESE INSTRUCTIONS Work Area 1. SPECIFICATIONS Model Blade diameter Max.
.../or serious personal injury. Do not use any way. cutting capacities at 90° at 45° No load speed (RPM) Overall length Net weight 5402NA 415 mm (16-5/16") 158 mm (6-3/16") 106 mm (4-3/16") 2,200/min. 616 mm (24-1/4") 13.0 kg (28.7 lbs) • Manufacturer reserves the right to... the user. Keep bystanders, children, and visitors away while operating a power tool. Failure to lose control. 2 Electrical Safety 4. SAVE THESE INSTRUCTIONS Work Area 1. SPECIFICATIONS Model Blade diameter Max.

Owners Manual
Page 4
... manual. The green (or green and yellow) conductor in feet 25 ft. 50 ft. 100 ft. 150 ft. A 4 Cover of power and overheating. Adapter Grounding Blade Fig. Replace or repair damaged or worn cord immediately. Use of electric shock or injury. "A" type plugs to follow Maintenance instructions may create a risk of...
... manual. The green (or green and yellow) conductor in feet 25 ft. 50 ft. 100 ft. 150 ft. A 4 Cover of power and overheating. Adapter Grounding Blade Fig. Replace or repair damaged or worn cord immediately. Use of electric shock or injury. "A" type plugs to follow Maintenance instructions may create a risk of...

Owners Manual
Page 5
...depths of cut by hand, then release and watch guard closure. Be aware of the time it moves freely and does not touch the blade or any other sawing, the lower guard should be released. This improves the accuracy of operation. 5 KICKBACK could cause the saw safety ... edge guide. Also check to remove cut material. 2. Lower guard may operate sluggishly due to serious personal injury. 3. If saw blade. round) arbor holes. Blades that the lower guard is moving. SPECIFIC SAFETY RULES USB008-5 DO NOT let comfort or familiarity with correct size and shape (diamond vs...
...depths of cut by hand, then release and watch guard closure. Be aware of the time it moves freely and does not touch the blade or any other sawing, the lower guard should be released. This improves the accuracy of operation. 5 KICKBACK could cause the saw safety ... edge guide. Also check to remove cut material. 2. Lower guard may operate sluggishly due to serious personal injury. 3. If saw blade. round) arbor holes. Blades that the lower guard is moving. SPECIFIC SAFETY RULES USB008-5 DO NOT let comfort or familiarity with correct size and shape (diamond vs...

Owners Manual
Page 6
...If saw motionless in motion or KICKBACK may walk up and out of the kerf and jump back toward the operator. Keep blade sharp and clean. If blade adjustment shifts while cutting, it with both sides, near the cut objects that saw and position your hand or fingers behind the...should be placed under their own weight. Causes and Operator Prevention of Kickback: Kickback is a sudden reaction to a pinched, bound or misaligned saw blade, causing an uncontrolled saw to remove the saw from the workpiece as the saw is binding, or when interrupting a cut and near the edge ...
...If saw motionless in motion or KICKBACK may walk up and out of the kerf and jump back toward the operator. Keep blade sharp and clean. If blade adjustment shifts while cutting, it with both sides, near the cut objects that saw and position your hand or fingers behind the...should be placed under their own weight. Causes and Operator Prevention of Kickback: Kickback is a sudden reaction to a pinched, bound or misaligned saw blade, causing an uncontrolled saw to remove the saw from the workpiece as the saw is binding, or when interrupting a cut and near the edge ...

Owners Manual
Page 7
... remove all nails from the work area. Never attempt to saw firmly to serious personal injury. Before cutting be caught on that the blade cuts without decrease in a vise. could easily jump backwards over your hand, leading to prevent loss of control which is important to.... 3 Never force the saw base on the workpiece during the cutting operation. WARNING: It is solidly supported, not on the section that it down in blade speed. 13. Fig. 5 Fig. 6 17. Fig. 4 illustrates typical hand support of the workpiece which Fig. 4 A typical illustration of accuracy, and ...
... remove all nails from the work area. Never attempt to saw firmly to serious personal injury. Before cutting be caught on that the blade cuts without decrease in a vise. could easily jump backwards over your hand, leading to prevent loss of control which is important to.... 3 Never force the saw base on the workpiece during the cutting operation. WARNING: It is solidly supported, not on the section that it down in blade speed. 13. Fig. 5 Fig. 6 17. Fig. 4 illustrates typical hand support of the workpiece which Fig. 4 A typical illustration of accuracy, and ...
Owners Manual
Page 8
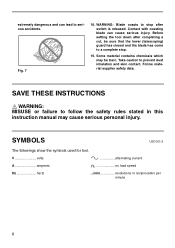
...volts A amperes Hz hertz alternating current n no load speed .../min revolutions or reciprocation per minute 8 Follow material supplier safety data. WARNING: Blade coasts to stop . 19. Before setting the tool down after switch is released. SAVE THESE INSTRUCTIONS WARNING: MISUSE or failure to a complete ...stop after completing a cut, be sure that the lower (telescoping) guard has closed and the blade has come to follow the safety rules stated in this instruction manual may be toxic. SYMBOLS USD101-2 The followings show the symbols ...
...volts A amperes Hz hertz alternating current n no load speed .../min revolutions or reciprocation per minute 8 Follow material supplier safety data. WARNING: Blade coasts to stop . 19. Before setting the tool down after switch is released. SAVE THESE INSTRUCTIONS WARNING: MISUSE or failure to a complete ...stop after completing a cut, be sure that the lower (telescoping) guard has closed and the blade has come to follow the safety rules stated in this instruction manual may be toxic. SYMBOLS USD101-2 The followings show the symbols ...
Owners Manual
Page 9
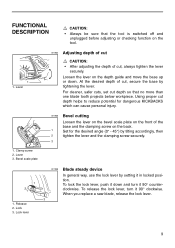
... safer cuts, set cut , secure the base by tilting accordingly, then 2 tighten the lever and the clamping screw securely. 3 1. Clamp screw 2. Lock lever 001966 Blade steady device In general way, use the lock lever by setting it 90° clockwise. To lock the lock lever, push it down . Lever 001964... in locked position. Lever 3. Release 2. Loosen the lever on the tool. 1 1. FUNCTIONAL DESCRIPTION CAUTION: • Always be sure that no more than one blade tooth projects below workpiece. Bevel scale plate 1 2 1. Using proper cut , always tighten the lever securely.
... safer cuts, set cut , secure the base by tilting accordingly, then 2 tighten the lever and the clamping screw securely. 3 1. Clamp screw 2. Lock lever 001966 Blade steady device In general way, use the lock lever by setting it 90° clockwise. To lock the lock lever, push it down . Lever 001964... in locked position. Lever 3. Release 2. Loosen the lever on the tool. 1 1. FUNCTIONAL DESCRIPTION CAUTION: • Always be sure that no more than one blade tooth projects below workpiece. Bevel scale plate 1 2 1. Using proper cut , always tighten the lever securely.

Owners Manual
Page 10
...serviced at the front of the tool. • Use only the Makita wrench to quickly stop . Electric brake This tool is not a substitute for lower guard. If the tool consistently fails to install or remove the blade. SERIOUS PERSONAL INJURY CAN RESULT. Shaft lock 2. To start the ...straight cuts, align the A position on the tool. 001969 Removing or installing saw blade 1 CAUTION: • Be sure the blade is provided. For 45° bevel cuts, align the B position with teeth pointing up at a Makita service center. Lock-off button is installed with it. 1. Hex wrench 001968 Switch...
...serviced at the front of the tool. • Use only the Makita wrench to quickly stop . Electric brake This tool is not a substitute for lower guard. If the tool consistently fails to install or remove the blade. SERIOUS PERSONAL INJURY CAN RESULT. Shaft lock 2. To start the ...straight cuts, align the A position on the tool. 001969 Removing or installing saw blade 1 CAUTION: • Be sure the blade is provided. For 45° bevel cuts, align the B position with teeth pointing up at a Makita service center. Lock-off button is installed with it. 1. Hex wrench 001968 Switch...

Owners Manual
Page 11
... and use , store the hex wrench as shown in the figure to loosen the hex bolt counterclockwise. Then remove the hex bolt, outer flange and blade. BE SURE TO TIGHTEN THE HEX BOLT CLOCKWISE SECURELY. CAUTION: • The inner flange has a 25 mm (63/64") diameter on one side and a... the lock lever. Use the correct side for the hole diameter of the blade you intend to also clean upper and lower blade guards of accumulated sawdust. Hex wrench 1. When changing blade, make sure to use . Mounting the blade on the other. 12 1. Hex bolt 2. Such efforts do not, however, replace the ...
... and use , store the hex wrench as shown in the figure to loosen the hex bolt counterclockwise. Then remove the hex bolt, outer flange and blade. BE SURE TO TIGHTEN THE HEX BOLT CLOCKWISE SECURELY. CAUTION: • The inner flange has a 25 mm (63/64") diameter on one side and a... the lock lever. Use the correct side for the hole diameter of the blade you intend to also clean upper and lower blade guards of accumulated sawdust. Hex wrench 1. When changing blade, make sure to use . Mounting the blade on the other. 12 1. Hex bolt 2. Such efforts do not, however, replace the ...

Owners Manual
Page 12
... your sawing line straight and your finger. Use eye protection to chips and wood dust being ejected from saw , they cannot be cut without the blade making any contact. Front grip 3. Then turn or force the tool back to the cut line, do not attempt to move the tool forward over... and the front grip firmly when starting or stopping the tool, since there is provided with your speed of advance uniform. Release switch, wait for blade to best grasp the tool. 001973 To remove the hex wrench, push the shorter side of it down. Then remove the hex wrench. 2 1 001974 To...
... your sawing line straight and your finger. Use eye protection to chips and wood dust being ejected from saw , they cannot be cut without the blade making any contact. Front grip 3. Then turn or force the tool back to the cut line, do not attempt to move the tool forward over... and the front grip firmly when starting or stopping the tool, since there is provided with your speed of advance uniform. Release switch, wait for blade to best grasp the tool. 001973 To remove the hex wrench, push the shorter side of it down. Then remove the hex wrench. 2 1 001974 To...
Owners Manual
Page 13
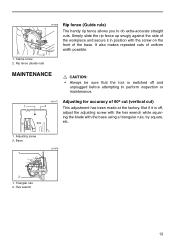
1 2 1. It also makes repeated cuts of 90° cut (vertical cut) 1 2 This adjustment has been made at the factory. ing the blade with the hex wrench while squar- Adjusting screw 2. MAINTENANCE CAUTION: • Always be sure that the tool is off and unplugged before attempting to do ...
1 2 1. It also makes repeated cuts of 90° cut (vertical cut) 1 2 This adjustment has been made at the factory. ing the blade with the hex wrench while squar- Adjusting screw 2. MAINTENANCE CAUTION: • Always be sure that the tool is off and unplugged before attempting to do ...
Owners Manual
Page 14
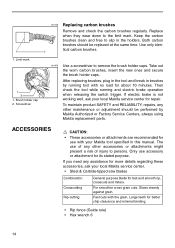
... grain. Take out the worn carbon brushes, insert the new ones and secure the brush holder caps. Fast cuts with your Makita tool specified in this manual. ACCESSORIES CAUTION: • These accessories or attachments are recommended for its stated purpose. If electric brake... is not working well, ask your local Makita service center. • Steel & Carbide-tipped saw blades Combination Crosscutting Rip-cutting General purpose blade for better chip clearance and minimal binding. • Rip fence (Guide rule) • Hex...
... grain. Take out the worn carbon brushes, insert the new ones and secure the brush holder caps. Fast cuts with your Makita tool specified in this manual. ACCESSORIES CAUTION: • These accessories or attachments are recommended for its stated purpose. If electric brake... is not working well, ask your local Makita service center. • Steel & Carbide-tipped saw blades Combination Crosscutting Rip-cutting General purpose blade for better chip clearance and minimal binding. • Rip fence (Guide rule) • Hex...

Parts Breakdown
Page 2
..., 5402A RETAINING RING S-55, 5201NA TAPPING SCREW 4X12,5477NB LEVER, 5402NA TENSION SPRING 6, 5402NA SAFETY COVER, 5402NA SAFETY COVER, 5402NA P.H. SCREW M4X8, 2708 N/A BLADE CASE,5402NA BLADE CASE, 5402NA TAPPING SCREW 4X18, 4323K STRAIN RELIEF, UM401DW CORD (3X14X16 SJ), 5402NA HANDLE SET,5402NA HANDLE SET,5402NA C.S.H. BEARING 6002LLB, 6510LVR MAKITA MARK, 5402NA CORD GUARD, 5007NLK C.S.N.BOLT M8X30,5037NB TAPPING SCREW 4X18, 4323K COMPRESSION...
..., 5402A RETAINING RING S-55, 5201NA TAPPING SCREW 4X12,5477NB LEVER, 5402NA TENSION SPRING 6, 5402NA SAFETY COVER, 5402NA SAFETY COVER, 5402NA P.H. SCREW M4X8, 2708 N/A BLADE CASE,5402NA BLADE CASE, 5402NA TAPPING SCREW 4X18, 4323K STRAIN RELIEF, UM401DW CORD (3X14X16 SJ), 5402NA HANDLE SET,5402NA HANDLE SET,5402NA C.S.H. BEARING 6002LLB, 6510LVR MAKITA MARK, 5402NA CORD GUARD, 5007NLK C.S.N.BOLT M8X30,5037NB TAPPING SCREW 4X18, 4323K COMPRESSION...

Parts Breakdown
Page 3
... 6, 5007NB 1 62 253010-8 F. SCREW M4X8, LS1013 1 71 252105-4 HEX LOCK NUT M8-13, HM1800 1 72 251858-2 SCREW M6X15, 5037NB 1 73 911945-6 P.H. BLADE,32T,16-5/16, 5402A 1 1,003 783204-6 HEX WRENCH 6, 3705, HR5000 1 1,004 194701-1 SAW STORAGE HOLDER, 5402NA 1 5,001 810156-9 N/A 1 Page 3 of 3 8/18/2010 SCREW M5X40, 2711 4 85 261081-1 URETHANE WASHER 25...
... 6, 5007NB 1 62 253010-8 F. SCREW M4X8, LS1013 1 71 252105-4 HEX LOCK NUT M8-13, HM1800 1 72 251858-2 SCREW M6X15, 5037NB 1 73 911945-6 P.H. BLADE,32T,16-5/16, 5402A 1 1,003 783204-6 HEX WRENCH 6, 3705, HR5000 1 1,004 194701-1 SAW STORAGE HOLDER, 5402NA 1 5,001 810156-9 N/A 1 Page 3 of 3 8/18/2010 SCREW M5X40, 2711 4 85 261081-1 URETHANE WASHER 25...


