
Owners Manual
Page 1
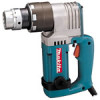
torque 60 kg.m (434 Ibs,ftl 82 kg,m 1593 Ibs,ft) No loadspeed IRPMI 26 18 Dimensions (L x W x H) 241 mm x 84 mm x 246 mm (9-112'' x 3-5/16" x 9-11/16") 249 mm x 84 mm x 252 mm 19-13/16" x 3-5/16" x 9-15/16") Net weight 4.3 kg (9.5 lbsl 4 . 8 kg (10.6 Ibsl Shear Wrench MODEL 6920NB MODEL 6922NB INSTRUCTION MANUAL DOUBLE lNSULATlON Model 6920NB 6922N8 Bolt size 5/8". 314" (A4901 5/13",3 4 " . 7/8" (A4901 Max.
torque 60 kg.m (434 Ibs,ftl 82 kg,m 1593 Ibs,ft) No loadspeed IRPMI 26 18 Dimensions (L x W x H) 241 mm x 84 mm x 246 mm (9-112'' x 3-5/16" x 9-11/16") 249 mm x 84 mm x 252 mm 19-13/16" x 3-5/16" x 9-15/16") Net weight 4.3 kg (9.5 lbsl 4 . 8 kg (10.6 Ibsl Shear Wrench MODEL 6920NB MODEL 6922NB INSTRUCTION MANUAL DOUBLE lNSULATlON Model 6920NB 6922N8 Bolt size 5/8". 314" (A4901 5/13",3 4 " . 7/8" (A4901 Max.

Owners Manual
Page 2
.... Follow instructions for purpose not intended. 7. sories. rized service facility. DISCONNECT TOOLS. Don't use tool in use face or dust mask if cutting operation is dusty. 9. It will do the job of children. 5. Also use , before servicing, and when changing accessories, such as blades, bits, cutters. 2 SECURE WORK. Inspect tool cords periodically and if damaged, have repaired by cord or yank it frees both hands to operate tool. 11. Inspect extension cords periodically and replace if...
.... Follow instructions for purpose not intended. 7. sories. rized service facility. DISCONNECT TOOLS. Don't use tool in use face or dust mask if cutting operation is dusty. 9. It will do the job of children. 5. Also use , before servicing, and when changing accessories, such as blades, bits, cutters. 2 SECURE WORK. Inspect tool cords periodically and if damaged, have repaired by cord or yank it frees both hands to operate tool. 11. Inspect extension cords periodically and replace if...

Owners Manual
Page 3
... properly repaired or replaced by authorized service center. Don't operate tool when you are tired. 19. STAY ALERT. GUARD AGAINST ELECTRIC SHOCK. pipes, radiators, ranges, refrigerator enclosures. 21. To reduce the risk o f electric shock, this instruction manual. When servicing, use tool if switch does not turn it still does not fit, contact a qualified electrician t o install the proper outlet. CHECK DAMAGED PARTS. Before further use common sense. Have defective switches replaced...
... properly repaired or replaced by authorized service center. Don't operate tool when you are tired. 19. STAY ALERT. GUARD AGAINST ELECTRIC SHOCK. pipes, radiators, ranges, refrigerator enclosures. 21. To reduce the risk o f electric shock, this instruction manual. When servicing, use tool if switch does not turn it still does not fit, contact a qualified electrician t o install the proper outlet. CHECK DAMAGED PARTS. Before further use common sense. Have defective switches replaced...
Owners Manual
Page 4
... INSTRUCTIONS. 4 Using a power source with voltage greater than the nameplate rating is harmful to a power source (receptacle, outlet, etc.) be sure you maintain good balance and firm footing. ADDITIONAL SAFETY RULES 1. Be sure no one is the same as damage t o the tool. Falling tips from high locations or scattered tips can result in SERIOUS INJURY t o the user - A power...
... INSTRUCTIONS. 4 Using a power source with voltage greater than the nameplate rating is harmful to a power source (receptacle, outlet, etc.) be sure you maintain good balance and firm footing. ADDITIONAL SAFETY RULES 1. Be sure no one is the same as damage t o the tool. Falling tips from high locations or scattered tips can result in SERIOUS INJURY t o the user - A power...
Owners Manual
Page 5
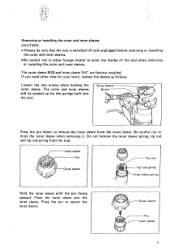
... I f you need other sizes for your work, replace the sleeves as follows. Be careful not to remove the inner sleeve from the tool. - 1 Inner sleeve Hold the inner sleeve with the pin facing upward. Press the pin to enter the insides of the tool when removing or installing the outer and inner sleeves. Inner sleeve spring Outer sleeve in sleeve 5 Removing or installing t h e outer...
... I f you need other sizes for your work, replace the sleeves as follows. Be careful not to remove the inner sleeve from the tool. - 1 Inner sleeve Hold the inner sleeve with the pin facing upward. Press the pin to enter the insides of the tool when removing or installing the outer and inner sleeves. Inner sleeve spring Outer sleeve in sleeve 5 Removing or installing t h e outer...

Owners Manual
Page 6
Then tighten the two screws securely. Switch action To start the tool, simply pull the trigger. Keep forward pressure on the tool while sliding it will no gap between the outer sleeve and the tool. sleeve Pull the trigger switch. Striking the tip can damage i t so that the trigger switch actuates properly and returns to the "OFF" position when released. I f the tool fails to stop. CAUTION : Before plugging...
Then tighten the two screws securely. Switch action To start the tool, simply pull the trigger. Keep forward pressure on the tool while sliding it will no gap between the outer sleeve and the tool. sleeve Pull the trigger switch. Striking the tip can damage i t so that the trigger switch actuates properly and returns to the "OFF" position when released. I f the tool fails to stop. CAUTION : Before plugging...

Owners Manual
Page 7
Release the trigger and withdraw the tool in a straight line. Keep the tips off of the ground, floor, walkways, etc. l tion - - __Outer sleeve Press the tip ejector (tip lever) to eject the bolt tip from falling dangerously below. Catch the sheared bolt tips to prevent injury from tripping or falling. to prevent them from the tool. I Bolt tip 7 , ..I I When the specified torque is attained, the ' bolt tip will remain inside the inner sleeve. The bolt tip will be sheared at its notched portion.
Release the trigger and withdraw the tool in a straight line. Keep the tips off of the ground, floor, walkways, etc. l tion - - __Outer sleeve Press the tip ejector (tip lever) to eject the bolt tip from falling dangerously below. Catch the sheared bolt tips to prevent injury from tripping or falling. to prevent them from the tool. I Bolt tip 7 , ..I I When the specified torque is attained, the ' bolt tip will remain inside the inner sleeve. The bolt tip will be sheared at its notched portion.
Owners Manual
Page 8
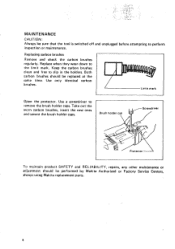
... worn carbon brushes, insert the new ones and secure the brush holder caps. Brush holder c To maintain product SAFETY and RELIABILITY, repairs, any other maintenance or adjustment should be replaced a t the same time. Keep the carbon brushes clean and free to perform inspection or maintenance. - Open the protector. Use only identical carbon brushes. MAINTENANCE CAUTION : Always be performed by Makita Authorized or Factory Service Centers, always using Makita replacement parts. 8 Both carbon brushes should be sure that the tool i s switched...
... worn carbon brushes, insert the new ones and secure the brush holder caps. Brush holder c To maintain product SAFETY and RELIABILITY, repairs, any other maintenance or adjustment should be replaced a t the same time. Keep the carbon brushes clean and free to perform inspection or maintenance. - Open the protector. Use only identical carbon brushes. MAINTENANCE CAUTION : Always be performed by Makita Authorized or Factory Service Centers, always using Makita replacement parts. 8 Both carbon brushes should be sure that the tool i s switched...

Owners Manual
Page 9
SHEAR WRENCH Model 6920NB Model 6922NB - Fob 1 0 - ' 9 4 US Note: The switch, noise suppressor and other part configuratlons may differ from country 10 country 9
SHEAR WRENCH Model 6920NB Model 6922NB - Fob 1 0 - ' 9 4 US Note: The switch, noise suppressor and other part configuratlons may differ from country 10 country 9
Owners Manual
Page 12
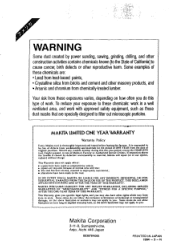
... rights which vary from chemically-treatedlumber. This Warranty does not apply where: repairs have been made or lllcnIDled by defeftivc workmanship 01 material, Makita will rcplir (or at o u r Option. INCLUDING IMPLIED WARRANTIES O F "MERCHANTABILITY" AND "FITNESS FOR A SPECIFIC PURPOSE." MAKITA DISCLAIMS LIABILITY FOR ANY IMPLIED WARRANTIES. WARNING Some dust created by power sanding, sawing, grinding, drilling, and other construction activities contains chemicals known...
... rights which vary from chemically-treatedlumber. This Warranty does not apply where: repairs have been made or lllcnIDled by defeftivc workmanship 01 material, Makita will rcplir (or at o u r Option. INCLUDING IMPLIED WARRANTIES O F "MERCHANTABILITY" AND "FITNESS FOR A SPECIFIC PURPOSE." MAKITA DISCLAIMS LIABILITY FOR ANY IMPLIED WARRANTIES. WARNING Some dust created by power sanding, sawing, grinding, drilling, and other construction activities contains chemicals known...

Parts Breakdown
Page 2
... 1010, 6922NB NEEDLE CAGE 810, 6922NB-T2 SPUR GEAR 20, 6922NB SPUR GEAR 20, 6922NB-T2 WASHER 2542, 6922NB PIN 8, 6922NB-T2 PIN 10, 6922NB SCREW M8X8, 6922NB SPUR GEAR 25, 6922NB BALL BEARING 404, 8411D SPUR GEAR 25, 6922NB . BOLT M4X14, 6922NB REAR COVER, 6922NB STOPPER PLATE, 6922NB ROD SUPPORTER, 6922NB BALL BEARING 699, 6922NB GEAR 14-41, 6922NB H.S.H. GAUGE 1528, 6922NB INTERNAL GEAR 53-66, 6922NB INTERNAL GEAR 53-66, 6922NB-T2 COMPRESSION SPRING 4, 6922NB BRACKET, 6922NB BRACKET, 6922NB SPIRO LOCK WASHER 52, 6922NB RING 44, 6922NB BALL BEARING...
... 1010, 6922NB NEEDLE CAGE 810, 6922NB-T2 SPUR GEAR 20, 6922NB SPUR GEAR 20, 6922NB-T2 WASHER 2542, 6922NB PIN 8, 6922NB-T2 PIN 10, 6922NB SCREW M8X8, 6922NB SPUR GEAR 25, 6922NB BALL BEARING 404, 8411D SPUR GEAR 25, 6922NB . BOLT M4X14, 6922NB REAR COVER, 6922NB STOPPER PLATE, 6922NB ROD SUPPORTER, 6922NB BALL BEARING 699, 6922NB GEAR 14-41, 6922NB H.S.H. GAUGE 1528, 6922NB INTERNAL GEAR 53-66, 6922NB INTERNAL GEAR 53-66, 6922NB-T2 COMPRESSION SPRING 4, 6922NB BRACKET, 6922NB BRACKET, 6922NB SPIRO LOCK WASHER 52, 6922NB RING 44, 6922NB BALL BEARING...
Parts Breakdown
Page 3
...-2 Parts Breakdown BALL BEARING 6000LLB, 5740NB FAN 55, 6922NB ARMATURE ASS'Y 115V, 6922NB INS. BOLT M4X25, 6922NB GEAR HOUSING ASS'Y, 6922NB FIELD, 6922NB BAFFLE PLATE, 6922NB BALL BEARING 608LLB, 9227C B. BOLT M4X25, 6922NB TAPPING SCREW BT4X20, 6201DW H.S.H. BOLT M4X25, 6922NB HANDLE SET, 6922NB TAPPING SCREW 4X18, 4323K STRAIN RELIEF, HM1500B SWITCH, 6920N SWITCH LEVER, 6922NB CHIP LEVER, 6922NB HANDLE SET, 6922NB CORD GUARD, 2711 CORD (2X16X8;SJ), 5007NBA MAKITA MARK, 6922NB N/A LEAF SPRING, 6922NB SPACER, 6922NB SPACER, 6922NB-T2 RUBBER RING, 6922NB SPIRO LOCK WASHER 62, 6922NB FLAT...
...-2 Parts Breakdown BALL BEARING 6000LLB, 5740NB FAN 55, 6922NB ARMATURE ASS'Y 115V, 6922NB INS. BOLT M4X25, 6922NB GEAR HOUSING ASS'Y, 6922NB FIELD, 6922NB BAFFLE PLATE, 6922NB BALL BEARING 608LLB, 9227C B. BOLT M4X25, 6922NB TAPPING SCREW BT4X20, 6201DW H.S.H. BOLT M4X25, 6922NB HANDLE SET, 6922NB TAPPING SCREW 4X18, 4323K STRAIN RELIEF, HM1500B SWITCH, 6920N SWITCH LEVER, 6922NB CHIP LEVER, 6922NB HANDLE SET, 6922NB CORD GUARD, 2711 CORD (2X16X8;SJ), 5007NBA MAKITA MARK, 6922NB N/A LEAF SPRING, 6922NB SPACER, 6922NB SPACER, 6922NB-T2 RUBBER RING, 6922NB SPIRO LOCK WASHER 62, 6922NB FLAT...


