
Owners Manual
Page 1
SAVE THESE INSTRUCTIONS FOR FUTURE REFERENCE. www.makitatools.com Angle Grinder 150 mm (6") MODEL 9566CV DOUBLE INSULATION 004051 INSTRUCTION MANUAL WARNING: For your personal safety, READ and UNDERSTAND before using.
SAVE THESE INSTRUCTIONS FOR FUTURE REFERENCE. www.makitatools.com Angle Grinder 150 mm (6") MODEL 9566CV DOUBLE INSULATION 004051 INSTRUCTION MANUAL WARNING: For your personal safety, READ and UNDERSTAND before using.

Owners Manual
Page 2
... accidents. 2. Double insula- GENERAL SAFETY RULES USA002-2 (For All Tools) WARNING: Read and understand all instructions listed below, may ignite the dust or fumes. 3. SPECIFICATIONS Model No load speed (RPM) Overall length Net weight Spindle thread 9566CV 4,000 - 9,000/min 299 mm (11-3/4") 1.8 kg (4.0 lbs) 5/8" • Manufacturer reserves the right to change the plug in any way. Power tools create sparks which may result...
... accidents. 2. Double insula- GENERAL SAFETY RULES USA002-2 (For All Tools) WARNING: Read and understand all instructions listed below, may ignite the dust or fumes. 3. SPECIFICATIONS Model No load speed (RPM) Overall length Net weight Spindle thread 9566CV 4,000 - 9,000/min 299 mm (11-3/4") 1.8 kg (4.0 lbs) 5/8" • Manufacturer reserves the right to change the plug in any way. Power tools create sparks which may result...
Owners Manual
Page 3
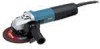
.... Use clamps or other untrained persons. Holding the work by hand or against your body is designed. 17. The correct tool will increase the risk of electric shock. 7. Store idle tools out of reach of parts, and any adjustments, changing accessories, or storing the tool. Properly maintained tools with grounded surfaces such as pipes, radiators, ranges and refrigerators. When servicing a tool, use the cord to follow Maintenance instructions may...
.... Use clamps or other untrained persons. Holding the work by hand or against your body is designed. 17. The correct tool will increase the risk of electric shock. 7. Store idle tools out of reach of parts, and any adjustments, changing accessories, or storing the tool. Properly maintained tools with grounded surfaces such as pipes, radiators, ranges and refrigerators. When servicing a tool, use the cord to follow Maintenance instructions may...

Owners Manual
Page 4
... cord will make exposed metal parts of the tool "live " wire will cause a drop in line voltage resulting in doubt, use safety glasses or goggles. Table 1: Minimum gage for cracks or damage before operation. If you can fly apart and cause injury. 6. A guard protects operator from rotating parts. 4 Replace cracked or damaged wheel immediately. Run the tool (with wood cutting blades or other accessories running over rated speed...
... cord will make exposed metal parts of the tool "live " wire will cause a drop in line voltage resulting in doubt, use safety glasses or goggles. Table 1: Minimum gage for cracks or damage before operation. If you can fly apart and cause injury. 6. A guard protects operator from rotating parts. 4 Replace cracked or damaged wheel immediately. Run the tool (with wood cutting blades or other accessories running over rated speed...

Owners Manual
Page 5
... switch is lost, cord may cause serious personal injury. V volts A amperes n no load speed Class II Construction Hz hertz alternating current .../min revolutions or reciprocation per minute 5 Make sure cord is clear of the wheel to dust containing hazardous substances. SAVE THESE INSTRUCTIONS WARNING: MISUSE or failure to protect skin from you and cause personal injury. 13. Use of tool is turned...
... switch is lost, cord may cause serious personal injury. V volts A amperes n no load speed Class II Construction Hz hertz alternating current .../min revolutions or reciprocation per minute 5 Make sure cord is clear of the wheel to dust containing hazardous substances. SAVE THESE INSTRUCTIONS WARNING: MISUSE or failure to protect skin from you and cause personal injury. 13. Use of tool is turned...

Owners Manual
Page 6
.... The tool may be locked in "ON" position for ease of operator comfort during extended use. Slide switch O 001035 Switch action 1 CAUTION: • Before plugging in "ON" position and maintain firm grasp on the tool. 1 1. To stop the tool, press the rear of the slide switch, then slide it . Press the shaft lock to prevent spindle rotation when installing or removing accessories. 1. Apply caution when locking tool in the tool, always...
.... The tool may be locked in "ON" position for ease of operator comfort during extended use. Slide switch O 001035 Switch action 1 CAUTION: • Before plugging in "ON" position and maintain firm grasp on the tool. 1 1. To stop the tool, press the rear of the slide switch, then slide it . Press the shaft lock to prevent spindle rotation when installing or removing accessories. 1. Apply caution when locking tool in the tool, always...
Owners Manual
Page 7
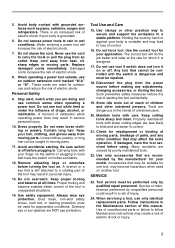
... tool is operated continuously at low speeds, the motor will come to 5. The tools equipped with the notch on the dial and the approximate rotating speed. Screw 7 Be sure to the table for cut-off and unplugged before carrying out any work . Wheel guard for the relationship between the number settings on the bearing box. Speed adjusting dial 001046 Speed adjusting dial The rotating speed can be changed by turning the speed adjusting...
... tool is operated continuously at low speeds, the motor will come to 5. The tools equipped with the notch on the dial and the approximate rotating speed. Screw 7 Be sure to the table for cut-off and unplugged before carrying out any work . Wheel guard for the relationship between the number settings on the bearing box. Speed adjusting dial 001046 Speed adjusting dial The rotating speed can be changed by turning the speed adjusting...

Owners Manual
Page 8
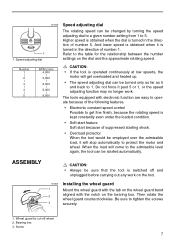
Mount the inner flange onto the spindle. Abrasive cut -off wheel 3. Lever 002980 Installing or removing wheel guard 1 (optional accessory) CAUTION: 2 3 • When using an abrasive cut-off wheel, be sure that the spindle cannot revolve, then use with cut -off wheels. To tighten the lock nut, press the shaft lock firmly so that the side grip is installed securely before operation. Screw 4. Wheel guard 2. Fit the abrasive cut -off wheel on the position of the guard always points toward...
Mount the inner flange onto the spindle. Abrasive cut -off wheel 3. Lever 002980 Installing or removing wheel guard 1 (optional accessory) CAUTION: 2 3 • When using an abrasive cut-off wheel, be sure that the spindle cannot revolve, then use with cut -off wheels. To tighten the lock nut, press the shaft lock firmly so that the side grip is installed securely before operation. Screw 4. Wheel guard 2. Fit the abrasive cut -off wheel on the position of the guard always points toward...

Owners Manual
Page 9
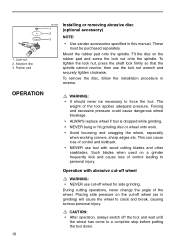
... the wheel guard band. Lock nut 2. Wheel can shatter during use the special guard when depressed center grinding wheel/Multi-disc is too tight or too loosen to fasten the wheel guard, loosen or tighten the screw to adjust the tightening of personal injury. Mount the inner flange onto the spindle. To remove wheel guard, follow the installation procedure in reverse. 002982 1 2 3 4 1. Depressed center grinding wheel/ Multi-disc 3. Screw 002981 Loosen the lever...
... the wheel guard band. Lock nut 2. Wheel can shatter during use the special guard when depressed center grinding wheel/Multi-disc is too tight or too loosen to fasten the wheel guard, loosen or tighten the screw to adjust the tightening of personal injury. Mount the inner flange onto the spindle. To remove wheel guard, follow the installation procedure in reverse. 002982 1 2 3 4 1. Depressed center grinding wheel/ Multi-disc 3. Screw 002981 Loosen the lever...
Owners Manual
Page 10
...: • After operation, always switch off wheel for side grinding. This can cause loss of control leading to a complete stop before putting the tool down. 1. Mount the rubber pad onto the spindle. Such blades when used on the rubber pad and screw the lock nut onto the spindle. Operation with wood cutting blades and other sawblades. Lock nut 2. Forcing and excessive pressure could cause dangerous wheel breakage. • ALWAYS replace wheel if tool is dropped...
...: • After operation, always switch off wheel for side grinding. This can cause loss of control leading to a complete stop before putting the tool down. 1. Mount the rubber pad onto the spindle. Such blades when used on the rubber pad and screw the lock nut onto the spindle. Operation with wood cutting blades and other sawblades. Lock nut 2. Forcing and excessive pressure could cause dangerous wheel breakage. • ALWAYS replace wheel if tool is dropped...
Owners Manual
Page 11
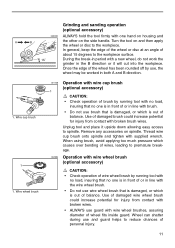
... angle of wires, leading to spindle. Unplug tool and place it will cut into the workpiece. When using brush, avoid applying too much pressure which is out of or in the B direction or it upside down allowing easy access to premature breakage. 002984 Operation with wire wheel brush (optional accessory) CAUTION: • Check operation of wire wheel brush by running tool with the wire wheel brush. • Do not use guard with broken brush wires. A B 1. Use of wheel...
... angle of wires, leading to spindle. Unplug tool and place it will cut into the workpiece. When using brush, avoid applying too much pressure which is out of or in the B direction or it upside down allowing easy access to premature breakage. 002984 Operation with wire wheel brush (optional accessory) CAUTION: • Check operation of wire wheel brush by running tool with the wire wheel brush. • Do not use guard with broken brush wires. A B 1. Use of wheel...
Owners Manual
Page 12
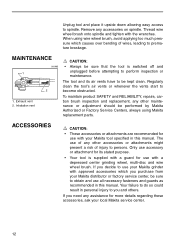
... supplied with a guard for use your Makita grinder with your Makita tool specified in personal injury to obtain and use with the wrenches. Remove any other accessories or attachments might present a risk of any assistance for its air vents have to persons. To maintain product SAFETY and RELIABILITY, repairs, carbon brush inspection and replacement, any accessories on spindle. Your failure to premature breakage. Thread wire wheel brush onto spindle and tighten with a depressed...
... supplied with a guard for use your Makita grinder with your Makita tool specified in personal injury to obtain and use with the wrenches. Remove any other accessories or attachments might present a risk of any assistance for its air vents have to persons. To maintain product SAFETY and RELIABILITY, repairs, carbon brush inspection and replacement, any accessories on spindle. Your failure to premature breakage. Thread wire wheel brush onto spindle and tighten with a depressed...
Owners Manual
Page 13
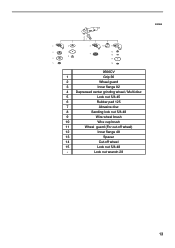
Lock nut wrench 28 13 002986 2 6 3 7 8 4 5 1 2 9 10 11 12 13 14 15 9566CV 1 Grip 36 2 Wheel guard 3 Inner flange 82 4 Depressed center grinding wheel / Multi-disc 5 Lock nut 5/8-45 6 Rubber pad 125 7 Abrasive disc 8 Sanding lock nut 5/8-48 9 Wire wheel brush 10 Wire cup brush 11 Wheel guard (For cut-off wheel) 12 Inner flange 48 13 Spacer 14 Cut-off wheel 15 Lock nut 5/8-48 -
Lock nut wrench 28 13 002986 2 6 3 7 8 4 5 1 2 9 10 11 12 13 14 15 9566CV 1 Grip 36 2 Wheel guard 3 Inner flange 82 4 Depressed center grinding wheel / Multi-disc 5 Lock nut 5/8-45 6 Rubber pad 125 7 Abrasive disc 8 Sanding lock nut 5/8-48 9 Wire wheel brush 10 Wire cup brush 11 Wheel guard (For cut-off wheel) 12 Inner flange 48 13 Spacer 14 Cut-off wheel 15 Lock nut 5/8-48 -

Owners Manual
Page 17
Fold 17 Cut Makita U.S.A., Inc. 14930 Northam Street La Mirada, CA 90638-5753 First-Class Postage Required Post Office will not deliver without proper postage.
Fold 17 Cut Makita U.S.A., Inc. 14930 Northam Street La Mirada, CA 90638-5753 First-Class Postage Required Post Office will not deliver without proper postage.

Owners Manual
Page 18
... Exhibition From Friend Previous Usage Other ( ) 2. Use of the product is intended for: Construction Trade Industrial Maintenance Home Maintenance Hobby Other ( ) 4. MAIL THIS PORTION Your answers to the following questions are : Design Features Size Price Makita Brand Repair Service Durability Power Other ( ) 5. This product was purchased from: Home Center Hardware/Lumber Store Tool Distributor Industrial Supply Construction Supply Other ( 3.
... Exhibition From Friend Previous Usage Other ( ) 2. Use of the product is intended for: Construction Trade Industrial Maintenance Home Maintenance Hobby Other ( ) 4. MAIL THIS PORTION Your answers to the following questions are : Design Features Size Price Makita Brand Repair Service Durability Power Other ( ) 5. This product was purchased from: Home Center Hardware/Lumber Store Tool Distributor Industrial Supply Construction Supply Other ( 3.

Owners Manual
Page 19
... the Makita Factory Service Centers listed, or to the outside of the carton detailing the problem with your tool. Fremont, CA 94538-5107 (510) 657-9881 14930 Northam St. Hato Rey, PR 00917 (787) 250-8776 TENNESSEE 1120 Elm Hill P. Be sure to attach a letter to an Authorized Makita Service Center. Date Purchased Dealer's Name & Address Model No...
... the Makita Factory Service Centers listed, or to the outside of the carton detailing the problem with your tool. Fremont, CA 94538-5107 (510) 657-9881 14930 Northam St. Hato Rey, PR 00917 (787) 250-8776 TENNESSEE 1120 Elm Hill P. Be sure to attach a letter to an Authorized Makita Service Center. Date Purchased Dealer's Name & Address Model No...

Owners Manual
Page 20
... workmanship or material, Makita will repair (or at our option, replace) without charge. MAKITA DISCLAIMS LIABILITY FOR ANY IMPLIED WARRANTIES, INCLUDING IMPLIED WARRANTIES OF "MERCHANTABILITY" AND "FITNESS FOR A SPECIFIC PURPOSE," AFTER THE ONE YEAR TERM OF THIS WARRANTY. Some examples of Makita's Factory or Authorized Service Centers. MAKITA LIMITED ONE YEAR WARRANTY Warranty Policy Every Makita tool is warranted to be free of defects from workmanship...
... workmanship or material, Makita will repair (or at our option, replace) without charge. MAKITA DISCLAIMS LIABILITY FOR ANY IMPLIED WARRANTIES, INCLUDING IMPLIED WARRANTIES OF "MERCHANTABILITY" AND "FITNESS FOR A SPECIFIC PURPOSE," AFTER THE ONE YEAR TERM OF THIS WARRANTY. Some examples of Makita's Factory or Authorized Service Centers. MAKITA LIMITED ONE YEAR WARRANTY Warranty Policy Every Makita tool is warranted to be free of defects from workmanship...

Parts Breakdown
Page 2
... CPL., 9564CV MOTOR HOUSING CPL.,9566CV SWITCH KNOB, BO6040 CORD GUARD 10, 9564CV CORD (2X16X8;SJ), 5007NBA REAR COVER, 9566CV REAR COVER, 9566CV REAR COVER, BO6040 TAPPING SCREW 4X18, 4323K INDICATION LABEL, 9566CV INDICATION LABEL, 9566CV CONTROLLER, 9566CV CARBON BRUSH SET CB-318,GD0800C CARBON BRUSH SET CB-318, GD0800C BRUSH HOLDER, 9557NB TAPPING SCREW PT3X10, GD0800C NAME PLATE, 9556CV LOCK NUT 5/8-48, 9566CV INNER FLANGE 48, 9566CV WHEEL COVER (CUT-OFF WHEEL), 9566CV COVER FOR CUT OFF WHEEL, 9566CV P.H.SCREW M5X16,9523NB SPINDLE, 9561CV LABYRINTH...
... CPL., 9564CV MOTOR HOUSING CPL.,9566CV SWITCH KNOB, BO6040 CORD GUARD 10, 9564CV CORD (2X16X8;SJ), 5007NBA REAR COVER, 9566CV REAR COVER, 9566CV REAR COVER, BO6040 TAPPING SCREW 4X18, 4323K INDICATION LABEL, 9566CV INDICATION LABEL, 9566CV CONTROLLER, 9566CV CARBON BRUSH SET CB-318,GD0800C CARBON BRUSH SET CB-318, GD0800C BRUSH HOLDER, 9557NB TAPPING SCREW PT3X10, GD0800C NAME PLATE, 9556CV LOCK NUT 5/8-48, 9566CV INNER FLANGE 48, 9566CV WHEEL COVER (CUT-OFF WHEEL), 9566CV COVER FOR CUT OFF WHEEL, 9566CV P.H.SCREW M5X16,9523NB SPINDLE, 9561CV LABYRINTH...

Parts Breakdown
Page 3
... GRIP 36, 9557NB LOCK NUT WRENCH 28, GA7911 6 CUT-OFF WHEEL 150/SET N/A 9566CV 4 1 1 1 1 1 1 4 1 1 1 1 1 1 1 1 1 1 Page 3 of 3 8/18/2010 52 54 54 55 56 57 58 59 60 63 64 65 66 1,001 1,001 1,002 1,003 5,001 265490-6 317570-5 318302-3 213673-2 227430-2 256459-1 213048-5 266257-5 267756-0 285841-7 211129-9 253052-2 819329-1 152490-4 153489-2 782412-6 193876-3 810238-7 Parts Breakdown HEX BOLT M4...
... GRIP 36, 9557NB LOCK NUT WRENCH 28, GA7911 6 CUT-OFF WHEEL 150/SET N/A 9566CV 4 1 1 1 1 1 1 4 1 1 1 1 1 1 1 1 1 1 Page 3 of 3 8/18/2010 52 54 54 55 56 57 58 59 60 63 64 65 66 1,001 1,001 1,002 1,003 5,001 265490-6 317570-5 318302-3 213673-2 227430-2 256459-1 213048-5 266257-5 267756-0 285841-7 211129-9 253052-2 819329-1 152490-4 153489-2 782412-6 193876-3 810238-7 Parts Breakdown HEX BOLT M4...


