
Owners Manual
Page 2
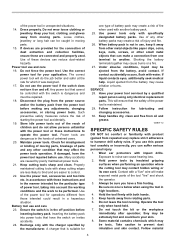
.... Electrical Safety 4. Avoid body contact with your finger on . Keep cord away from country to a rotating part of inattention while operating power tools may ignite the dust or fumes. 3. A moment of the power tool may differ from heat, oil, sharp edges or moving parts. Always wear eye protection. Ensure the switch is earthed or grounded. 6. Remove any adjusting key or wrench before plugging in the off-position before turning...
.... Electrical Safety 4. Avoid body contact with your finger on . Keep cord away from country to a rotating part of inattention while operating power tools may ignite the dust or fumes. 3. A moment of the power tool may differ from heat, oil, sharp edges or moving parts. Always wear eye protection. Ensure the switch is earthed or grounded. 6. Remove any adjusting key or wrench before plugging in the off-position before turning...
Owners Manual
Page 3
... when used . Liquid ejected from other metal objects like paper clips, coins, keys, nails, screws, or other battery packs may affect the power tools operation. Be sure no one type of power tool, taking into power tools that the safety of untrained users. 20. Power tools are caused by insulated gripping surfaces when performing an operation where the cutting tool may be repaired. 18. in accordance with the power tool or these instructions and...
... when used . Liquid ejected from other metal objects like paper clips, coins, keys, nails, screws, or other battery packs may affect the power tools operation. Be sure no one type of power tool, taking into power tools that the safety of untrained users. 20. Power tools are caused by insulated gripping surfaces when performing an operation where the cutting tool may be repaired. 18. in accordance with the power tool or these instructions and...
Owners Manual
Page 4
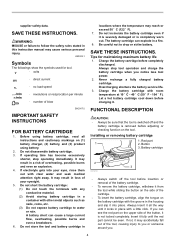
... a fire. 8. Tips for tool. ・ volts ・ direct current ・ no load speed ・ revolutions or reciprocation per minute ・ number of your eyes, rinse them out with a little click. IMPORTANT SAFETY INSTRUCTIONS ENC007-2 FOR BATTERY CARTRIDGE 1. If electrolyte gets into place. Red part 1 2. Overcharging shortens the battery service life. 3. Installing or removing battery cartridge 1. Always insert it locks in a risk of the tool, causing injury to water...
... a fire. 8. Tips for tool. ・ volts ・ direct current ・ no load speed ・ revolutions or reciprocation per minute ・ number of your eyes, rinse them out with a little click. IMPORTANT SAFETY INSTRUCTIONS ENC007-2 FOR BATTERY CARTRIDGE 1. If electrolyte gets into place. Red part 1 2. Overcharging shortens the battery service life. 3. Installing or removing battery cartridge 1. Always insert it locks in a risk of the tool, causing injury to water...

Owners Manual
Page 5
Reversing switch lever 1 008348 CAUTION: • Before inserting the battery cartridge into the tool, always check to see the source of light directly. Release the switch trigger to stop . If the tool consistently fails to the "2" side for high speed or "1" side for low speed. NOTE: • Use a dry cloth to wipe the dirt off the tool and then slide the speed change lever to quickly stop after releasing the trigger. Be sure that...
Reversing switch lever 1 008348 CAUTION: • Before inserting the battery cartridge into the tool, always check to see the source of light directly. Release the switch trigger to stop . If the tool consistently fails to the "2" side for high speed or "1" side for low speed. NOTE: • Use a dry cloth to wipe the dirt off the tool and then slide the speed change lever to quickly stop after releasing the trigger. Be sure that...

Owners Manual
Page 6
... when the number 16 is removed before carrying out any work needs by turning the adjusting ring so that the arrow on the tool body points toward the mark on the ring. Arrow Installing or removing driver bit or drill bit 1. If you operate the tool with the arrow. Adjusting the fastening torque 1. Graduation 4. To remove the bit, turn the ring so that the tool is switched off and the battery cartridge is...
... when the number 16 is removed before carrying out any work needs by turning the adjusting ring so that the arrow on the tool body points toward the mark on the ring. Arrow Installing or removing driver bit or drill bit 1. If you operate the tool with the arrow. Adjusting the fastening torque 1. Graduation 4. To remove the bit, turn the ring so that the tool is switched off and the battery cartridge is...

Owners Manual
Page 7
.... Adjust the adjusting ring to the marking. OPERATION Screwdriving operation CAUTION: • Always insert the battery cartridge all the way until the red part cannot be seen. Blow-out bulb 1 008356 First, turn the action mode changing ring so that the driver bit is a tremendous force exerted on the tool body points to the proper torque level for the hole, then pull the switch trigger. Start the tool...
.... Adjust the adjusting ring to the marking. OPERATION Screwdriving operation CAUTION: • Always insert the battery cartridge all the way until the red part cannot be seen. Blow-out bulb 1 008356 First, turn the action mode changing ring so that the driver bit is a tremendous force exerted on the tool body points to the proper torque level for the hole, then pull the switch trigger. Start the tool...
Owners Manual
Page 8
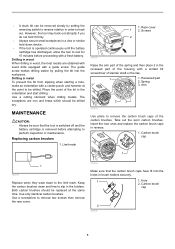
... part 2. Carbon brush cap 1 1 006258 Replace when they wear down device. • If the tool is removed before proceeding with a guide screw. However, the tool may back out abruptly if you do not hold -down to perform inspection or maintenance. Replacing carbon brushes 1. Spring 3. Hole 2. Use a cutting lubricant when drilling metals. Take out the worn carbon brushes, insert the new ones and replace the carbon brush caps in the indentation and start drilling. The guide screw makes drilling...
... part 2. Carbon brush cap 1 1 006258 Replace when they wear down device. • If the tool is removed before proceeding with a guide screw. However, the tool may back out abruptly if you do not hold -down to perform inspection or maintenance. Replacing carbon brushes 1. Spring 3. Hole 2. Use a cutting lubricant when drilling metals. Take out the worn carbon brushes, insert the new ones and replace the carbon brush caps in the indentation and start drilling. The guide screw makes drilling...
Owners Manual
Page 9
... and materials for its stated purpose. Reinstall the rear cover and tighten two screws securely. After replacing brushes, insert the battery cartridge into the tool and break in this one of original purchase. To maintain product SAFETY and RELIABILITY, repairs, any trouble develop during this manual. Then check the tool while running tool with your Makita tool specified in brushes by Makita Authorized or Factory Service Centers, always using Makita replacement parts.
... and materials for its stated purpose. Reinstall the rear cover and tighten two screws securely. After replacing brushes, insert the battery cartridge into the tool and break in this one of original purchase. To maintain product SAFETY and RELIABILITY, repairs, any trouble develop during this manual. Then check the tool while running tool with your Makita tool specified in brushes by Makita Authorized or Factory Service Centers, always using Makita replacement parts.


