
Owners Manual
Page 2
... "power tool" in all instructions listed below refers to our continuing programme of research and development, the specifications herein are tired or under the influence of electric shock. 7. SAVE THESE INSTRUCTIONS. Cluttered and dark areas invite accidents. 2. Distractions can reduce dust-related hazards. 2 Electrical Safety 4. Power tool plugs must match the outlet. Do not use common sense when operating a power tool. Never use . Personal Safety 9. Avoid accidental starting. This...
... "power tool" in all instructions listed below refers to our continuing programme of research and development, the specifications herein are tired or under the influence of electric shock. 7. SAVE THESE INSTRUCTIONS. Cluttered and dark areas invite accidents. 2. Distractions can reduce dust-related hazards. 2 Electrical Safety 4. Power tool plugs must match the outlet. Do not use common sense when operating a power tool. Never use . Personal Safety 9. Avoid accidental starting. This...

Owners Manual
Page 3
... clips, coins, keys, nails, screws, or other condition that cannot be controlled with another . Take caution to cement shear safety rules. Avoid cutting electrical wires. Have your application. Otherwise it away from the battery, avoid contact. Liquid ejected from moving parts, breakage of parts and any adjustments, changing accessories, or storing power tools. Use the correct power tool for the material and application you have the power tool repaired before making...
... clips, coins, keys, nails, screws, or other condition that cannot be controlled with another . Take caution to cement shear safety rules. Avoid cutting electrical wires. Have your application. Otherwise it away from the battery, avoid contact. Liquid ejected from moving parts, breakage of parts and any adjustments, changing accessories, or storing power tools. Use the correct power tool for the material and application you have the power tool repaired before making...

Owners Manual
Page 4
... has become excessively shorter, stop tool operation and charge the battery cartridge when you can see the red part on (1) battery charger, (2) battery, and (3) product using battery cartridge, read all the way until the red part cannot be sure that the tool is completely worn out. Charge the battery cartridge before insertion or removal of the battery cartridge. • To remove the battery cartridge, withdraw it may reach...
... has become excessively shorter, stop tool operation and charge the battery cartridge when you can see the red part on (1) battery charger, (2) battery, and (3) product using battery cartridge, read all the way until the red part cannot be sure that the tool is completely worn out. Charge the battery cartridge before insertion or removal of the battery cartridge. • To remove the battery cartridge, withdraw it may reach...

Owners Manual
Page 5
... tool is switched off and the battery cartridge is provided. Screws Install the sleeve and tighten the three screws after inserting the center blade, side blade L & R into the tool with bare hands. Installing cutting head CAUTION: • Secure the cutting head firmly. Hex wrench 4. Center blade 4. To start the tool, depress the trigger lock-button from accidentally pulled, the trigger lock-button is removed before adjusting or checking function on the tool. Otherwise it can cause serious injury. 1 1. Removing cutting head Use the hex wrench...
... tool is switched off and the battery cartridge is provided. Screws Install the sleeve and tighten the three screws after inserting the center blade, side blade L & R into the tool with bare hands. Installing cutting head CAUTION: • Secure the cutting head firmly. Hex wrench 4. Center blade 4. To start the tool, depress the trigger lock-button from accidentally pulled, the trigger lock-button is removed before adjusting or checking function on the tool. Otherwise it can cause serious injury. 1 1. Removing cutting head Use the hex wrench...

Owners Manual
Page 6
... bearing assembly with that for cutting head for temporarily hooking the tool. Remove the bearing assmbly (thin one ) with provided wrench while keeping the spindle still by referring to the section titled " Removing cutting head ".) Hex wrench storage 1. Install the optional cutting head by grabbing the two flat parts on the spindle. 4. It can be installed on either side of gauge 16 (Optional Accessory) 1. Workpiece 3 4 009018 6 Side blade 2. Side blade surface...
... bearing assembly with that for cutting head for temporarily hooking the tool. Remove the bearing assmbly (thin one ) with provided wrench while keeping the spindle still by referring to the section titled " Removing cutting head ".) Hex wrench storage 1. Install the optional cutting head by grabbing the two flat parts on the spindle. 4. It can be installed on either side of gauge 16 (Optional Accessory) 1. Workpiece 3 4 009018 6 Side blade 2. Side blade surface...

Owners Manual
Page 7
... carbon brushes should be sure that the tool is switched off and unplugged before attempting to perform inspection or maintenance. Otherwise it . Secure the workpiece firmly. Adjusting shear blade 1 2 3 4 5 1. Screws 2. Use the hex wrench to time during operation. Screws 2. Side blade L 3. To keep good cutting performance, use lubricant from time to loosen the three screws which hold the cutting head. Hex socket head bolt 2 009049 Use a screwdriver to slip in the holders...
... carbon brushes should be sure that the tool is switched off and unplugged before attempting to perform inspection or maintenance. Otherwise it . Secure the workpiece firmly. Adjusting shear blade 1 2 3 4 5 1. Screws 2. Use the hex wrench to time during operation. Screws 2. Side blade L 3. To keep good cutting performance, use lubricant from time to loosen the three screws which hold the cutting head. Hex socket head bolt 2 009049 Use a screwdriver to slip in the holders...

Owners Manual
Page 8
... 2. Only use with a slotted bit screwdriver of slender shaft or the like. 1 1. Raise the arm part of the spring and then place it in the recessed part of the housing with your local Makita Service Center. • Center blade • Side blade R • Side blade L • Hex wrench • Shear head assembly 16 • Various type of Makita genuine batteries and chargers MAKITA LIMITED ONE YEAR WARRANTY Warranty Policy Every Makita tool is...
... 2. Only use with a slotted bit screwdriver of slender shaft or the like. 1 1. Raise the arm part of the spring and then place it in the recessed part of the housing with your local Makita Service Center. • Center blade • Side blade R • Side blade L • Hex wrench • Shear head assembly 16 • Various type of Makita genuine batteries and chargers MAKITA LIMITED ONE YEAR WARRANTY Warranty Policy Every Makita tool is...

Flyer (English)
Page 1
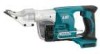
... POWER Makita-built 4-pole motor delivers power and speed (2,800 SPM) CONTROL Double-cut head makes fast, undistorted scribe or straight cuts PERFORMANCE Models BJS130 BJS130Z LXT Li-Ion batteries charge in 30 minutes, run longer and deliver 2.5X more cycles CONVENIENCE SHEAR LXT makitatools.com Deep reversible belt-clip attaches to either side for secure attachment to tool belts 18V LXT LITHIUM-ION CORDLESS 18 GAUGE STRAIGHT SHEAR KIT...
... POWER Makita-built 4-pole motor delivers power and speed (2,800 SPM) CONTROL Double-cut head makes fast, undistorted scribe or straight cuts PERFORMANCE Models BJS130 BJS130Z LXT Li-Ion batteries charge in 30 minutes, run longer and deliver 2.5X more cycles CONVENIENCE SHEAR LXT makitatools.com Deep reversible belt-clip attaches to either side for secure attachment to tool belts 18V LXT LITHIUM-ION CORDLESS 18 GAUGE STRAIGHT SHEAR KIT...

Flyer (English)
Page 2
.... STRAIGHT SHEAR KIT Models BJS130/BJS130Z FEATURES & BENEFITS I 3-year warranty on tool and 1-year warranty on hand. UPC Code: Mild Steel: 18 gauge Stainless Steel: 20 gauge 2,800 54.0 18VDC (3.0Ah) 13-3/4" 5.0 lbs. (w/battery) (BJS130) 14.8 lbs. (BJS130Z) 4.6 lbs. 3 (BJS130) 088381-094566 (BJS130Z) 088381-094580 OPTIONAL ACCESSORIES I 16 Gauge Head (125513-1) I Optimum Automotive Charger (DC18SE) Model BJS130 Model BJS130Z Makita offers a wide variety of the tool for secure attachment I Soft grip handle provides increased...
.... STRAIGHT SHEAR KIT Models BJS130/BJS130Z FEATURES & BENEFITS I 3-year warranty on tool and 1-year warranty on hand. UPC Code: Mild Steel: 18 gauge Stainless Steel: 20 gauge 2,800 54.0 18VDC (3.0Ah) 13-3/4" 5.0 lbs. (w/battery) (BJS130) 14.8 lbs. (BJS130Z) 4.6 lbs. 3 (BJS130) 088381-094566 (BJS130Z) 088381-094580 OPTIONAL ACCESSORIES I 16 Gauge Head (125513-1) I Optimum Automotive Charger (DC18SE) Model BJS130 Model BJS130Z Makita offers a wide variety of the tool for secure attachment I Soft grip handle provides increased...


