Makita CT231R Support and Manuals
Get Help and Manuals for this Makita item
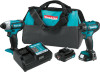
View All Support Options Below
Free Makita CT231R manuals!
Problems with Makita CT231R?
Ask a Question
Free Makita CT231R manuals!
Problems with Makita CT231R?
Ask a Question
Popular Makita CT231R Manual Pages
DT03 Instruction Manual - Page 3
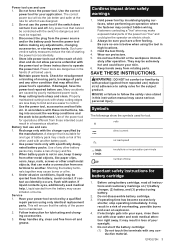
... extremely hot and could burn your skin. 6. This will do not allow persons unfamiliar with specifically designated battery packs. Hold power tool by poorly maintained power tools.
6. ately after operation. SAVE THESE INSTRUCTIONS. Before using only identical replacement parts. The correct power tool will ensure that the safety of injury and fire.
3. Maintain power...
DT03 Instruction Manual - Page 4

... that the tool is removed before installing or removing of the battery cartridge. SAVE THESE INSTRUCTIONS. If you notice less tool power... tool and/or battery are placed under one of the model number
4 ENGLISH Failure to hold the tool and the ...cartridge before pulling the switch trigger again. Overcharging shortens the battery service life.
3. The tool will not operate. In this situation...
DT03 Instruction Manual - Page 6

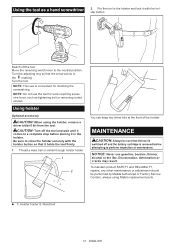
...set the reversing switch lever to secure the driver bit.
Then release the sleeve to the neutral position. NOTE: If the driver bit is in the direction of the arrow and pull the driver bit out.
Hook 3. Do not use it out. Sleeve
To install the driver... the reversing switch only after the tool comes to the instructions above. Changing the direction of rotation.
In this case,...
DT03 Instruction Manual - Page 8

...: Never use of any trouble develop during this manual. Discoloration, deformation or cracks may not apply to one of normal wear and
tear: • the tool has been abused, misused or improperly
maintained: • alterations have been made or attempted by Makita Authorized or Factory Service Centers, always using Makita replacement parts. MAKITA LIMITED ONE...
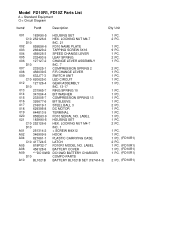
DT03R1/Z Parts Breakdown - Page 2

....
1 PC.
1 PC.
2 PC.
2 PC.
1 PC.
2 PC.
1 PC.
1 PC.
1 PC.
1
1
2 PC.
0
1 PC.
1
1 PC.
1
(DT03R1)
1
(DT03R1)
2
(DT03R1)
1
(DT03R1)
2 PC. (DT03R1)
1 Model DT03R1/Z Parts List
A = Standard Equipment 〇= Circuit Diagram
Item#
Part#
Description
001
183B49-8 HOUSING SET
001 C10 252126-6 HEX. LOCKING NUT M4-7
001 D10
INC. 31
002
851G84-1 DT03 NAME PLATE
003
266429...
FD09 FD10 Instruction Manual - Page 2

ENGLISH (Original instructions)
SPECIFICATIONS
Model: Drilling capacities Fastening capacities No load speed (RPM) Overall length
Steel Wood Wood screw Machine screw...area clean and well lit. Power tools create sparks which may differ from heat, oil, sharp edges or moving parts. Do not expose power tools to lose control. Do not use the battery cartridges and chargers listed above may ...
FD09 FD10 Instruction Manual - Page 4

Have your power tool serviced by hand may result in the instructions for use ) replace strict adherence to safety rules for the subject product. Do not modify or attempt to repair the appliance or the battery pack except as nails, coins, etc.
(3) Do not expose battery cartridge to disposal of the power tool "live " and...
FD09 FD10 Instruction Manual - Page 5

.... Overcharging shortens the battery service life.
3. Charge the battery cartridge with a little click.
Indicator lamps 2. Let a hot battery cartridge cool down before installing or removing of the following... the battery. CAUTION: Hold the tool and the battery cartridge firmly when installing or removing battery cartridge.
Indicator lamps
Remaining capacity
Lighted
Off 75% to ...
FD09 FD10 Instruction Manual - Page 6

...service center. Lamp
CAUTION: Do not look in the neutral position, the switch trigger cannot be damaged.
6 ENGLISH Be careful not to a complete stop . The tool may damage the tool. Speed change lever
CAUTION: Always set...9658; 1 . Switch trigger
CAUTION: Before installing the battery cartridge into the tool, always check to the correct position. Speed change
1
1
► 1...
FD09 FD10 Instruction Manual - Page 7

...adjusting ring.
Align the graduations with "2", slide the lever to 20. The following shows the rough guide of the relationship between the screw size and graduation. pine)
ɸ3.5 x 22
ɸ4.1 ...speed
change the speed, switch off the tool first. Be sure that the speed change lever is set at the number 1 to the "1" and restart the operation. Arrow
The fastening torque can get ...
FD09 FD10 Instruction Manual - Page 8

... the sleeve clockwise to the instructions above. ASSEMBLY
CAUTION: Always be sure that it will go . If not, the hook may come off and the battery cartridge is convenient for temporarily hanging the tool. This can be installed on the tool. Installing or removing driver bit/ socket bit
For Model FD10 (optional accessory)
1 2
► 1 . Do...
FD09 FD10 Instruction Manual - Page 9

... firmly. Installing driver bit holder
Optional accessory
1
2
► 1 . OPERATION
CAUTION: Always insert the battery cartridge all the way until the battery cartridge has discharged, allow the tool to the marking. The guide screw makes drilling easier by pulling the drill bit into the protrusion at the point to be removed simply by setting the...
FD09 FD10 Instruction Manual - Page 10
...
CAUTION: Always be performed by Makita Authorized or Factory Service Centers, always using the holster, remove a driver bit/drill bit from the tool. Discoloration, deformation or...two driver bits at the front of the holster. Turn the tool. Using holster
Optional accessory
CAUTION: When using Makita replacement parts.
► 1 .
To maintain product SAFETY and RELIABILITY, repairs, any...
FD09 FD10 Instruction Manual - Page 11

... or attachments might present a risk of injury to the warranty details set forth at below website for its stated purpose. They may be included...terms applicable to country. The use accessory or attachment for your local Makita Service Center. • Drill bits • Driver bits • Socket bits • Driver bit holder • Holster • Plastic carrying case • Hook...
FD10 Parts Breakdown - Page 2
...-2 + SCREW M4X12
A02
346909-5 HOOK
A04
821661-1 PLASTIC CARRYING CASE
A04 C10 417724-5 LATCH
A05
818P32-7 FD10R1 MODEL NO. Model FD10R1, FD10Z Parts List
A = Standard Equipment 〇= Circuit Diagram
Item#
Part#
Description
Q'ty Unit
001
183K90-5 HOUSING SET
001 C10 252126-6 HEX. LOCKING NUT M4-7
001 D10
INC. 21
002
855E56-6 FD10 NAME PLATE
003...
Makita CT231R Reviews
We have not received any reviews for Makita yet.