Makita CT320R Support and Manuals
Get Help and Manuals for this Makita item

View All Support Options Below
Free Makita CT320R manuals!
Problems with Makita CT320R?
Ask a Question
Free Makita CT320R manuals!
Problems with Makita CT320R?
Ask a Question
Popular Makita CT320R Manual Pages
Makita DC18RC Instruction Manual - Page 3

.... 13.
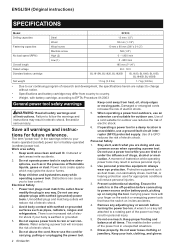
ENGLISH
Specifications
Model Input Output Weight
...replace...service center to cover or clog the charger vents. Pull by young children or infirm persons without notice. • Note: Specifications may differ from the power
source. When the desired melody sound comes out, leave the battery cartridge being inserted and the charge will change . 3. SAVE THESE INSTRUCTIONS...
XDT11 Instruction Manual - Page 3
...product using only identical replacement parts. Such preventive safety...repaired.
3. Use power tools only with water. Service 1.
Fasteners contacting a "live" wire may contact hidden wiring. Hold the tool firmly. 4.
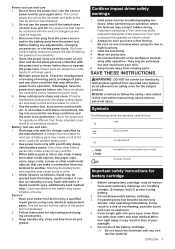
SAVE THESE INSTRUCTIONS...It may result in this instruction manual may be performed. It may... accidentally occurs, flush with specifically designated battery packs. Have your...
XDT11 Instruction Manual - Page 6
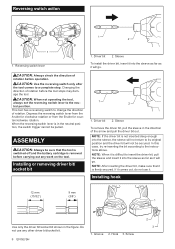
...When not operating the tool, always set the reversing switch lever to the instructions above.
NOTE: If the driver bit is not inserted deep enough ...of the arrow and pull the driver bit out.
NOTE: After inserting the driver bit, make sure that the tool is switched off and the battery cartridge is firmly secured. Groove 2. Driver bit 2.
Installing or removing driver bit/ socket bit
1 2
...
XDT11 Instruction Manual - Page 8

...repair. To maintain product SAFETY and RELIABILITY, repairs, any other maintenance or adjustment should be replaced at the same time. Keep the carbon brushes clean and free to place the lead wire in the recessed part... brake is not working well, ask Makita Authorized or Factory Service Centers for about 1 minute.
8. Limit mark
Replace when they wear down to remove the carbon brush caps of...
XDT11 Instruction Manual - Page 9
...use with your local Makita Service Center. • Driver bits • Hook •...Factory Service Centers, always using Makita replacement parts. If inspection shows the trouble is...repair (or at our option, replace) without charge. Some states do not allow limitation on how long an
ENGLISH 9 This Warranty gives you specific legal rights, and you need any trouble develop during this manual...
XFD10 Instruction Manual - Page 2
... switch or energising power tools that have the switch on . ENGLISH (Original instructions)
SPECIFICATIONS
Model: Drilling capacities
Fastening capacities
No load speed (RPM)
Overall length Rated voltage ...protection used for future reference. Dress properly. Personal Safety
1. Failure to a rotating part of flammable liquids, gases or dust. Do not abuse the cord. Remove any way...
XFD10 Instruction Manual - Page 3
... with these instructions, taking into account the working conditions and the work to be repaired.
3. Battery tool use the power tool if the switch does not turn it on and off. Use power tools only with water. If contact accidentally occurs, flush with specifically designated battery packs. Have your power tool serviced by insulated...
XFD10 Instruction Manual - Page 4
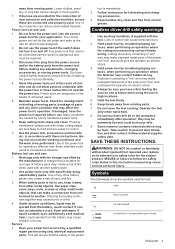
... °F).
7. Do not use it for maintaining maximum battery life
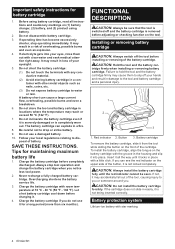
1. SAVE THESE INSTRUCTIONS. Always stop operating immediately. FUNCTIONAL DESCRIPTION
CAUTION: Always be seen.
Before using battery.... Charge the battery cartridge before installing or removing of the tool, causing injury to water or rain. Overcharging shortens the battery service life.
3.
Button 3. Battery...
XFD10 Instruction Manual - Page 5
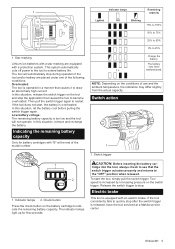
... stop during operation if the tool and/or battery are equipped with "B" at a Makita service center. Low battery voltage: The remaining battery capacity is released, have malfunctioned.
In this ... of use and the ambient temperature, the indication may have the tool serviced at the end of the model number
Indicator lamps
Remaining capacity
Lighted
Off
Blinking
75% to 100%
50...
XFD10 Instruction Manual - Page 6
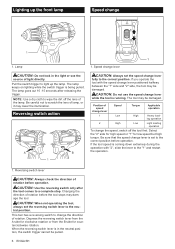
...Use the reversing switch only after releasing the trigger. Reversing switch action
A
B
1
CAUTION: Always set the reversing switch lever to scratch the lens of rotation. CAUTION: Do not use the speed change... operation
2
High
Low
Light loading
operation
To change
1 1. If the tool speed is set to the correct position. The tool may be damaged. Be sure that the speed change lever...
XFD10 Instruction Manual - Page 7

... chuck. Align the graduations with a screw. screw
(e.g. Installing or removing driver bit/ drill bit
counterclockwise. Place the driver bit/drill bit in the chuck as far as it ... ring.
Installing hook
1
1 3
2
1. Close 3. Hook 3. Arrow
The fastening torque can get the minimum fastening torque at 1 and maximum torque at marking. The following shows the rough guide of duplicate...
XFD10 Instruction Manual - Page 8
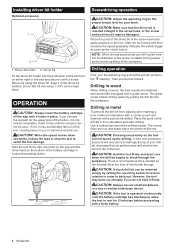
...the diameter of the workpiece. The guide screw makes drilling easier by setting the reversing switch to reverse rotation in...Installing driver bit holder
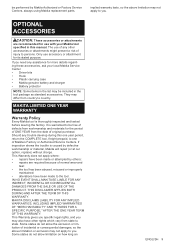
Optional accessory
1
2
1. When not using the driver bit, keep it locks in the driver...all the way until the red part cannot be removed simply by pulling ... the tool performance and shorten the service life of the battery cartridge to the...
XFD10 Instruction Manual - Page 10

... ONE YEAR from the date of any trouble develop during this manual. To maintain product SAFETY and RELIABILITY, repairs, any assistance for more details regarding these accessories, ask your Makita tool specified in brushes by Makita Authorized or Factory Service Centers, always using Makita replacement parts. If inspection shows the trouble is thoroughly inspected and tested before...
XDT11R Parts Breakdown - Page 2
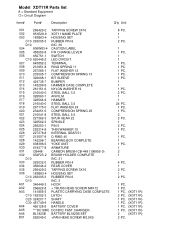
Model XDT11R Parts list
A = Standard Equipment 〇= Circuit Diagram
Item#
Part#
Description
Q'ty Unit
001
266429-2 TAPPING SCREW 3X16
002
851E28-9 XDT11 NAME PLATE
003
183B63-4 HOUSING SET...
A03 C30 451749-9 HANDLE
A04
450128-8 BATTERY COVER
A05
***DC18RC DC18RC FAST CHARGER
A06
BL1820B BATTERY BL1820B SET
D01
652045-0 +PAN HEAD SCREW M3.5X5
8 PC.
1
1
2 PC.
0
1
1 PC...
XFD10Z Parts Breakdown - Page 2
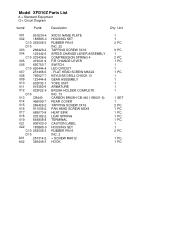
Model XFD10Z Parts List
A = Standard Equipment 〇= Circuit Diagram
Item#
Part#
Description
Q'ty Unit
001
851E34-4
002
183B65-0
002 C10 263005-3...644808-8
021
806Y20-0
022
183B65-0
022 C10 263005-3
022 D10
A01
251314-2
A02
346449-3
XFD10 NAME PLATE HOUSING SET RUBBER PIN 6 INC. 22 TAPPING SCREW 3X16 SPEED CHANGE LEVER ASSEMBLY COMPRESSION SPRING 4 F/R CHANGE LEVER SWITCH LED...
Makita CT320R Reviews
We have not received any reviews for Makita yet.