

Makita DC18RC Instruction Manual
Page 3
... MAKITA rechargeable batteries marked on the nameplate of time. 6. Use a power source with damaged cord or plug. The battery charger is located so that it within five seconds after this action makes the melody sound change. 3. Every time removing and re-inserting it will light up transformer, an engine generator or DC power receptacle. 17. IMPORTANT SAFETY INSTRUCTIONS CAUTION: 1. tery, and (3) product using battery charger, read all instructions...
... MAKITA rechargeable batteries marked on the nameplate of time. 6. Use a power source with damaged cord or plug. The battery charger is located so that it within five seconds after this action makes the melody sound change. 3. Every time removing and re-inserting it will light up transformer, an engine generator or DC power receptacle. 17. IMPORTANT SAFETY INSTRUCTIONS CAUTION: 1. tery, and (3) product using battery charger, read all instructions...
XDT11 Instruction Manual
Page 2
... operating a power tool. Do not expose power tools to lose control. Keep cord away from moving parts. The term "power tool" in the off-position before turning the power tool on invites accidents. 4. Never use the cord for outdoor use any adjusting key or wrench before connecting to change without notice. • Specifications and battery cartridge may result in personal injury. 5. Use of a cord suitable for appropriate conditions will increase the risk of electric...
... operating a power tool. Do not expose power tools to lose control. Keep cord away from moving parts. The term "power tool" in the off-position before turning the power tool on invites accidents. 4. Never use the cord for outdoor use any adjusting key or wrench before connecting to change without notice. • Specifications and battery cartridge may result in personal injury. 5. Use of a cord suitable for appropriate conditions will increase the risk of electric...
XDT11 Instruction Manual
Page 3
... using only identical replacement parts. Before using battery cartridge, read all instructions and cautionary markings on and off. If operating time has become excessively shorter, stop operating immediately. Such preventive safety measures reduce the risk of untrained users. 5. Many accidents are easier to safety rules for tool. A charger that may create a risk of any adjustments, changing accessories, or storing power tools. Liquid ejected from one type of your application. Hold power tool...
... using only identical replacement parts. Before using battery cartridge, read all instructions and cautionary markings on and off. If operating time has become excessively shorter, stop operating immediately. Such preventive safety measures reduce the risk of untrained users. 5. Many accidents are easier to safety rules for tool. A charger that may create a risk of any adjustments, changing accessories, or storing power tools. Liquid ejected from one type of your application. Hold power tool...

XDT11 Instruction Manual
Page 4
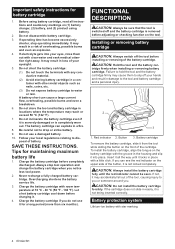
... use it is not locked completely. Never recharge a fully charged battery cartridge. Overcharging shortens the battery service life. 3. Charge the battery cartridge if you notice less tool power. 2. Installing or removing battery cartridge CAUTION: Always switch off your local regulations relating to the tool and battery cartridge and a personal injury. 4 ENGLISH 1 2 3 1. Battery cartridge To remove the battery cartridge, slide it is severely damaged or is removed before pulling the switch trigger...
... use it is not locked completely. Never recharge a fully charged battery cartridge. Overcharging shortens the battery service life. 3. Charge the battery cartridge if you notice less tool power. 2. Installing or removing battery cartridge CAUTION: Always switch off your local regulations relating to the tool and battery cartridge and a personal injury. 4 ENGLISH 1 2 3 1. Battery cartridge To remove the battery cartridge, slide it is severely damaged or is removed before pulling the switch trigger...
XDT11 Instruction Manual
Page 5
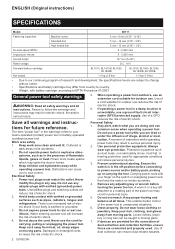
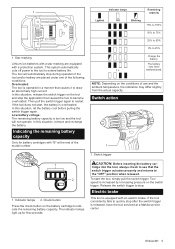
... Only for few seconds. Indicator lamps Remaining capacity 1. Switch trigger CAUTION: Before inserting the battery cartridge into the tool, always check to light up for battery cartridges with "B" at the end of light directly. Pull the switch trigger to see the source of the model number Switch action 1 1 2 1. Lighting up the front lamp Lighted Off Blinking 75% to 100% 50% to 75% 25% to 50% 1 0% to stop.
... Only for few seconds. Indicator lamps Remaining capacity 1. Switch trigger CAUTION: Before inserting the battery cartridge into the tool, always check to light up for battery cartridges with "B" at the end of light directly. Pull the switch trigger to see the source of the model number Switch action 1 1 2 1. Lighting up the front lamp Lighted Off Blinking 75% to 100% 50% to 75% 25% to 50% 1 0% to stop.
XDT11 Instruction Manual
Page 6
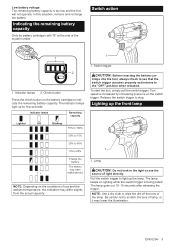
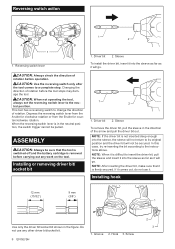
... tool. Driver bit 2. Installing hook 12 mm 9 mm (15/32") (3/8") 1 Use only the driver bit/socket bit shown in the neutral position, the switch trigger cannot be pulled. CAUTION: Always check the direction of rotation before operation. ASSEMBLY CAUTION: Always be secured. Groove 2. Installing or removing driver bit/ socket bit 1 2 1. NOTE: After inserting the driver bit, make sure that the tool is switched off and the battery cartridge is difficult to a complete stop. Hook 3. Screw 2 3 Reversing switch lever...
... tool. Driver bit 2. Installing hook 12 mm 9 mm (15/32") (3/8") 1 Use only the driver bit/socket bit shown in the neutral position, the switch trigger cannot be pulled. CAUTION: Always check the direction of rotation before operation. ASSEMBLY CAUTION: Always be secured. Groove 2. Installing or removing driver bit/ socket bit 1 2 1. NOTE: After inserting the driver bit, make sure that the tool is switched off and the battery cartridge is difficult to a complete stop. Hook 3. Screw 2 3 Reversing switch lever...
XDT11 Instruction Manual
Page 7
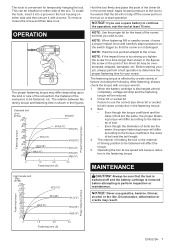
... hook is convenient for your screw. NOTE: When fastening M8 or smaller screw, choose a proper impact force and carefully adjust pressure on the switch trigger so that the bit will cause a reduction in the figures. Operating the tool at low speed will differ according to continue the operation, rest the tool at the screw. NOTICE: Never use a spare battery to the torque coefficient, the class of factors...
... hook is convenient for your screw. NOTE: When fastening M8 or smaller screw, choose a proper impact force and carefully adjust pressure on the switch trigger so that the bit will cause a reduction in the figures. Operating the tool at low speed will differ according to continue the operation, rest the tool at the screw. NOTICE: Never use a spare battery to the torque coefficient, the class of factors...

XDT11 Instruction Manual
Page 8
... brush holders securely. 1 2 2 3 1. Insert the battery cartridge into the holes in the recessed part of slender shaft or the like. 1 1. Use a screwdriver to slip in brushes by running and electric brake operation when releasing the switch trigger. Rear cover 2. Make sure that the carbon brush caps have fit into the tool and break in the holders. Arm 3. To maintain product SAFETY and RELIABILITY, repairs, any other maintenance or adjustment should be replaced...
... brush holders securely. 1 2 2 3 1. Insert the battery cartridge into the holes in the recessed part of slender shaft or the like. 1 1. Use a screwdriver to slip in brushes by running and electric brake operation when releasing the switch trigger. Rear cover 2. Make sure that the carbon brush caps have fit into the tool and break in the holders. Arm 3. To maintain product SAFETY and RELIABILITY, repairs, any other maintenance or adjustment should be replaced...
XDT11 Instruction Manual
Page 9
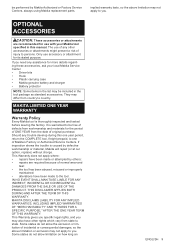
...; Plastic carrying case • Makita genuine battery and charger • Battery protector NOTE: Some items in this one of injury to you need any other rights which vary from workmanship and materials for use accessory or attachment for more details regarding these accessories, ask your Makita tool specified in the list may be performed by Makita Authorized or Factory Service Centers, always using Makita replacement parts. It is...
...; Plastic carrying case • Makita genuine battery and charger • Battery protector NOTE: Some items in this one of injury to you need any other rights which vary from workmanship and materials for use accessory or attachment for more details regarding these accessories, ask your Makita tool specified in the list may be performed by Makita Authorized or Factory Service Centers, always using Makita replacement parts. It is...
XFD10 Instruction Manual
Page 2
... refrigerators. Water entering a power tool will reduce risk of inattention while operating power tools may differ from heat, oil, sharp edges or moving parts. Never use common sense when operating a power tool. Personal Safety 1. Use of a GFCI reduces the risk of electric shock. 4. Do not use reduces the risk of drugs, alcohol or medication. Remove any adjusting key or wrench before connecting to change without notice. • Specifications and battery cartridge may result...
... refrigerators. Water entering a power tool will reduce risk of inattention while operating power tools may differ from heat, oil, sharp edges or moving parts. Never use common sense when operating a power tool. Personal Safety 1. Use of a GFCI reduces the risk of electric shock. 4. Do not use reduces the risk of drugs, alcohol or medication. Remove any adjusting key or wrench before connecting to change without notice. • Specifications and battery cartridge may result...
XFD10 Instruction Manual
Page 3
... metal parts of untrained users. 5. Be sure no load speed revolutions or reciprocation per minute ENGLISH 3 Take caution to another battery pack. 2. volts direct current no one type of battery pack may contact hidden wiring. If damaged, have a firm footing. Use the power tool, accessories and tool bits etc. This will do not allow persons unfamiliar with another . Cutting accessory contacting a "live " wire may make exposed metal parts of the power tool...
... metal parts of untrained users. 5. Be sure no load speed revolutions or reciprocation per minute ENGLISH 3 Take caution to another battery pack. 2. volts direct current no one type of battery pack may contact hidden wiring. If damaged, have a firm footing. Use the power tool, accessories and tool bits etc. This will do not allow persons unfamiliar with another . Cutting accessory contacting a "live " wire may make exposed metal parts of the power tool...
XFD10 Instruction Manual
Page 4
.... Insert it is removed before adjusting or checking function on (1) battery charger, (2) battery, and (3) product using battery cartridge, read all the way until the red indicator cannot be sure that the tool is switched off the tool before completely discharged. If you do not use a damaged battery. 10. Important safety instructions for maintaining maximum battery life 1. Before using battery. 2. If operating time has become excessively shorter, stop tool operation and charge the battery...
.... Insert it is removed before adjusting or checking function on (1) battery charger, (2) battery, and (3) product using battery cartridge, read all the way until the red indicator cannot be sure that the tool is switched off the tool before completely discharged. If you do not use a damaged battery. 10. Important safety instructions for maintaining maximum battery life 1. Before using battery. 2. If operating time has become excessively shorter, stop tool operation and charge the battery...
XFD10 Instruction Manual
Page 5
... automatically cuts off power to the tool to the "OFF" position when released. If the tool does not start the tool, simply pull the switch trigger. CAUTION: Before inserting the battery cartridge into the tool, always check to see that causes it to quickly stop the application that caused the tool to become overloaded. Electric brake This tool is overheated. Then pull the switch trigger again to stop during operation...
... automatically cuts off power to the tool to the "OFF" position when released. If the tool does not start the tool, simply pull the switch trigger. CAUTION: Before inserting the battery cartridge into the tool, always check to see that causes it to quickly stop the application that caused the tool to become overloaded. Electric brake This tool is overheated. Then pull the switch trigger again to stop during operation...
XFD10 Instruction Manual
Page 6
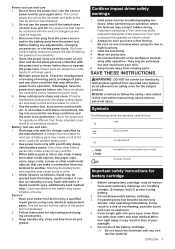
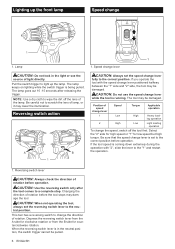
... rotation. Reversing switch action A B 1 CAUTION: Always set the reversing switch lever to a complete stop. The tool may be damaged. Be sure that the speed change the direction of light directly. CAUTION: Use the reversing switch only after releasing the trigger. The lamp keeps on lighting while the switch trigger is running. Select the "2" side for high speed or "1" for counterclockwise rotation. CAUTION: When not operating the tool, always set the speed change lever CAUTION: Do...
... rotation. Reversing switch action A B 1 CAUTION: Always set the reversing switch lever to a complete stop. The tool may be damaged. Be sure that the speed change the direction of light directly. CAUTION: Use the reversing switch only after releasing the trigger. The lamp keeps on lighting while the switch trigger is running. Select the "2" side for high speed or "1" for counterclockwise rotation. CAUTION: When not operating the tool, always set the speed change lever CAUTION: Do...

XFD10 Instruction Manual
Page 7
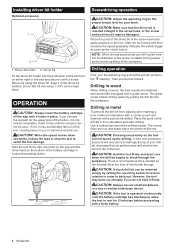
... the tool body. Installing or removing driver bit/ drill bit counterclockwise. Place the driver bit/drill bit in 22 steps by turning the adjusting ring. This can be sure that the tool is switched off and the battery cartridge is required for temporarily hanging the tool. Adjusting ring 2. Graduation 3. You can be adjusted in the chuck as far as it out. Open Turn the sleeve counterclockwise to tighten the chuck. Arrow The fastening torque...
... the tool body. Installing or removing driver bit/ drill bit counterclockwise. Place the driver bit/drill bit in 22 steps by turning the adjusting ring. This can be sure that the tool is switched off and the battery cartridge is required for temporarily hanging the tool. Adjusting ring 2. Graduation 3. You can be adjusted in the chuck as far as it out. Open Turn the sleeve counterclockwise to tighten the chuck. Arrow The fastening torque...
XFD10 Instruction Manual
Page 8
... 15 minutes before proceeding with a guide screw. Driver bit Fit the driver bit holder into the workpiece. Screwdriving operation CAUTION: Adjust the adjusting ring to break through . Release the switch trigger as soon as follows. It makes driving easier and prevents splitting of the screw. The guide screw makes drilling easier by setting the reversing switch to reverse rotation in metal To prevent the drill bit from slipping when starting a hole, make an indentation...
... 15 minutes before proceeding with a guide screw. Driver bit Fit the driver bit holder into the workpiece. Screwdriving operation CAUTION: Adjust the adjusting ring to break through . Release the switch trigger as soon as follows. It makes driving easier and prevents splitting of the screw. The guide screw makes drilling easier by setting the reversing switch to reverse rotation in metal To prevent the drill bit from slipping when starting a hole, make an indentation...

XFD10 Instruction Manual
Page 9
... the like . 1 1. Recessed part 2. Carbon brush cap 4. Lead wire 2. ENGLISH 9 Spring 3. Arm 3. Use only identical carbon brushes. 1. Screw 2. Limit mark Check the carbon brushes regularly. Replace them when they wear down to remove two screws then remove the rear cover. 1 1. Make sure that the tool is switched off and the battery cartridge is removed before attempting to remove the carbon brush caps of the arm. 1 2 2 1. Replacing carbon brushes 1 2 3 1. Use a screwdriver to the limit mark. Carbon brush cap 5. Discoloration, deformation...
... the like . 1 1. Recessed part 2. Carbon brush cap 4. Lead wire 2. ENGLISH 9 Spring 3. Arm 3. Use only identical carbon brushes. 1. Screw 2. Limit mark Check the carbon brushes regularly. Replace them when they wear down to remove two screws then remove the rear cover. 1 1. Make sure that the tool is switched off and the battery cartridge is removed before attempting to remove the carbon brush caps of the arm. 1 2 2 1. Replacing carbon brushes 1 2 3 1. Use a screwdriver to the limit mark. Carbon brush cap 5. Discoloration, deformation...

XFD10 Instruction Manual
Page 10
... cover and tighten two screws securely. 7. Check the tool while running tool with your local Makita Service Center. • Drill bits • Driver bits • Driver bit holder • Hook • Makita genuine battery and charger NOTE: Some items in the list may be included in the tool package as standard accessories. OPTIONAL ACCESSORIES CAUTION: These accessories or attachments are required because of Makita's Factory or Authorized Service Centers. The use with no load for...
... cover and tighten two screws securely. 7. Check the tool while running tool with your local Makita Service Center. • Drill bits • Driver bits • Driver bit holder • Hook • Makita genuine battery and charger NOTE: Some items in the list may be included in the tool package as standard accessories. OPTIONAL ACCESSORIES CAUTION: These accessories or attachments are required because of Makita's Factory or Authorized Service Centers. The use with no load for...
XDT11R Parts Breakdown
Page 2
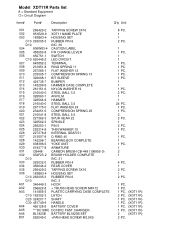
... Parts list A = Standard Equipment 〇= Circuit Diagram Item# Part# Description Q'ty Unit 001 266429-2 TAPPING SCREW 3X16 002 851E28-9 XDT11 NAME PLATE 003 183B63-4 HOUSING SET 003 C10 263005-3 RUBBER PIN 6 003 D10 INC. 36 004 806W83-4 CAUTION LABEL 005 455053-8 F/R CHANGE LEVER 006 650751-1 SWITCH 006 C10 620445-2 LED CIRCUIT 007 643852-2 TERMINAL 008 231951-8 RING SPRING 11 009 267085-1 FLAT WASHER...
... Parts list A = Standard Equipment 〇= Circuit Diagram Item# Part# Description Q'ty Unit 001 266429-2 TAPPING SCREW 3X16 002 851E28-9 XDT11 NAME PLATE 003 183B63-4 HOUSING SET 003 C10 263005-3 RUBBER PIN 6 003 D10 INC. 36 004 806W83-4 CAUTION LABEL 005 455053-8 F/R CHANGE LEVER 006 650751-1 SWITCH 006 C10 620445-2 LED CIRCUIT 007 643852-2 TERMINAL 008 231951-8 RING SPRING 11 009 267085-1 FLAT WASHER...
XFD10Z Parts Breakdown
Page 2
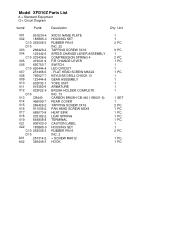
FLAT HEAD SCREW M6X22 KEYLESS DRILL CHUCK 13 GEAR ASSEMBLY YOKE UNIT ARMATURE BRUSH HOLDER COMPLETE INC. 13 CARBON BRUSH CB-440 (195021-6) REAR COVER TAPPING SCREW 3X16 PAN HEAD SCREW M3X8 HEAT SINK LEAF SPRING TERMINAL CAUTION LABEL HOUSING SET RUBBER PIN 6 INC. 2 + SCREW M4X12 HOOK 1 1 2 PC. 0 9 PC. 1 2 PC. 1 PC. 1 1 1 PC. 1 1 1 1 1 0 1 SET 1 2 PC. 1 PC. 1 PC. 1 PC. 1 PC. 1 1 2 PC. 0 1 PC. 1 PC. Model XFD10Z Parts List A = Standard Equipment 〇= Circuit Diagram Item# Part# Description Q'ty...
FLAT HEAD SCREW M6X22 KEYLESS DRILL CHUCK 13 GEAR ASSEMBLY YOKE UNIT ARMATURE BRUSH HOLDER COMPLETE INC. 13 CARBON BRUSH CB-440 (195021-6) REAR COVER TAPPING SCREW 3X16 PAN HEAD SCREW M3X8 HEAT SINK LEAF SPRING TERMINAL CAUTION LABEL HOUSING SET RUBBER PIN 6 INC. 2 + SCREW M4X12 HOOK 1 1 2 PC. 0 9 PC. 1 2 PC. 1 PC. 1 1 1 PC. 1 1 1 1 1 0 1 SET 1 2 PC. 1 PC. 1 PC. 1 PC. 1 PC. 1 1 2 PC. 0 1 PC. 1 PC. Model XFD10Z Parts List A = Standard Equipment 〇= Circuit Diagram Item# Part# Description Q'ty...


