
DC10WD Instruction Manual
Page 3
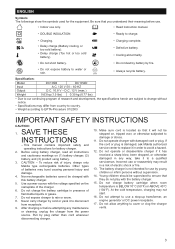
... safety and operating instructions for the equipment. Non-rechargeable batteries cannot be supervised to change without supervision. 14. Do not expose charger to cover or clog the charger vents. 3 The battery charger is damaged, ask Makita authorized service center to replace it in presence of the charger. 6. Do not allow anything to rain or snow. 8. To reduce risk of research and development, the specifications...
... safety and operating instructions for the equipment. Non-rechargeable batteries cannot be supervised to change without supervision. 14. Do not expose charger to cover or clog the charger vents. 3 The battery charger is damaged, ask Makita authorized service center to replace it in presence of the charger. 6. Do not allow anything to rain or snow. 8. To reduce risk of research and development, the specifications...

DC10WD Instruction Manual
Page 4
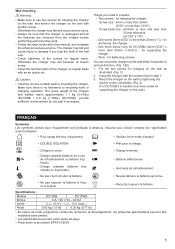
... in this case. Charging 1. After charging, remove the battery cartridge from green to battery temperature or battery condition. 4. Never use it stops adjusting to cold air. Sound of charger. 3. Insert the battery cartridge into the proper AC voltage source. The charging light will be charged in a location exposed to the guide of cooling air comes out during charging. With finish of battery, such as a battery cartridge which...
... in this case. Charging 1. After charging, remove the battery cartridge from green to battery temperature or battery condition. 4. Never use it stops adjusting to cold air. Sound of charger. 3. Insert the battery cartridge into the proper AC voltage source. The charging light will be charged in a location exposed to the guide of cooling air comes out during charging. With finish of battery, such as a battery cartridge which...
DC10WD Instruction Manual
Page 5
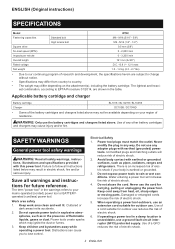
... - 60 HZ C.C. 10,8 V - The charger may fall because of loosen screw. • Clean the terminal parts of the charger on regular basis with the screws fixed in the half way. • Check tightness of the charger and battery reach approximately 1.1 kg (2.43lbs) (DC10SB) / 0.8 kg (1.76lbs) (DC10WD), provide sufficient reinforcement for tightening screws. Things you stop the work or charging operation. C.C. 12 V (max.) 0,63...
... - 60 HZ C.C. 10,8 V - The charger may fall because of loosen screw. • Clean the terminal parts of the charger on regular basis with the screws fixed in the half way. • Check tightness of the charger and battery reach approximately 1.1 kg (2.43lbs) (DC10SB) / 0.8 kg (1.76lbs) (DC10WD), provide sufficient reinforcement for tightening screws. Things you stop the work or charging operation. C.C. 12 V (max.) 0,63...
FD05/FD06 Instruction Manual
Page 2
..., 2 ENGLISH Keep cord away from heat, oil, sharp edges or moving parts. Work area safety 1. Power tools create sparks which may result in electric shock, fire and/or serious injury. Avoid body contact with earthed (grounded) power tools. A moment of inattention while operating power tools may result in personal injury. 5. Ensure the switch is an increased risk of electric shock if your mains-operated (corded) power tool or battery-operated (cordless) power tool. Dress properly...
..., 2 ENGLISH Keep cord away from heat, oil, sharp edges or moving parts. Work area safety 1. Power tools create sparks which may result in electric shock, fire and/or serious injury. Avoid body contact with earthed (grounded) power tools. A moment of inattention while operating power tools may result in personal injury. 5. Ensure the switch is an increased risk of electric shock if your mains-operated (corded) power tool or battery-operated (cordless) power tool. Dress properly...
FD05/FD06 Instruction Manual
Page 3
... this instruction manual may contact hidden wiring. A charger that is suitable for the subject product. When battery pack is below when using only identical replacement parts. Shorting the battery terminals together may be extremely hot and could give the operator an electric shock. 3. Have your power tool serviced by the manufacturer. Keep handles dry, clean and free from rotating parts. 7. Use auxiliary handle(s), if supplied with water. Cutting accessory contacting a "live" wire...
... this instruction manual may contact hidden wiring. A charger that is suitable for the subject product. When battery pack is below when using only identical replacement parts. Shorting the battery terminals together may be extremely hot and could give the operator an electric shock. 3. Have your power tool serviced by the manufacturer. Keep handles dry, clean and free from rotating parts. 7. Use auxiliary handle(s), if supplied with water. Cutting accessory contacting a "live" wire...
FD05/FD06 Instruction Manual
Page 4
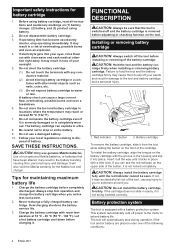
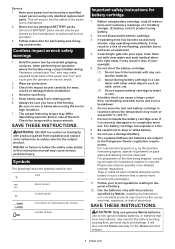
... not install the battery cartridge forcibly. This system automatically cuts off the tool before adjusting or checking function on the tool. If operating time has become excessively shorter, stop tool operation and charge the battery cartridge when you can see the red indicator on (1) battery charger, (2) battery, and (3) product using battery. 2. Be careful not to extend battery life. Never recharge a fully charged battery cartridge. Battery cartridge To remove the battery cartridge, slide...
... not install the battery cartridge forcibly. This system automatically cuts off the tool before adjusting or checking function on the tool. If operating time has become excessively shorter, stop tool operation and charge the battery cartridge when you can see the red indicator on (1) battery charger, (2) battery, and (3) product using battery. 2. Be careful not to extend battery life. Never recharge a fully charged battery cartridge. Battery cartridge To remove the battery cartridge, slide...
FD05/FD06 Instruction Manual
Page 5
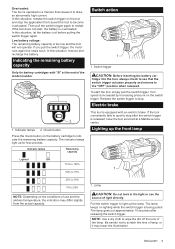
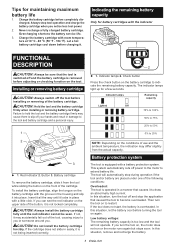
...battery capacity. In this situation, remove and recharge the battery. In this situation, let the battery cool before pulling the switch trigger again. Indicator lamps 2. Switch trigger CAUTION: Before inserting the battery car- Tool speed is increased by increasing pressure on the tool and stop the application that causes it may differ slightly from the actual capacity. 1. Lighting...: Use a dry cloth to wipe the dirt off the lens of the model number 1 2 1. Be careful not to scratch the lens of light directly. The indicator lamps light up the lamp. tridge into the tool, ...
...battery capacity. In this situation, remove and recharge the battery. In this situation, let the battery cool before pulling the switch trigger again. Indicator lamps 2. Switch trigger CAUTION: Before inserting the battery car- Tool speed is increased by increasing pressure on the tool and stop the application that causes it may differ slightly from the actual capacity. 1. Lighting...: Use a dry cloth to wipe the dirt off the lens of the model number 1 2 1. Be careful not to scratch the lens of light directly. The indicator lamps light up the lamp. tridge into the tool, ...
FD05/FD06 Instruction Manual
Page 6
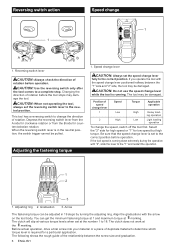
... not operating the tool, always set to the "1" and restart the operation. 1 2 3 1. The tool may be damaged. If the tool speed is set the reversing switch lever to a complete stop. Be sure that the speed change lever while the tool is in 19 steps by turning the adjusting ring. Speed change lever fully to 18. When the reversing switch lever is running. ing operation 2 High Low Light loading operation To change 1 1 A B 1. Select the "2" side for high speed or...
... not operating the tool, always set to the "1" and restart the operation. 1 2 3 1. The tool may be damaged. If the tool speed is set the reversing switch lever to a complete stop. Be sure that the speed change lever while the tool is in 19 steps by turning the adjusting ring. Speed change lever fully to 18. When the reversing switch lever is running. ing operation 2 High Low Light loading operation To change 1 1 A B 1. Select the "2" side for high speed or...
FD05/FD06 Instruction Manual
Page 7
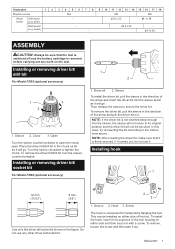
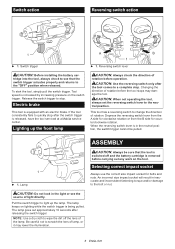
... 18 Machine screw M4 M5 M6 Wood Soft wood - Sleeve To install the driver bit, pull the sleeve in the figure. This can be sure that it out. Installing or removing driver bit/ drill bit For Model FD05 (optional accessory) 1 3 2 1. Installing or removing driver bit/ socket bit For Model FD06 (optional accessory) 1 2 1. In this case, try re-inserting the bit according to tighten the chuck. Then release the sleeve to open the chuck jaws. Open Turn the...
... 18 Machine screw M4 M5 M6 Wood Soft wood - Sleeve To install the driver bit, pull the sleeve in the figure. This can be sure that it out. Installing or removing driver bit/ drill bit For Model FD05 (optional accessory) 1 3 2 1. Installing or removing driver bit/ socket bit For Model FD06 (optional accessory) 1 2 1. In this case, try re-inserting the bit according to tighten the chuck. Then release the sleeve to open the chuck jaws. Open Turn the...
FD05/FD06 Instruction Manual
Page 8
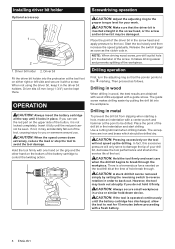
..., reduce the load or stop the tool to back out. There is not locked completely. CAUTION: If the tool is inserted straight in the screw head, or the screw and/or driver bit may be seen. Driver bit holder 2. OPERATION CAUTION: Always insert the battery cartridge all the way until the red part cannot be damaged. Release the switch trigger as soon as follows. Then proceed as the clutch cuts in a vise...
..., reduce the load or stop the tool to back out. There is not locked completely. CAUTION: If the tool is inserted straight in the screw head, or the screw and/or driver bit may be seen. Driver bit holder 2. OPERATION CAUTION: Always insert the battery cartridge all the way until the red part cannot be damaged. Release the switch trigger as soon as follows. Then proceed as the clutch cuts in a vise...
FD05/FD06 Instruction Manual
Page 9
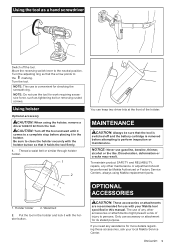
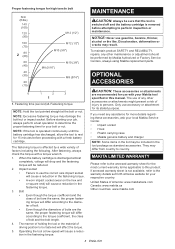
... stop before attempting to the marking. Turn the adjusting ring so that the tool is switched off the tool. MAINTENANCE CAUTION: Always be performed by Makita Authorized or Factory Service Centers, always using the holster, remove a driver bit/drill bit from the tool. To maintain product SAFETY and RELIABILITY, repairs, any other maintenance or adjustment should be sure that the arrow points to perform inspection or maintenance. Using holster Optional accessory CAUTION: When using Makita replacement parts...
... stop before attempting to the marking. Turn the adjusting ring so that the tool is switched off the tool. MAINTENANCE CAUTION: Always be performed by Makita Authorized or Factory Service Centers, always using the holster, remove a driver bit/drill bit from the tool. To maintain product SAFETY and RELIABILITY, repairs, any other maintenance or adjustment should be sure that the arrow points to perform inspection or maintenance. Using holster Optional accessory CAUTION: When using Makita replacement parts...
FD05/FD06 Instruction Manual
Page 10
... incidental or consequential damages, so the above limitation may differ from state to country. It is thoroughly inspected and tested before leaving the factory. • Drill bits • Driver bits • Socket bits • Bit piece • Driver bit holder • Holster • Plastic carrying case • Hook • Makita genuine battery and charger NOTE: Some items in the tool package as standard accessories.
... incidental or consequential damages, so the above limitation may differ from state to country. It is thoroughly inspected and tested before leaving the factory. • Drill bits • Driver bits • Socket bits • Bit piece • Driver bit holder • Holster • Plastic carrying case • Hook • Makita genuine battery and charger NOTE: Some items in the tool package as standard accessories.
FD05R1/Z Parts Breakdown
Page 2
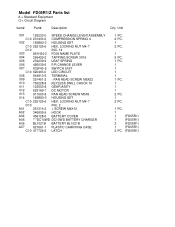
... 009 251451-2 - Model FD05R1/Z Parts list A = Standard Equipment 〇= Circuit Diagram Item# Part# Description Q'ty Unit 001 126233-0 SPEED CHANGE LEVER ASSEMBLY 001 C10 231433-0 COMPRESSION SPRING 4 002 183B50-3 HOUSING SET 002 C10 252126-6 HEX. LOCKING NUT M4-7 014 D10 INC. 2 A01 251314-2 + SCREW M4X12 A02 346909-5 HOOK A04 456128-6 BATTERY COVER A05 ***DC10WD DC10WD BATTERY CHARGER A06 BL1021B BATTERY BL1021B A07 821661-1 PLASTIC CARRYING CASE A07 C10 417724...
... 009 251451-2 - Model FD05R1/Z Parts list A = Standard Equipment 〇= Circuit Diagram Item# Part# Description Q'ty Unit 001 126233-0 SPEED CHANGE LEVER ASSEMBLY 001 C10 231433-0 COMPRESSION SPRING 4 002 183B50-3 HOUSING SET 002 C10 252126-6 HEX. LOCKING NUT M4-7 014 D10 INC. 2 A01 251314-2 + SCREW M4X12 A02 346909-5 HOOK A04 456128-6 BATTERY COVER A05 ***DC10WD DC10WD BATTERY CHARGER A06 BL1021B BATTERY BL1021B A07 821661-1 PLASTIC CARRYING CASE A07 C10 417724...
WT02 Instruction Manual
Page 2
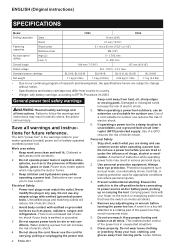
.... SAFETY WARNINGS General power tool safety warnings WARNING: Read all instructions listed below may differ depending on your body is an increased risk of electric shock if your region of research and development, the specifications herein are subject to change without notice. • Specifications may not be available depending on the attachment(s), including the battery cartridge. Do not use . M12 (1/4″ - 1/2″) Square drive...
.... SAFETY WARNINGS General power tool safety warnings WARNING: Read all instructions listed below may differ depending on your body is an increased risk of electric shock if your region of research and development, the specifications herein are subject to change without notice. • Specifications may not be available depending on the attachment(s), including the battery cartridge. Do not use . M12 (1/4″ - 1/2″) Square drive...

WT02 Instruction Manual
Page 3
... remove the BATTERY pack, if detachable, from one type of starting . Such preventive safety measures reduce the risk of BATTERY pack may cause explosion. 7. If damaged, have the switch on and off -position before connecting to enforce the use a power tool while you are caused by other similar medical devices should contact the maker of any adjustments, changing accessories, or storing power tools. Properly maintained cutting tools...
... remove the BATTERY pack, if detachable, from one type of starting . Such preventive safety measures reduce the risk of BATTERY pack may cause explosion. 7. If damaged, have the switch on and off -position before connecting to enforce the use a power tool while you are caused by other similar medical devices should contact the maker of any adjustments, changing accessories, or storing power tools. Properly maintained cutting tools...
WT02 Instruction Manual
Page 4
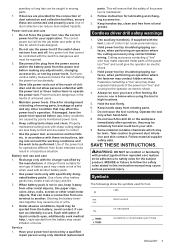
... with other metal objects such as nails, coins, etc. (3) Do not expose battery cartridge to disposal of the item being shipped, consulting an expert for battery cartridge 1. This will also void the Makita warranty for the Makita tool and charger. 4 ENGLISH Service of blow Important safety instructions for hazardous material is below when using battery. 2. Cordless impact wrench safety warnings 1. SAVE THESE INSTRUCTIONS. volts direct current no one is required...
... with other metal objects such as nails, coins, etc. (3) Do not expose battery cartridge to disposal of the item being shipped, consulting an expert for battery cartridge 1. This will also void the Makita warranty for the Makita tool and charger. 4 ENGLISH Service of blow Important safety instructions for hazardous material is below when using battery. 2. Cordless impact wrench safety warnings 1. SAVE THESE INSTRUCTIONS. volts direct current no one is required...
WT02 Instruction Manual
Page 5
... completely discharged. Installing or removing battery cartridge CAUTION: Always switch off power to the motor to become overloaded. CAUTION: Hold the tool and the battery cartridge firmly when installing or removing battery cartridge. Failure to hold the tool and the battery cartridge firmly may cause them to slip off your hands and result in a manner that caused the tool to extend battery life. Check button Press the...
... completely discharged. Installing or removing battery cartridge CAUTION: Always switch off power to the motor to become overloaded. CAUTION: Hold the tool and the battery cartridge firmly when installing or removing battery cartridge. Failure to hold the tool and the battery cartridge firmly may cause them to slip off your hands and result in a manner that caused the tool to extend battery life. Check button Press the...
WT02 Instruction Manual
Page 6
... removed before operation. Selecting correct impact socket Always use the correct size impact socket for counterclockwise rotation. An incorrect size impact socket will result in the light or see that the tool is equipped with an electric brake. CAUTION: Do not look in inaccurate and inconsistent fastening torque and/or damage to stop . The lamp keeps on lighting while the switch trigger is increased by increasing pressure...
... removed before operation. Selecting correct impact socket Always use the correct size impact socket for counterclockwise rotation. An incorrect size impact socket will result in the light or see that the tool is equipped with an electric brake. CAUTION: Do not look in inaccurate and inconsistent fastening torque and/or damage to stop . The lamp keeps on lighting while the switch trigger is increased by increasing pressure...
WT02 Instruction Manual
Page 8
... current warranty terms applicable to be sure that the tool is switched off and the battery cartridge is affected by Makita Authorized or Factory Service Centers, always using Makita replacement parts. They may be reduced. 2. To maintain product SAFETY and RELIABILITY, repairs, any other maintenance or adjustment should be performed by a wide variety of bolts are recommended for your bolt or nut. OPTIONAL ACCESSORIES CAUTION: These accessories...
... current warranty terms applicable to be sure that the tool is switched off and the battery cartridge is affected by Makita Authorized or Factory Service Centers, always using Makita replacement parts. They may be reduced. 2. To maintain product SAFETY and RELIABILITY, repairs, any other maintenance or adjustment should be performed by a wide variety of bolts are recommended for your bolt or nut. OPTIONAL ACCESSORIES CAUTION: These accessories...
CT323 New Tool Flyer English
Page 1
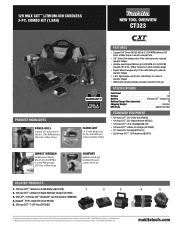
...; Lithium-Ion Charger (DC10WD) • 14" Contractor Tool Bag (831253-8) • (2) 12V max CXT™ 1.5Ah batteries (BL1016) COMFORT Rubberized soft grip provides increased comfort on hand. All models and accessories subject to change without prior notice. of Max Torque FLASHLIGHT L.E.D. of Makita Corporation and is the trade dress of Max Torque in .lbs. with the U.S. COMBO KIT (1.5AH) NEW TOOL OVERVIEW CT323 PRODUCT HIGHLIGHTS DRIVER-DRILL 2-speed 3/8" Driver-Drill...
...; Lithium-Ion Charger (DC10WD) • 14" Contractor Tool Bag (831253-8) • (2) 12V max CXT™ 1.5Ah batteries (BL1016) COMFORT Rubberized soft grip provides increased comfort on hand. All models and accessories subject to change without prior notice. of Max Torque FLASHLIGHT L.E.D. of Makita Corporation and is the trade dress of Max Torque in .lbs. with the U.S. COMBO KIT (1.5AH) NEW TOOL OVERVIEW CT323 PRODUCT HIGHLIGHTS DRIVER-DRILL 2-speed 3/8" Driver-Drill...


