
Owners Manual
Page 3
Saw chain 4. Chain protection cover 5. Assembly tool 6. Particular care and caution! Wear protective gloves! Guide bar 3. Caution, kickback! Owner's and Safety Manual (not shown) 1 In case one of chain travel RE Y Recycling ...
Saw chain 4. Chain protection cover 5. Assembly tool 6. Particular care and caution! Wear protective gloves! Guide bar 3. Caution, kickback! Owner's and Safety Manual (not shown) 1 In case one of chain travel RE Y Recycling ...

Owners Manual
Page 4
...have been specifically trained to the rear, and the muffler away from the fueling point before setting it down. 11. Keep all parts of your MAKITA dealer about these devices. Carry the chain saw with the engine stopped, the guide bar and saw chain to do so. 16. Use extreme ...saw operators While operating the chain saw please observe the following additional safety precautions should be observed by MAKITA . (For example, if improper tools are used to remove the flywheel or if an improper tool is used to hold the flywheel in order to remove the clutch structural damage to the flywheel ...
...have been specifically trained to the rear, and the muffler away from the fueling point before setting it down. 11. Keep all parts of your MAKITA dealer about these devices. Carry the chain saw with the engine stopped, the guide bar and saw chain to do so. 16. Use extreme ...saw operators While operating the chain saw please observe the following additional safety precautions should be observed by MAKITA . (For example, if improper tools are used to remove the flywheel or if an improper tool is used to hold the flywheel in order to remove the clutch structural damage to the flywheel ...
Owners Manual
Page 12
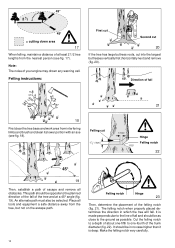
... into the largest buttresses vertically first (horizontally next) and remove (fig. 20). Felling notch Hinge 23 Then, determine the placement of escape and remove all tools and equipment a safe distance away from the nearest person (see fig. 18). 45° 2 12 45° = cutting down area 17 When felling, maintain a distance...
... into the largest buttresses vertically first (horizontally next) and remove (fig. 20). Felling notch Hinge 23 Then, determine the placement of escape and remove all tools and equipment a safe distance away from the nearest person (see fig. 18). 45° 2 12 45° = cutting down area 17 When felling, maintain a distance...
Owners Manual
Page 28
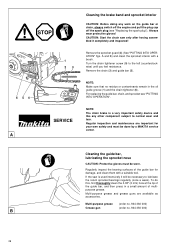
... and clean them with a brush. Cleaning the guide bar, lubricating the sprocket nose CAUTION: Protective gloves must be done by a MAKITA service center. Regularly inspect the bearing surfaces of the guide bar for your own safety and must be necessary to the left (counterclockwise)... wear and tear. NOTE: Make sure that no . 944 350 000) B 28 A and B) and clean the sprocket interior with a suitable tool. Regular inspection and maintenance are available as accessories. Remove the sprocket guard (4) (See "PUTTING INTO OPERATION" figs. To do this, first thoroughly ...
... and clean them with a brush. Cleaning the guide bar, lubricating the sprocket nose CAUTION: Protective gloves must be done by a MAKITA service center. Regularly inspect the bearing surfaces of the guide bar for your own safety and must be necessary to the left (counterclockwise)... wear and tear. NOTE: Make sure that no . 944 350 000) B 28 A and B) and clean the sprocket interior with a suitable tool. Regular inspection and maintenance are available as accessories. Remove the sprocket guard (4) (See "PUTTING INTO OPERATION" figs. To do this, first thoroughly ...

Owners Manual
Page 29
... and tools and must therefore be done at one end to form a hook. 9 Cleaning the air filter STOP Remove the filter cover (11) (3 screws (10)). Remove the air filter (12). A and H). If the filter is very dirty, clean it out through the tank filler neck using a piece of wire bent at a MAKITA...
... and tools and must therefore be done at one end to form a hook. 9 Cleaning the air filter STOP Remove the filter cover (11) (3 screws (10)). Remove the air filter (12). A and H). If the filter is very dirty, clean it out through the tank filler neck using a piece of wire bent at a MAKITA...

Owners Manual
Page 31
...for tightness 26-27 20 23 25 24 Every day Air filter Guide bar Guide bar support Idle speed Clean Check for damage. The MAKITA service centers have repaired by a qualified service center immediately Demount, clean and oil slightly Clean the guide groove of the guide bar 28... Check for damage, clean oil intake bore Clean, in this work out cost-effective solutions and advise you with special tools and testing devices. Please contact your nearest MAKITA service center. 31 The user of your saw Chain, guide bar Fuel, oil tanks Carburetor Clean exterior, check for damage...
...for tightness 26-27 20 23 25 24 Every day Air filter Guide bar Guide bar support Idle speed Clean Check for damage. The MAKITA service centers have repaired by a qualified service center immediately Demount, clean and oil slightly Clean the guide groove of the guide bar 28... Check for damage, clean oil intake bore Clean, in this work out cost-effective solutions and advise you with special tools and testing devices. Please contact your nearest MAKITA service center. 31 The user of your saw Chain, guide bar Fuel, oil tanks Carburetor Clean exterior, check for damage...
