

Accessory Catalog
Page 2
... Wrench Nut M8 X P 1.25 Packaging: Retail Clamshell Line Capacity: 17 ft. of .080 Fit's Makita EM4250CA Models: EM4251CA EM2650LH EM2650UH 12 ft. of .110 2 OPE Accessory Catalog_12-04-12 of .105 9 ft. trimmer / brush cutter 713300-B Description: Manual Feed Trimmer Head Features: • Eyelets are replaceable and easy to remove. • Spring lock, locks spool in place for easy assembly. • Quick and easy loading...
... Wrench Nut M8 X P 1.25 Packaging: Retail Clamshell Line Capacity: 17 ft. of .080 Fit's Makita EM4250CA Models: EM4251CA EM2650LH EM2650UH 12 ft. of .110 2 OPE Accessory Catalog_12-04-12 of .105 9 ft. trimmer / brush cutter 713300-B Description: Manual Feed Trimmer Head Features: • Eyelets are replaceable and easy to remove. • Spring lock, locks spool in place for easy assembly. • Quick and easy loading...

Accessory Catalog
Page 3
... ft. trimmer / brush cutter B-60115 Description: Fixed Line Trimmer Head Features: • Metal head for installation: M10 x 1.25 LH Nut Part # 264025-0 or M8 x 1.25 LH Nut Part # 625-85050-01 Line Capacity: 6 ft. Includes: B-60115 manual trimmer head .130 line Packaging: Retail Carton Fit's Makita EM4250CA Models: EM4251CA EM2650LH EM2650UH NOTE: B-60115 requires arbor nut with washer for durability. • Quick and easy loading. Includes: B-60143...
... ft. trimmer / brush cutter B-60115 Description: Fixed Line Trimmer Head Features: • Metal head for installation: M10 x 1.25 LH Nut Part # 264025-0 or M8 x 1.25 LH Nut Part # 625-85050-01 Line Capacity: 6 ft. Includes: B-60115 manual trimmer head .130 line Packaging: Retail Carton Fit's Makita EM4250CA Models: EM4251CA EM2650LH EM2650UH NOTE: B-60115 requires arbor nut with washer for durability. • Quick and easy loading. Includes: B-60143...

Owners Manual
Page 2
... you with applicable U.S. All parts and accessories replaced under this limited warranty must be defective during the warranty period, you shall notify MAKITA Warranty service Department at 1-888-OPE-PART for your engine to the nearest service dealer authorized by the Emission Components Defect Warranty. OWNER'S WARRANTY RESPONSIBILITIES As the engine owner, you are the parts covered by MAKITA when a problem exists. HOWEVER, WARRANTY REPAIRS MUST BE PERFORMED BY...
... you with applicable U.S. All parts and accessories replaced under this limited warranty must be defective during the warranty period, you shall notify MAKITA Warranty service Department at 1-888-OPE-PART for your engine to the nearest service dealer authorized by the Emission Components Defect Warranty. OWNER'S WARRANTY RESPONSIBILITIES As the engine owner, you are the parts covered by MAKITA when a problem exists. HOWEVER, WARRANTY REPAIRS MUST BE PERFORMED BY...
Owners Manual
Page 3
... hours. Contents Delivery inventory Symbols Safety precautions Denomination of many potential dangers in this owners manual. WARNING ! For your chain saw . Kickback may cause severe or fatal injury and is consequently reuseable or suitable for daily and periodic maintenance 36 Service, spare parts and guarantee 36-37 Troubleshooting 37 Extract from the spare parts list 38-39 The DCS460, DCS510...
... hours. Contents Delivery inventory Symbols Safety precautions Denomination of many potential dangers in this owners manual. WARNING ! For your chain saw . Kickback may cause severe or fatal injury and is consequently reuseable or suitable for daily and periodic maintenance 36 Service, spare parts and guarantee 36-37 Troubleshooting 37 Extract from the spare parts list 38-39 The DCS460, DCS510...

Owners Manual
Page 4
... the chain saw 2 Guide bar 3 Saw chain 5 6 4 Chain protection cover 5 Universal wrench 6 Wrench 7 Screw driver for carburetor adjustment 8 Owner's and Safety Manual (not shown) 7 1 In case one of the parts listed should not be included in the Owner's and Safety Manual: Read instruction manual and follow the warning- Wear protective helmet, eye and ear protection! and safety precautions! Push decompression valve Start engine Carburetor adjustment Chain oil fill/oil pump Saw chain oil adjustment screw First aid Combination switch Start/Stop (I/O), Choke...
... the chain saw 2 Guide bar 3 Saw chain 5 6 4 Chain protection cover 5 Universal wrench 6 Wrench 7 Screw driver for carburetor adjustment 8 Owner's and Safety Manual (not shown) 7 1 In case one of the parts listed should not be included in the Owner's and Safety Manual: Read instruction manual and follow the warning- Wear protective helmet, eye and ear protection! and safety precautions! Push decompression valve Start engine Carburetor adjustment Chain oil fill/oil pump Saw chain oil adjustment screw First aid Combination switch Start/Stop (I/O), Choke...
Owners Manual
Page 5
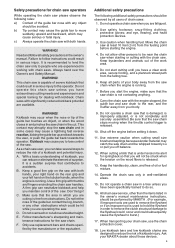
... saw chain stops moving when the throttle control trigger is released. 10. c) Always operate the chain saw . Always hand over the Owner's and Safety Manual. Follow manufacturer's sharpening and maintenance instructions for the saw at least 10 feet (3 m) from the falling tree. 6. Use safety footwear; Use caution when handling fuel. Use extreme caution when cutting small size brush and saplings because slender material may cause you to lose control of the guide...
... saw chain stops moving when the throttle control trigger is released. 10. c) Always operate the chain saw . Always hand over the Owner's and Safety Manual. Follow manufacturer's sharpening and maintenance instructions for the saw at least 10 feet (3 m) from the falling tree. 6. Use safety footwear; Use caution when handling fuel. Use extreme caution when cutting small size brush and saplings because slender material may cause you to lose control of the guide...

Owners Manual
Page 7
... sure the saw safety standard. WARNING ! Bow guide bars substantially increase the potential for use with the specific saw with the en- The use reduces the risk of movement. gine running is recommended. Wear sturdy boots with a reinforced cutting resistant insert (fig. 3). Wear an approved safety hard hat to protect your head. Chain saw down or carrying it. Continual and regular users should...
... sure the saw safety standard. WARNING ! Bow guide bars substantially increase the potential for use with the specific saw with the en- The use reduces the risk of movement. gine running is recommended. Wear sturdy boots with a reinforced cutting resistant insert (fig. 3). Wear an approved safety hard hat to protect your head. Chain saw down or carrying it. Continual and regular users should...

Owners Manual
Page 8
.... Fueling instructions Fuel your left hand (fig. 6a). Never attempt to your hands. Failure to work). MAKITA chain, guide bar and sprocket must be fast enough for fueling and move the chain saw at regular intervals (always before starting to follow the procedure in the appropriate section "Mounting Guide Bar and Chain" of this manual. Starting Do not drop start the saw on firm...
.... Fueling instructions Fuel your left hand (fig. 6a). Never attempt to your hands. Failure to work). MAKITA chain, guide bar and sprocket must be fast enough for fueling and move the chain saw at regular intervals (always before starting to follow the procedure in the appropriate section "Mounting Guide Bar and Chain" of this manual. Starting Do not drop start the saw on firm...

Owners Manual
Page 9
... during their initial use. Place your left hand on freshly debarked logs. Important adjustments WARNING! Adjust the idle speed yourself according to adjust idle speed, see section of slipping on the tubular handle and your thumb and forefinger (fig. 7). Take extreme care in this instruction manual. Left-handers should not turn. A properly adjusted saw without sagging. Be extremely cautious when working . Always start a cut any foreign...
... during their initial use. Place your left hand on freshly debarked logs. Important adjustments WARNING! Adjust the idle speed yourself according to adjust idle speed, see section of slipping on the tubular handle and your thumb and forefinger (fig. 7). Take extreme care in this instruction manual. Left-handers should not turn. A properly adjusted saw without sagging. Be extremely cautious when working . Always start a cut any foreign...

Owners Manual
Page 16
... maintenance or repair work or cleaning the saw. Have such work in the appropriate section of this manual. Keep the chain sharp. e. Relieving cut 34 WARNING! 5. Maintenance and Repair Never operate a chain saw from pinching. Tighten all nuts, bolts and screws except the carburetor adjustment screws after each use. Relieving cut Pressure side Tension side 2. Cross cut is then made on the log (see fig. 33, 34). Follow the maintenance and repair instructions...
... maintenance or repair work or cleaning the saw. Have such work in the appropriate section of this manual. Keep the chain sharp. e. Relieving cut 34 WARNING! 5. Maintenance and Repair Never operate a chain saw from pinching. Tighten all nuts, bolts and screws except the carburetor adjustment screws after each use. Relieving cut Pressure side Tension side 2. Cross cut is then made on the log (see fig. 33, 34). Follow the maintenance and repair instructions...
Owners Manual
Page 18
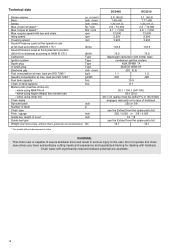
... saw unless you have extraordinary cutting needs and experience and specialized training for dealing with significantly reduced kickback potential are available. 18 Technical data Stroke volume Bore Stroke Max. power at speed 1) Max. load per ISO 7293 1) Fuel tank capacity Chain oil tank capacity Mixture ratio (fuel/two-stroke oil) - load per ISO 7293 1) Specific consumption at max. when using MAKITA oil - in case...
... saw unless you have extraordinary cutting needs and experience and specialized training for dealing with significantly reduced kickback potential are available. 18 Technical data Stroke volume Bore Stroke Max. power at speed 1) Max. load per ISO 7293 1) Fuel tank capacity Chain oil tank capacity Mixture ratio (fuel/two-stroke oil) - load per ISO 7293 1) Specific consumption at max. when using MAKITA oil - in case...

Owners Manual
Page 19
Turn chain tensioning screw (4) to the left (counter-clockwise) until the pin (5) of properly. a Put on the guide bar or chain, always switch off the engine and pull the plug cap off the sprocket guard (3). Always wear protective gloves! CAUTION: Start the chain saw chain: 2 Release the chain brake by pulling the hand guard (1) in direction of the chain tensioner engages in the...
Turn chain tensioning screw (4) to the left (counter-clockwise) until the pin (5) of properly. a Put on the guide bar or chain, always switch off the engine and pull the plug cap off the sprocket guard (3). Always wear protective gloves! CAUTION: Start the chain saw chain: 2 Release the chain brake by pulling the hand guard (1) in direction of the chain tensioner engages in the...

Owners Manual
Page 27
...-clockwise) lowers the idle speed. Set idle 3. Set idle Set the idle speed per the technical specifications. Turning it warm up (3-5 minutes) 2. Set the top speed Set the top speed with a minimal adjustment to about 180 degrees) prevents over-rich settings. Adjusting the carburetor CAUTION: Carburetor adjustment must only be done with the engine warm, a clean air filter and the saw chain or cutting tool must not move in...
...-clockwise) lowers the idle speed. Set idle 3. Set idle Set the idle speed per the technical specifications. Turning it warm up (3-5 minutes) 2. Set the top speed Set the top speed with a minimal adjustment to about 180 degrees) prevents over-rich settings. Adjusting the carburetor CAUTION: Carburetor adjustment must only be done with the engine warm, a clean air filter and the saw chain or cutting tool must not move in...
Owners Manual
Page 28
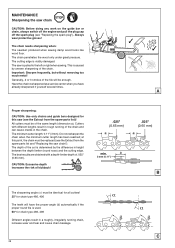
This is used. 60° for chain type 486, 496 Different angles result in height between the depth limiter (round nose) and the cutting edge. Important: Sharpen frequently, but without removing too much metal! Have the chain resharpened at this saw (see "Replacing the spark plug"). All cutters must be replaced (see the Extract from the spare-parts list)! CAUTION: Excessive depth increases the...
This is used. 60° for chain type 486, 496 Different angles result in height between the depth limiter (round nose) and the cutting edge. Important: Sharpen frequently, but without removing too much metal! Have the chain resharpened at this saw (see "Replacing the spark plug"). All cutters must be replaced (see the Extract from the spare-parts list)! CAUTION: Excessive depth increases the...

Owners Manual
Page 30
... with a suitable tool. Cleaning the guide bar CAUTION: Protective gloves must be worn. STOP 7 2 65 SERVICE A B 30 CAUTION: Start the chain saw only after having assembled it completely and inspected. Remove the sprocket guard (1) (See "PUTTING INTO OPERATION" figs. Remove the chain (5) and guide bar (6). 4 3 NOTE: Make sure there are important for damage, and clean them with a brush. Regular inspection and maintenance are no...
... with a suitable tool. Cleaning the guide bar CAUTION: Protective gloves must be worn. STOP 7 2 65 SERVICE A B 30 CAUTION: Start the chain saw only after having assembled it completely and inspected. Remove the sprocket guard (1) (See "PUTTING INTO OPERATION" figs. Remove the chain (5) and guide bar (6). 4 3 NOTE: Make sure there are important for damage, and clean them with a brush. Regular inspection and maintenance are no...

Owners Manual
Page 31
... sprocket see "Extract from the spare parts list". Check the sprocket before use the clutch drum cpl. (12). It may damage the new chain and must be replaced. Remove the chain and guide bar. When changing chain types, always make sure to use . Replacing the saw chain CAUTION: Use only chains and guide bars designed for this , first cut along the marking (15) with...
... sprocket see "Extract from the spare parts list". Check the sprocket before use the clutch drum cpl. (12). It may damage the new chain and must be replaced. Remove the chain and guide bar. When changing chain types, always make sure to use . Replacing the saw chain CAUTION: Use only chains and guide bars designed for this , first cut along the marking (15) with...

Owners Manual
Page 34
... tighten screw (7) and washer (8). Carefully let the drum turn against it down. Screw in small steps. Position the fan housing against the housing, press against the return spring. Remove any cable pieces. Tension the spring (see above ). Unscrew screw (7) and remove washer (8). Tighten screws (1). 34 STOP 1 2 3 10 4 12 9 13 78 11 5 6 A The spring will be necessary to be held upright on a wooden surface with your left hand...
... tighten screw (7) and washer (8). Carefully let the drum turn against it down. Screw in small steps. Position the fan housing against the housing, press against the return spring. Remove any cable pieces. Tension the spring (see above ). Unscrew screw (7) and remove washer (8). Tighten screws (1). 34 STOP 1 2 3 10 4 12 9 13 78 11 5 6 A The spring will be necessary to be held upright on a wooden surface with your left hand...

Owners Manual
Page 36
... brake Combination switch, Safety locking button, Throttle lever Fuel/oil tank cap Air filter Guide bar Guide bar support Idle speed Fan housing Cylinder area Spark plug Muffler Spark arrester screen Chain guide Fuel filter Fuel, oil tanks Chain saw Chain saw must be carried out by a MAKITA service center. Check and replace if necessary Check tightness of mounting, Check screws Clean Check Replace Clean Check at an authorized service center Turn over...
... brake Combination switch, Safety locking button, Throttle lever Fuel/oil tank cap Air filter Guide bar Guide bar support Idle speed Fan housing Cylinder area Spark plug Muffler Spark arrester screen Chain guide Fuel filter Fuel, oil tanks Chain saw Chain saw must be carried out by a MAKITA service center. Check and replace if necessary Check tightness of mounting, Check screws Clean Check Replace Clean Check at an authorized service center Turn over...

Owners Manual
Page 37
... safety of the spare parts used , this will therefore reimburse all costs for damage caused by: • Disregard of the instruction manual. • Non-performance of the required maintenance and cleaning. • Incorrect carburetor adjustment. • Normal wear and tear. • Obvious overloading due to determine the required spare part numbers, and will also have any responsibility for repair by a MAKITA service...
... safety of the spare parts used , this will therefore reimburse all costs for damage caused by: • Disregard of the instruction manual. • Non-performance of the required maintenance and cleaning. • Incorrect carburetor adjustment. • Normal wear and tear. • Obvious overloading due to determine the required spare part numbers, and will also have any responsibility for repair by a MAKITA service...
Parts Breakdown
Page 8
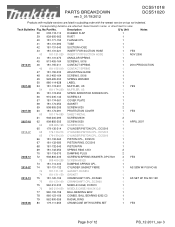
No. PARTS BREAKDOWN PARTreSv 3B_0R1E/1A9/K20D12OWN DCS51018 DCS51020 EM4251 Products with the newest version on top not indented. BALL BEARING 6202 C3 1 79 962-900-056 RADIAL RING 1 2009-06 80 179-111-653 CRANKCASE WITH SCREW SET 1 YES ...INSERT FOR SUCTION HOSE 1 YES 43 181-131-020 INSERT FOR SUCTION HOSE 1 NOV 2006 44 181-131-070 ANNULAR SPRING 1 45 913-455-164 SCREW 5, 5X16 1 2010-01 46 181-155-011 CONTACT SPRING 1 2010 PRODUCTION 46 181-155-010 CONTACT SPRING 1 47 181-155-030 ADJUSTING GUIDE 1 48 913-455-164 SCREW 5, 5X16 1 49 928-405-000 SPRING WASHER...
No. PARTS BREAKDOWN PARTreSv 3B_0R1E/1A9/K20D12OWN DCS51018 DCS51020 EM4251 Products with the newest version on top not indented. BALL BEARING 6202 C3 1 79 962-900-056 RADIAL RING 1 2009-06 80 179-111-653 CRANKCASE WITH SCREW SET 1 YES ...INSERT FOR SUCTION HOSE 1 YES 43 181-131-020 INSERT FOR SUCTION HOSE 1 NOV 2006 44 181-131-070 ANNULAR SPRING 1 45 913-455-164 SCREW 5, 5X16 1 2010-01 46 181-155-011 CONTACT SPRING 1 2010 PRODUCTION 46 181-155-010 CONTACT SPRING 1 47 181-155-030 ADJUSTING GUIDE 1 48 913-455-164 SCREW 5, 5X16 1 49 928-405-000 SPRING WASHER...


