
Flyer (English)
Page 1
... Wires are protected with a dust proof design DURABILITY Labyrinth construction and protective zig-zag varnish seals the motor and bearings from contamination PERFORMANCE Weight 4.5 lbs. 3.5 lbs. Comp. Compact, lightweight design is only 2.5'' for continuous use (9557PB) ACCURACY 4'' Models 9553NB 9553NBK (Case) 4-1/2'' Models 9554NB 9557NB (AC/DC) 9557PB (Paddle Switch, AC/DC) 5'' Models 9558NB (AC/DC) 9558PB (Paddle Switch, AC/DC) Gear...
... Wires are protected with a dust proof design DURABILITY Labyrinth construction and protective zig-zag varnish seals the motor and bearings from contamination PERFORMANCE Weight 4.5 lbs. 3.5 lbs. Comp. Compact, lightweight design is only 2.5'' for continuous use (9557PB) ACCURACY 4'' Models 9553NB 9553NBK (Case) 4-1/2'' Models 9554NB 9557NB (AC/DC) 9557PB (Paddle Switch, AC/DC) 5'' Models 9558NB (AC/DC) 9558PB (Paddle Switch, AC/DC) Gear...

Flyer (English)
Page 2
.../PB n 5'' Grinding Wheel (741407-8-1) n Wheel Guard (125274-3) n Lock Nut (193465-4) n Lock Nut Wrench (782422-3) n Side Handle (153489-2) n Inner Flange (224399-1) Specifications Model Grinding Wheel Wire Cup Brush Sanding Disc No Load Speed AMPS (120V) Spindle Thread Overall Length Net Weight Shipping Weight Master Carton Qty. 4'', 4-1/2'' & 5'' ANGLE GRINDER SERIES Models 9553NB/K, 9554NB, 9557NB/PB & 9558NB/PB Features & Benefits n Small circumference barrel grip (only 2.5'') for added comfort n Protective zig-zag varnish seals motor from contaminants...
.../PB n 5'' Grinding Wheel (741407-8-1) n Wheel Guard (125274-3) n Lock Nut (193465-4) n Lock Nut Wrench (782422-3) n Side Handle (153489-2) n Inner Flange (224399-1) Specifications Model Grinding Wheel Wire Cup Brush Sanding Disc No Load Speed AMPS (120V) Spindle Thread Overall Length Net Weight Shipping Weight Master Carton Qty. 4'', 4-1/2'' & 5'' ANGLE GRINDER SERIES Models 9553NB/K, 9554NB, 9557NB/PB & 9558NB/PB Features & Benefits n Small circumference barrel grip (only 2.5'') for added comfort n Protective zig-zag varnish seals motor from contaminants...

Owners Manual
Page 2
... while operating a power tool. Double insulated tools are subject to change the plug in any way. Do not change without notice. • Note: Specifications may differ from heat, oil, sharp edges or moving parts. tion eliminates the need for appropriate con- 2 Do not abuse the cord. Keep cord away from country to country. Personal Safety 9. Contain long hair. Avoid accidental starting. SAVE THESE INSTRUCTIONS Work Area 1. Electrical Safety 4. Avoid...
... while operating a power tool. Double insulated tools are subject to change the plug in any way. Do not change without notice. • Note: Specifications may differ from heat, oil, sharp edges or moving parts. tion eliminates the need for appropriate con- 2 Do not abuse the cord. Keep cord away from country to country. Personal Safety 9. Contain long hair. Avoid accidental starting. SAVE THESE INSTRUCTIONS Work Area 1. Electrical Safety 4. Avoid...

Owners Manual
Page 3
... force tool. Use only accessories that may contact hidden wiring or its own cord. Use of unauthorized parts or failure to bind and are NOT safety glasses. 6. Ordinary eye or sun glasses are easier to grinder safety rules. Store idle tools out of reach of electric shock or injury. When servicing a tool, use ) replace strict adherence to control. 21. Table 1 shows the correct size to use tool if switch does not turn...
... force tool. Use only accessories that may contact hidden wiring or its own cord. Use of unauthorized parts or failure to bind and are NOT safety glasses. 6. Ordinary eye or sun glasses are easier to grinder safety rules. Store idle tools out of reach of electric shock or injury. When servicing a tool, use ) replace strict adherence to control. 21. Table 1 shows the correct size to use tool if switch does not turn...

Owners Manual
Page 4
... this instruction manual may be sure that could result in this test. 7. After using the tool on the tool. Press the shaft lock to damage the spindle, the flange (especially the installing surface) or the lock nut. Use only flanges specified for tool. Such blades when used for this tool to a complete stop before setting the tool down with the wheel rotating can cause personal injury. Before using the tool, make...
... this instruction manual may be sure that could result in this test. 7. After using the tool on the tool. Press the shaft lock to damage the spindle, the flange (especially the installing surface) or the lock nut. Use only flanges specified for tool. Such blades when used for this tool to a complete stop before setting the tool down with the wheel rotating can cause personal injury. Before using the tool, make...

Owners Manual
Page 5
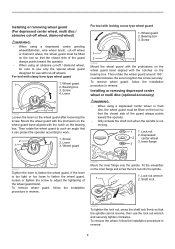
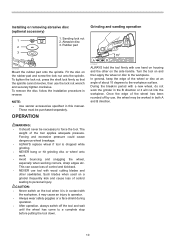
... the slide switch, then slide it . Mount the inner flange onto the spindle. Bearing box 3 3. Mount the wheel guard with the protrusion on the wheel guard band aligned with the notch on the inner flange and screw the lock nut onto the spindle. 2 5 Installing or removing wheel guard 005806 9556NB 1 1. Screw 3 3. Wheel can be sure that the side grip is on tool. Installing side grip (handle) 005804 9557NB/9558NB 005808 1 1. To remove wheel guard, follow the installation...
... the slide switch, then slide it . Mount the inner flange onto the spindle. Bearing box 3 3. Mount the wheel guard with the protrusion on the wheel guard band aligned with the notch on the inner flange and screw the lock nut onto the spindle. 2 5 Installing or removing wheel guard 005806 9556NB 1 1. Screw 3 3. Wheel can be sure that the side grip is on tool. Installing side grip (handle) 005804 9557NB/9558NB 005808 1 1. To remove wheel guard, follow the installation...

Owners Manual
Page 7
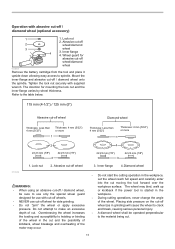
... both A and B direction. Such blades when used on the side handle. Turn the tool on spindle. Remove any accessories on and then apply the wheel or disc to force the tool. The wheel may be necessary to the workpiece. Operation with diamond wheel (optional accessory) CAUTION: • Check operation of damaged brush could increase potential for injury from contact with broken wires. • Do not start the cutting operation in the...
... both A and B direction. Such blades when used on the side handle. Turn the tool on spindle. Remove any accessories on and then apply the wheel or disc to force the tool. The wheel may be necessary to the workpiece. Operation with diamond wheel (optional accessory) CAUTION: • Check operation of damaged brush could increase potential for injury from contact with broken wires. • Do not start the cutting operation in the...

Owners Manual
Page 8
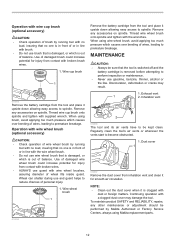
... speed and carefully enter into the cut moving the tool forward over bending of cut -off wheel, be performed by Makita Authorized or Factory Service Centers, always using wire wheel brush, avoid applying too much pressure which you decide to use your local Makita service center. 8 To maintain product SAFETY and RELIABILITY, repairs, carbon brush inspection and replacement, any accessories on the cut -off wheel (as recommended in this manual. The use and guard helps to spindle...
... speed and carefully enter into the cut moving the tool forward over bending of cut -off wheel, be performed by Makita Authorized or Factory Service Centers, always using wire wheel brush, avoid applying too much pressure which you decide to use your local Makita service center. 8 To maintain product SAFETY and RELIABILITY, repairs, carbon brush inspection and replacement, any accessories on the cut -off wheel (as recommended in this manual. The use and guard helps to spindle...

Owners Manual
Page 9
... 1 9557NB Grip 36 9558NB 2 Wheel gurad 3 Inner flange 35 Inner flange 45 Inner flange 45 4 Depressed center grinding wheel/Multi-disc/Diamond wheel 5 Lock nut 10-35 6 Plastic pad Lock nut 5/8-45 N/A Lock nut 5/8-45 N/A 7 Flex wheel 8 Rubber pad 76 N/A Rubber pad 100 N/A Rubber pad 115 9 10 Sanding lock nut 10-30 Abrasive disc Sanding lock nut 5/8-48 Sanding lock nut 5/8-48 11 Wire wheel brush 12 Wire cup brush 13 Wheel guard (For cut-off wheel Lock nut wrench 28 Lock nut wrench 28 9 Lock nut wrench 20 Cut-off wheel) 14 -
... 1 9557NB Grip 36 9558NB 2 Wheel gurad 3 Inner flange 35 Inner flange 45 Inner flange 45 4 Depressed center grinding wheel/Multi-disc/Diamond wheel 5 Lock nut 10-35 6 Plastic pad Lock nut 5/8-45 N/A Lock nut 5/8-45 N/A 7 Flex wheel 8 Rubber pad 76 N/A Rubber pad 100 N/A Rubber pad 115 9 10 Sanding lock nut 10-30 Abrasive disc Sanding lock nut 5/8-48 Sanding lock nut 5/8-48 11 Wire wheel brush 12 Wire cup brush 13 Wheel guard (For cut-off wheel Lock nut wrench 28 Lock nut wrench 28 9 Lock nut wrench 20 Cut-off wheel) 14 -

XAG03Z Instruction Manual
Page 3
... gloves away from the battery; Battery tool use accessories which the power tool was designed. 18. Use of any adjusting key or wrench before turning the power tool on and off tool. Under abusive conditions, liquid may result in unexpected situations. 15. Follow instruction for Grinding, Sanding, Wire Brushing, or Abrasive Cutting-Off Operations: 1. GEB059-3 CORDLESS GRINDER SAFETY WARNINGS Safety Warnings Common for lubricating and changing accessories. 30. Operations for one terminal to operate the power tool. Remove any other small metal...
... gloves away from the battery; Battery tool use accessories which the power tool was designed. 18. Use of any adjusting key or wrench before turning the power tool on and off tool. Under abusive conditions, liquid may result in unexpected situations. 15. Follow instruction for Grinding, Sanding, Wire Brushing, or Abrasive Cutting-Off Operations: 1. GEB059-3 CORDLESS GRINDER SAFETY WARNINGS Safety Warnings Common for lubricating and changing accessories. 30. Operations for one terminal to operate the power tool. Remove any other small metal...

XAG03Z Instruction Manual
Page 4
... the power tool will run the power tool at maximum no-load speed for damage or install an undamaged accessory. c) Do not position your side. Such blades create frequent kickback and loss of control or kickback. 5. For accessories mounted by insulated gripping surfaces only, when performing an operation where the cutting tool may either jump toward or away from the operator, depending on direction of the wheel...
... the power tool will run the power tool at maximum no-load speed for damage or install an undamaged accessory. c) Do not position your side. Such blades create frequent kickback and loss of control or kickback. 5. For accessories mounted by insulated gripping surfaces only, when performing an operation where the cutting tool may either jump toward or away from the operator, depending on direction of the wheel...
XAG03Z Instruction Manual
Page 5
... guard lip cannot be placed under their own weight. Safety Warnings Specific for Sanding Operations: a) Do not use of such a product may propel the spinning wheel and the power tool directly at the point of a smaller tool and may cut -off wheel from the cut for any oversized workpiece to the power tool and positioned for maximum safety, so the least amount of the wire wheel or brush with this grinder...
... guard lip cannot be placed under their own weight. Safety Warnings Specific for Sanding Operations: a) Do not use of such a product may propel the spinning wheel and the power tool directly at the point of a smaller tool and may cut -off wheel from the cut for any oversized workpiece to the power tool and positioned for maximum safety, so the least amount of the wire wheel or brush with this grinder...

XAG03Z Instruction Manual
Page 6
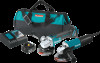
... THESE INSTRUCTIONS. Before using battery. 2. A battery short can explode in a risk of your skin. 24. Be careful not to safety rules for correct mounting and use cut-off . 30. Always stop operating immediately. Let a hot battery cartridge cool down before completely discharged. it for tool. ・ volts ・ direct current ・ rated speed ・ no load speed ・ revolutions or reciprocation per minute IMPORTANT SAFETY INSTRUCTIONS ENC007-8 FOR BATTERY CARTRIDGE 1. Use...
... THESE INSTRUCTIONS. Before using battery. 2. A battery short can explode in a risk of your skin. 24. Be careful not to safety rules for correct mounting and use cut-off . 30. Always stop operating immediately. Let a hot battery cartridge cool down before completely discharged. it for tool. ・ volts ・ direct current ・ rated speed ・ no load speed ・ revolutions or reciprocation per minute IMPORTANT SAFETY INSTRUCTIONS ENC007-8 FOR BATTERY CARTRIDGE 1. Use...
XAG03Z Instruction Manual
Page 7
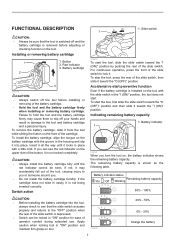
... slip off the tool before adjusting or checking function on the upper side of the slide switch. Apply caution when locking tool in damage to lock it into the tool, always check to see the red indicator on the tool. Installing or removing battery cartridge 1 2 1. The remaining battery capacity is not being inserted correctly. To stop the tool, press the rear of the slide switch, then slide it toward...
... slip off the tool before adjusting or checking function on the upper side of the slide switch. Apply caution when locking tool in damage to lock it into the tool, always check to see the red indicator on the tool. Installing or removing battery cartridge 1 2 1. The remaining battery capacity is not being inserted correctly. To stop the tool, press the rear of the slide switch, then slide it toward...

XAG03Z Instruction Manual
Page 8
... the battery indicator shows following conditions. ASSEMBLY CAUTION: • Always be sure that the tool is switched off and on the tool. Overheat protection for tool When the tool is removed before carrying out any indications. Then turn the tool off power to the motor to become overloaded. Installing side grip (handle) CAUTION: • Always be damaged. 1 1. This system automatically cuts off and stop during operation, the tool...
... the battery indicator shows following conditions. ASSEMBLY CAUTION: • Always be sure that the tool is switched off and on the tool. Overheat protection for tool When the tool is removed before carrying out any indications. Then turn the tool off power to the motor to become overloaded. Installing side grip (handle) CAUTION: • Always be damaged. 1 1. This system automatically cuts off and stop during operation, the tool...
XAG03Z Instruction Manual
Page 9
... protect the operator according to tighten the screw securely. Installing or removing wheel guard (For depressed center wheel, multi disc / abrasive cut-off wheel, diamond wheel) WARNING: • When using a depressed center grinding wheel/Multi-disc, wire wheel brush, cut-off wheels. Mount the wheel guard with the protrusion on the wheel guard band aligned with the notches on the bearing box. Wheel guard For tool with clamp lever type wheel guard 1 1. Lock nut wrench 1 2. Screw 2 2. Lever 1 3. Screw 1 2 3 015303 Mount the wheel guard with the protrusions...
... protect the operator according to tighten the screw securely. Installing or removing wheel guard (For depressed center wheel, multi disc / abrasive cut-off wheel, diamond wheel) WARNING: • When using a depressed center grinding wheel/Multi-disc, wire wheel brush, cut-off wheels. Mount the wheel guard with the protrusion on the wheel guard band aligned with the notches on the bearing box. Wheel guard For tool with clamp lever type wheel guard 1 1. Lock nut wrench 1 2. Screw 2 2. Lever 1 3. Screw 1 2 3 015303 Mount the wheel guard with the protrusions...
XAG03Z Instruction Manual
Page 10
.... Installing or removing abrasive disc (optional accessory) 1. Sanding lock nut 1 2. NOTE: • Use sander accessories specified in reverse. In general, keep the edge of the wheel or disc at an angle of the tool applies adequate pressure. The weight of about 15 degrees to a complete stop before putting the tool down. 10 Abrasive disc 2 3. Such blades when used on the rubber pad and screw the lock nut onto the spindle. CAUTION: • Never switch...
.... Installing or removing abrasive disc (optional accessory) 1. Sanding lock nut 1 2. NOTE: • Use sander accessories specified in reverse. In general, keep the edge of the wheel or disc at an angle of the tool applies adequate pressure. The weight of about 15 degrees to a complete stop before putting the tool down. 10 Abrasive disc 2 3. Such blades when used on the rubber pad and screw the lock nut onto the spindle. CAUTION: • Never switch...
XAG03Z Instruction Manual
Page 11
... wheel increases the loading and susceptibility to spindle. Tighten the lock nut securely with cut-off wheels. • NEVER use cut-off wheel for abrasive cut-off wheel/diamond wheel 010855 Remove the battery cartridge from the tool and place it upside down allowing easy access to twisting or binding of the motor may bind, walk up or kickback if the power tool is started in the workpiece. The direction for mounting the lock nut...
... wheel increases the loading and susceptibility to spindle. Tighten the lock nut securely with cut-off wheels. • NEVER use cut-off wheel for abrasive cut-off wheel/diamond wheel 010855 Remove the battery cartridge from the tool and place it upside down allowing easy access to twisting or binding of the motor may bind, walk up or kickback if the power tool is started in the workpiece. The direction for mounting the lock nut...
XAG03Z Instruction Manual
Page 12
.... Wire wheel brush 1 015094 Remove the battery cartridge from the tool and place it for injury from contact with broken brush wires. 1. When using Makita replacement parts. 12 To maintain product SAFETY and RELIABILITY, repairs, any accessories on spindle. Inhalation vent 2 015086 The tool and its air vents have to be sure that no load, insuring that the tool is switched off and the battery cartridge is out of wires, leading to spindle. Regularly...
.... Wire wheel brush 1 015094 Remove the battery cartridge from the tool and place it for injury from contact with broken brush wires. 1. When using Makita replacement parts. 12 To maintain product SAFETY and RELIABILITY, repairs, any accessories on spindle. Inhalation vent 2 015086 The tool and its air vents have to be sure that no load, insuring that the tool is switched off and the battery cartridge is out of wires, leading to spindle. Regularly...

9557NB Parts Breakdown
Page 2
... WHEEL COVER ASS'Y, 9554NB INNER FLANGE 45, GA4030 LOCK NUT 5/8-45, 9005B LOCK NUT 5/8-45, 9005B TAPPING SCREW 4X80, 9557NB NAME PLATE, 9557NB TAPPING SCREW 3X10, 9557NB BRUSH HOLDER, 9557NB CARBON BRUSH SET, 195001-2 CARBON BRUSH SET, 195001-2 CARBON BRUSH CB325,9553NB SPACER, 9557NB SWITCH, BGA452 SWITCH, 9557NB STRAIN RELIEF, JV0600K TAPPING SCREW PT 4X18, 5007MG CORD GUARD 8, 6824 CORD (2X18X8 SJ), BO4556 CORD SWITCH KNOB, GA4030 SWITCH KNOB, 9553NB Quantity 1 1 1 1 1 1 1 1 1 1 1 1 1 1 4 1 1 1 1 1 1 1 1 1 1 1 1 1 4 1 1 1 1 1 1 1 2 1 4 1 1 1 1 1 2 1 1 1 Page 2 of 3 2/13 Parts Breakdown...
... WHEEL COVER ASS'Y, 9554NB INNER FLANGE 45, GA4030 LOCK NUT 5/8-45, 9005B LOCK NUT 5/8-45, 9005B TAPPING SCREW 4X80, 9557NB NAME PLATE, 9557NB TAPPING SCREW 3X10, 9557NB BRUSH HOLDER, 9557NB CARBON BRUSH SET, 195001-2 CARBON BRUSH SET, 195001-2 CARBON BRUSH CB325,9553NB SPACER, 9557NB SWITCH, BGA452 SWITCH, 9557NB STRAIN RELIEF, JV0600K TAPPING SCREW PT 4X18, 5007MG CORD GUARD 8, 6824 CORD (2X18X8 SJ), BO4556 CORD SWITCH KNOB, GA4030 SWITCH KNOB, 9553NB Quantity 1 1 1 1 1 1 1 1 1 1 1 1 1 1 4 1 1 1 1 1 1 1 1 1 1 1 1 1 4 1 1 1 1 1 1 1 2 1 4 1 1 1 1 1 2 1 1 1 Page 2 of 3 2/13 Parts Breakdown...


