

EA6100P53G Instruction Manual
Page 2
...ßer screws 25 Replacing the starter cable/Replacing the return spring cassette/Replacing the Featherlight -Start spring ....26-27 Mounting the fan housing 27 Cleaning the air Þlter compartment/fan compartment ... 28 Cleaning the cylinder Þns 28 Replacing the suction head 28 Instructions for periodic maintenance 29 Service, spare parts and guarantee 30 Trouble shooting 31 Extract from spare parts list 32-33 Accessories 32-33...
...ßer screws 25 Replacing the starter cable/Replacing the return spring cassette/Replacing the Featherlight -Start spring ....26-27 Mounting the fan housing 27 Cleaning the air Þlter compartment/fan compartment ... 28 Cleaning the cylinder Þns 28 Replacing the suction head 28 Instructions for periodic maintenance 29 Service, spare parts and guarantee 30 Trouble shooting 31 Extract from spare parts list 32-33 Accessories 32-33...

EA6100P53G Instruction Manual
Page 4
..., i. SAFETY PRECAUTIONS Intended use Power chain saws This power chain saw may be worn during operation of the chain saw: - It is to read this saw. Professional and mid-class: Use on its use this instruction manual to make himself familiar with special signal-coloured shoulder straps and is recommended to lend the chain saw only to improper handling. - Hobbyklasse: Occasional use of the unit! Unauthorised users: Persons...
..., i. SAFETY PRECAUTIONS Intended use Power chain saws This power chain saw may be worn during operation of the chain saw: - It is to read this saw. Professional and mid-class: Use on its use this instruction manual to make himself familiar with special signal-coloured shoulder straps and is recommended to lend the chain saw only to improper handling. - Hobbyklasse: Occasional use of the unit! Unauthorised users: Persons...
EA6100P53G Instruction Manual
Page 5
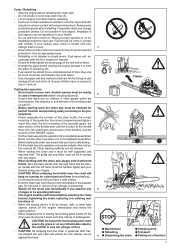
... oil products. Change the place before refuelling. - Do not work in this instruction manual (8). Pay attention to your clothes have no fuel or chain oil oozes into operation - Never use an appropriate base. 5 3 Meter 6 7 8 ● Maintenance ● Stopping work or leaving the working area, as described in closed rooms. Fuel vapors will pollute the soil. Hold the handles tightly with the left hand. CAUTION: When releasing...
... oil products. Change the place before refuelling. - Do not work in this instruction manual (8). Pay attention to your clothes have no fuel or chain oil oozes into operation - Never use an appropriate base. 5 3 Meter 6 7 8 ● Maintenance ● Stopping work or leaving the working area, as described in closed rooms. Fuel vapors will pollute the soil. Hold the handles tightly with the left hand. CAUTION: When releasing...
EA6100P53G Instruction Manual
Page 6
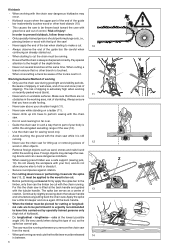
... lowest possible angle (14). When crosscutting a trunk be released 14 in the working with the chain saw for sawing wood only. - Remove foreign objects such as sand, stones and nails found within the elongated swivelling range of the trunks next to perform sawing with the chain saw (12). - Only use a safe support (sawing jack, 13). Never cut several cuts the throttle lever must be cut . - When the...
... lowest possible angle (14). When crosscutting a trunk be released 14 in the working with the chain saw for sawing wood only. - Remove foreign objects such as sand, stones and nails found within the elongated swivelling range of the trunks next to perform sawing with the chain saw (12). - Only use a safe support (sawing jack, 13). Never cut several cuts the throttle lever must be cut . - When the...
EA6100P53G Instruction Manual
Page 7
... the tree check the direction of stumbling). Thus clamping of the notch (D). The distance between both cuts must stay above the bottom edge of the guide bar can be supported on the trunk. - Insert felling wedges in the direction of the bar whenever possible. Do not use the lower edge of the user if the chain gets clamped. Cut pieces of plastic or aluminium...
... the tree check the direction of stumbling). Thus clamping of the notch (D). The distance between both cuts must stay above the bottom edge of the guide bar can be supported on the trunk. - Insert felling wedges in the direction of the bar whenever possible. Do not use the lower edge of the user if the chain gets clamped. Cut pieces of plastic or aluminium...
EA6100P53G Instruction Manual
Page 8
... the chain saw , in a storage case or vehicle. Before starting work switch off the chain saw is always sharpened and tightened correctly (22). - Store the chain saw during work always check the operating safety of the chain saw with the mufßer (danger of the chain saw safely in the instruction manual. What happened - Ensure safe positioning of burns). - Use only original MAKITA spare parts and accessories. Number of...
... the chain saw , in a storage case or vehicle. Before starting work switch off the chain saw is always sharpened and tightened correctly (22). - Store the chain saw during work always check the operating safety of the chain saw with the mufßer (danger of the chain saw safely in the instruction manual. What happened - Ensure safe positioning of burns). - Use only original MAKITA spare parts and accessories. Number of...
EA6100P53G Instruction Manual
Page 10
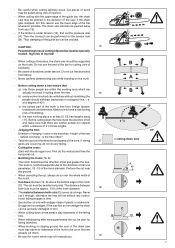
... Adjusting screws for carburetor 10 24 23 22 21 14 ON/OFF switch for grip heating (EA6101P only) 15 Fuel pump (Primer) 16 IdentiÞcation plate 17 Starter grip 18 Combination switch (Choke / ON / Stop) 19 Throttle lever 20 Safety locking button 21 Rear hand guard 22 Fuel tank cap 23 Fan housing with starting assembly 24 Oil tank cap 25 Chain (Blade) 26 Guide bar Serial number...
... Adjusting screws for carburetor 10 24 23 22 21 14 ON/OFF switch for grip heating (EA6101P only) 15 Fuel pump (Primer) 16 IdentiÞcation plate 17 Starter grip 18 Combination switch (Choke / ON / Stop) 19 Throttle lever 20 Safety locking button 21 Rear hand guard 22 Fuel tank cap 23 Fan housing with starting assembly 24 Oil tank cap 25 Chain (Blade) 26 Guide bar Serial number...
EA6100P53G Instruction Manual
Page 11
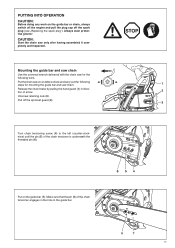
... sprocket guard (3). 3 Turn chain tensioning screw (4) to the left (counter-clockwise) until the pin (5) of the chain tensioner engages in the hole in direction of arrow. 2 Unscrew retaining nuts (2). Make sure that the pin (5) of the chain tensioner is underneath the threaded pin (6). Mounting the guide bar and saw chain Use the universal wrench delivered with the chain saw for mounting the guide bar and saw chain: 1 Release...
... sprocket guard (3). 3 Turn chain tensioning screw (4) to the left (counter-clockwise) until the pin (5) of the chain tensioner engages in the hole in direction of arrow. 2 Unscrew retaining nuts (2). Make sure that the pin (5) of the chain tensioner is underneath the threaded pin (6). Mounting the guide bar and saw chain Use the universal wrench delivered with the chain saw for mounting the guide bar and saw chain: 1 Release...
EA6100P53G Instruction Manual
Page 13
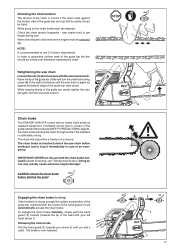
... the hand guard (1) towards the tip of the saw chain Loosen the nuts (2) about one turn the chain tensioning screw (4) to contact of the guide-bar tip with wood (see SAFETY PRECAUTIONS, page 6), the chain brake will stop the chain through inertia if the kickback is sufÞciently strong. In order to use ! ALWAYS release the chain brake before starting the work...
... the hand guard (1) towards the tip of the saw chain Loosen the nuts (2) about one turn the chain tensioning screw (4) to contact of the guide-bar tip with wood (see SAFETY PRECAUTIONS, page 6), the chain brake will stop the chain through inertia if the kickback is sufÞciently strong. In order to use ! ALWAYS release the chain brake before starting the work...

EA6100P53G Instruction Manual
Page 14
...environment and clog the exhaust channel in the following sizes: 1 l order number 980 008 210 5 l order number 980 008 211 Bio-degradable oil is 100% bio-degradable. Fuel mixture This tool is powered by MAKITA is made of special vegetable oils and is stable only for being ßung...in proper containers, in order to ensure safe operation. If your individual requirements: 1 l order number 980 008 607 100 ml order number 980 008 606 In case MAKITA high-performance two-stroke engine oil is available, you can cause starting problems and damage the engine.Purchase only that amount ...
...environment and clog the exhaust channel in the following sizes: 1 l order number 980 008 210 5 l order number 980 008 211 Bio-degradable oil is 100% bio-degradable. Fuel mixture This tool is powered by MAKITA is made of special vegetable oils and is stable only for being ßung...in proper containers, in order to ensure safe operation. If your individual requirements: 1 l order number 980 008 607 100 ml order number 980 008 606 In case MAKITA high-performance two-stroke engine oil is available, you can cause starting problems and damage the engine.Purchase only that amount ...
EA6100P53G Instruction Manual
Page 18
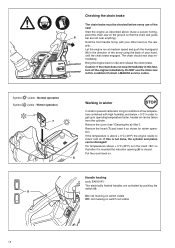
... the cylinder. The chain should now stop immediately in the direction of the arrow using the back of the saw! Contact a MAKITA service centre. Normal operation Symbol visible - Remove the cover (see "Cleaning the air Þlter"). Winter operation 7 Working in winter In order to prevent carburetor icing in conditions of low temperature combined with your hand, until the chain brake engages...
... the cylinder. The chain should now stop immediately in the direction of the arrow using the back of the saw! Contact a MAKITA service centre. Normal operation Symbol visible - Remove the cover (see "Cleaning the air Þlter"). Winter operation 7 Working in winter In order to prevent carburetor icing in conditions of low temperature combined with your hand, until the chain brake engages...
EA6100P53G Instruction Manual
Page 20
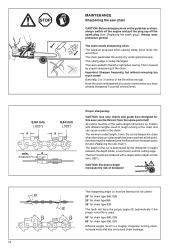
... sharpening: CAUTION: Use only chains and guide bars designed for chain type 093 The teeth will be of kickback! α β α β The sharpening angle (α) must be replaced (see the Extract from the spare-parts list)! Important: Sharpen frequently, but without removing too much metal! CAUTION: Excessive depth increases the risk of the same length (dimension a). All cutters...
... sharpening: CAUTION: Use only chains and guide bars designed for chain type 093 The teeth will be of kickback! α β α β The sharpening angle (α) must be replaced (see the Extract from the spare-parts list)! Important: Sharpen frequently, but without removing too much metal! CAUTION: Excessive depth increases the risk of the same length (dimension a). All cutters...

EA6100P53G Instruction Manual
Page 22
... own safety and must be done by a MAKITA service centre. Cleaning the guide bar CAUTION: Protective gloves must be worn. To install the guide bar, saw only after having assembled it completely and inspected. Always wear protective gloves! NOTE: Make sure there are important for damage, and clean them with a brush. CAUTION: Start the chain saw chain, and sprocket guard, see „Replacing...
... own safety and must be done by a MAKITA service centre. Cleaning the guide bar CAUTION: Protective gloves must be worn. To install the guide bar, saw only after having assembled it completely and inspected. Always wear protective gloves! NOTE: Make sure there are important for damage, and clean them with a brush. CAUTION: Start the chain saw chain, and sprocket guard, see „Replacing...
EA6100P53G Instruction Manual
Page 23
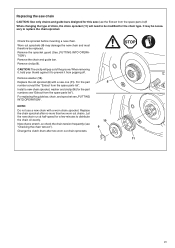
... INTO OPERATION". Remove circlip (9). For replacing the guide bar, chain, and sprocket see "Checking the chain tension"). Change the clutch drum after no more than two worn out chains. When changing the type of the groove. Replace the old sprocket (8) with a worn chain sprocket. Remove the sprocket guard (See „PUTTING INTO OPERATION"). Replacing the saw (see the Extract from the spare parts list"). Replace the...
... INTO OPERATION". Remove circlip (9). For replacing the guide bar, chain, and sprocket see "Checking the chain tension"). Change the clutch drum after no more than two worn out chains. When changing the type of the groove. Replace the old sprocket (8) with a worn chain sprocket. Remove the sprocket guard (See „PUTTING INTO OPERATION"). Replacing the saw (see the Extract from the spare parts list"). Replace the...
EA6100P53G Instruction Manual
Page 24
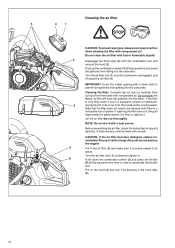
...is a noticeable loss of power. Put on the hood (2) and lock it . Note that the Þlter does not need to replace it out from getting into the fabric. Before assembling the air Þlter, check the choke ßap for any , remove them with compressed air! If the Þ... it with compressed air. Pieces of dishwashing liquid and rinse it . Do not clean the air Þlter with the combination tool and remove the hood (2). Cleaning the Þlter: Carefully tap out dust or carefully blow out dust from falling into the carburetor. Push down the combination switch (3) and press...
...is a noticeable loss of power. Put on the hood (2) and lock it . Note that the Þlter does not need to replace it out from getting into the fabric. Before assembling the air Þlter, check the choke ßap for any , remove them with compressed air! If the Þ... it with compressed air. Pieces of dishwashing liquid and rinse it . Do not clean the air Þlter with the combination tool and remove the hood (2). Cleaning the Þlter: Carefully tap out dust or carefully blow out dust from falling into the carburetor. Push down the combination switch (3) and press...

EA6100P53G Instruction Manual
Page 29
... Guide bar Starter cable Saw chain Guide bar Chain lubrication Chain brake Combination switch, Safety locking button, Throttle lever Fuel/oil tank cap Air Þlter Guide bar Guide bar support Idle speed Fan housing Air Þlter compartment Fan compartment Cylinder Þns Spark plug Mufßer Chain guide Screws and nuts Suction head Fuel, oil tanks Chain saw Chain saw must not perform maintenance work can be performed regularly. Instructions for periodic maintenance...
... Guide bar Starter cable Saw chain Guide bar Chain lubrication Chain brake Combination switch, Safety locking button, Throttle lever Fuel/oil tank cap Air Þlter Guide bar Guide bar support Idle speed Fan housing Air Þlter compartment Fan compartment Cylinder Þns Spark plug Mufßer Chain guide Screws and nuts Suction head Fuel, oil tanks Chain saw Chain saw must not perform maintenance work can be performed regularly. Instructions for periodic maintenance...

EA6100P53G Instruction Manual
Page 30
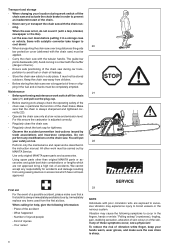
... parts used , this Manual may exist. Please note that we cannot accept any questions, please contact your local dealer. Please note that in material, dimensions, function and safety. Original spare parts and accessories can work is responsible for damage caused by a MAKITA service centre. He will also have the spare part lists to permanent exceeding of the upper performance limits. • Use of guide...
... parts used , this Manual may exist. Please note that we cannot accept any questions, please contact your local dealer. Please note that in material, dimensions, function and safety. Original spare parts and accessories can work is responsible for damage caused by a MAKITA service centre. He will also have the spare part lists to permanent exceeding of the upper performance limits. • Use of guide...

EA6100P53G Instruction Manual
Page 32
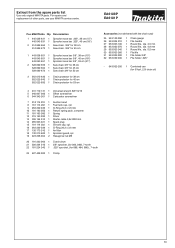
For repairs and replacement of other parts, see your MAKITA service centre. EA6100P EA6101P 3 2 1 4 5 6 10 15 11 16 12 14 17 13 9 8 7 25 19 20 21, 22 18 23 27 28 29 30 31/32 26 32 Extract from the spare parts list Use only original MAKITA parts.
For repairs and replacement of other parts, see your MAKITA service centre. EA6100P EA6101P 3 2 1 4 5 6 10 15 11 16 12 14 17 13 9 8 7 25 19 20 21, 22 18 23 27 28 29 30 31/32 26 32 Extract from the spare parts list Use only original MAKITA parts.
EA6100P53G Instruction Manual
Page 33
...spare parts list Use only original MAKITA parts. Qty. MAKITA-No. For repairs and replacement of other parts, see your MAKITA service centre. Denomination 1 445 038 631 1 Sprocket nose bar .325", 38 cm (15") 445 045 631 1 Sprocket nose bar .325", 45 cm (18") 2 514 686 664 1 Saw chain .325" for 38 cm 514 686 672 1 Saw chain ...Spring 12 315 163 090 1 Driver 13 395 164 010 1 Starter cable 3,8x1000 mm 14 965 603 021 1 Spark plug 15 181 114 202 1 Oil tank cap, cpl. 16 963 229 036 1 O-Ring 29,3 x 3,6 mm 17 130 173 010 1 Air Þlter 18 130 213 600 1 Sprocket guard, cpl. 19 923 208 004 2 Hexagonal nut...
...spare parts list Use only original MAKITA parts. Qty. MAKITA-No. For repairs and replacement of other parts, see your MAKITA service centre. Denomination 1 445 038 631 1 Sprocket nose bar .325", 38 cm (15") 445 045 631 1 Sprocket nose bar .325", 45 cm (18") 2 514 686 664 1 Saw chain .325" for 38 cm 514 686 672 1 Saw chain ...Spring 12 315 163 090 1 Driver 13 395 164 010 1 Starter cable 3,8x1000 mm 14 965 603 021 1 Spark plug 15 181 114 202 1 Oil tank cap, cpl. 16 963 229 036 1 O-Ring 29,3 x 3,6 mm 17 130 173 010 1 Air Þlter 18 130 213 600 1 Sprocket guard, cpl. 19 923 208 004 2 Hexagonal nut...
EA6100P53G PS-6100 Parts Breakdown
Page 13
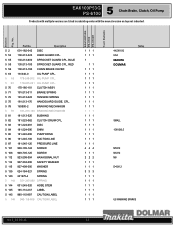
... Part No. BLUE 5 55 130-213-100 SPROCKET GUARD CPL. Section Fig. 5 EA6100P53G PS-6100 Chain Brake, Clutch, Oil Pump Products with multiple versions are listed in subsiding order with the newest version on top not indented. No. Description 52 001-182-042 DISC 5 54 130-213-220 HAND GUARD ... DRIVE 5 86 181-245-100 SUCTION LINE 5 87 181-245-120 PRESSURE LINE 5 101 908-105-124 SCREW 5 106 908-705-125 SCREW 5 112 923-208-004 HAXAGONAL NUT 5 114 927-304-000 SAFETY WASHER 5 115 927-408-000 WASHER 5 135 024-184-021 SPRING 5 143 231975-4 SPRING 5 143 021-245-060 SPRING ...
... Part No. BLUE 5 55 130-213-100 SPROCKET GUARD CPL. Section Fig. 5 EA6100P53G PS-6100 Chain Brake, Clutch, Oil Pump Products with multiple versions are listed in subsiding order with the newest version on top not indented. No. Description 52 001-182-042 DISC 5 54 130-213-220 HAND GUARD ... DRIVE 5 86 181-245-100 SUCTION LINE 5 87 181-245-120 PRESSURE LINE 5 101 908-105-124 SCREW 5 106 908-705-125 SCREW 5 112 923-208-004 HAXAGONAL NUT 5 114 927-304-000 SAFETY WASHER 5 115 927-408-000 WASHER 5 135 024-184-021 SPRING 5 143 231975-4 SPRING 5 143 021-245-060 SPRING ...


