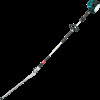
EN4950H Instruction Manual
Page 2
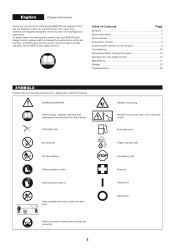
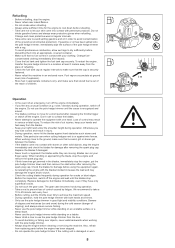
... electrical lines, risk of electrical shock Fuel (Gasoline) Engine manual-start Emergency stop First aid ON/START OFF/STOP Table of Contents Page Symbols 2 Safety instructions 3 Technical data 7 Designation of parts 8 Connecting the trimmer unit to the pole 9 Fuel/refuelling 10 Precautions before using the machine, and follow all instructions given herein to offer you very much for choosing the MAKITA pole hedge trimmer. English (Original instructions...
... electrical lines, risk of electrical shock Fuel (Gasoline) Engine manual-start Emergency stop First aid ON/START OFF/STOP Table of Contents Page Symbols 2 Safety instructions 3 Technical data 7 Designation of parts 8 Connecting the trimmer unit to the pole 9 Fuel/refuelling 10 Precautions before using the machine, and follow all instructions given herein to offer you very much for choosing the MAKITA pole hedge trimmer. English (Original instructions...
EN4950H Instruction Manual
Page 3
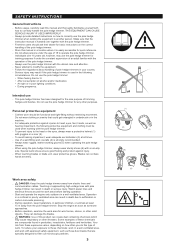
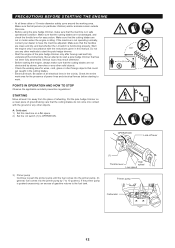
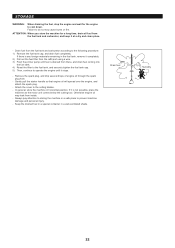
THIS EQUIPMENT CAN CAUSE SERIOUS INJURY IF USED IMPROPERLY! -- Make sure that the instruction manual is used when working gloves (5) when operating the pole hedge trimmer. -- First-time users should be used in the following protective equipment and clothing must be functional and ... correctly handle the pole hedge trimmer. Follow the regulations about handling of trimming hedges and bushes. Do not use -- Watch power lines and electrical fences around the work shoes ensure good footing and protect against injuries to filter out microscopic particles. 3 Stop the engine as ...
THIS EQUIPMENT CAN CAUSE SERIOUS INJURY IF USED IMPROPERLY! -- Make sure that the instruction manual is used when working gloves (5) when operating the pole hedge trimmer. -- First-time users should be used in the following protective equipment and clothing must be functional and ... correctly handle the pole hedge trimmer. Follow the regulations about handling of trimming hedges and bushes. Do not use -- Watch power lines and electrical fences around the work shoes ensure good footing and protect against injuries to filter out microscopic particles. 3 Stop the engine as ...
EN4950H Instruction Manual
Page 4
... this instruction manual. Never drag the engine across the ground as this may seriously damage the machine. -- Cleaning the machine -- Follow the instructions below to avoid leakage of moisture, mud, oil or grease. When operating the pole hedge trimmer, always maintain a firm grip on the drive shaft. -- Always stop the engine and adjust the idle speed down. -- Turn off the engine before continuing work. The lock-off lever functions...
... this instruction manual. Never drag the engine across the ground as this may seriously damage the machine. -- Cleaning the machine -- Follow the instructions below to avoid leakage of moisture, mud, oil or grease. When operating the pole hedge trimmer, always maintain a firm grip on the drive shaft. -- Always stop the engine and adjust the idle speed down. -- Turn off the engine before continuing work. The lock-off lever functions...
EN4950H Instruction Manual
Page 5
... after removing the spark plug cap. Operation -- In the event of control caused by fatigue. The blades continue to prevent loss of an emergency, turn off the engine. To reduce the risk of control may damage the engine and/or clutch. -- If thick branches get between the blades. -- Take a rest to move for damage before cleaning or servicing the machine. Only use the pole hedge trimmer from replacing parts...
... after removing the spark plug cap. Operation -- In the event of control caused by fatigue. The blades continue to prevent loss of an emergency, turn off the engine. To reduce the risk of control may damage the engine and/or clutch. -- If thick branches get between the blades. -- Take a rest to move for damage before cleaning or servicing the machine. Only use the pole hedge trimmer from replacing parts...
EN4950H Instruction Manual
Page 6
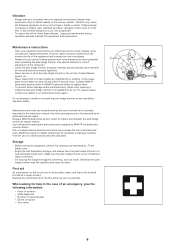
... first aid kit as soon as possible when operating the pole hedge trimmer. Use of unauthorized accessories and tools may cause parts of the blades to correct adjustment of children's reach at regular interval. Before storing the equipment, perform full cleaning and maintenance. Replace any of accident and injury. Do not prop the equipment against something, such as this instruction manual. People with...
... first aid kit as soon as possible when operating the pole hedge trimmer. Use of unauthorized accessories and tools may cause parts of the blades to correct adjustment of children's reach at regular interval. Before storing the equipment, perform full cleaning and maintenance. Replace any of accident and injury. Do not prop the equipment against something, such as this instruction manual. People with...

EN4950H Instruction Manual
Page 7
TECHNICAL DATA Model Dimensions (L x W x H) Net weight Volume (fuel tank) Cutting length Maximum branch diameter Engine displacement Maximum engine performance Engine speed at recommended max, spindle speed Fuel consumption Specific fuel consumption Idling speed Clutch engagement speed Carburetor (Diaphragm carburetor) Ignition system Spark plug type Electrode gap Fuel Engine oil Gear ratio EN4950H Loop handle 2,550 mm x 242 mm x 241 mm 6.9 kg 0.6 L 490 mm 7 mm 25.4 cm3 0.77 kW at 7,000 min-1 10,000 min-1 0.33 kg/h 408 g/kWh 3,000 ...
TECHNICAL DATA Model Dimensions (L x W x H) Net weight Volume (fuel tank) Cutting length Maximum branch diameter Engine displacement Maximum engine performance Engine speed at recommended max, spindle speed Fuel consumption Specific fuel consumption Idling speed Clutch engagement speed Carburetor (Diaphragm carburetor) Ignition system Spark plug type Electrode gap Fuel Engine oil Gear ratio EN4950H Loop handle 2,550 mm x 242 mm x 241 mm 6.9 kg 0.6 L 490 mm 7 mm 25.4 cm3 0.77 kW at 7,000 min-1 10,000 min-1 0.33 kg/h 408 g/kWh 3,000 ...
EN4950H Instruction Manual
Page 9
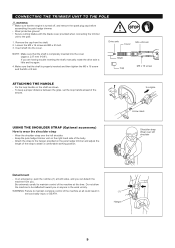
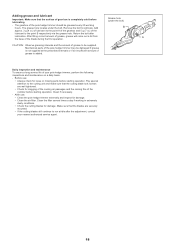
... sure that the engine is turned off, and remove the spark plug cap before assembling the pole hedge trimmer. • Wear protective gloves! • Secure cutting blades with the blade cover provided when connecting the trimmer unit to maintain complete control of the machine at all could result in the work vicinity. To keep a proper distance between the grips, set the loop handle ahead of the...
... sure that the engine is turned off, and remove the spark plug cap before assembling the pole hedge trimmer. • Wear protective gloves! • Secure cutting blades with the blade cover provided when connecting the trimmer unit to maintain complete control of the machine at all could result in the work vicinity. To keep a proper distance between the grips, set the loop handle ahead of the...
EN4950H Instruction Manual
Page 10
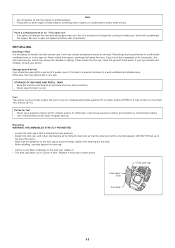
... to remove the oil cap. Keep the detached oil cap free of oil inside of the oil pipe (Fig. 2). -- Set the engine level, remove oil cap (Fig. 1), and check to be lost, and oil level will result in color or mixes with dirt, replace it with white smoke. However, if oil pipe becomes extremely dirty, visibility may be checked against these marks. (2) Fill with oil to the oil cap may catch fire with new one...
... to remove the oil cap. Keep the detached oil cap free of oil inside of the oil pipe (Fig. 2). -- Set the engine level, remove oil cap (Fig. 1), and check to be lost, and oil level will result in color or mixes with dirt, replace it with white smoke. However, if oil pipe becomes extremely dirty, visibility may be checked against these marks. (2) Fill with oil to the oil cap may catch fire with new one...
EN4950H Instruction Manual
Page 11
... similar to use a gasoline mixture which contains engine oil. Be sure to release the tank pressure. -- If you . Keep the machine and tank at a cool place free from you touch fuel repeatedly or for fuel -- Be sure to solvents. Refuelling WARNING: INFLAMMABLES STRICTLY PROHIBITED -- Wipe well the periphery of operation. REFUELLING Handling of fuel It is any flaw or damage on the tank cap, replace it...
... similar to use a gasoline mixture which contains engine oil. Be sure to release the tank pressure. -- If you . Keep the machine and tank at a cool place free from you touch fuel repeatedly or for fuel -- Be sure to solvents. Refuelling WARNING: INFLAMMABLES STRICTLY PROHIBITED -- Wipe well the periphery of operation. REFUELLING Handling of fuel It is any flaw or damage on the tank cap, replace it...
EN4950H Instruction Manual
Page 12
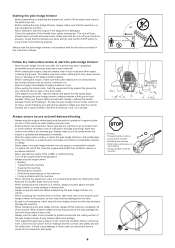
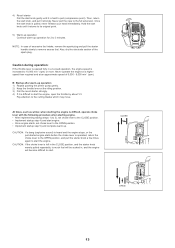
... of power lines and electrical fences before starting the engine, always make sure that the cutting blades are clean and dry, and test whether the I -O switch (1) to start a pole hedge trimmer that the handles are not in the cutting blades. -- OPERATION Lock-off lever 3) Primer pump Continue to 10 pushes.) If the primer pump is idling. Check the entire work area for the presence of all persons (in this zone. -- STOP (1) High Throttle lever speed Low speed Primer pump Carburetor 12...
... of power lines and electrical fences before starting the engine, always make sure that the cutting blades are clean and dry, and test whether the I -O switch (1) to start a pole hedge trimmer that the handles are not in the cutting blades. -- OPERATION Lock-off lever 3) Primer pump Continue to 10 pushes.) If the primer pump is idling. Check the entire work area for the presence of all persons (in this zone. -- STOP (1) High Throttle lever speed Low speed Primer pump Carburetor 12...
EN4950H Instruction Manual
Page 13
... fuel intake, remove the spark plug and pull the starter handle slowly to 10,000 min-1 (rpm) or more. B: Startup after warm-up operation 1) Repeat pushing the primer pump gently. 2) Keep the throttle lever at an approximate speed of 6,000 - 9,000 min-1 (rpm). Pay attention to the full extension. At times, such as winter, when starting engine. • After implementing startup steps 1) to 3), set choke lever to the CLOSE position...
... fuel intake, remove the spark plug and pull the starter handle slowly to 10,000 min-1 (rpm) or more. B: Startup after warm-up operation 1) Repeat pushing the primer pump gently. 2) Keep the throttle lever at an approximate speed of 6,000 - 9,000 min-1 (rpm). Pay attention to the full extension. At times, such as winter, when starting engine. • After implementing startup steps 1) to 3), set choke lever to the CLOSE position...
EN4950H Instruction Manual
Page 15
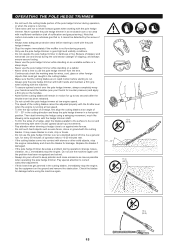
... the cutting blades, immediately stop the engine immediately and check the blades for every 50 minutes of time. To trim the top surface of suffocation and gas poisoning). Replace the blades if damaged. -- Do not use the pole hedge trimmer from the tree. -- Check the blades for damage before starting to use the machine again until the problem has been recognized and solved. -- Do not operate the...
... the cutting blades, immediately stop the engine immediately and check the blades for every 50 minutes of time. To trim the top surface of suffocation and gas poisoning). Replace the blades if damaged. -- Do not use the pole hedge trimmer from the tree. -- Check the blades for damage before starting to use the machine again until the problem has been recognized and solved. -- Do not operate the...

EN4950H Instruction Manual
Page 16
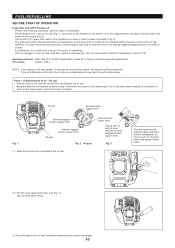
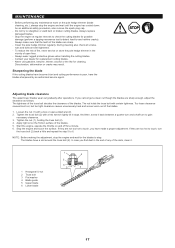
... angle, return the angle lock gently. If the angle is not appropriate, the clutch is in an upright position. -- Set the socket wrench and the hex wrench on the unit. Adjustment of the cutter unit. Do not operate the tool with the blade cover provided before adjusting cutting angle. The cutter unit is fasten ... switch to the "O" position and lay the pole hedge trimmer flat on the cutter unit with one hand, and hold the handle (A) on the ground to be changed if it is loose, the bolt (the axis of the cutter unit by turning hex wrench, and then fasten the bolt by turning the...
... angle, return the angle lock gently. If the angle is not appropriate, the clutch is in an upright position. -- Set the socket wrench and the hex wrench on the unit. Adjustment of the cutter unit. Do not operate the tool with the blade cover provided before adjusting cutting angle. The cutter unit is fasten ... switch to the "O" position and lay the pole hedge trimmer flat on the cutter unit with one hand, and hold the handle (A) on the ground to be changed if it is loose, the bolt (the axis of the cutter unit by turning hex wrench, and then fasten the bolt by turning the...
EN4950H Instruction Manual
Page 17
... of open -ended wrench. 2. During cleaning also check all screws, nuts and bolts are sharp. -- Sharpening the blade If the cutting blades have become blunt and cutting performance is poor, have a slot around the truss bolt (2). If you have made a proper adjustment. Start the engine, operate the throttle on the pole hedge trimmer (blade cleaning, etc.), always stop the engine and wait until the engine has cooled down. Stop the...
... of open -ended wrench. 2. During cleaning also check all screws, nuts and bolts are sharp. -- Sharpening the blade If the cutting blades have become blunt and cutting performance is poor, have a slot around the truss bolt (2). If you have made a proper adjustment. Start the engine, operate the throttle on the pole hedge trimmer (blade cleaning, etc.), always stop the engine and wait until the engine has cooled down. Stop the...
EN4950H Instruction Manual
Page 18
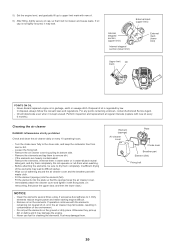
... or missing parts before starting operation. The grease hole locates under the bolt) -- The gearbox of the pole hedge trimmer should be greased every 25 working in extremely dusty conditions. • Check the cutting blades for damage. • Clean the air filter. Adding grease and lubricant Important: Make sure that the surface of gear box is completely cold before starting operation. Before use ; • Clean the pole hedge trimmer externally and...
... or missing parts before starting operation. The grease hole locates under the bolt) -- The gearbox of the pole hedge trimmer should be greased every 25 working in extremely dusty conditions. • Check the cutting blades for damage. • Clean the air filter. Adding grease and lubricant Important: Make sure that the surface of gear box is completely cold before starting operation. Before use ; • Clean the pole hedge trimmer externally and...
EN4950H Instruction Manual
Page 20
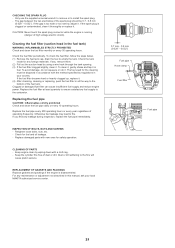
... around the air cleaner cover and the breather part with new oil. 6) After filling, tightly secure oil cap, so that the sponge faces the air cleaner cover. -- Clean the elements several times a day, if excessive dust adheres to it is regulated by pulling its bottom side. -- Remove oil on the ground or dirty place. Element (sponge) Air cleaner cover Plate Choke lever Breather part Element (felt) Fixing bolt 20 If...
... around the air cleaner cover and the breather part with new oil. 6) After filling, tightly secure oil cap, so that the sponge faces the air cleaner cover. -- Clean the elements several times a day, if excessive dust adheres to it is regulated by pulling its bottom side. -- Remove oil on the ground or dirty place. Element (sponge) Air cleaner cover Plate Choke lever Breather part Element (felt) Fixing bolt 20 If...
EN4950H Instruction Manual
Page 21
... the carburetor. INSPECTION OF BOLTS, NUTS AND SCREWS -- For any leakage during inspection, replace the fuel pipe immediately. CHECKING THE SPARK PLUG -- Only use the supplied universal wrench to remove or to the bottom of the spark plug should be disposed in accordance with new ones for fuel and oil leakage. -- The gap between the two electrodes of the fuel tank. Cleaning the fuel filter (suction head in this manual, ask your country. To clean...
... the carburetor. INSPECTION OF BOLTS, NUTS AND SCREWS -- For any leakage during inspection, replace the fuel pipe immediately. CHECKING THE SPARK PLUG -- Only use the supplied universal wrench to remove or to the bottom of the spark plug should be disposed in accordance with new ones for fuel and oil leakage. -- The gap between the two electrodes of the fuel tank. Cleaning the fuel filter (suction head in this manual, ask your country. To clean...
EN4950H Instruction Manual
Page 22
... engine oil through the spark plug hole. -- Always pay attention to storing the machine in the fuel tank, remove it completely. 2) Pull out the fuel filter from the refill port using a wire. 3) Push the primer pump until it stops. -- Keep the drained fuel in a special container in horizontal position. Attach the cover to the following procedure: 1) Remove the fuel tank cap, and drain fuel completely. Gently pull the starter handle so that engine oil will spread over the engine, and attach the spark plug...
... engine oil through the spark plug hole. -- Always pay attention to storing the machine in the fuel tank, remove it completely. 2) Pull out the fuel filter from the refill port using a wire. 3) Push the primer pump until it stops. -- Keep the drained fuel in a special container in horizontal position. Attach the cover to the following procedure: 1) Remove the fuel tank cap, and drain fuel completely. Gently pull the starter handle so that engine oil will spread over the engine, and attach the spark plug...

EN4950H Instruction Manual
Page 23
... *3 After emptying the fuel tank, continue to P19). Operating time Item Engine oil Inspect Replace Tightening parts (bolt, nut) Inspect Fuel tank Clean/inspect Drain fuel Throttle lever Check function Stop switch Check function Cutting blades Inspect Low-speed rotation Inspect/adjust Air cleaner Clean Ignition plug Inspect Cooling air duct Clean/inspect Fuel pipe Inspect Replace Gear-case grease Refill Fuel filter Clean/replace Clearance between Adjust air intake valve and air discharge valve Engine overhaul Carburetor Drain fuel Before operation Daily (10h...
... *3 After emptying the fuel tank, continue to P19). Operating time Item Engine oil Inspect Replace Tightening parts (bolt, nut) Inspect Fuel tank Clean/inspect Drain fuel Throttle lever Check function Stop switch Check function Cutting blades Inspect Low-speed rotation Inspect/adjust Air cleaner Clean Ignition plug Inspect Cooling air duct Clean/inspect Fuel pipe Inspect Replace Gear-case grease Refill Fuel filter Clean/replace Clearance between Adjust air intake valve and air discharge valve Engine overhaul Carburetor Drain fuel Before operation Daily (10h...
EN4950H Instruction Manual
Page 24
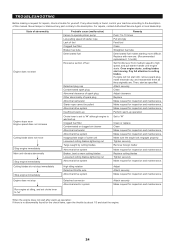
... inspection and maintenance. Run engine at idling, and set to " " although engine is no abnormality found , control your machine according to the description of abnormality Engine does not start as they originally are. Clogged fuel filter Contaminated or clogged air cleaner Abnormal carburetor Abnormal drive system Inappropriate angle of spark plug Abnormal carburetor Starter rope cannot be pulled Abnormal drive system Insufficient warm-up Choke lever is set choke lever to high speed, and pull starter handle until engine starts. Replace cutting blades Tighten securely...
... inspection and maintenance. Run engine at idling, and set to " " although engine is no abnormality found , control your machine according to the description of abnormality Engine does not start as they originally are. Clogged fuel filter Contaminated or clogged air cleaner Abnormal carburetor Abnormal drive system Inappropriate angle of spark plug Abnormal carburetor Starter rope cannot be pulled Abnormal drive system Insufficient warm-up Choke lever is set choke lever to high speed, and pull starter handle until engine starts. Replace cutting blades Tighten securely...


