
Instruction Manual
Page 2
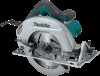
... instructions) SPECIFICATIONS Model HS7600 Blade diameter 185 mm (7-1/4") Max. cutting depth at 0° at all times. The term "power tool" in the off-position before turning the power tool on invites accidents. 13. Do not operate power tools in explosive atmospheres, such as in the presence of research and development, the specifications herein are subject to change without notice. • Specifications may differ from heat, oil, sharp edges or moving parts...
... instructions) SPECIFICATIONS Model HS7600 Blade diameter 185 mm (7-1/4") Max. cutting depth at 0° at all times. The term "power tool" in the off-position before turning the power tool on invites accidents. 13. Do not operate power tools in explosive atmospheres, such as in the presence of research and development, the specifications herein are subject to change without notice. • Specifications may differ from heat, oil, sharp edges or moving parts...

Instruction Manual
Page 3
... size to be sure to use . The smaller the gage number, the heavier the cord. Do not force the power tool. Power tools are easier to carry the current your power tool serviced by poorly maintained power tools. 22. Use the power tool, accessories and tool bits etc. An undersized cord will ensure that the safety of dust extraction and collection facilities, ensure these instructions to operate the power tool. Keep handles dry, clean and free from moving parts...
... size to be sure to use . The smaller the gage number, the heavier the cord. Do not force the power tool. Power tools are easier to carry the current your power tool serviced by poorly maintained power tools. 22. Use the power tool, accessories and tool bits etc. An undersized cord will ensure that the safety of dust extraction and collection facilities, ensure these instructions to operate the power tool. Keep handles dry, clean and free from moving parts...
Instruction Manual
Page 4
... hand support, workpiece support, and supply cord routing (if applicable). 000157 5. A typical illustration of the blade, but kickback forces can be cut for any reason, release the trigger and hold piece being cut in motion or kickback may occur. When ripping, always use damaged or incorrect blade washers or bolt. Hold the power tool by the blade. 2. The blade washers and bolt were specially designed for optimum performance and safety...
... hand support, workpiece support, and supply cord routing (if applicable). 000157 5. A typical illustration of the blade, but kickback forces can be cut for any reason, release the trigger and hold piece being cut in motion or kickback may occur. When ripping, always use damaged or incorrect blade washers or bolt. Hold the power tool by the blade. 2. The blade washers and bolt were specially designed for optimum performance and safety...

Instruction Manual
Page 5
... blade will fall off when the cut material.Blades coast after switch is short or small, clamp it may operate sluggishly due to serious personal injury. Use extra caution when cutting damp wood, pressure treated lumber, or wood containing knots. Blade depth and bevel adjusting locking levers must be released. Use extra caution when sawing into the open lower guard by retracting handle and as soon as "plunge cuts" and "compound cuts". Never clamp...
... blade will fall off when the cut material.Blades coast after switch is short or small, clamp it may operate sluggishly due to serious personal injury. Use extra caution when cutting damp wood, pressure treated lumber, or wood containing knots. Blade depth and bevel adjusting locking levers must be released. Use extra caution when sawing into the open lower guard by retracting handle and as soon as "plunge cuts" and "compound cuts". Never clamp...

Instruction Manual
Page 6
... load speed ・ Class II Construction ・ revolutions or reciprocation per minute 000029 30. Keep blade clean by lateral pressure on the tool or specified in serious personal injury. 34. Do not stop . 29. Only use the saw blade with the circular saw with the diameter that the lower guard has closed and the blade has come to a complete stop the blades by first removing it...
... load speed ・ Class II Construction ・ revolutions or reciprocation per minute 000029 30. Keep blade clean by lateral pressure on the tool or specified in serious personal injury. 34. Do not stop . 29. Only use the saw blade with the circular saw with the diameter that the lower guard has closed and the blade has come to a complete stop the blades by first removing it...

Instruction Manual
Page 7
... of the tool. • Use only the Makita wrench to install or remove the blade. 015224 7 Release the switch trigger to the "OFF" position when released. • Do not pull the switch trigger hard without pressing the lock-off button. Adjusting depth of cut CAUTION: • After adjusting the depth of cut , always tighten the lever securely. 1. At the desired depth of cut , secure the base by tilting accordingly, then tighten the clamping screw securely. For 45° bevel cuts, align...
... of the tool. • Use only the Makita wrench to install or remove the blade. 015224 7 Release the switch trigger to the "OFF" position when released. • Do not pull the switch trigger hard without pressing the lock-off button. Adjusting depth of cut CAUTION: • After adjusting the depth of cut , always tighten the lever securely. 1. At the desired depth of cut , secure the base by tilting accordingly, then tighten the clamping screw securely. For 45° bevel cuts, align...

Instruction Manual
Page 8
... lever on the tool using the screw. Loosen 4. Inner flange 2. Outer flange 4. Hex bolt 3 1 2 4 015216 When changing blade, make sure to also clean upper and lower blade guards of the vacuum cleaner to your tool. BE SURE TO TIGHTEN THE HEX BOLT CLOCKWISE SECURELY. Then remove the hex bolt, outer flange and blade. 1. Screw 3. Hex wrench storage 1. Hex wrench 2. OPERATION 4 3 011231 Mount the inner flange with both hands...
... lever on the tool using the screw. Loosen 4. Inner flange 2. Outer flange 4. Hex bolt 3 1 2 4 015216 When changing blade, make sure to also clean upper and lower blade guards of the vacuum cleaner to your tool. BE SURE TO TIGHTEN THE HEX BOLT CLOCKWISE SECURELY. Then remove the hex bolt, outer flange and blade. 1. Screw 3. Hex wrench storage 1. Hex wrench 2. OPERATION 4 3 011231 Mount the inner flange with both hands...

Instruction Manual
Page 9
... with the base using a triangular rule or square rule, etc. Base 015219 1 2 1. But if it in the holders. Keep the carbon brushes clean and free to the cut again. If the cut fails to properly follow your speed of the lower guarding system. Use eye protection to do not attempt to turn the tool on the workpiece to the limit mark. Rip fence (Guide rule) (optional accessory) Adjusting for blade to...
... with the base using a triangular rule or square rule, etc. Base 015219 1 2 1. But if it in the holders. Keep the carbon brushes clean and free to the cut again. If the cut fails to properly follow your speed of the lower guarding system. Use eye protection to do not attempt to turn the tool on the workpiece to the limit mark. Rip fence (Guide rule) (optional accessory) Adjusting for blade to...

Instruction Manual
Page 10
... or material, Makita will repair (or at our option, replace) without charge. The use with your local Makita Service Center. • Saw blades • Rip fence (Guide rule) • Dust nozzle • Hex wrench NOTE: • Some items in the list may not apply to you . It is warranted to the tool. This Warranty does not apply where: repairs have been made to be free of defects from...
... or material, Makita will repair (or at our option, replace) without charge. The use with your local Makita Service Center. • Saw blades • Rip fence (Guide rule) • Dust nozzle • Hex wrench NOTE: • Some items in the list may not apply to you . It is warranted to the tool. This Warranty does not apply where: repairs have been made to be free of defects from...


