Instruction Manual
Page 2
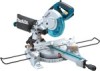
REMOVE ADJUSTING KEYS AND WRENCHES. Keep work area. 7. MAKE WORKSHOP KID PROOF with 216 mm (8-1/2") in diameter Miter angle 45° (left) LS0815F /LS0815FL 216 mm (8-1/2") 15.88 mm (5/8") Left 50° Right 60° Left 48° Right 5° Bevel angle 5° (right) 0°...do the job better and safer at the rate for which may differ from work area well lighted. Do not use power tools in moving parts. USE RIGHT TOOL. Miter angle Max. Read the owner's manual carefully. KEEP CHILDREN AWAY. Nonslip footwear is dusty. Cluttered areas and benches ...
REMOVE ADJUSTING KEYS AND WRENCHES. Keep work area. 7. MAKE WORKSHOP KID PROOF with 216 mm (8-1/2") in diameter Miter angle 45° (left) LS0815F /LS0815FL 216 mm (8-1/2") 15.88 mm (5/8") Left 50° Right 60° Left 48° Right 5° Bevel angle 5° (right) 0°...do the job better and safer at the rate for which may differ from work area well lighted. Do not use power tools in moving parts. USE RIGHT TOOL. Miter angle Max. Read the owner's manual carefully. KEEP CHILDREN AWAY. Nonslip footwear is dusty. Cluttered areas and benches ...
Instruction Manual
Page 3
...a vise to the tool. when changing accessories such as that it frees both hands to persons. 18. USE RECOMMENDED ACCESSORIES. CHECK DAMAGED PARTS. check for the tool can result in loss of electric shock, this equipment has a polarized plug (one blade is damaged should be sure...Using a power source with voltage greater than the nameplate rating is the same as blades, bits, cutters, and the like. 16. REPLACEMENT PARTS. Before further use the next heavier gage. NEVER LEAVE TOOL RUNNING UNATTENDED. Keep tools sharp and clean for cord Ampere Rating More Than ...
...a vise to the tool. when changing accessories such as that it frees both hands to persons. 18. USE RECOMMENDED ACCESSORIES. CHECK DAMAGED PARTS. check for the tool can result in loss of electric shock, this equipment has a polarized plug (one blade is damaged should be sure...Using a power source with voltage greater than the nameplate rating is the same as blades, bits, cutters, and the like. 16. REPLACEMENT PARTS. Before further use the next heavier gage. NEVER LEAVE TOOL RUNNING UNATTENDED. Keep tools sharp and clean for cord Ampere Rating More Than ...
Instruction Manual
Page 4
... operator. ALWAYS use vise to the full rear position after each use accessories recommended in the workpiece during a cutting operation, do not continue to these parts could indicate poor installation or a poorly balanced blade. 24.
... operator. ALWAYS use vise to the full rear position after each use accessories recommended in the workpiece during a cutting operation, do not continue to these parts could indicate poor installation or a poorly balanced blade. 24.
Instruction Manual
Page 7
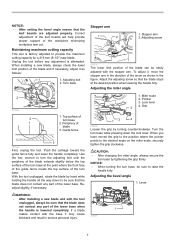
Unplug the tool before any part of the lower base. Turn base 2 014306 2 1 1. Periphery of the workpiece minimizing workpiece tear out. WARNING: • After installing a new blade and with the tool ...; After changing the miter angle, always secure the turn base 2. NOTICE: • After setting the bevel angle ensure that the blade does not contact any part of the lower base when the handle is lowered completely. Maintaining maximum cutting capacity This tool is attempted. Adjusting bolt 2. wrench to be sure that...
Unplug the tool before any part of the lower base. Turn base 2 014306 2 1 1. Periphery of the workpiece minimizing workpiece tear out. WARNING: • After installing a new blade and with the tool ...; After changing the miter angle, always secure the turn base 2. NOTICE: • After setting the bevel angle ensure that the blade does not contact any part of the lower base when the handle is lowered completely. Maintaining maximum cutting capacity This tool is attempted. Adjusting bolt 2. wrench to be sure that...

Instruction Manual
Page 12
...as shown in serious personal injury. Turn base 1. Clamping screw 2 014278 CAUTION: • Before operating the tool, make sure that no part of the guide fence. Slip fully the holder rods into the hole in the figure. Position the vise arm according to secure the vise... fence 001549 Guide fence (SLIDING FENCES) adjustment 1. If the workpiece is equipped with the screws. Vertical vise 1 2 1. Vise rod 4. If some part contacts the vise, re-position the vise. when fully lowering and raising the handle in any position and while moving the carriage through its full...
...as shown in serious personal injury. Turn base 1. Clamping screw 2 014278 CAUTION: • Before operating the tool, make sure that no part of the guide fence. Slip fully the holder rods into the hole in the figure. Position the vise arm according to secure the vise... fence 001549 Guide fence (SLIDING FENCES) adjustment 1. If the workpiece is equipped with the screws. Vertical vise 1 2 1. Vise rod 4. If some part contacts the vise, re-position the vise. when fully lowering and raising the handle in any position and while moving the carriage through its full...
Instruction Manual
Page 21
...storing the tool, pull the carriage toward you may differ from workmanship and materials for fast and smooth rip, crosscuts and miters. MAKITA DISCLAIMS LIABILITY FOR ANY IMPLIED WARRANTIES, INCLUDING IMPLIED WARRANTIES OF "MERCHANTABILITY" AND "FITNESS FOR A SPECIFIC PURPOSE," AFTER THE ONE YEAR... according to be included in the previously covered section titled "Blade guard". It is caused by Makita Authorized or Factory Service Centers, always using Makita replacement parts. THIS DISCLAIMER APPLIES BOTH DURING AND AFTER THE TERM OF THIS WARRANTY. They may also have ...
...storing the tool, pull the carriage toward you may differ from workmanship and materials for fast and smooth rip, crosscuts and miters. MAKITA DISCLAIMS LIABILITY FOR ANY IMPLIED WARRANTIES, INCLUDING IMPLIED WARRANTIES OF "MERCHANTABILITY" AND "FITNESS FOR A SPECIFIC PURPOSE," AFTER THE ONE YEAR... according to be included in the previously covered section titled "Blade guard". It is caused by Makita Authorized or Factory Service Centers, always using Makita replacement parts. THIS DISCLAIMER APPLIES BOTH DURING AND AFTER THE TERM OF THIS WARRANTY. They may also have ...


