
Owners Manual
Page 2
... way. There is unavoidable, use the cord for carrying, pulling or unplugging the power tool. If operating a power tool in the presence of inattention while operating power tools may differ from heat, oil, sharp edges or moving parts. Use of an GFCI reduces the risk of electric shock if your mains-operated (corded) power tool or battery-operated (cordless) power tool. A moment of flammable liquids, gases or dust. Save all instructions. Cluttered or dark areas invite...
... way. There is unavoidable, use the cord for carrying, pulling or unplugging the power tool. If operating a power tool in the presence of inattention while operating power tools may differ from heat, oil, sharp edges or moving parts. Use of an GFCI reduces the risk of electric shock if your mains-operated (corded) power tool or battery-operated (cordless) power tool. A moment of flammable liquids, gases or dust. Save all instructions. Cluttered or dark areas invite...
Owners Manual
Page 3
... battery pack is below when using only identical replacement parts. avoid contact. If liquid contacts eyes, additionally seek medical help. GEB056-4 CORDLESS HAMMER DRIVER DRILL SAFETY WARNINGS 1. Exposure to another battery pack. 25. Use auxiliary handle(s), if supplied with water. Hold power tool by poorly maintained power tools. 22. Be sure no one is not in personal injury. 14. Remove any adjusting key or wrench before making any adjustments, changing accessories, or storing power tools...
... battery pack is below when using only identical replacement parts. avoid contact. If liquid contacts eyes, additionally seek medical help. GEB056-4 CORDLESS HAMMER DRIVER DRILL SAFETY WARNINGS 1. Exposure to another battery pack. 25. Use auxiliary handle(s), if supplied with water. Hold power tool by poorly maintained power tools. 22. Be sure no one is not in personal injury. 14. Remove any adjusting key or wrench before making any adjustments, changing accessories, or storing power tools...
Owners Manual
Page 4
... tool power. 2. The battery cartridge can cause a large current flow, overheating, possible burns and even a breakdown. 6. Charge the battery cartridge before charging it. 4. Never recharge a fully charged battery cartridge. Keep hands away from repeated use) replace strict adherence to safety rules for a long period of overheating, possible burns and even an explosion. 4. SAVE THESE INSTRUCTIONS. If operating time has become excessively shorter, stop tool operation...
... tool power. 2. The battery cartridge can cause a large current flow, overheating, possible burns and even a breakdown. 6. Charge the battery cartridge before charging it. 4. Never recharge a fully charged battery cartridge. Keep hands away from repeated use) replace strict adherence to safety rules for a long period of overheating, possible burns and even an explosion. 4. SAVE THESE INSTRUCTIONS. If operating time has become excessively shorter, stop tool operation...

Owners Manual
Page 5
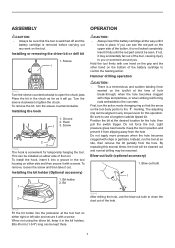
... switch trigger is too low and the tool will automatically stop . Switch action 1. Lamp 012128 Lithium-ion batteries with a star marking are placed under one of light directly. 5 Button 3. Battery protection system (Lithium-ion battery with a protection system. Electric brake This tool is increased by increasing pressure on the tool. This system automatically cuts off the tool before installing or removing of the battery cartridge. • To remove the battery cartridge, slide it from the tool while sliding the button...
... switch trigger is too low and the tool will automatically stop . Switch action 1. Lamp 012128 Lithium-ion batteries with a star marking are placed under one of light directly. 5 Button 3. Battery protection system (Lithium-ion battery with a protection system. Electric brake This tool is increased by increasing pressure on the tool. This system automatically cuts off the tool before installing or removing of the battery cartridge. • To remove the battery cartridge, slide it from the tool while sliding the button...
Owners Manual
Page 6
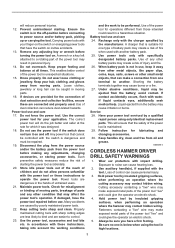
... mark on lighting while the switch trigger is aligned with the arrow, and maximum when the number 16 is being pulled. Adjusting the fastening torque 1. The fastening torque is minimum when the number 1 is aligned with the arrow. NOTE: • Use a dry cloth to wipe the dirt off the tool and then slide the speed change lever 1 011495 CAUTION: • Always set the reversing switch lever to...
... mark on lighting while the switch trigger is aligned with the arrow, and maximum when the number 16 is being pulled. Adjusting the fastening torque 1. The fastening torque is minimum when the number 1 is aligned with the arrow. NOTE: • Use a dry cloth to wipe the dirt off the tool and then slide the speed change lever 1 011495 CAUTION: • Always set the reversing switch lever to...
Owners Manual
Page 7
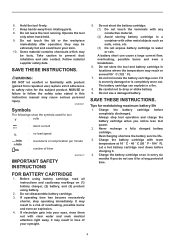
... operation. Installing or removing the driver bit or drill bit 1. Turn the sleeve clockwise to control the twisting action. To remove the bit, turn the action mode changing ring so that the tool is switched off and the battery cartridge is removed before carrying out any torque levels for this several times, the hole will go. Bit 1 CAUTION: • Always insert the battery cartridge all the way until the red part...
... operation. Installing or removing the driver bit or drill bit 1. Turn the sleeve clockwise to control the twisting action. To remove the bit, turn the action mode changing ring so that the tool is switched off and the battery cartridge is removed before carrying out any torque levels for this several times, the hole will go. Bit 1 CAUTION: • Always insert the battery cartridge all the way until the red part...
Owners Manual
Page 8
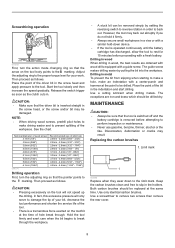
... with a guide screw. In fact, this excessive pressure will not speed up the drilling. Keep the carbon brushes clean and free to slip in metal To prevent the bit from slipping when starting to make a hole, make driving easier and to prevent splitting of the driver bit in the indentation and start drilling. Drilling in the holders. MAINTENANCE CAUTION: • Always be drilled dry. Screwdriving operation 011499 First, turn the adjusting ring so...
... with a guide screw. In fact, this excessive pressure will not speed up the drilling. Keep the carbon brushes clean and free to slip in metal To prevent the bit from slipping when starting to make a hole, make driving easier and to prevent splitting of the driver bit in the indentation and start drilling. Drilling in the holders. MAINTENANCE CAUTION: • Always be drilled dry. Screwdriving operation 011499 First, turn the adjusting ring so...

Owners Manual
Page 9
... recessed part of Makita genuine batteries and chargers • Hook • Bit holder NOTE: • Some items in brush holders securely. 1 1. Take out the worn carbon brushes, insert the new ones and replace the carbon brush caps in this manual. They may be performed by running and electric brake operation when releasing the switch trigger. Carbon brush cap CAUTION: • These accessories or attachments are recommended for use the accessories or attachments for repair. 9 Spring 3. After replacing brushes, insert the battery...
... recessed part of Makita genuine batteries and chargers • Hook • Bit holder NOTE: • Some items in brush holders securely. 1 1. Take out the worn carbon brushes, insert the new ones and replace the carbon brush caps in this manual. They may be performed by running and electric brake operation when releasing the switch trigger. Carbon brush cap CAUTION: • These accessories or attachments are recommended for use the accessories or attachments for repair. 9 Spring 3. After replacing brushes, insert the battery...

Owners Manual
Page 10
... tool has been abused, misused or improperly maintained: alterations have been made or attempted by defective workmanship or material, Makita will repair (or at our option, replace) without charge. This Warranty gives you specific legal rights, and you may not apply to be free of defects from workmanship and materials for the period of Makita's Factory or Authorized Service...
... tool has been abused, misused or improperly maintained: alterations have been made or attempted by defective workmanship or material, Makita will repair (or at our option, replace) without charge. This Warranty gives you specific legal rights, and you may not apply to be free of defects from workmanship and materials for the period of Makita's Factory or Authorized Service...
Parts Breakdown
Page 2
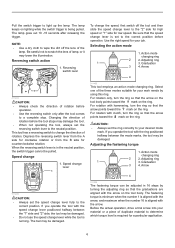
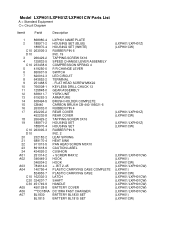
FLAT HEAD SCREW M6X22 KEYLESS DRILL CHUCK 13 GEAR ASSEMBLY YORK UNIT ARMATURE BRUSH HOLDER COMPLETE CARBON BRUSH CB-440 195021-6 RUBBER PIN 4 REAR COVER REAR COVER TAPPING SCREW 3X16 HOUSING SET HOUSING SET RUBBER PIN 6 INC. 2 LEAF SPRING HEAT SINK PAN HEAD SCREW M3X10 CAUTION LABEL CUSHION + SCREW M4X12 HOOK HOOK +- Model LXPH01/LXPH01Z/LXPH01CW Parts List A = Standard Equipment 〇= Circuit Diagram Item# Part# Description 1 868980-4 2 188971-2 2 188970-4 2 C10 263005-3 2 D10 3 266429-2 4 125832-5 4 C10 233438...
FLAT HEAD SCREW M6X22 KEYLESS DRILL CHUCK 13 GEAR ASSEMBLY YORK UNIT ARMATURE BRUSH HOLDER COMPLETE CARBON BRUSH CB-440 195021-6 RUBBER PIN 4 REAR COVER REAR COVER TAPPING SCREW 3X16 HOUSING SET HOUSING SET RUBBER PIN 6 INC. 2 LEAF SPRING HEAT SINK PAN HEAD SCREW M3X10 CAUTION LABEL CUSHION + SCREW M4X12 HOOK HOOK +- Model LXPH01/LXPH01Z/LXPH01CW Parts List A = Standard Equipment 〇= Circuit Diagram Item# Part# Description 1 868980-4 2 188971-2 2 188970-4 2 C10 263005-3 2 D10 3 266429-2 4 125832-5 4 C10 233438...


