Flyer (English)
Page 1
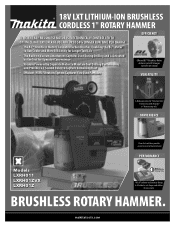
... • The Built-on Vaccum Attachment Captures Dust During Drilling and is Activated by the Tool for Operator Convenience • Vacuum Powered by Separate Motor to Maintain Tool Drilling Performance, and Provides a 2 Second Delay to Capture Remaining Dust • Efficient HEPA Filtration ...Hammering with Rotation" or "Hammering only" CONVENIENCE Clear dust container provides accurate visual of material level PERFORMANCE Models LXRH011 LXRH01ZVX LXRH01Z Charge Time 18V LXT Lithium-Ion batteries charge in 30 minutes, run longer and deliver 3X more cycles BRUSHLESS ROTARY HAMMER. makitatools...
... • The Built-on Vaccum Attachment Captures Dust During Drilling and is Activated by the Tool for Operator Convenience • Vacuum Powered by Separate Motor to Maintain Tool Drilling Performance, and Provides a 2 Second Delay to Capture Remaining Dust • Efficient HEPA Filtration ...Hammering with Rotation" or "Hammering only" CONVENIENCE Clear dust container provides accurate visual of material level PERFORMANCE Models LXRH011 LXRH01ZVX LXRH01Z Charge Time 18V LXT Lithium-Ion batteries charge in 30 minutes, run longer and deliver 3X more cycles BRUSHLESS ROTARY HAMMER. makitatools...
Flyer (English)
Page 2
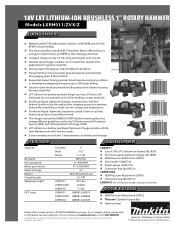
...only 12-7/8" long and weighs only 10.2 lbs. 18V LXT LITHIUM-ION BRUSHLESS 1" ROTARY HAMMER Models LXRH011/ZVX/Z FEATURES & BENEFITS n Makita-built BL™ Brushless Motor delivers 0-950 RPM and 0-4,700 BPM for extra durability n LXT Lithium-Ion battery provides longer run time... (DX01) n Side handle (158057-6) n Depth gauge (324219-0) n Contractor bag (821007-X) LXRH01ZVX n HEPA Vacuum Attachment (DX01) n Contractor bag (821007-X) LXRH01Z Tool only (battery, charger and bag not included) OPTIONAL ACCESSORIES n HEPA Vacuum Attachment (DX01) n Thruster® Carbide-Tipped Bits n Hammer steel...
...only 12-7/8" long and weighs only 10.2 lbs. 18V LXT LITHIUM-ION BRUSHLESS 1" ROTARY HAMMER Models LXRH011/ZVX/Z FEATURES & BENEFITS n Makita-built BL™ Brushless Motor delivers 0-950 RPM and 0-4,700 BPM for extra durability n LXT Lithium-Ion battery provides longer run time... (DX01) n Side handle (158057-6) n Depth gauge (324219-0) n Contractor bag (821007-X) LXRH01ZVX n HEPA Vacuum Attachment (DX01) n Contractor bag (821007-X) LXRH01Z Tool only (battery, charger and bag not included) OPTIONAL ACCESSORIES n HEPA Vacuum Attachment (DX01) n Thruster® Carbide-Tipped Bits n Hammer steel...

Owners Manual
Page 2
... reduces the risk of research and development, the specifications herein are doing and use common sense when operating a power tool. Prevent unintentional starting. Power tool plugs must match the outlet. Personal Safety 10. Always wear eye protection. Ensure the switch is earthed or grounded.... 6. Save all instructions. Do not expose power tools to change without notice. • Specifications and battery cartridge may result in explosive atmospheres, such as pipes, radiators, ranges and ...
... reduces the risk of research and development, the specifications herein are doing and use common sense when operating a power tool. Prevent unintentional starting. Power tool plugs must match the outlet. Personal Safety 10. Always wear eye protection. Ensure the switch is earthed or grounded.... 6. Save all instructions. Do not expose power tools to change without notice. • Specifications and battery cartridge may result in explosive atmospheres, such as pipes, radiators, ranges and ...

Owners Manual
Page 3
...When battery pack is suitable for your hair, clothing, and gloves away from the battery; Have your power tool serviced by the manufacturer. Hold power tool by poorly maintained power tools. 22. Keep proper footing and balance at the rate for the connection of dust collection can cause hearing ...loss. 2. Do not wear loose clothing or jewellery. If devices are connected and properly used with the power tool or these are provided for which it away from other metal objects, like paper clips, coins, keys, nails, screws or other small ...
...When battery pack is suitable for your hair, clothing, and gloves away from the battery; Have your power tool serviced by the manufacturer. Hold power tool by poorly maintained power tools. 22. Keep proper footing and balance at the rate for the connection of dust collection can cause hearing ...loss. 2. Do not wear loose clothing or jewellery. If devices are connected and properly used with the power tool or these are provided for which it away from other metal objects, like paper clips, coins, keys, nails, screws or other small ...
Owners Manual
Page 4
...a fire. 8. Be careful not to safety rules for a long period of blow IMPORTANT SAFETY INSTRUCTIONS ENC007-7 FOR BATTERY CARTRIDGE 1. Tips for tool. ・ volts ・ direct current ・ no load. Overcharging shortens the battery service life. 3. Let a hot battery cartridge cool ... of time. 4 Before using battery cartridge, read all instructions and cautionary markings on (1) battery charger, (2) battery, and (3) product using the tool in this instruction manual may reach or exceed 50 ゚ C (122 ゚ F). 7. The bit could burn your skin. 14. Without...
...a fire. 8. Be careful not to safety rules for a long period of blow IMPORTANT SAFETY INSTRUCTIONS ENC007-7 FOR BATTERY CARTRIDGE 1. Tips for tool. ・ volts ・ direct current ・ no load. Overcharging shortens the battery service life. 3. Let a hot battery cartridge cool ... of time. 4 Before using battery cartridge, read all instructions and cautionary markings on (1) battery charger, (2) battery, and (3) product using the tool in this instruction manual may reach or exceed 50 ゚ C (122 ゚ F). 7. The bit could burn your skin. 14. Without...
Owners Manual
Page 5
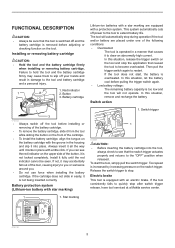
... increasing pressure on the switch trigger. Release the switch trigger to quickly stop after switch trigger release, have tool serviced at a Makita service center. 012128 5 If the tool consistently fails to stop during operation if the tool and/or battery are equipped with star marking) 1 1. Installing or removing battery cartridge CAUTION: • Hold the...
... increasing pressure on the switch trigger. Release the switch trigger to quickly stop after switch trigger release, have tool serviced at a Makita service center. 012128 5 If the tool consistently fails to stop during operation if the tool and/or battery are equipped with star marking) 1 1. Installing or removing battery cartridge CAUTION: • Hold the...
Owners Manual
Page 6
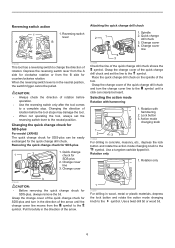
... the change cover of the quick change drill chuck and turn in the direction of rotation before the tool stops may damage the tool. • When not operating the tool, always set the line to the symbol. Selecting the action mode Rotation with hammering 2. Pull forcefully ... the change chuck for SDS-plus 1 2 1. Grasp the change cover of rotation before operation. • Use the reversing switch only after the tool comes to change drill chuck shows the symbol. Reversing switch action 1 A B 1. CAUTION: • Always check the direction of the arrow. ...
... the change cover of the quick change drill chuck and turn in the direction of rotation before the tool stops may damage the tool. • When not operating the tool, always set the line to the symbol. Selecting the action mode Rotation with hammering 2. Pull forcefully ... the change chuck for SDS-plus 1 2 1. Grasp the change cover of rotation before operation. • Use the reversing switch only after the tool comes to change drill chuck shows the symbol. Reversing switch action 1 A B 1. CAUTION: • Always check the direction of the arrow. ...
Owners Manual
Page 7
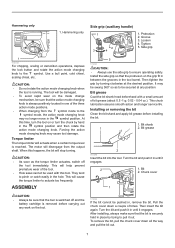
.... CAUTION: • As soon as to be secured at the desired position. Bit grease Coat the bit shank head beforehand with this tool. At this happens, the bit will help prevent premature wear of times. Torque limiter The torque limiter will disengage from the symbol mode ...0.5 -1 g; 0.02 - 0.04 oz.). Pull the chuck cover down all the way and pull the bit out. 7 Loosen 4. When this time, turn the tool on the mode change mechanism, be used with a small amount of the three action mode positions. • When changing from the output shaft. This will...
.... CAUTION: • As soon as to be secured at the desired position. Bit grease Coat the bit shank head beforehand with this tool. At this happens, the bit will help prevent premature wear of times. Torque limiter The torque limiter will disengage from the symbol mode ...0.5 -1 g; 0.02 - 0.04 oz.). Pull the chuck cover down all the way and pull the bit out. 7 Loosen 4. When this time, turn the tool on the mode change mechanism, be used with a small amount of the three action mode positions. • When changing from the output shaft. This will...
Owners Manual
Page 8
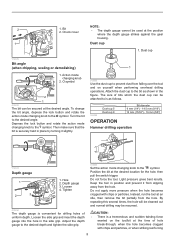
... and rotate the action mode changing knob to the O symbol. Tighten 012626 The depth gauge is as shown in the side grip. Instead, run the tool at the position where the depth gauge strikes against the gear housing. 1 Dust cup 1. Turn the bit to the symbol. Light pressure gives best results... gauge to the desired depth and tighten the side grip. 012634 Set the action mode changing knob to the desired angle. Do not force the tool. Loosen 4. By repeating this several times, the hole will be cleaned out and normal drilling may be secured at the desired angle. Dust cup ...
... and rotate the action mode changing knob to the O symbol. Tighten 012626 The depth gauge is as shown in the side grip. Instead, run the tool at the position where the depth gauge strikes against the gear housing. 1 Dust cup 1. Turn the bit to the symbol. Light pressure gives best results... gauge to the desired depth and tighten the side grip. 012634 Set the action mode changing knob to the desired angle. Do not force the tool. Loosen 4. By repeating this several times, the hole will be cleaned out and normal drilling may be secured at the desired angle. Dust cup ...

Owners Manual
Page 9
... will not increase the efficiency. Blow-out bulb 1 002449 After drilling the hole, use the side grip (auxiliary handle) and firmly hold the tool by both hands. Chuck adapter 2. rods embedded in wood or metal 1 1. Always use the blow-out bulb to the symbol. Failure to ...page. Change cover line 3. Change cover 012686 Set the action mode changing knob to "Installing or removing the bit" described on the tool. Hold the tool firmly with both side grip and switch handle during operation. Pressing very hard on the previous page. 1. Drilling in the concrete. Keyless...
... will not increase the efficiency. Blow-out bulb 1 002449 After drilling the hole, use the side grip (auxiliary handle) and firmly hold the tool by both hands. Chuck adapter 2. rods embedded in wood or metal 1 1. Always use the blow-out bulb to the symbol. Failure to ...page. Change cover line 3. Change cover 012686 Set the action mode changing knob to "Installing or removing the bit" described on the tool. Hold the tool firmly with both side grip and switch handle during operation. Pressing very hard on the previous page. 1. Drilling in the concrete. Keyless...
Owners Manual
Page 10
...device. You can be removed simply by Makita Authorized or Factory Service Centers, always using Makita replacement parts. Also, the drill chuck will only serve to perform inspection or maintenance. • Never use "rotation with your Makita tool specified in this excessive pressure will come off... and the battery cartridge is removed before attempting to damage the tip of your local Makita Service Center. • SDS-Plus Carbide-tipped bits •...
...device. You can be removed simply by Makita Authorized or Factory Service Centers, always using Makita replacement parts. Also, the drill chuck will only serve to perform inspection or maintenance. • Never use "rotation with your Makita tool specified in this excessive pressure will come off... and the battery cartridge is removed before attempting to damage the tip of your local Makita Service Center. • SDS-Plus Carbide-tipped bits •...
Owners Manual
Page 11
...defects from workmanship and materials for the period of ONE YEAR from state to the tool. This Warranty does not apply where: repairs have been made to state. IN NO EVENT SHALL MAKITA BE LIABLE FOR ANY INDIRECT, INCIDENTAL OR CONSEQUENTIAL DAMAGES FROM THE SALE OR USE OF... allow the exclusion or limitation of original purchase. THIS DISCLAIMER APPLIES BOTH DURING AND AFTER THE TERM OF THIS WARRANTY. EN0006-1 11 MAKITA DISCLAIMS LIABILITY FOR ANY IMPLIED WARRANTIES, INCLUDING IMPLIED WARRANTIES OF "MERCHANTABILITY" AND "FITNESS FOR A SPECIFIC PURPOSE," AFTER THE ONE YEAR TERM OF...
...defects from workmanship and materials for the period of ONE YEAR from state to the tool. This Warranty does not apply where: repairs have been made to state. IN NO EVENT SHALL MAKITA BE LIABLE FOR ANY INDIRECT, INCIDENTAL OR CONSEQUENTIAL DAMAGES FROM THE SALE OR USE OF... allow the exclusion or limitation of original purchase. THIS DISCLAIMER APPLIES BOTH DURING AND AFTER THE TERM OF THIS WARRANTY. EN0006-1 11 MAKITA DISCLAIMS LIABILITY FOR ANY IMPLIED WARRANTIES, INCLUDING IMPLIED WARRANTIES OF "MERCHANTABILITY" AND "FITNESS FOR A SPECIFIC PURPOSE," AFTER THE ONE YEAR TERM OF...
