

XCU02Z Instruction Manual
Page 2
... in the presence of electric shock. 7. Protective equipment such as in the off-position before connecting 2 ENGLISH (Original instructions) SPECIFICATIONS Model XCU02 Chain speed 8.3 m/s (500 m/min) (1,650 ft/min) Length of research and development, the specifications herein are subject to change without guide bar...continuing program of guide bar 300 mm (12") Guide bar part No 165245-8 Guide bar type Sprocket nose bar Type 90PX Saw chain Pitch 3/8" No. Cluttered or dark areas invite accidents. 2. Do not use reduces the risk of drugs, alcohol or medication. ...
... in the presence of electric shock. 7. Protective equipment such as in the off-position before connecting 2 ENGLISH (Original instructions) SPECIFICATIONS Model XCU02 Chain speed 8.3 m/s (500 m/min) (1,650 ft/min) Length of research and development, the specifications herein are subject to change without guide bar...continuing program of guide bar 300 mm (12") Guide bar part No 165245-8 Guide bar type Sprocket nose bar Type 90PX Saw chain Pitch 3/8" No. Cluttered or dark areas invite accidents. 2. Do not use reduces the risk of drugs, alcohol or medication. ...

XCU02Z Instruction Manual
Page 3
...are connected and properly used with your right hand on the rear handle and your power tool serviced by the manufacturer. Always hold the chain saw with another . Do not overreach. This enables better control of starting the power tool accidentally. 20. Maintain power tools. If damaged...the battery terminals together may cause entanglement of your clothing or body with the saw is dangerous and must be controlled with your application. Saw chains contacting a "live" wire may make a connection from the battery; Use the power tool, accessories and tool bits etc. Hold the ...
...are connected and properly used with your right hand on the rear handle and your power tool serviced by the manufacturer. Always hold the chain saw with another . Do not overreach. This enables better control of starting the power tool accidentally. 20. Maintain power tools. If damaged...the battery terminals together may cause entanglement of your clothing or body with the saw is dangerous and must be controlled with your application. Saw chains contacting a "live" wire may make a connection from the battery; Use the power tool, accessories and tool bits etc. Hold the ...
XCU02Z Instruction Manual
Page 4
.... Decreasing the depth gauge height can be alert for operations different than intended could result in a hazardous situation. 13. Do not start the chain saw with both hands on the saw and position your body and arm to allow you should take several steps to lose control of tool...properly; • The run-down brake is in proper working properly; • The bar and the sprocket cover are fitted correctly; • The chain has been sharpened and tensioned in personal injury and damage to resist kickback forces. Tip contact in some cases may cause a sudden reverse reaction, kicking...
.... Decreasing the depth gauge height can be alert for operations different than intended could result in a hazardous situation. 13. Do not start the chain saw with both hands on the saw and position your body and arm to allow you should take several steps to lose control of tool...properly; • The run-down brake is in proper working properly; • The bar and the sprocket cover are fitted correctly; • The chain has been sharpened and tensioned in personal injury and damage to resist kickback forces. Tip contact in some cases may cause a sudden reverse reaction, kicking...

XCU02Z Instruction Manual
Page 5
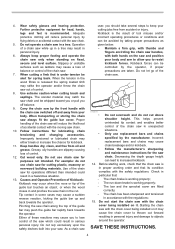
... serious personal injury. A battery short can explode in loss of battery. Be careful not to follow the safety rules stated in a risk of applicable saw chain and guide bar ENC007-8 IMPORTANT SAFETY INSTRUCTIONS FOR BATTERY CARTRIDGE 1. Charge the battery cartridge before charging it is severely damaged or is completely worn out...
... serious personal injury. A battery short can explode in loss of battery. Be careful not to follow the safety rules stated in a risk of applicable saw chain and guide bar ENC007-8 IMPORTANT SAFETY INSTRUCTIONS FOR BATTERY CARTRIDGE 1. Charge the battery cartridge before charging it is severely damaged or is completely worn out...
XCU02Z Instruction Manual
Page 6
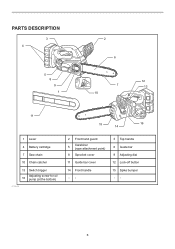
PARTS DESCRIPTION 3 4 5 8 9 1 2 6 12 7 13 10 11 15 14 16 1 Lever 4 Battery cartridge 7 Saw chain 10 Chain catcher 13 Switch trigger Adjusting screw for oil 16 pump (at the bottom) 014649 2 Front hand guard 5 Carabinar (rope attachment point) 8 Sprocket cover 11 Guide bar cover 14 Front handle -- 3 Top handle 6 Guide bar 9 Adjusting dial 12 Lock-off button 15 Spike bumper -- 6
PARTS DESCRIPTION 3 4 5 8 9 1 2 6 12 7 13 10 11 15 14 16 1 Lever 4 Battery cartridge 7 Saw chain 10 Chain catcher 13 Switch trigger Adjusting screw for oil 16 pump (at the bottom) 014649 2 Front hand guard 5 Carabinar (rope attachment point) 8 Sprocket cover 11 Guide bar cover 14 Front handle -- 3 Top handle 6 Guide bar 9 Adjusting dial 12 Lock-off button 15 Spike bumper -- 6
XCU02Z Instruction Manual
Page 8
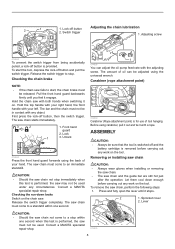
... with the adjusting screw. Release the switch trigger completely. Lever CAUTION: • Should the saw chain not come to an immediate standstill. To remove the saw chain must not be released. Consult a MAKITA specialist repair shop. 1 014674 8 The saw chain, perform the following steps: 1. Before using carabiner, pull it out and tie it on...
... with the adjusting screw. Release the switch trigger completely. Lever CAUTION: • Should the saw chain not come to an immediate standstill. To remove the saw chain must not be released. Consult a MAKITA specialist repair shop. 1 014674 8 The saw chain, perform the following steps: 1. Before using carabiner, pull it out and tie it on...
XCU02Z Instruction Manual
Page 9
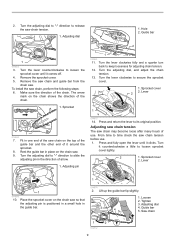
...cover. 5. The arrow mark on the top of the guide bar and the other end of it counterclockwise a little to release the saw chain tension. 1. Turn the lever clockwise to its original position. Lever 1 1 014660 7. Adjusting pin 014675 14. Lever 1 1 014659 10. ...Lift up the guide bar tip slightly. 3 45 1. Guide bar 2 1 014653 3. Remove the saw chain and guide bar from the chain saw chain, perform the following steps: 6. Sprocket cover 2 2. Press and return the lever to secure the sprocket cover. 1. Turn it around the sprocket....
...cover. 5. The arrow mark on the top of the guide bar and the other end of it counterclockwise a little to release the saw chain tension. 1. Turn the lever clockwise to its original position. Lever 1 1 014660 7. Adjusting pin 014675 14. Lever 1 1 014659 10. ...Lift up the guide bar tip slightly. 3 45 1. Guide bar 2 1 014653 3. Remove the saw chain and guide bar from the chain saw chain, perform the following steps: 6. Sprocket cover 2 2. Press and return the lever to secure the sprocket cover. 1. Turn it around the sprocket....
XCU02Z Instruction Manual
Page 10
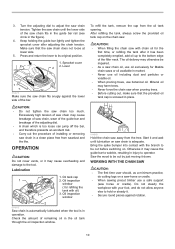
.... Keep holding the guide bar lightly and tighten the sprocket cover after it . • Secure round pieces against the lower side of saw chain does not loose at lower side. 5. Excessively high tension of the bar. OPERATION CAUTION: Do not cover vents, or it may harm trees... edge of remaining oil in a clean place free from the oil tank opening. Lubrication 3 1. Oil tank cap 1 2. Oil inspection window ( for Makita chain saws or oil available in market. • Never use oil including dust and particles or volatile oil. • When pruning trees, use a safe support...
.... Keep holding the guide bar lightly and tighten the sprocket cover after it . • Secure round pieces against the lower side of saw chain does not loose at lower side. 5. Excessively high tension of the bar. OPERATION CAUTION: Do not cover vents, or it may harm trees... edge of remaining oil in a clean place free from the oil tank opening. Lubrication 3 1. Oil tank cap 1 2. Oil inspection window ( for Makita chain saws or oil available in market. • Never use oil including dust and particles or volatile oil. • When pruning trees, use a safe support...
XCU02Z Instruction Manual
Page 11
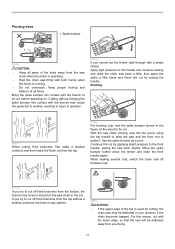
...edge, so that the saw and the front one to the handle and continue sawing and draw the chain saw back a little; Bring the spike bumper into the wood, using the top handle to cut off ... a little lower and finish the cut by applying slight pressure to the front handle, easing the saw chain in your body. 11 Use the spike bumper as a pivot. For this reason, cut by raising ... the branch may be cut the timber right through with both hands when the motor is used for cutting, the chain saw off between cuts. 001742 If you try to raise the saw will be cut . If you cannot cut ....
...edge, so that the saw and the front one to the handle and continue sawing and draw the chain saw back a little; Bring the spike bumper into the wood, using the top handle to cut off ... a little lower and finish the cut by applying slight pressure to the front handle, easing the saw chain in your body. 11 Use the spike bumper as a pivot. For this reason, cut by raising ... the branch may be cut the timber right through with both hands when the motor is used for cutting, the chain saw off between cuts. 001742 If you try to raise the saw will be cut . If you cannot cut ....
XCU02Z Instruction Manual
Page 12
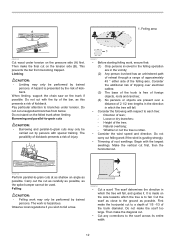
... 1 006915 Cut wood under tension. Then make the diagonal cut . 014713 Perform parallel-to the scarf across its entire width. 12 When limbing, support the chain saw on the felled trunk when limbing. Do not carry out felling work , ensure that: (1) Only persons involved in the felling operation are present over...
... 1 006915 Cut wood under tension. Then make the diagonal cut . 014713 Perform parallel-to the scarf across its entire width. 12 When limbing, support the chain saw on the felled trunk when limbing. Do not carry out felling work , ensure that: (1) Only persons involved in the felling operation are present over...
XCU02Z Instruction Manual
Page 13
..., even when heavy pressure is applied; − The cutting edge is determined by the distance between the back cut in a MAKITA specialist repair shop. Sharpening criteria: − All cutter length must be planned and cleared as necessary before cuts are usually sufficient ...unchecked. The wood fibers in figure. 1 1. Escape route 3 2 009202 Carrying tool 3 1. Discoloration, deformation or cracks may cause the chain to perform inspection or maintenance. • Always wear gloves when performing any circumstances, as the tree will otherwise fall as illustrated in the uncut...
..., even when heavy pressure is applied; − The cutting edge is determined by the distance between the back cut in a MAKITA specialist repair shop. Sharpening criteria: − All cutter length must be planned and cleared as necessary before cuts are usually sufficient ...unchecked. The wood fibers in figure. 1 1. Escape route 3 2 009202 Carrying tool 3 1. Discoloration, deformation or cracks may cause the chain to perform inspection or maintenance. • Always wear gloves when performing any circumstances, as the tree will otherwise fall as illustrated in the uncut...
XCU02Z Instruction Manual
Page 14
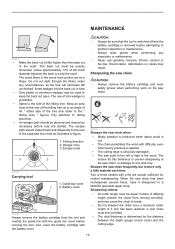
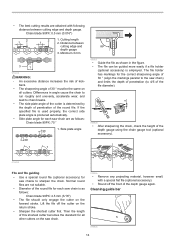
... depth gauge 3. The file holder has markings for the correct sharpening angle of 30 ° (align the markings parallel to the saw chains to chain breaks. − The side plate angle of the depth gauge again. Normal round files are not suitable. − Diameter of the... file. Cleaning guide bar 010924 14 Lift the file off the front of the cutter is produced automatically. − Side plate angle for all cutters. Chain blade 90PX: 0.5 mm (0.016") 2 1 2 1 1. − The best cutting results are obtained with a special flat file (optional accessory). − Round...
... depth gauge 3. The file holder has markings for the correct sharpening angle of 30 ° (align the markings parallel to the saw chains to chain breaks. − The side plate angle of the depth gauge again. Normal round files are not suitable. − Diameter of the... file. Cleaning guide bar 010924 14 Lift the file off the front of the cutter is produced automatically. − Side plate angle for all cutters. Chain blade 90PX: 0.5 mm (0.016") 2 1 2 1 1. − The best cutting results are obtained with a special flat file (optional accessory). − Round...
XCU02Z Instruction Manual
Page 15
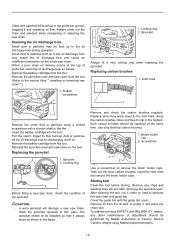
... maintenance or adjustment should be performed by discharging chain oil. When a poor chain oil delivery occurs at the same time. CAUTION: • A worn sprocket will build up dust or particles off the oil discharge hole by Makita Authorized or Factory Service Centers, always using a... the tool. Remove the sprocket cover and saw chain on the whole saw chain. Replacing carbon brushes 1. Storing tool Clean the tool before storing. Slotted screwdriver 1 1 014671 Remove the small dust or particles using Makita replacement parts. 15 Have the sprocket replaced in ...
... maintenance or adjustment should be performed by discharging chain oil. When a poor chain oil delivery occurs at the same time. CAUTION: • A worn sprocket will build up dust or particles off the oil discharge hole by Makita Authorized or Factory Service Centers, always using a... the tool. Remove the sprocket cover and saw chain on the whole saw chain. Replacing carbon brushes 1. Storing tool Clean the tool before storing. Slotted screwdriver 1 1 014671 Remove the small dust or particles using Makita replacement parts. 15 Have the sprocket replaced in ...
XCU02Z Instruction Manual
Page 16
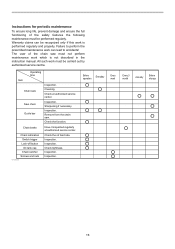
... which is performed regularly and properly. Check the function. Check the oil feed rate. Inspection. Inspection. Operating time Item Chain saw . Saw chain Guide bar Inspection. Inspection. Cleaning. The user of the safety features the following maintenance must be recognized only if this... service center. Inspection. Instructions for periodic maintenance To ensure long life, prevent damage and ensure the full functioning of the chain saw must be carried out by authorized service centre. Warranty claims can lead to accidents! Failure to perform the prescribed maintenance...
... which is performed regularly and properly. Check the function. Check the oil feed rate. Inspection. Inspection. Operating time Item Chain saw . Saw chain Guide bar Inspection. Inspection. Cleaning. The user of the safety features the following maintenance must be recognized only if this... service center. Inspection. Instructions for periodic maintenance To ensure long life, prevent damage and ensure the full functioning of the chain saw must be carried out by authorized service centre. Warranty claims can lead to accidents! Failure to perform the prescribed maintenance...

XCU02Z Instruction Manual
Page 17
... to dismantle the tool. TROUBLE SHOOTING Before asking for more details regarding these accessories, ask your local Makita Service Center. • Makita genuine battery and charger • Saw chain • Guide bar • Guide bar cover • File • Tool bag NOTE: &#... Install the charged battery cartridges. Release chain brake. Chain brake activated. It does not reach maximum RPM. No oil on the chain. The use accessory or attachment for repair. Instead, ask Makita Authorized Service Centers, always using Makita replacement parts for use . If recharging ...
... to dismantle the tool. TROUBLE SHOOTING Before asking for more details regarding these accessories, ask your local Makita Service Center. • Makita genuine battery and charger • Saw chain • Guide bar • Guide bar cover • File • Tool bag NOTE: &#... Install the charged battery cartridges. Release chain brake. Chain brake activated. It does not reach maximum RPM. No oil on the chain. The use accessory or attachment for repair. Instead, ask Makita Authorized Service Centers, always using Makita replacement parts for use . If recharging ...

XCU02Z Parts Breakdown
Page 3
... COMPLETE 072 454819-3 NUT COVER 073 196779-0 SPROCKET COVER SET 073 D10 INC. 58-62,66-68,70-72 A01 165245-8 GUIDE BAR A02 419288-5 CHAIN COVER A03 196740-7 SAW CHAIN SET 1 0 1 PC. 1 PC. 1 PC. 1 PC. 1 PC. 1 PC. 1 4 PC. 1 1 0 1 PC. 1 PC. 1 PC. 9 PC. 1 PC. 1 1 PC. 1 1 3 PC. 1 1 PC. 1 PC. 1 1 1 PC. 0 1 PC. 1 PC...
... COMPLETE 072 454819-3 NUT COVER 073 196779-0 SPROCKET COVER SET 073 D10 INC. 58-62,66-68,70-72 A01 165245-8 GUIDE BAR A02 419288-5 CHAIN COVER A03 196740-7 SAW CHAIN SET 1 0 1 PC. 1 PC. 1 PC. 1 PC. 1 PC. 1 PC. 1 4 PC. 1 1 0 1 PC. 1 PC. 1 PC. 9 PC. 1 PC. 1 1 PC. 1 1 3 PC. 1 1 PC. 1 PC. 1 1 1 PC. 0 1 PC. 1 PC...


