

XCU02Z Instruction Manual
Page 2
...-operated (corded) power tool or battery-operated (cordless) power tool. Save all instructions. Never modify the plug in electric shock, fire and/or serious injury. Do not abuse the cord. Use of an GFCI reduces the risk of guide bar 300 mm (12") Guide bar part No 165245-8 Guide bar type Sprocket nose bar Type 90PX Saw chain Pitch 3/8" No. Always wear eye protection. Ensure the switch is unavoidable, use an extension cord...
...-operated (corded) power tool or battery-operated (cordless) power tool. Save all instructions. Never modify the plug in electric shock, fire and/or serious injury. Do not abuse the cord. Use of an GFCI reduces the risk of guide bar 300 mm (12") Guide bar part No 165245-8 Guide bar type Sprocket nose bar Type 90PX Saw chain Pitch 3/8" No. Always wear eye protection. Ensure the switch is unavoidable, use an extension cord...

XCU02Z Instruction Manual
Page 3
... front handle. Use the power tool, accessories and tool bits etc. A charger that may cause burns or a fire. 27. Use power tools only with water. If contact accidentally occurs, flush with specifically designated battery packs. If liquid contacts eyes, additionally seek medical help. Liquid ejected from the power tool before making any adjusting key or wrench before use the power tool if the switch does not turn it was designed. 18. Follow instruction for...
... front handle. Use the power tool, accessories and tool bits etc. A charger that may cause burns or a fire. 27. Use power tools only with water. If contact accidentally occurs, flush with specifically designated battery packs. If liquid contacts eyes, additionally seek medical help. Liquid ejected from the power tool before making any adjusting key or wrench before use the power tool if the switch does not turn it was designed. 18. Follow instruction for...
XCU02Z Instruction Manual
Page 4
... the manufacturer's sharpening and maintenance instructions for head, hands, legs and feet is released the spring loaded limb may either break or increase the chance for lubricating, chain tensioning and changing accessories. Do not start the chain saw chain. Further protective equipment for the saw with the chain cover being installed on fixed, secure and level surface. Do not use chain saw for cutting plastic, masonry or...
... the manufacturer's sharpening and maintenance instructions for head, hands, legs and feet is released the spring loaded limb may either break or increase the chance for lubricating, chain tensioning and changing accessories. Do not start the chain saw chain. Further protective equipment for the saw with the chain cover being installed on fixed, secure and level surface. Do not use chain saw for cutting plastic, masonry or...

XCU02Z Instruction Manual
Page 5
... explode in a risk of time. 5 Tips for tool. ・ volts ・ direct current ・ feet per minute ・ parts number of battery. Always stop operating immediately. USD307-1 Symbols The followings show the symbols used for maintaining maximum battery life 1. Follow your eyesight. 5. Before using battery cartridge, read all instructions and cautionary markings on (1) battery charger, (2) battery, and (3) product using battery. 2. If electrolyte gets into your eyes, rinse them...
... explode in a risk of time. 5 Tips for tool. ・ volts ・ direct current ・ feet per minute ・ parts number of battery. Always stop operating immediately. USD307-1 Symbols The followings show the symbols used for maintaining maximum battery life 1. Follow your eyesight. 5. Before using battery cartridge, read all instructions and cautionary markings on (1) battery charger, (2) battery, and (3) product using battery. 2. If electrolyte gets into your eyes, rinse them...
XCU02Z Instruction Manual
Page 6
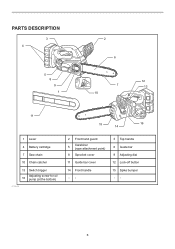
PARTS DESCRIPTION 3 4 5 8 9 1 2 6 12 7 13 10 11 15 14 16 1 Lever 4 Battery cartridge 7 Saw chain 10 Chain catcher 13 Switch trigger Adjusting screw for oil 16 pump (at the bottom) 014649 2 Front hand guard 5 Carabinar (rope attachment point) 8 Sprocket cover 11 Guide bar cover 14 Front handle -- 3 Top handle 6 Guide bar 9 Adjusting dial 12 Lock-off button 15 Spike bumper -- 6
PARTS DESCRIPTION 3 4 5 8 9 1 2 6 12 7 13 10 11 15 14 16 1 Lever 4 Battery cartridge 7 Saw chain 10 Chain catcher 13 Switch trigger Adjusting screw for oil 16 pump (at the bottom) 014649 2 Front hand guard 5 Carabinar (rope attachment point) 8 Sprocket cover 11 Guide bar cover 14 Front handle -- 3 Top handle 6 Guide bar 9 Adjusting dial 12 Lock-off button 15 Spike bumper -- 6
XCU02Z Instruction Manual
Page 7
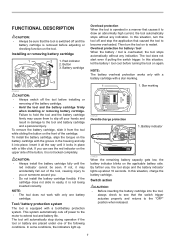
... tool stops automatically without any indication. By further use, the tool stops and the battery indicator lights up . To remove the battery cartridge, slide it from the tool while sliding the button on the applicable battery side. This system automatically cuts off and stop during operation if the tool or battery are placed under one battery cartridge. In this situation, turn the tool on the upper side of the button, it is not locked...
... tool stops automatically without any indication. By further use, the tool stops and the battery indicator lights up . To remove the battery cartridge, slide it from the tool while sliding the button on the applicable battery side. This system automatically cuts off and stop during operation if the tool or battery are placed under one battery cartridge. In this situation, turn the tool on the upper side of the button, it is not locked...
XCU02Z Instruction Manual
Page 8
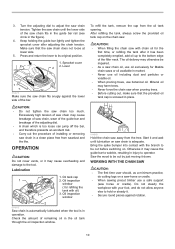
... a rope. First press the lock-off button and pull the switch trigger. The amount of oil can adjust the oil pump feed rate with the adjusting screw. Removing or installing saw chain CAUTION: • Always wear gloves when installing or removing the saw chain. • The saw chain starts immediately. 3 2 1. Switch trigger Adjusting the chain lubrication 1. Pull the front hand guard backwards firmly until it on the tool. The saw chain must come to...
... a rope. First press the lock-off button and pull the switch trigger. The amount of oil can adjust the oil pump feed rate with the adjusting screw. Removing or installing saw chain CAUTION: • Always wear gloves when installing or removing the saw chain. • The saw chain starts immediately. 3 2 1. Switch trigger Adjusting the chain lubrication 1. Pull the front hand guard backwards firmly until it on the tool. The saw chain must come to...
XCU02Z Instruction Manual
Page 9
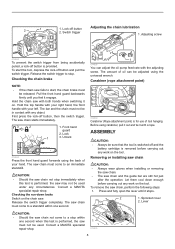
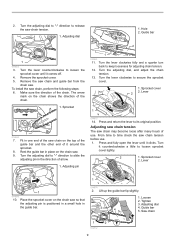
... direction of the chain. To install the saw chain tension before use . Press and return the lever to secure the sprocket cover. 1. 2. Remove the sprocket cover. 5. The arrow mark on the top of the guide bar and the other end of arrow. 1. Lever 1 1 014660 7. Adjusting pin 014675 14. From time to slide the adjusting pin in the guide bar. 014674 2. Guide bar 5. Turn the adjusting dial to "-" direction...
... direction of the chain. To install the saw chain tension before use . Press and return the lever to secure the sprocket cover. 1. 2. Remove the sprocket cover. 5. The arrow mark on the top of the guide bar and the other end of arrow. 1. Lever 1 1 014660 7. Adjusting pin 014675 14. From time to slide the adjusting pin in the guide bar. 014674 2. Guide bar 5. Turn the adjusting dial to "-" direction...
XCU02Z Instruction Manual
Page 10
... in injury to adjust the saw chain fits in the guide bar rail (see circle in the oil tank through the oil inspection window. Turn the adjusting dial to operator. Keep holding the guide bar lightly and tighten the sprocket cover after it may otherwise be cut before switching on saw chain fits snugly against rotation. 10 Lever 1 014675 Make sure the saw chain is too...
... in injury to adjust the saw chain fits in the guide bar rail (see circle in the oil tank through the oil inspection window. Turn the adjusting dial to operator. Keep holding the guide bar lightly and tighten the sprocket cover after it may otherwise be cut before switching on saw chain fits snugly against rotation. 10 Lever 1 014675 Make sure the saw chain is too...
XCU02Z Instruction Manual
Page 11
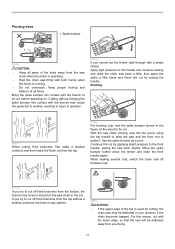
... to operator. 014714 If you cannot cut the timber right through with the branch may splinter. 006914 CAUTION: • If the upper edge of the body away from your direction if the chain becomes trapped. Use the spike bumper as a pivot. Continue the cut before switching on the wood to be cut by applying slight pressure to guide it. Cutting without...
... to operator. 014714 If you cannot cut the timber right through with the branch may splinter. 006914 CAUTION: • If the upper edge of the body away from your direction if the chain becomes trapped. Use the spike bumper as a pivot. Continue the cut before switching on the wood to be cut by applying slight pressure to guide it. Cutting without...
XCU02Z Instruction Manual
Page 12
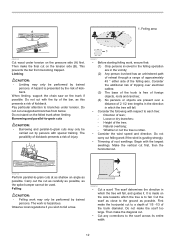
...cut first, then the horizontal cut. 014713 Perform parallel-to fell a tree. 006918 − Cut a scarf: The scarf determines the direction in which the tree will fall, and guides it. The work may only be used. Observe local regulations if you wish to -grain cuts at as shallow an angle as possible. Cut... Felling work is rotten. − Consider the wind speed and direction. It is gusting strongly. − Trimming of kickback. 1. Then make the diagonal cut on the tension side (B). When limbing, support the chain saw on the felled trunk when limbing. Do not cut as carefully...
...cut first, then the horizontal cut. 014713 Perform parallel-to fell a tree. 006918 − Cut a scarf: The scarf determines the direction in which the tree will fall, and guides it. The work may only be used. Observe local regulations if you wish to -grain cuts at as shallow an angle as possible. Cut... Felling work is rotten. − Consider the wind speed and direction. It is gusting strongly. − Trimming of kickback. 1. Then make the diagonal cut on the tension side (B). When limbing, support the chain saw on the felled trunk when limbing. Do not cut as carefully...
XCU02Z Instruction Manual
Page 13
... used to keep the back cut in the wood. Insert wedges into the back cut open. Danger zone 2 3. Discoloration, deformation or cracks may cause the chain to break. − Do not sharpen the chain once a minimum cutter length of the scarf. Sharpening the saw chain CAUTION: • Always remove the battery cartridge and wear safety gloves when performing work...
... used to keep the back cut in the wood. Insert wedges into the back cut open. Danger zone 2 3. Discoloration, deformation or cracks may cause the chain to break. − Do not sharpen the chain once a minimum cutter length of the scarf. Sharpening the saw chain CAUTION: • Always remove the battery cartridge and wear safety gloves when performing work...
XCU02Z Instruction Manual
Page 14
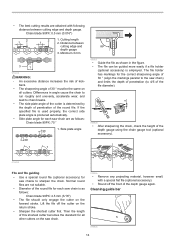
... a file holder (optional accessory) is produced automatically. − Side plate angle for each saw chain is determined by the depth of penetration of the depth gauge using the chain gauge tool (optional accessory). 014455 File and file guiding − Use a special round file (optional accessory) for each saw chains to the saw chain. 014344 − Remove any projecting material, however small, with following distance between cutting edge and depth gauge 3. Cutting length 2. Normal...
... a file holder (optional accessory) is produced automatically. − Side plate angle for each saw chain is determined by the depth of penetration of the depth gauge using the chain gauge tool (optional accessory). 014455 File and file guiding − Use a special round file (optional accessory) for each saw chains to the saw chain. 014344 − Remove any projecting material, however small, with following distance between cutting edge and depth gauge 3. Cutting length 2. Normal...
XCU02Z Instruction Manual
Page 15
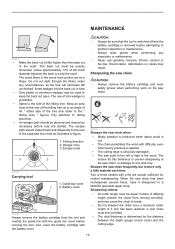
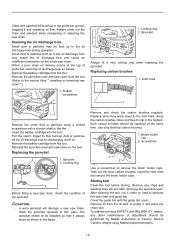
... the switch trigger to the section titled " Installing or removing saw chain from the tool. (Refer to flow built-up in the oil discharge hole during operation. Remove the battery cartridge from the tool. Keep the carbon brushes clean and free to remove the brush holder caps. Screwdriver 1 2 014672 Use a screwdriver to slip in the holders. Cover the guide bar with a slender shaft or the like. Replacing the sprocket 1 1. Have the sprocket replaced in...
... the switch trigger to the section titled " Installing or removing saw chain from the tool. (Refer to flow built-up in the oil discharge hole during operation. Remove the battery cartridge from the tool. Keep the carbon brushes clean and free to remove the brush holder caps. Screwdriver 1 2 014672 Use a screwdriver to slip in the holders. Cover the guide bar with a slender shaft or the like. Replacing the sprocket 1 1. Have the sprocket replaced in...
XCU02Z Instruction Manual
Page 16
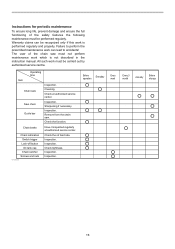
... Chain lubrication Switch trigger Lock-off button Oil tank cap Chain catcher Screws and nuts 014804 Have it inspected regularly at authorized service center. Inspection. All such work is not described in the instruction manual. Warranty claims can lead to perform the prescribed maintenance work which is performed regularly and properly. Check at authorized service center. Inspection. The user of the safety features the following maintenance must be...
... Chain lubrication Switch trigger Lock-off button Oil tank cap Chain catcher Screws and nuts 014804 Have it inspected regularly at authorized service center. Inspection. All such work is not described in the instruction manual. Warranty claims can lead to perform the prescribed maintenance work which is performed regularly and properly. Check at authorized service center. Inspection. The user of the safety features the following maintenance must be...

XCU02Z Instruction Manual
Page 17
... use . TROUBLE SHOOTING Before asking for repairs, conduct your local authorized service center for repair. Instead, ask Makita Authorized Service Centers, always using Makita replacement parts for repair. 014805 OPTIONAL ACCESSORIES CAUTION: • These accessories or attachments are not installed. Malfunction status Cause Action Chain saw chain tension. Battery problem (under voltage). Recharge the battery cartridge. If recharging is not effective, replace battery cartridge. Chain does not run. Release chain brake. Motor stops running...
... use . TROUBLE SHOOTING Before asking for repairs, conduct your local authorized service center for repair. Instead, ask Makita Authorized Service Centers, always using Makita replacement parts for repair. 014805 OPTIONAL ACCESSORIES CAUTION: • These accessories or attachments are not installed. Malfunction status Cause Action Chain saw chain tension. Battery problem (under voltage). Recharge the battery cartridge. If recharging is not effective, replace battery cartridge. Chain does not run. Release chain brake. Motor stops running...

XCU02Z Instruction Manual
Page 18
.... EN0006-1 18 This Warranty gives you specific legal rights, and you . Should any trouble develop during this one of original purchase. This Warranty does not apply where: repairs have been made to one year period, return the COMPLETE tool, freight prepaid, to the tool. MAKITA LIMITED ONE YEAR WARRANTY Warranty Policy Every Makita tool is caused by others: repairs are required because of...
.... EN0006-1 18 This Warranty gives you specific legal rights, and you . Should any trouble develop during this one of original purchase. This Warranty does not apply where: repairs have been made to one year period, return the COMPLETE tool, freight prepaid, to the tool. MAKITA LIMITED ONE YEAR WARRANTY Warranty Policy Every Makita tool is caused by others: repairs are required because of...
XCU02Z Parts Breakdown
Page 2
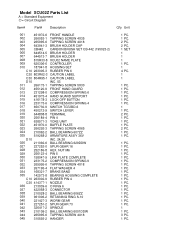
Model XCU02Z Parts List A = Standard Equipment 〇= Circuit Diagram Item# Part# Description 001 451972-6 FRONT HANDLE 002 266053-1 TAPPING SCREW 4X35 003 265995-6 TAPPING SCREW 4X18 004 643941-3 BRUSH HOLDER CAP 005 CB442 CARBON BRUSH SET CB-442 (195023-2) 006 644514-5 BRUSH HOLDER 007 644513-7 BRUSH HOLDER 008 815R33-8 XCU02 NAME PLATE 009 620306-6 CONTROLLER 010 187941-8 HOUSING SET 010 C10 263005-3 RUBBER PIN 6 010 C20 803R62-3 CAUTION LABEL 010 C30 804R95...
Model XCU02Z Parts List A = Standard Equipment 〇= Circuit Diagram Item# Part# Description 001 451972-6 FRONT HANDLE 002 266053-1 TAPPING SCREW 4X35 003 265995-6 TAPPING SCREW 4X18 004 643941-3 BRUSH HOLDER CAP 005 CB442 CARBON BRUSH SET CB-442 (195023-2) 006 644514-5 BRUSH HOLDER 007 644513-7 BRUSH HOLDER 008 815R33-8 XCU02 NAME PLATE 009 620306-6 CONTROLLER 010 187941-8 HOUSING SET 010 C10 263005-3 RUBBER PIN 6 010 C20 803R62-3 CAUTION LABEL 010 C30 804R95...

XCU02Z Parts Breakdown
Page 3
...-2 STRAIGHT BEVEL GEAR 14 061 326372-8 ADJUST SCREW 062 326310-0 ADJUST PIN 066 266020-6 TAPPING SCREW 4X12 067 142571-2 SPROCKET COVER COMPLETE 068 142665-3 DRIVE GEAR COMPLETE 070 263002-9 RUBBER PIN 4 071 142235-8 NUT COMPLETE 072 454819-3 NUT COVER 073 196779-0 SPROCKET COVER SET 073 D10 INC. 58-62,66-68,70-72 A01 165245-8 GUIDE BAR A02 419288-5 CHAIN COVER A03 196740-7 SAW CHAIN SET...
...-2 STRAIGHT BEVEL GEAR 14 061 326372-8 ADJUST SCREW 062 326310-0 ADJUST PIN 066 266020-6 TAPPING SCREW 4X12 067 142571-2 SPROCKET COVER COMPLETE 068 142665-3 DRIVE GEAR COMPLETE 070 263002-9 RUBBER PIN 4 071 142235-8 NUT COMPLETE 072 454819-3 NUT COVER 073 196779-0 SPROCKET COVER SET 073 D10 INC. 58-62,66-68,70-72 A01 165245-8 GUIDE BAR A02 419288-5 CHAIN COVER A03 196740-7 SAW CHAIN SET...


