
Makita DC18RD Instruction Manual
Page 3
.... 12. Do not insert a nail, wire, etc. Use a power source with a preset brief melody sound coming out for battery charger. 2. Do not charge battery cartridge when room temperature is damaged, ask Makita authorized service center to replace it will begin with the voltage specified on the nameplate of injury, charge only MAKITA rechargeable batteries marked on the charger label. Charging light will change specifications without supervision. 14...
.... 12. Do not insert a nail, wire, etc. Use a power source with a preset brief melody sound coming out for battery charger. 2. Do not charge battery cartridge when room temperature is damaged, ask Makita authorized service center to replace it will begin with the voltage specified on the nameplate of injury, charge only MAKITA rechargeable batteries marked on the charger label. Charging light will change specifications without supervision. 14...

Makita DC18RD Instruction Manual
Page 4
... keep clean the vent on the charger. • Yellow light will begin after this , the melody sound changes in this case. Changing melody sound of full charged battery 4. Insert the battery cartridge into the charging port that has been left for a long time in a location exposed to repair or maintenance, if the yellow warning light will frequently flash. With finish of...
... keep clean the vent on the charger. • Yellow light will begin after this , the melody sound changes in this case. Changing melody sound of full charged battery 4. Insert the battery cartridge into the charging port that has been left for a long time in a location exposed to repair or maintenance, if the yellow warning light will frequently flash. With finish of...

Makita DC18RD Instruction Manual
Page 5
... Voltage Number of cells Ni-MH Battery cartridge 9.6 V 8 BH9020A - BL1820 - - 24 - - Li-ion Battery - BL1440 BL1840 36 - - - After charging, unplug the charger. BL1850 45 Note: • It may lose by any possibility. • When not using or after charging, remove the USB cable and close the cover. 1. BH9033A - 12 V 10 - Note: • The charger may not supply power to...
... Voltage Number of cells Ni-MH Battery cartridge 9.6 V 8 BH9020A - BL1820 - - 24 - - Li-ion Battery - BL1440 BL1840 36 - - - After charging, unplug the charger. BL1850 45 Note: • It may lose by any possibility. • When not using or after charging, remove the USB cable and close the cover. 1. BH9033A - 12 V 10 - Note: • The charger may not supply power to...

XML02 Instruction Manual
Page 2
... mower before servicing, cleaning, removing material from work area. Use Safety Glasses- Use Right Appliance - Do not operate machine while under the influence of children. 12. Store Idle Lawn Mower Indoors - Keep blades sharp. 15. Stay behind the handle when the engine (motor) is dusty. 6. ENGLISH (Original instructions) SPECIFICATIONS Model: XML02 Mowing width (blade diameter) 430 mm (17″) No load speed 3,600 /min Dimensions (L x W x H) during operation Max...
... mower before servicing, cleaning, removing material from work area. Use Safety Glasses- Use Right Appliance - Do not operate machine while under the influence of children. 12. Store Idle Lawn Mower Indoors - Keep blades sharp. 15. Stay behind the handle when the engine (motor) is dusty. 6. ENGLISH (Original instructions) SPECIFICATIONS Model: XML02 Mowing width (blade diameter) 430 mm (17″) No load speed 3,600 /min Dimensions (L x W x H) during operation Max...

XML02 Instruction Manual
Page 3
... motor off . 28. SAVE THESE INSTRUCTIONS. Poor footing could increase internal cell pressure and rupture the discharged battery. • Use power tools only with approved safety equipment, such as necessary. 45. Battery tool use , keep it is capable of this type of trouble. 31. Check the grass basket frequently for safety. 36. Check their proper operation regularly. Use of any other reason that the blades coast after turn...
... motor off . 28. SAVE THESE INSTRUCTIONS. Poor footing could increase internal cell pressure and rupture the discharged battery. • Use power tools only with approved safety equipment, such as necessary. 45. Battery tool use , keep it is capable of this type of trouble. 31. Check the grass basket frequently for safety. 36. Check their proper operation regularly. Use of any other reason that the blades coast after turn...

XML02 Instruction Manual
Page 4
... battery. 9. Slide the battery cover locking lever and open the battery cover. 1 2 1. Symbols The followings show the symbols used for the Makita tool and charger. Do not disassemble battery cartridge. 3. It may result in a fire. 8. ductive material. (2) Avoid storing battery cartridge in loss of overheating, possible burns and even an explosion. 4. SAVE THESE INSTRUCTIONS. FUNCTIONAL DESCRIPTION Installing or removing battery cartridge CAUTION: Always switch off the tool before use...
... battery. 9. Slide the battery cover locking lever and open the battery cover. 1 2 1. Symbols The followings show the symbols used for the Makita tool and charger. Do not disassemble battery cartridge. 3. It may result in a fire. 8. ductive material. (2) Avoid storing battery cartridge in loss of overheating, possible burns and even an explosion. 4. SAVE THESE INSTRUCTIONS. FUNCTIONAL DESCRIPTION Installing or removing battery cartridge CAUTION: Always switch off the tool before use...
XML02 Instruction Manual
Page 5
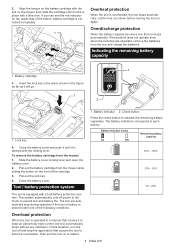
... switches are operated, remove the batteries from the mower while sliding the button on again. Battery cartridge 3. Insert the lock key in the place shown in a manner that caused the tool to restart. 5 ENGLISH Lock key 1. To remove the battery cartridge from the mower; 1. Tool / battery protection system 50% - 100% 20% - 50% 0% - 20% The tool is overheated, the tool stops automatically. This system automatically cuts off and stop during operation if the tool or battery...
... switches are operated, remove the batteries from the mower while sliding the button on again. Battery cartridge 3. Insert the lock key in the place shown in a manner that caused the tool to restart. 5 ENGLISH Lock key 1. To remove the battery cartridge from the mower; 1. Tool / battery protection system 50% - 100% 20% - 50% 0% - 20% The tool is overheated, the tool stops automatically. This system automatically cuts off and stop during operation if the tool or battery...

XML02 Instruction Manual
Page 6
... Lighted Off Blinking 75% to 25% Charge the battery. Release the switch button as soon as the motor starts running. Remove the lock key. 2. NOTE: Mower may have them checked by your nearest Makita Authorized Service Center. 1. Pull the mowing height adjusting lever to the outward of use and the ambient temperature, the indication may differ slightly from the actual capacity. 1. Insert the lock key into the interlock switch...
... Lighted Off Blinking 75% to 25% Charge the battery. Release the switch button as soon as the motor starts running. Remove the lock key. 2. NOTE: Mower may have them checked by your nearest Makita Authorized Service Center. 1. Pull the mowing height adjusting lever to the outward of use and the ambient temperature, the indication may differ slightly from the actual capacity. 1. Insert the lock key into the interlock switch...

XML02 Instruction Manual
Page 7
... the conditions of the basket, this case, stop mowing immediately and empty the basket. Place your desired height. Grass level indicator ASSEMBLY WARNING: Always be used just as a guideline. Battery cover 2. If the battery cover is installed correctly, it is completely assembled. Installing the battery cover WARNING: Do not insert the lock key and battery cartridge before the operation. In this indicator may cause a serious...
... the conditions of the basket, this case, stop mowing immediately and empty the basket. Place your desired height. Grass level indicator ASSEMBLY WARNING: Always be used just as a guideline. Battery cover 2. If the battery cover is installed correctly, it is completely assembled. Installing the battery cover WARNING: Do not insert the lock key and battery cartridge before the operation. In this indicator may cause a serious...

XML02 Instruction Manual
Page 8
Battery cover locking lever Installing the handle NOTICE: When installing handles, position the cords so that it does not drop off your hand. 2 3 1. WARNING: The blade coasts for a few seconds after releasing the switch. Put the mower on the base of the blade. 3. Turn the bolt counterclockwise with the clamping screws and nuts. 1. Screwdriver 3. 3. Align the screw holes of the mower then fully tighten the clamping screws. 1 2 1. Holder Removing or installing the mower blade WARNING: Always remove the lock key and...
Battery cover locking lever Installing the handle NOTICE: When installing handles, position the cords so that it does not drop off your hand. 2 3 1. WARNING: The blade coasts for a few seconds after releasing the switch. Put the mower on the base of the blade. 3. Turn the bolt counterclockwise with the clamping screws and nuts. 1. Screwdriver 3. 3. Align the screw holes of the mower then fully tighten the clamping screws. 1 2 1. Holder Removing or installing the mower blade WARNING: Always remove the lock key and...

XML02 Instruction Manual
Page 9
... bolt clockwise firmly to stop the mower then remove the lock key and the battery cartridge. Remove the lock key. 2. Grass basket OPERATION Mowing WARNING: Before mowing, clear away sticks and stones from mowing area in reverse. Place the blade so that the blade and all the fixing parts are installed correctly and tightened securely. WARNING: Make sure that the rotational direction arrow faces outward. Lift...
... bolt clockwise firmly to stop the mower then remove the lock key and the battery cartridge. Remove the lock key. 2. Grass basket OPERATION Mowing WARNING: Before mowing, clear away sticks and stones from mowing area in reverse. Place the blade so that the blade and all the fixing parts are installed correctly and tightened securely. WARNING: Make sure that the rotational direction arrow faces outward. Lift...
XML02 Instruction Manual
Page 10
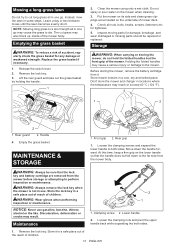
... °F). 1 2 2 1. Don't store the mower and charger in a cool, dry and locked place. Handle 4. WARNING: Always be repaired or replaced. Maintenance 1. Remove the lock key. Replace the grass basket if necessary. 1. Clean the mower using only a wet cloth. for any damage or weakened strength. Rear guard 2. Lower handle 2. Mowing a long-grass lawn Do not try to cut grass may cause a serious injury or damage...
... °F). 1 2 2 1. Don't store the mower and charger in a cool, dry and locked place. Handle 4. WARNING: Always be repaired or replaced. Maintenance 1. Remove the lock key. Replace the grass basket if necessary. 1. Clean the mower using only a wet cloth. for any damage or weakened strength. Rear guard 2. Lower handle 2. Mowing a long-grass lawn Do not try to cut grass may cause a serious injury or damage...

XML02 Instruction Manual
Page 11
... repairs. Replace the blade. 11 ENGLISH Store the grass basket between the handle and the mower body. 1. Cutting tool does not rotate: stop the mower immediately! If recharging is installed improperly. Remove the foreign object. Install the battery cartridge as a branch is imbalanced, excessively or unevenly worn. Clamping nut 2. Grass basket NOTE: When putting the mower in this manual. Instead, ask Makita Authorized Service Centers, always using Makita replacement parts. Motor stops...
... repairs. Replace the blade. 11 ENGLISH Store the grass basket between the handle and the mower body. 1. Cutting tool does not rotate: stop the mower immediately! If recharging is installed improperly. Remove the foreign object. Install the battery cartridge as a branch is imbalanced, excessively or unevenly worn. Clamping nut 2. Grass basket NOTE: When putting the mower in this manual. Instead, ask Makita Authorized Service Centers, always using Makita replacement parts. Motor stops...
XML02 Instruction Manual
Page 12
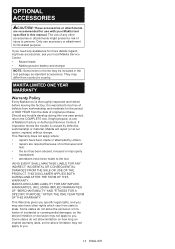
... WARRANTIES, INCLUDING IMPLIED WARRANTIES OF "MERCHANTABILITY" AND "FITNESS FOR A SPECIFIC PURPOSE," AFTER THE ONE YEAR TERM OF THIS WARRANTY. IN NO EVENT SHALL MAKITA BE LIABLE FOR ANY INDIRECT, INCIDENTAL OR CONSEQUENTIAL DAMAGES FROM THE SALE OR USE OF THE PRODUCT. The use with your local Makita Service Center. • Mower blade • Makita genuine battery and charger NOTE: Some items in the list...
... WARRANTIES, INCLUDING IMPLIED WARRANTIES OF "MERCHANTABILITY" AND "FITNESS FOR A SPECIFIC PURPOSE," AFTER THE ONE YEAR TERM OF THIS WARRANTY. IN NO EVENT SHALL MAKITA BE LIABLE FOR ANY INDIRECT, INCIDENTAL OR CONSEQUENTIAL DAMAGES FROM THE SALE OR USE OF THE PRODUCT. The use with your local Makita Service Center. • Mower blade • Makita genuine battery and charger NOTE: Some items in the list...
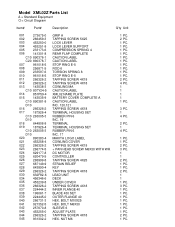
XML02 Parts Breakdown
Page 5
... PIN 6 INC. 19 TERMINAL TERMINAL HOUSING SET RUBBER PIN 6 INC. 17 MAKITA LOGO LABEL COWLING COVER TAPPING SCREW 4X18 + PAN HEAD SCREW M6X30 WITH WR DC MOTOR CONTROLLER TAPPING SCREW 4X25 STRAIN RELIEF KEY TAPPING SCREW 4X18 LEAD UNIT DECK UNDER COVER TAPPING SCREW 4X18 INNER FLANGE 40 BLADE 430 SET OUTER FLANGE 40 HEX. BOLT M10X25 HEX. BOLT M6X30 SLEEVE 6 ADJUST PLATE TAPPING SCREW 4X18 HEX. NUT...
... PIN 6 INC. 19 TERMINAL TERMINAL HOUSING SET RUBBER PIN 6 INC. 17 MAKITA LOGO LABEL COWLING COVER TAPPING SCREW 4X18 + PAN HEAD SCREW M6X30 WITH WR DC MOTOR CONTROLLER TAPPING SCREW 4X25 STRAIN RELIEF KEY TAPPING SCREW 4X18 LEAD UNIT DECK UNDER COVER TAPPING SCREW 4X18 INNER FLANGE 40 BLADE 430 SET OUTER FLANGE 40 HEX. BOLT M10X25 HEX. BOLT M6X30 SLEEVE 6 ADJUST PLATE TAPPING SCREW 4X18 HEX. NUT...
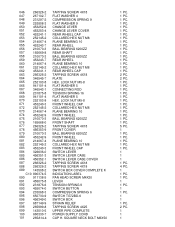
XML02 Parts Breakdown
Page 6
... BEARING 6200ZZ FRONT SHAFT TAPPING SCREW 4X18 FRONT COVER BALL BEARING 6200ZZ FRONT WHEEL PLANE BEARING 10 COLLARED HEX NUT M8 FRONT WHEEL CAP SWITCH LEVER SWITCH LEVER CASE SWITCH LEVER CASE COVER TAPPING SCREW 4X18 TAPPING SCREW 4X18 SWITCH BOX COVER COMPLETE K INDICATION LABEL PAN HEAD SCREW M4X20 LEVER TENSION SPRING 9 SWITCH BUTTON COMPRESSION SPRING 6 SWITCH TG72BD-6 SWITCH BOX STRAIN RELIEF TAPPING SCREW 4X25 UPPER PIPE COMPLETE POWER SUPPLY CORD CUP H. 046 266326-2 047 267102-7 048...
... BEARING 6200ZZ FRONT SHAFT TAPPING SCREW 4X18 FRONT COVER BALL BEARING 6200ZZ FRONT WHEEL PLANE BEARING 10 COLLARED HEX NUT M8 FRONT WHEEL CAP SWITCH LEVER SWITCH LEVER CASE SWITCH LEVER CASE COVER TAPPING SCREW 4X18 TAPPING SCREW 4X18 SWITCH BOX COVER COMPLETE K INDICATION LABEL PAN HEAD SCREW M4X20 LEVER TENSION SPRING 9 SWITCH BUTTON COMPRESSION SPRING 6 SWITCH TG72BD-6 SWITCH BOX STRAIN RELIEF TAPPING SCREW 4X25 UPPER PIPE COMPLETE POWER SUPPLY CORD CUP H. 046 266326-2 047 267102-7 048...
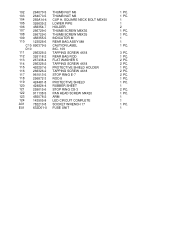
XML02 Parts Breakdown
Page 7
...-0 THUMB NUT M6 THUMB NUT M6 CUP H. SQUARE NECK BOLT M6X50 LOWER PIPE HOLDER THUMB SCREW M8X35 THUMB SCREW M8X35 INDICATOR M REAR BAG ASS'Y MA CAUTION LABEL INC. 109 TAPPING SCREW 4X18 REAR BAG ROD FLAT WASHER 5 TAPPING SCREW 4X18 PROTECTIVE SHIELD HOLDER TAPPING SCREW 4X18 STOP RING E-7 ROD 8 PROTECTIVE SHIELD RUBBER SHEET STOP RING CS-3 PAN HEAD SCREW M4X20 ARM LED CIRCUIT COMPLETE SOCKET WRENCH 17...
...-0 THUMB NUT M6 THUMB NUT M6 CUP H. SQUARE NECK BOLT M6X50 LOWER PIPE HOLDER THUMB SCREW M8X35 THUMB SCREW M8X35 INDICATOR M REAR BAG ASS'Y MA CAUTION LABEL INC. 109 TAPPING SCREW 4X18 REAR BAG ROD FLAT WASHER 5 TAPPING SCREW 4X18 PROTECTIVE SHIELD HOLDER TAPPING SCREW 4X18 STOP RING E-7 ROD 8 PROTECTIVE SHIELD RUBBER SHEET STOP RING CS-3 PAN HEAD SCREW M4X20 ARM LED CIRCUIT COMPLETE SOCKET WRENCH 17...

Makita XML02PTX1 New Tool Flyer English
Page 1
... dress of Makita Corporation and is located on hand. All models and accessories subject to operate lever for quick adjustment of the grass collector Battery n Grass collector holds up reaction for reduced operator fatigue Dimensions (LxWxH) 37-1/2" Net Weight (with the U.S. 18v X2 LXT® Lithium-Ion (36V) Cordless Lawn Mower Kit (5.0Ah) and Brushless Angle Grinder Model XML02PTX1 Kit Includes X2 LXT® Lawn Mower, Dual Port Charger, 2 ea...
... dress of Makita Corporation and is located on hand. All models and accessories subject to operate lever for quick adjustment of the grass collector Battery n Grass collector holds up reaction for reduced operator fatigue Dimensions (LxWxH) 37-1/2" Net Weight (with the U.S. 18v X2 LXT® Lithium-Ion (36V) Cordless Lawn Mower Kit (5.0Ah) and Brushless Angle Grinder Model XML02PTX1 Kit Includes X2 LXT® Lawn Mower, Dual Port Charger, 2 ea...


