Makita XML11CT1 Support and Manuals
Get Help and Manuals for this Makita item
View All Support Options Below
Free Makita XML11CT1 manuals!
Problems with Makita XML11CT1?
Ask a Question
Free Makita XML11CT1 manuals!
Problems with Makita XML11CT1?
Ask a Question
Popular Makita XML11CT1 Manual Pages
XML10/11 Instruction Manual - Page 2

...Specifications may differ from work area. Keep Children Away - Be alert and turn mower off if a child enters the area. The lawn should always be available depending on the mower and in the instruction manuals... before starting. ENGLISH (Original instructions)
SPECIFICATIONS
Model: Mowing width (blade diameter) No load speed Part number of replacement mower blade Dimensions (L x ...
XML10/11 Instruction Manual - Page 3

... Use identical replacement blades only.
6. Replace a worn grass basket with manufacturer's recommended parts, when necessary. Replace cracked or ...of children.
2. Then inspect the mower.
23. Follow instructions for wear or deterioration. Check the grass basket frequently ...anyone. Replace the blade if it was designed.
5. When you leave it repaired by an authorized service facility...
XML10/11 Instruction Manual - Page 4

...and then wipe it with local codes for use and care. Don't...your power tool serviced by a qualified repair person using only identical replacement parts. Never do not... with another .
Maintain or replace safety and instruction labels, as rings, bracelets,...service damaged battery packs. Be careful during adjustment of the battery(ies) in use . Never remove or tamper with specifically...
XML10/11 Instruction Manual - Page 5

...revolutions or reciprocation per minute
Important safety instructions for the Makita tool and charger. Installing the batteries to these chemicals are ...period of the battery cartridge. Overcharging shortens the battery service life.
3. It may cause heating, catching fire,...for maintaining maximum battery life
1. Unless the tool supports the use , the battery cartridge may result in...
XML10/11 Instruction Manual - Page 12

...1 . Depending on the mower body and the approximate mowing height. Mowing height adjusting lever
Fig.26 ► 1 .
Install the battery cartridges. Release the switch button as soon as a guideline. Number 1 2 3 4 5 6 7 8
...the lawn or the ground, the actual lawn height may become slightly different from the set height. Switch lever
4. Press the main power switch.
3.
Pull the switch lever ...
XML10/11 Instruction Manual - Page 13

... on both sides 90°. Knob
Adjusting the traveling speed
For XML11
1
Fig.28
2
► 1 . Knob
NOTE: Supporting the handle makes it easier to release the locking pin. When the grass basket is a rough guide. Adjust the handle height, and then turn the lever forward.
13 ENGLISH Adjusting the handle height
The...
XML10/11 Instruction Manual - Page 14
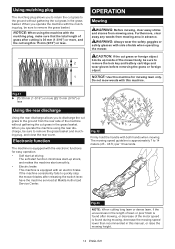
...mulching plug, and close the rear cover.
The mowing speed guideline is equipped with this manual, or raise the mowing height.
14 ENGLISH Furthermore, clear away any weeds from the ...rear side of grass after releasing the switch lever, have the machine serviced at driving
The soft-start function minimizes start smoothly. • Electric brake This machine is 30...
XML10/11 Instruction Manual - Page 15

...and take out the grass basket by Makita Authorized or Factory Service Centers, always using Makita replacement parts.
15 ENGLISH
Empty the grass basket.
MAINTENANCE
WARNING: Always ... raise the mowing height. Store the lock key in strips. To maintain product SAFETY and RELIABILITY, repairs, any damage or weakened strength. Overlap by one half to one direction. Remove the lock key....
XML10/11 Instruction Manual - Page 17

... not to release the locking pin when pulling the knob.
3. Loosen the thumb nuts on the other side, and then fold the handle. Knob
NOTE: Supporting the handle makes it easier to pinch the cords when folding the handle. 4. Upper handle
5. Turn the knob 90° while pulling the knob on...
XML10/11 Instruction Manual - Page 18

... installing the mower
2
blade
WARNING: The blade coasts for a few seconds after releasing the switch. Failure to secure the blade.
WARNING: When you replace the blades, always follow the instructions ...key and battery cartridge when removing or installing the blade.
Blade support 2. Mower blade 3. Installing the mower blade
WARNING: Install the mower blade carefully. It has ...
XML10/11 Instruction Manual - Page 19

... manual. If you find a problem that is not available, refer to disassemble the machine. The drive system does not work correctly.
Recharge the battery cartridge. Instead, ask Makita Authorized Service Centers, always using Makita replacement parts for your Makita machine specified in the manual, do not attempt to the warranty details set forth at below website for repairs...
Parts Breakdown - Page 3

... 14 183V31-7
SWITCH BOX SET
1
1 15 231227-3
COMPRESSION SPRING 15
1
1 16 413A99-6
SWITCH LEVER SUPPORT R
1
1
931102-0
HEX.
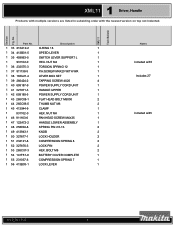
1 XML11
Driver, Handle
Products with multiple...SCREW FLANGE 4X18
1
1 7 253814-8
FLAT WASHER 8
1
1 8 413B10-4
DRIVING LEVER SUPPORT L
1
1
931102-0
HEX. XML11 Tech Bulletin
Part No. Section Fig. NUT M4
1
1 17 413B00-7
LOCK OFF BUTTON
1
1 18 911138...
Parts Breakdown - Page 4
...Driver, Handle
Products with multiple versions are listed in subsiding order with the newest version on top not indented.
NUT M4
1
1 36 232575-3
TORSION SPRING 12
1
1 37 911138-5
P.H.SCREW M4X20 WITH WR
1
1 38 183U21-4
LEVER BOX SET...Included w/35 Includes 27
Included w/45
rev 0_01-19-22
4 Part No. Section Fig. NUT M4
1
1 46 911163-6
PAN ...SUPPORT L
1
1
931102-0
HEX.
Parts Breakdown - Page 6

... 67 347866-0
HANDLE BRACKET L
1
2 68 266424-2
TAPPING SCREW 4X20
3
2 69 183N35-1
TERMINAL HOUSING SET
1
2
263005-3
RUBBER PIN 6
4
2 70 644809-6
TERMINAL
2
2 71 183N35-1
TERMINAL HOUSING SET
1
2
263005-3
RUBBER PIN 6
4
2 72 266424-2
TAPPING SCREW 4X20
3
2 75 266424-2
TAPPING SCREW...6
Notes
Includede w/69 Included w/71
Section Fig. XML11 Tech Bulletin
Part No.
No.
Parts Breakdown - Page 8

... SCREW 4X14
4
3 101 265C22-7
H.S.H.BOLT M8X30 WITH WG
4
3 102 240229-8
FAN 170
1
3 103 313392-1
BLADE SUPPORT 530
1
3 104 266424-2
TAPPING SCREW 4X20
2
3 105 191V96-5
BLADE 530 SET
1
3 106 265A69-9
HEX. Section Fig.
Description
3 92 620G78-5
CONTROLLER
1
3 93 266424-2
TAPPING SCREW 4X20
2
3... in subsiding order with the newest version on top not indented. Part No.
Makita XML11CT1 Reviews
We have not received any reviews for Makita yet.