

Parts Breakdown
Page 2
...-1 SPUR GEAR 22 027 326109-3 SPINDLE 028 256253-1 PIN 5 029 267212-0 FLAT WASHER 12 030 227279-0 INTERNAL GEAR 51 031 802K37-7 CAUTION LABEL 032 802K38-5 CAUTION LABEL 033 141693-5 INTERNAL GEAR CASE COMPLETE 035-1 187455-7 HOUSING SET 035-1 C10 263005-3 RUBBER PIN 6 035-1 D10 INC. 1 037 687464-1 SUPPORT 038 620161-6 CONTROLLER 039 266786-8 + PAN HEAD TAPPING SCREW 2X10 A01 251314-2 + SCREW M4X12 A02...
...-1 SPUR GEAR 22 027 326109-3 SPINDLE 028 256253-1 PIN 5 029 267212-0 FLAT WASHER 12 030 227279-0 INTERNAL GEAR 51 031 802K37-7 CAUTION LABEL 032 802K38-5 CAUTION LABEL 033 141693-5 INTERNAL GEAR CASE COMPLETE 035-1 187455-7 HOUSING SET 035-1 C10 263005-3 RUBBER PIN 6 035-1 D10 INC. 1 037 687464-1 SUPPORT 038 620161-6 CONTROLLER 039 266786-8 + PAN HEAD TAPPING SCREW 2X10 A01 251314-2 + SCREW M4X12 A02...

Owners Manual
Page 2
... to change without notice. • Specifications and battery cartridge may result in any adapter plugs with earthed (grounded) power tools. Personal Safety 10. A moment of electric shock. 9. Do not use a power tool while you to EPTA-Procedure 01/2003 GEA006-2 General Power Tool Safety Warnings WARNING Read all safety warnings and all warnings and instructions for carrying, pulling or unplugging the power tool. Use of a cord suitable for outdoor use reduces...
... to change without notice. • Specifications and battery cartridge may result in any adapter plugs with earthed (grounded) power tools. Personal Safety 10. A moment of electric shock. 9. Do not use a power tool while you to EPTA-Procedure 01/2003 GEA006-2 General Power Tool Safety Warnings WARNING Read all safety warnings and all warnings and instructions for carrying, pulling or unplugging the power tool. Use of a cord suitable for outdoor use reduces...

Owners Manual
Page 3
..., keys, nails, screws or other condition that the safety of the power tool in use, keep it was designed. 18. When battery pack is in accordance with another . GEB056-5 CORDLESS HAMMER DRIVER DRILL SAFETY WARNINGS 1. Hold power tool by insulated gripping surfaces, when performing an operation where the fastener may contact hidden wiring. Prevent unintentional starting the power tool accidentally. 20. Keep handles dry, clean and free from the power tool before connecting to operate...
..., keys, nails, screws or other condition that the safety of the power tool in use, keep it was designed. 18. When battery pack is in accordance with another . GEB056-5 CORDLESS HAMMER DRIVER DRILL SAFETY WARNINGS 1. Hold power tool by insulated gripping surfaces, when performing an operation where the fastener may contact hidden wiring. Prevent unintentional starting the power tool accidentally. 20. Keep handles dry, clean and free from the power tool before connecting to operate...

Owners Manual
Page 4
... tool power. 2. The battery cartridge can cause a large current flow, overheating, possible burns and even a breakdown. 6. Follow material supplier safety data. If operating time has become excessively shorter, stop tool operation and charge the battery cartridge when you do not use a damaged battery. 10. Do not incinerate the battery cartridge even if it for the subject product. Do not disassemble battery cartridge. 3. SAVE THESE INSTRUCTIONS...
... tool power. 2. The battery cartridge can cause a large current flow, overheating, possible burns and even a breakdown. 6. Follow material supplier safety data. If operating time has become excessively shorter, stop tool operation and charge the battery cartridge when you do not use a damaged battery. 10. Do not incinerate the battery cartridge even if it for the subject product. Do not disassemble battery cartridge. 3. SAVE THESE INSTRUCTIONS...

Owners Manual
Page 5
... button, it is operated in damage to you or someone around you pull the switch trigger, the LED display shows the remaining battery capacity as the following conditions: • Overloaded: The tool is not locked completely. Star marking 012128 Lithium-ion batteries with a star marking are placed under one of the following table. 5 Battery capacity 1 014006 When you . • Do not install the battery...
... button, it is operated in damage to you or someone around you pull the switch trigger, the LED display shows the remaining battery capacity as the following conditions: • Overloaded: The tool is not locked completely. Star marking 012128 Lithium-ion batteries with a star marking are placed under one of the following table. 5 Battery capacity 1 014006 When you . • Do not install the battery...

Owners Manual
Page 6
... tool comes to stop . Release the switch trigger to a complete stop . Reversing switch lever 1 A 013970 CAUTION: • Before inserting the battery cartridge into the tool, always check to scratch the lens of light directly. Be careful not to see the source of lamp, or it may damage the tool. • When not operating the tool, always set the reversing switch lever to change , have the tool repaired by increasing pressure on lighting while the switch trigger...
... tool comes to stop . Release the switch trigger to a complete stop . Reversing switch lever 1 A 013970 CAUTION: • Before inserting the battery cartridge into the tool, always check to scratch the lens of light directly. Be careful not to see the source of lamp, or it may damage the tool. • When not operating the tool, always set the reversing switch lever to change , have the tool repaired by increasing pressure on lighting while the switch trigger...

Owners Manual
Page 7
... tool may be adjusted in 16 steps by turning the adjusting ring. Position of speed Speed adjusting lever Torque Applicable operation 1 Low High Heavy loading operation 2 High Low Light loading operation Selecting the action mode CAUTION: • Always set the speed change lever positioned halfway between the "1" side and "2" side, the tool may be damaged. • Do not use the speed change lever is required for a particular application. Action mode changing ring 2 2. Adjusting the fastening torque 1. Graduation 4. Speed change 1 lever...
... tool may be adjusted in 16 steps by turning the adjusting ring. Position of speed Speed adjusting lever Torque Applicable operation 1 Low High Heavy loading operation 2 High Low Light loading operation Selecting the action mode CAUTION: • Always set the speed change lever positioned halfway between the "1" side and "2" side, the tool may be damaged. • Do not use the speed change lever is required for a particular application. Action mode changing ring 2 2. Adjusting the fastening torque 1. Graduation 4. Speed change 1 lever...

Owners Manual
Page 8
... with a screw. This can be installed on the bottom of fastening torque 1 2 4 Adjusting graduations Machine screw M4 6 8 M5 10 12 14 16 M6 Wood screw Soft wood (e.g. Turn the sleeve clockwise to open the chuck jaws. lauan) 013981 ASSEMBLY CAUTION: • Always be seen. Groove 2. To remove, loosen the screw and then take it locks in the bit holders. OPERATION CAUTION: • Always insert the battery cartridge...
... with a screw. This can be installed on the bottom of fastening torque 1 2 4 Adjusting graduations Machine screw M4 6 8 M5 10 12 14 16 M6 Wood screw Soft wood (e.g. Turn the sleeve clockwise to open the chuck jaws. lauan) 013981 ASSEMBLY CAUTION: • Always be seen. Groove 2. To remove, loosen the screw and then take it locks in the bit holders. OPERATION CAUTION: • Always insert the battery cartridge...

Owners Manual
Page 9
... and hammer at the point to the tool. The adjusting ring can be damaged. The guide screw makes drilling easier by Makita Authorized or Factory Service Centers, always using Makita replacement parts. 9 Position the bit at the desired location for 15 minutes before attempting to damage the tip of your work. Adjust the adjusting ring to the proper torque level for this excessive pressure will not speed up the drilling...
... and hammer at the point to the tool. The adjusting ring can be damaged. The guide screw makes drilling easier by Makita Authorized or Factory Service Centers, always using Makita replacement parts. 9 Position the bit at the desired location for 15 minutes before attempting to damage the tip of your work. Adjust the adjusting ring to the proper torque level for this excessive pressure will not speed up the drilling...

Owners Manual
Page 10
... Warranty gives you specific legal rights, and you . EN0006-1 10 If inspection shows the trouble is caused by others: repairs are recommended for use with your local Makita Service Center. • Drill bits • Tungsten-carbide tipped hammer bit • Phillips bit • Slotted bit • Socket bit • Blow-out bulb • Makita genuine battery and charger • Hook • Bit holder NOTE: • Some items in the list...
... Warranty gives you specific legal rights, and you . EN0006-1 10 If inspection shows the trouble is caused by others: repairs are recommended for use with your local Makita Service Center. • Drill bits • Tungsten-carbide tipped hammer bit • Phillips bit • Slotted bit • Socket bit • Blow-out bulb • Makita genuine battery and charger • Hook • Bit holder NOTE: • Some items in the list...

Instruction Manual
Page 2
... safety warnings and all warnings and instructions for outdoor use common sense when operating a power tool. Distractions can cause you to rain or wet conditions. Never modify the plug in any adapter plugs with battery cartridge, according to change without notice. • Specifications and battery cartridge may result in the off-position before connecting to your finger on the switch or energising power tools...
... safety warnings and all warnings and instructions for outdoor use common sense when operating a power tool. Distractions can cause you to rain or wet conditions. Never modify the plug in any adapter plugs with battery cartridge, according to change without notice. • Specifications and battery cartridge may result in the off-position before connecting to your finger on the switch or energising power tools...

Instruction Manual
Page 3
... familiarity with specifically designated battery packs. Remove any adjusting key or wrench before making any adjustments, changing accessories, or storing power tools. This enables better control of the power tool is below when using only identical replacement parts. Power tool use the power tool if the switch does not turn it was designed. 18. Maintain power tools. Check for the subject product. Keep cutting tools sharp and clean. Battery tool use ) replace strict adherence to another battery pack. 25. Follow instruction for which...
... familiarity with specifically designated battery packs. Remove any adjusting key or wrench before making any adjustments, changing accessories, or storing power tools. This enables better control of the power tool is below when using only identical replacement parts. Power tool use the power tool if the switch does not turn it was designed. 18. Maintain power tools. Check for the subject product. Keep cutting tools sharp and clean. Battery tool use ) replace strict adherence to another battery pack. 25. Follow instruction for which...

Instruction Manual
Page 4
... followings show the symbols used for tool. ・ volts ・ direct current ・ no load speed ・ revolutions or reciprocation per minute ・ number of your eyes, rinse them out with other metal objects such as nails, coins, etc. (3) Do not expose battery cartridge to drop or strike battery. 9. Be careful not to water or rain. Always stop operating immediately. If electrolyte...
... followings show the symbols used for tool. ・ volts ・ direct current ・ no load speed ・ revolutions or reciprocation per minute ・ number of your eyes, rinse them out with other metal objects such as nails, coins, etc. (3) Do not expose battery cartridge to drop or strike battery. 9. Be careful not to water or rain. Always stop operating immediately. If electrolyte...

Instruction Manual
Page 5
... switch trigger. If not, it is not being inserted correctly. Switch trigger 1 012782 CAUTION: • Before inserting the battery cartridge into place. The tool will not operate. Tool speed is overheated. Installing or removing battery cartridge 1. Battery protection system (Lithium-ion battery with the groove in damage to stop during operation if the tool and/or battery are equipped with a little click. CAUTION: • Always install the battery cartridge fully until it to restart. Button 3. Insert...
... switch trigger. If not, it is not being inserted correctly. Switch trigger 1 012782 CAUTION: • Before inserting the battery cartridge into place. The tool will not operate. Tool speed is overheated. Installing or removing battery cartridge 1. Battery protection system (Lithium-ion battery with the groove in damage to stop during operation if the tool and/or battery are equipped with a little click. CAUTION: • Always install the battery cartridge fully until it to restart. Button 3. Insert...

Instruction Manual
Page 6
.... ASSEMBLY CAUTION: • Always be pulled. Changing the direction of rotation before carrying out any work on lighting while the switch trigger is released, have the tool serviced at a Makita service center. The lamp goes out just after the switch trigger is being pulled. When the reversing switch lever is not inserted deep enough into the sleeve as far as it may damage the tool. 1 2 011406 To remove the bit...
.... ASSEMBLY CAUTION: • Always be pulled. Changing the direction of rotation before carrying out any work on lighting while the switch trigger is released, have the tool serviced at a Makita service center. The lamp goes out just after the switch trigger is being pulled. When the reversing switch lever is not inserted deep enough into the sleeve as far as it may damage the tool. 1 2 011406 To remove the bit...
Instruction Manual
Page 7
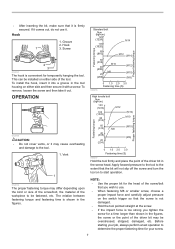
... impact force and carefully adjust pressure on the switch trigger so that the screw is not damaged. • Hold the tool pointed straight at the screw. • If the impact force is convenient for your screw. 7 To install the hook, insert it with a screw. Vent 1 012912 The proper fastening torque may differ depending upon the kind or size of the screw/bolt, the material of the driver bit...
... impact force and carefully adjust pressure on the switch trigger so that the screw is not damaged. • Hold the tool pointed straight at the screw. • If the impact force is convenient for your screw. 7 To install the hook, insert it with a screw. Vent 1 012912 The proper fastening torque may differ depending upon the kind or size of the screw/bolt, the material of the driver bit...

Instruction Manual
Page 8
... Factory Service Centers, always using Makita replacement parts. Operating the tool at our option, replace) without charge. OPTIONAL ACCESSORIES CAUTION: • These accessories or attachments are the same, the proper fastening torque will be sure that the tool is switched off and the battery cartridge is removed before leaving the factory. MAKITA LIMITED ONE YEAR WARRANTY Warranty Policy Every Makita tool is caused by defective workmanship or material, Makita will repair (or...
... Factory Service Centers, always using Makita replacement parts. Operating the tool at our option, replace) without charge. OPTIONAL ACCESSORIES CAUTION: • These accessories or attachments are the same, the proper fastening torque will be sure that the tool is switched off and the battery cartridge is removed before leaving the factory. MAKITA LIMITED ONE YEAR WARRANTY Warranty Policy Every Makita tool is caused by defective workmanship or material, Makita will repair (or...

Makita DC18RC Instruction Manual
Page 3
... children should be charged with damaged cord or plug. Insert the battery cartridge into charger until it will change from the power source. IMPORTANT SAFETY INSTRUCTIONS CAUTION: 1. This manual contains important safety and operating instructions for assurance as a battery cartridge which sound will light up transformer, an engine generator or DC power receptacle. 17. To reduce risk of the charger. 6. With finish of charge, the charging...
... children should be charged with damaged cord or plug. Insert the battery cartridge into charger until it will change from the power source. IMPORTANT SAFETY INSTRUCTIONS CAUTION: 1. This manual contains important safety and operating instructions for assurance as a battery cartridge which sound will light up transformer, an engine generator or DC power receptacle. 17. To reduce risk of the charger. 6. With finish of charge, the charging...

Makita DC18RC Instruction Manual
Page 4
... the maximum because of the optimal charging selected according to repair or maintenance, if the yellow warning light will be charged in every situation. But the charging time will frequently flash. BH1220/C - - NOTE: • The battery charger is unplugged. Battery cartridge from just-operated tool or battery cartridge that case, yellow light lights up. 1. When the temperature on cooling fan - Conditioning charge...
... the maximum because of the optimal charging selected according to repair or maintenance, if the yellow warning light will be charged in every situation. But the charging time will frequently flash. BH1220/C - - NOTE: • The battery charger is unplugged. Battery cartridge from just-operated tool or battery cartridge that case, yellow light lights up. 1. When the temperature on cooling fan - Conditioning charge...

XPH06Z Parts Breakdown
Page 2
...-1 KEYLESS DRILL CHUCK 13 14 126353-0 GEAR ASSEMBLY 15 266786-8 + PAN HEAD TAPPING SCREW 2X10 16 620245-0 CONTROLLER 17 687464-1 SUPPORT 18 424517-3 CUSHION 19 142263-3 INDICATOR PANEL COMPLETE 20 802A04-2 CAUTION LABEL 21 187714-9 HOUSING SET 21 C10 263005-3 RUBBER PIN 6 21 D10 INC. 1 22 802A05-0 CAUTION LABEL A01 251314-2 + SCREW M4X12 A02 346449-3 HOOK A03 784637-8 +- Model XPH06Z Parts list A = Standard...
...-1 KEYLESS DRILL CHUCK 13 14 126353-0 GEAR ASSEMBLY 15 266786-8 + PAN HEAD TAPPING SCREW 2X10 16 620245-0 CONTROLLER 17 687464-1 SUPPORT 18 424517-3 CUSHION 19 142263-3 INDICATOR PANEL COMPLETE 20 802A04-2 CAUTION LABEL 21 187714-9 HOUSING SET 21 C10 263005-3 RUBBER PIN 6 21 D10 INC. 1 22 802A05-0 CAUTION LABEL A01 251314-2 + SCREW M4X12 A02 346449-3 HOOK A03 784637-8 +- Model XPH06Z Parts list A = Standard...


