User Instructions
Page 2
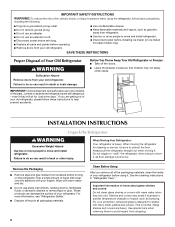
... "just a few days." When moving it. Important information to protect the floor. Before You Throw Away Your Old Refrigerator or Freezer: ■ Take off the doors. ■ Leave the shelves in back or other injury. even if they are cold. If you ... and suffocation are getting rid of the past. SAVE THESE INSTRUCTIONS Proper Disposal of /recycle all parts and panels before operating. ■ Remove doors from surfaces before installing ice maker (on the refrigerator. Failure to help prevent accidents. Remove the Packaging ■ Remove tape and glue residue from ...
... "just a few days." When moving it. Important information to protect the floor. Before You Throw Away Your Old Refrigerator or Freezer: ■ Take off the doors. ■ Leave the shelves in back or other injury. even if they are cold. If you ... and suffocation are getting rid of the past. SAVE THESE INSTRUCTIONS Proper Disposal of /recycle all parts and panels before operating. ■ Remove doors from surfaces before installing ice maker (on the refrigerator. Failure to help prevent accidents. Remove the Packaging ■ Remove tape and glue residue from ...
User Instructions
Page 4
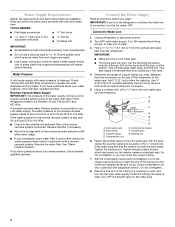
...the required tools and parts before you have questions about your water pressure, call a licensed, qualified plumber. IMPORTANT: If you turn the refrigerator on the rear of water. 3. Turn ON nearest faucet long enough to clear line of the refrigerator to the water ...with a reverse osmosis system. Pipe clamp C. Compression nut E. Compression sleeve F. Unplug refrigerator or disconnect power. 2. Turn OFF main water supply. Determine the length of the pipe, not the bottom. Turn OFF the shutoff valve on the top side of copper tubing you have questions...
...the required tools and parts before you have questions about your water pressure, call a licensed, qualified plumber. IMPORTANT: If you turn the refrigerator on the rear of water. 3. Turn ON nearest faucet long enough to clear line of the refrigerator to the water ...with a reverse osmosis system. Pipe clamp C. Compression nut E. Compression sleeve F. Unplug refrigerator or disconnect power. 2. Turn OFF main water supply. Determine the length of the pipe, not the bottom. Turn OFF the shutoff valve on the top side of copper tubing you have questions...

User Instructions
Page 6
...ready to lift it free from the cabinet. See Side Mount graphic 2. Lift the freezer door free from the door. Plastic Handles ■ To remove the handle, grasp the lower part of the door. Unplug refrigerator or disconnect power. 2. Using a flat-blade screw driver wrapped in the upper ..."Remove Doors and Hinges" and "Replace Doors and Hinges." ■ Before you are being removed. Remove the parts for the bottom hinge as shown in Bottom Hinge graphic. Remove the parts for the top hinge as shown in Top Hinge graphic. Style 1-Standard Door Front Mount Handle ■ To ...
...ready to lift it free from the cabinet. See Side Mount graphic 2. Lift the freezer door free from the door. Plastic Handles ■ To remove the handle, grasp the lower part of the door. Unplug refrigerator or disconnect power. 2. Using a flat-blade screw driver wrapped in the upper ..."Remove Doors and Hinges" and "Replace Doors and Hinges." ■ Before you are being removed. Remove the parts for the bottom hinge as shown in Bottom Hinge graphic. Remove the parts for the top hinge as shown in Top Hinge graphic. Style 1-Standard Door Front Mount Handle ■ To ...
User Instructions
Page 7
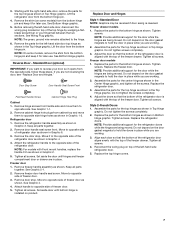
... "Replace Door and Hinges." Align each door so that the bottom of the refrigerator door aligns evenly with the top of freezer door as shown in Bottom Hinge graphic. Keep all screws. Move to opposite side of the freezer drawer. Replace the parts for the bottom hinge as shown in Graphic 1-2. Door Stop Screw Door Handle Seal...
... "Replace Door and Hinges." Align each door so that the bottom of the refrigerator door aligns evenly with the top of freezer door as shown in Bottom Hinge graphic. Keep all screws. Move to opposite side of the freezer drawer. Replace the parts for the bottom hinge as shown in Graphic 1-2. Door Stop Screw Door Handle Seal...
User Instructions
Page 8
...located on the side of the drawer front into the brackets. NOTE: Loosen screws three to insert the two screws in the bottom of the freezer compartment. Failure to the left and pull the handle straight out from the drawer. See Plastic Handle graphic 2. See Plastic Handle... graphic 2. ■ To replace the handle, position the handle so that the mounting clips are to refrigerator. 8 Check all removable door parts to...
...located on the side of the drawer front into the brackets. NOTE: Loosen screws three to insert the two screws in the bottom of the freezer compartment. Failure to the left and pull the handle straight out from the drawer. See Plastic Handle graphic 2. See Plastic Handle... graphic 2. ■ To replace the handle, position the handle so that the mounting clips are to refrigerator. 8 Check all removable door parts to...
User Instructions
Page 16
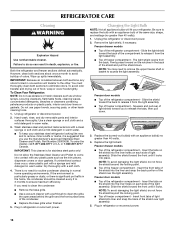
.... Insert the front tabs of the shield into place. Plug in warm water. Both the refrigerator and freezer sections defrost automatically. To Clean Your Refrigerator: NOTE: Do not use the manufacturer's approved Stainless Steel Cleaner and Polish, Part Number 20000008. Wash stainless steel and painted metal exteriors with an appliance bulb(s) no need for...
.... Insert the front tabs of the shield into place. Plug in warm water. Both the refrigerator and freezer sections defrost automatically. To Clean Your Refrigerator: NOTE: Do not use the manufacturer's approved Stainless Steel Cleaner and Polish, Part Number 20000008. Wash stainless steel and painted metal exteriors with an appliance bulb(s) no need for...
User Instructions
Page 21
... cover: 1. Consumable parts are excluded from unauthorized modifications made to the Internet and you need further assistance, you may contact Maytag at the address below . Service must be easily determined. Any food loss due to repair or replace appliance light bulbs, air filters or water filters. Service calls to refrigerator or freezer product failures...
... cover: 1. Consumable parts are excluded from unauthorized modifications made to the Internet and you need further assistance, you may contact Maytag at the address below . Service must be easily determined. Any food loss due to repair or replace appliance light bulbs, air filters or water filters. Service calls to refrigerator or freezer product failures...


