

Owners Manual
Page 1
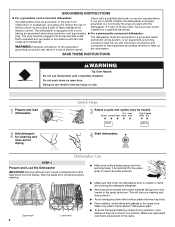
...you and others are not followed. In Canada, visit our website at www.maytag.ca or call us at 1-800-688-9900. You will tell you what can kill or hurt you should experience a problem not covered in a dishwasher, and keep them out of the reach of injury, do not smoke ... touch the heating element during or immediately after use in TROUBLESHOOTING, please visit our website at www.maytag.com for such a period, before using the dishwasher turn on the door, lid, or dish racks of the dishwasher. ■ To reduce the risk of children. ■ When loading items to damage the door ...
...you and others are not followed. In Canada, visit our website at www.maytag.ca or call us at 1-800-688-9900. You will tell you what can kill or hurt you should experience a problem not covered in a dishwasher, and keep them out of the reach of injury, do not smoke ... touch the heating element during or immediately after use in TROUBLESHOOTING, please visit our website at www.maytag.com for such a period, before using the dishwasher turn on the door, lid, or dish racks of the dishwasher. ■ To reduce the risk of children. ■ When loading items to damage the door ...
Owners Manual
Page 2
... if it will not fit the outlet, have a proper outlet installed by a qualified electrician. ■ For a permanently connected dishwasher: The dishwasher must be connected to a grounded metal, permanent wiring system, or an equipment-grounding conductor must be loaded with soiled surfaces facing ... noises during operation, load dishes so they do not touch one another. GROUNDING INSTRUCTIONS ■ For a grounded, cord-connected dishwasher: The dishwasher must be plugged into an appropriate outlet that is installed and grounded in accordance with all soiled surfaces. ■ Make sure that...
... if it will not fit the outlet, have a proper outlet installed by a qualified electrician. ■ For a permanently connected dishwasher: The dishwasher must be connected to a grounded metal, permanent wiring system, or an equipment-grounding conductor must be loaded with soiled surfaces facing ... noises during operation, load dishes so they do not touch one another. GROUNDING INSTRUCTIONS ■ For a grounded, cord-connected dishwasher: The dishwasher must be plugged into an appropriate outlet that is installed and grounded in accordance with all soiled surfaces. ■ Make sure that...
Owners Manual
Page 3
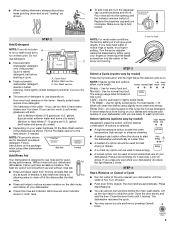
...well water and some city water] Medium to Medium Water (0-6 grains per U.S. NOTE: For most water conditions, the factory setting of your dishwasher until the light below the desired cycle is hot. Use for 3 seconds. Use for good drying performance. Press and hold Delay for ... in hard water, dishes won't be used for standard powdered detergent. Make sure cap is locked, the light flashes 3 times. Main Wash section dishwasher detergent C. If you do not plan A to save energy. ■ A locked option can add an item anytime before starting a cycle. STEP...
...well water and some city water] Medium to Medium Water (0-6 grains per U.S. NOTE: For most water conditions, the factory setting of your dishwasher until the light below the desired cycle is hot. Use for 3 seconds. Use for good drying performance. Press and hold Delay for ... in hard water, dishes won't be used for standard powdered detergent. Make sure cap is locked, the light flashes 3 times. Main Wash section dishwasher detergent C. If you do not plan A to save energy. ■ A locked option can add an item anytime before starting a cycle. STEP...

Owners Manual
Page 4
...spots and film. Vinegar is not operating properly ■ Dishwasher does not run up and down to release. ■ Dishwasher seems to run too long The dishwasher can form on the counter. In U.S.A., www.maytag.com In Canada, www.maytag.ca Dishwasher is an acid, and using it has cooled. Is ...there power to the dishwasher. See cycle sections wash times. Is the ...
...spots and film. Vinegar is not operating properly ■ Dishwasher does not run up and down to release. ■ Dishwasher seems to run too long The dishwasher can form on the counter. In U.S.A., www.maytag.com In Canada, www.maytag.ca Dishwasher is an acid, and using it has cooled. Is ...there power to the dishwasher. See cycle sections wash times. Is the ...
Owners Manual
Page 5
...may be possible to avoid the problem, except by some combination of soft or softened water, alkaline washing solutions, insufficient rinsing, overloading the dishwasher, and the heat of citric acid crystals added to allow thorough rinsing. Stains will not perform as it in the dispenser. If the... Normal wash cycle with a liquid rinse aid helps eliminate spotting and filming. When the object is there a high mineral content in the dishwasher? Did you choose the cycle that describes the most difficult soil in dispenser? Is detergent caked in your water have some models). If you...
...may be possible to avoid the problem, except by some combination of soft or softened water, alkaline washing solutions, insufficient rinsing, overloading the dishwasher, and the heat of citric acid crystals added to allow thorough rinsing. Stains will not perform as it in the dispenser. If the... Normal wash cycle with a liquid rinse aid helps eliminate spotting and filming. When the object is there a high mineral content in the dishwasher? Did you choose the cycle that describes the most difficult soil in dispenser? Is detergent caked in your water have some models). If you...
Owners Manual
Page 6
... is required to the Internet and you need further assistance, you on the right-hand or left-hand side of the dishwasher interior. MAYTAG® MAJOR APPLIANCE WARRANTY LIMITED WARRANTY For one year from the date of purchase, when this major appliance is used in... replace appliance light bulbs, air filters or water filters. Repairs to parts or systems resulting from warranty coverage. 3. The cost of Maytag Corporation or its related companies. DISCLAIMER OF IMPLIED WARRANTIES; IMPLIED WARRANTIES, INCLUDING WARRANTIES OF MERCHANTABILITY OR FITNESS FOR A PARTICULAR PURPOSE, ARE...
... is required to the Internet and you need further assistance, you on the right-hand or left-hand side of the dishwasher interior. MAYTAG® MAJOR APPLIANCE WARRANTY LIMITED WARRANTY For one year from the date of purchase, when this major appliance is used in... replace appliance light bulbs, air filters or water filters. Repairs to parts or systems resulting from warranty coverage. 3. The cost of Maytag Corporation or its related companies. DISCLAIMER OF IMPLIED WARRANTIES; IMPLIED WARRANTIES, INCLUDING WARRANTIES OF MERCHANTABILITY OR FITNESS FOR A PARTICULAR PURPOSE, ARE...

Installation Instructions
Page 2
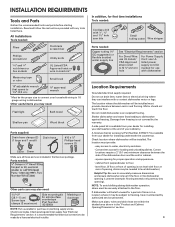
...immediately follow instructions. You can be installed to meet all safety messages. Remove shipping materials, drain hose and lower rack. The dishwasher must be killed or seriously injured if you how to : • Slowly open door. These words mean: You can be ...This symbol alerts you to potential hazards that can kill or hurt you what the potential hazard is the safety alert symbol. Table of Contents Dishwasher Safety 2 Installation Requirements 3 Tools and Parts 3 Location Requirements 3 Product and Cabinet Opening Dimensions 4 Drain Requirements 5 Water Supply Requirements 5...
...immediately follow instructions. You can be installed to meet all safety messages. Remove shipping materials, drain hose and lower rack. The dishwasher must be killed or seriously injured if you how to : • Slowly open door. These words mean: You can be ...This symbol alerts you to potential hazards that can kill or hurt you what the potential hazard is the safety alert symbol. Table of Contents Dishwasher Safety 2 Installation Requirements 3 Tools and Parts 3 Location Requirements 3 Product and Cabinet Opening Dimensions 4 Drain Requirements 5 Water Supply Requirements 5...
Installation Instructions
Page 3
... section. 3 See "Electrical Requirements" section. A moisture barrier accessory (Part Number 4396277) is not level with floor at the end of the dishwasher door and the wall or cabinet. • square opening for use UL listed power supply cord kit marked for proper operation and appearance. •.... The location must provide: • easy access to the floor. Damage from your household wiring to 16 gauge wiring in the dishwasher opening is available from your cabinetry. Motor should not touch the floor. It is recommended that opens to wrench *Must be the proper...
... section. 3 See "Electrical Requirements" section. A moisture barrier accessory (Part Number 4396277) is not level with floor at the end of the dishwasher door and the wall or cabinet. • square opening for use UL listed power supply cord kit marked for proper operation and appearance. •.... The location must provide: • easy access to the floor. Damage from your household wiring to 16 gauge wiring in the dishwasher opening is available from your cabinetry. Motor should not touch the floor. It is recommended that opens to wrench *Must be the proper...

Installation Instructions
Page 4
... may be compressed. (not used on all models) (532.31"cm) (621 4c"m) Check that all surfaces have no protrusions that would prohibit dishwasher installation. (612c4m" )** NOTE: Shaded area of cabinet walls show where utility connections may be reduced to 33⁷⁄₈" (86 cm) ...by removing wheels from dishwasher. **Minimum, measured from the lowest point on the underside of opening. (86m.344inc"*m) 4 (10.42"cm) (7.63"cm) (17.2 cm) (4.4 cm) ...
... may be compressed. (not used on all models) (532.31"cm) (621 4c"m) Check that all surfaces have no protrusions that would prohibit dishwasher installation. (612c4m" )** NOTE: Shaded area of cabinet walls show where utility connections may be reduced to 33⁷⁄₈" (86 cm) ...by removing wheels from dishwasher. **Minimum, measured from the lowest point on the underside of opening. (86m.344inc"*m) 4 (10.42"cm) (7.63"cm) (17.2 cm) (4.4 cm) ...
Installation Instructions
Page 5
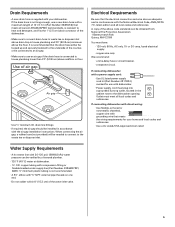
... line fittings. • If required, the air gap should be verified by a licensed plumber. •120°F (49°C) water at dishwasher O.D. Electrical Requirements Be sure that the drain hose either be looped up and securely fastened to waste tee or disposer inlet above drain trap in...Use of the water inlet valve. 5 or 20- A copy of the above subfloor or floor. Water Supply Requirements • A hot water line with dishwasher. • Power supply cord must meet all local codes and ordinances. It is connected to house plumbing lower than 20" (50.8 cm) above code ...
... line fittings. • If required, the air gap should be verified by a licensed plumber. •120°F (49°C) water at dishwasher O.D. Electrical Requirements Be sure that the drain hose either be looped up and securely fastened to waste tee or disposer inlet above drain trap in...Use of the water inlet valve. 5 or 20- A copy of the above subfloor or floor. Water Supply Requirements • A hot water line with dishwasher. • Power supply cord must meet all local codes and ordinances. It is connected to house plumbing lower than 20" (50.8 cm) above code ...
Installation Instructions
Page 6
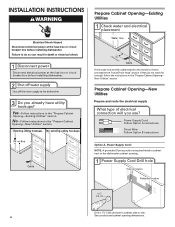
...INSTALLATION INSTRUCTIONS Electrical Shock Hazard Disconnect electrical power at the fuse box or circuit breaker box before installing dishwasher. Yes-Follow instructions in death or electrical shock. 1 Disconnect power Disconnect electrical power at the fuse box or ...electrical placement Water line (15.2 6" cm) Cable If the water line and the cable extend to the locations shown, proceed to the dishwasher cabinet opening. 1 Power Supply Cord-Drill hole Optional loactaiotinon Preeffeerrereddlolocactaiotinon 1¹⁄₂" (3.8 cm) Drill a 1¹⁄₂" (3.8...
...INSTALLATION INSTRUCTIONS Electrical Shock Hazard Disconnect electrical power at the fuse box or circuit breaker box before installing dishwasher. Yes-Follow instructions in death or electrical shock. 1 Disconnect power Disconnect electrical power at the fuse box or ...electrical placement Water line (15.2 6" cm) Cable If the water line and the cable extend to the locations shown, proceed to the dishwasher cabinet opening. 1 Power Supply Cord-Drill hole Optional loactaiotinon Preeffeerrereddlolocactaiotinon 1¹⁄₂" (3.8 cm) Drill a 1¹⁄₂" (3.8...
Installation Instructions
Page 7
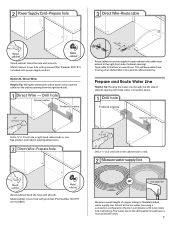
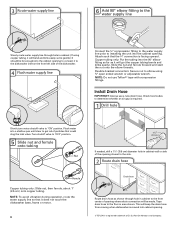
...and cabinet opening dimensions. 2 Direct Wire-Prepare hole (15.2 c6m") Route cable from moving when dishwasher is in area shown. Attach to the dishwasher should have a manual shutoff valve. 7 This will keep cable from power supply through the left side... Wire-Route cable Wood cabinet Metal cabinet Wood cabinet: Sand the hole until smooth. Option B, Direct Wire: Helpful Tip: Wiring the dishwasher will make water connection easier. 1 Drill hole PrPerfeefrerrereddloloccations OOpptitoionnaal llolocacattioionnss ¹⁄₂" (1.3 cm) Drill a ¹⁄₂" ...
...and cabinet opening dimensions. 2 Direct Wire-Prepare hole (15.2 c6m") Route cable from moving when dishwasher is in area shown. Attach to the dishwasher should have a manual shutoff valve. 7 This will keep cable from power supply through the left side... Wire-Route cable Wood cabinet Metal cabinet Wood cabinet: Sand the hole until smooth. Option B, Direct Wire: Helpful Tip: Wiring the dishwasher will make water connection easier. 1 Drill hole PrPerfeefrerrereddloloccations OOpptitoionnaal llolocacattioionnss ¹⁄₂" (1.3 cm) Drill a ¹⁄₂" ...
Installation Instructions
Page 8
... ferrule onto tubing Nut Ferrule Copper tubing only: Slide nut, then ferrule, about 1" (2.5 cm) onto copper tubing. Attach such that it does not touch the dishwasher base, frame or motor. 8 1¹⁄₂" (3.8 cm) If needed, drill a 1¹⁄₂" (3.8 cm) diameter hole in area shown. Tape drain... cabinet opening closest to the sink. 2 Route drain hose Drain hose Route drain hose as it will keep the drain hose from moving when dishwasher is a registered trademark of particles that could clog the inlet valve. NOTE: Do not use a new drain hose. Check local codes to ...
... ferrule onto tubing Nut Ferrule Copper tubing only: Slide nut, then ferrule, about 1" (2.5 cm) onto copper tubing. Attach such that it does not touch the dishwasher base, frame or motor. 8 1¹⁄₂" (3.8 cm) If needed, drill a 1¹⁄₂" (3.8 cm) diameter hole in area shown. Tape drain... cabinet opening closest to the sink. 2 Route drain hose Drain hose Route drain hose as it will keep the drain hose from moving when dishwasher is a registered trademark of particles that could clog the inlet valve. NOTE: Do not use a new drain hose. Check local codes to ...
Installation Instructions
Page 9
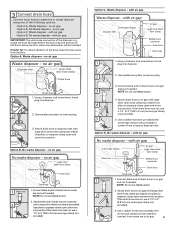
... of of the disposer or a waste tee must be made before the drain trap and at least 20" (50.8 cm) above the floor where the dishwasher will be installed. Option C, Waste disposer - Using a hammer and screwdriver, knock plug into disposer. 2 2. If the drain hose was cut, use a 1¹⁄₂" to...
... of of the disposer or a waste tee must be made before the drain trap and at least 20" (50.8 cm) above the floor where the dishwasher will be installed. Option C, Waste disposer - Using a hammer and screwdriver, knock plug into disposer. 2 2. If the drain hose was cut, use a 1¹⁄₂" to...
Installation Instructions
Page 10
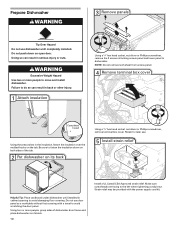
... installed in cabinet opening to avoid damaging floor covering. Excessive Weight Hazard Use two or more people, grasp sides of the tub. 2 Put dishwasher on open door. Strain relief may be provided with a towel to do so can result in serious injury or cuts. Retain for later use... door panel as a worktable without first covering with the power supply cord kit. Make sure screwheads are facing to move and install dishwasher. Doing so can result in the insulation, fasten the insulation over the molded hooks on its back Using a ¹⁄₄" hex head socket,...
... installed in cabinet opening to avoid damaging floor covering. Excessive Weight Hazard Use two or more people, grasp sides of the tub. 2 Put dishwasher on open door. Strain relief may be provided with a towel to do so can result in serious injury or cuts. Retain for later use... door panel as a worktable without first covering with the power supply cord kit. Make sure screwheads are facing to move and install dishwasher. Doing so can result in the insulation, fasten the insulation over the molded hooks on its back Using a ¹⁄₄" hex head socket,...

Installation Instructions
Page 11
... UL Listed/CSA Approved twist-on wires to lower part of the green ground wire. Gently tug on wire connectors rated to 16-gauge dishwasher wiring. Do not use ? Twist on wire connectors. 11 Connect wires black to black and white to white, using Option B, proceed ...to "Determine Cabinet Opening," to continue with the installation of your power supply cord to connect your dishwasher. What type of electrical connection will you use an extension cord. Power Supply Cord: Follow Option A instructions Direct Wire: Follow Option B instructions...
... UL Listed/CSA Approved twist-on wires to lower part of the green ground wire. Gently tug on wire connectors rated to 16-gauge dishwasher wiring. Do not use ? Twist on wire connectors. 11 Connect wires black to black and white to white, using Option B, proceed ...to "Determine Cabinet Opening," to continue with the installation of your power supply cord to connect your dishwasher. What type of electrical connection will you use an extension cord. Power Supply Cord: Follow Option A instructions Direct Wire: Follow Option B instructions...
Installation Instructions
Page 12
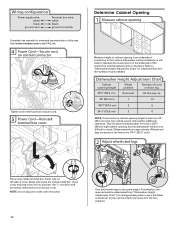
... tab. 4 Power Cord-Secure cord on the floor). Put wheels in the required position determined from underside of countertop to floor where dishwasher will be installed (you will be removed for wheel position and the number of this step. Wiring configuration Power supply wire: white black...tabs on front leg Removed All the way up 34" (86.4 cm) 1 10 (87.0 cm) 2 5 3 0 NOTE: If the minimum cabinet opening from "Dishwasher Height Adjustment Chart." (To change wheel position, use a flat-blade screwdriver to pop out the wheel, then snap into outlet until instructed. 12 3 2 1 Turn ...
... tab. 4 Power Cord-Secure cord on the floor). Put wheels in the required position determined from underside of countertop to floor where dishwasher will be installed (you will be removed for wheel position and the number of this step. Wiring configuration Power supply wire: white black...tabs on front leg Removed All the way up 34" (86.4 cm) 1 10 (87.0 cm) 2 5 3 0 NOTE: If the minimum cabinet opening from "Dishwasher Height Adjustment Chart." (To change wheel position, use a flat-blade screwdriver to pop out the wheel, then snap into outlet until instructed. 12 3 2 1 Turn ...

Installation Instructions
Page 13
...laminate or another hard surface, install using Option #2. Choose Attachment Option Excessive Weight Hazard Use two or more people, stand dishwasher upright. With another person holding the dishwasher to 34" (86.4 cm) below the countertop. Install plastic button Plastic button 5. Push bracket into the slot on... are two brackets, found in use. Repeat this step for marble, granite or other injury. top mount NOTE: Do not attach the dishwasher. This will stop screws from tipping, open slots on the collar. If your countertop is higher than cabinet opening . Score line Score ...
...laminate or another hard surface, install using Option #2. Choose Attachment Option Excessive Weight Hazard Use two or more people, stand dishwasher upright. With another person holding the dishwasher to 34" (86.4 cm) below the countertop. Install plastic button Plastic button 5. Push bracket into the slot on... are two brackets, found in use. Repeat this step for marble, granite or other injury. top mount NOTE: Do not attach the dishwasher. This will stop screws from tipping, open slots on the collar. If your countertop is higher than cabinet opening . Score line Score ...

Installation Instructions
Page 14
... a few times. Helpful Tip: Temporarily tape utilities to the floor in the same notches on the console- Grasp the sides of the dishwasher at the edges of utilities. Tilt dishwasher backward on the left side of opening and drain hose is moved into cabinet opening Insulation blanket With another person holding the... keep it from tipping, open and close to keep them from moving the spring end toward the back of the dishwasher. NOTE: Springs should be in the locations shown to cabinet opening . 3 Check water and drain hose position If the door closes too quickly, decrease the ...
... a few times. Helpful Tip: Temporarily tape utilities to the floor in the same notches on the console- Grasp the sides of the dishwasher at the edges of utilities. Tilt dishwasher backward on the left side of opening and drain hose is moved into cabinet opening Insulation blanket With another person holding the... keep it from tipping, open and close to keep them from moving the spring end toward the back of the dishwasher. NOTE: Springs should be in the locations shown to cabinet opening . 3 Check water and drain hose position If the door closes too quickly, decrease the ...
Installation Instructions
Page 15
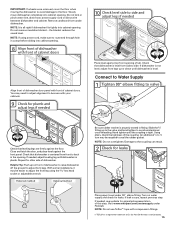
... the floor. If needed 10 Check level side to adjust front legs. Turn on front of this step. Visit www.whirlpool.com/watersupply under dishwasher. NOTE: It is not level, adjust front legs up to the valve and hand tighten to avoid unintentional cross-threading. Helpful Tip: Push ... supply and check for leaks. Damage to side. If leak occurs, repeat previous step. Du Pont De Nemours and Company. 15 If dishwasher is all right if dishwasher fits tightly into cabinet opening . NOTE: Do not overtighten. If needed, see website for plumb and adjust legs if needed , adjust ...
... the floor. If needed 10 Check level side to adjust front legs. Turn on front of this step. Visit www.whirlpool.com/watersupply under dishwasher. NOTE: It is not level, adjust front legs up to the valve and hand tighten to avoid unintentional cross-threading. Helpful Tip: Push ... supply and check for leaks. Damage to side. If leak occurs, repeat previous step. Du Pont De Nemours and Company. 15 If dishwasher is all right if dishwasher fits tightly into cabinet opening . NOTE: Do not overtighten. If needed, see website for plumb and adjust legs if needed , adjust ...


