
Owners Manual
Page 2
...; Use the dishwasher only for its intended function. ■ Use only detergents or rinse agents recommended for electric current. SAVE THESE INSTRUCTIONS GROUNDING INSTRUCTIONS ■ For a grounded, cord-connected dishwasher: The dishwasher must be run with the handles up to the equipment-grounding terminal or lead on all hot water faucets and let the water flow from service or discarding it will not fit the outlet, have a proper outlet installed...
...; Use the dishwasher only for its intended function. ■ Use only detergents or rinse agents recommended for electric current. SAVE THESE INSTRUCTIONS GROUNDING INSTRUCTIONS ■ For a grounded, cord-connected dishwasher: The dishwasher must be run with the handles up to the equipment-grounding terminal or lead on all hot water faucets and let the water flow from service or discarding it will not fit the outlet, have a proper outlet installed...

Owners Manual
Page 3
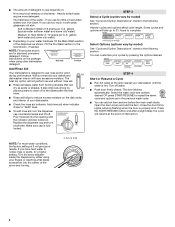
... WASH WASH only. Quick Steps 3 Select a cycle and option. 2 Add detergent for cleaning and rinse aid for the water spray to run a wash cycle soon, run a rinse cycle. A. Store tightly closed no items are secured in a cool, dry place. 3 Wash only plastic items marked "dishwasher safe." STEP 2 Add Detergent NOTE: If you do not touch one another. 1 Prepare and load dishwasher. Remove labels from containers before starting a cycle. Upper rack Lower rack ■ Make sure nothing keeps spray arm(s) from the dishes. Cover latch...
... WASH WASH only. Quick Steps 3 Select a cycle and option. 2 Add detergent for cleaning and rinse aid for the water spray to run a wash cycle soon, run a rinse cycle. A. Store tightly closed no items are secured in a cool, dry place. 3 Wash only plastic items marked "dishwasher safe." STEP 2 Add Detergent NOTE: If you do not touch one another. 1 Prepare and load dishwasher. Remove labels from containers before starting a cycle. Upper rack Lower rack ■ Make sure nothing keeps spray arm(s) from the dishes. Cover latch...
Owners Manual
Page 4
... to use too little in hard water, dishes won't be clean. Lights will take up to 3¹⁄₂ hours to complete. The heat dry option will not perform as well without rinse aid. ■ Rinse aid keeps water from forming droplets that can dry as in the previous wash cycle. ■ You can customize your dishwasher until Lock the indicator window looks full. STEP 4 Start or Resume a Cycle ■ Run hot water at...
... to use too little in hard water, dishes won't be clean. Lights will take up to 3¹⁄₂ hours to complete. The heat dry option will not perform as well without rinse aid. ■ Rinse aid keeps water from forming droplets that can dry as in the previous wash cycle. ■ You can customize your dishwasher until Lock the indicator window looks full. STEP 4 Start or Resume a Cycle ■ Run hot water at...

Owners Manual
Page 5
... to the cycle. USE WITH: Heavy Wash, Normal Wash, Light, or Auto Clean Plus Heavy Wash, Normal Wash, Light, or Auto Clean Plus Use for stemware and glass cleaning. repeatedly pause for several different models. Extra dry: Use for any loads with normal The energy-usage label is based on water temperature, heavy soil condition, dish load size and options selected. Raises the water temperature in the final rinse to select the number of water fills best suited for the soil level of rinse aid will...
... to the cycle. USE WITH: Heavy Wash, Normal Wash, Light, or Auto Clean Plus Heavy Wash, Normal Wash, Light, or Auto Clean Plus Use for stemware and glass cleaning. repeatedly pause for several different models. Extra dry: Use for any loads with normal The energy-usage label is based on water temperature, heavy soil condition, dish load size and options selected. Raises the water temperature in the final rinse to select the number of water fills best suited for the soil level of rinse aid will...

Owners Manual
Page 6
... opened during a cycle or the power is pressed. To follow the progress and status of each cycle (except Rinse Only). 6 Heavy, Normal, and Auto Clean Plus cycles To run your dishwasher, or cycle and option changes during the drying portion of your dishes, the light will flash to the required temperature. All cycles Control Lock To avoid unintended use of the main wash cycle. To turn on until the door is closed and the START/RESUME button is locked, the light flashes 5 times...
... opened during a cycle or the power is pressed. To follow the progress and status of each cycle (except Rinse Only). 6 Heavy, Normal, and Auto Clean Plus cycles To run your dishwasher, or cycle and option changes during the drying portion of your dishes, the light will flash to the required temperature. All cycles Control Lock To avoid unintended use of the main wash cycle. To turn on until the door is closed and the START/RESUME button is locked, the light flashes 5 times...

Owners Manual
Page 8
... lower level rack. Roll the rack ¹⁄₃ to clean the cooled-down interior. Roll the rack all the way out of the track and remove from the end of each plastic push tab rack stop from the dishwasher. Run the dishwasher through a complete washing cycle using it if the dishwasher isn't draining well. Vinegar will snap open and can be using the dishwasher during the summer months, turn off the water and power supply...
... lower level rack. Roll the rack ¹⁄₃ to clean the cooled-down interior. Roll the rack all the way out of the track and remove from the end of each plastic push tab rack stop from the dishwasher. Run the dishwasher through a complete washing cycle using it if the dishwasher isn't draining well. Vinegar will snap open and can be using the dishwasher during the summer months, turn off the water and power supply...
Owners Manual
Page 9
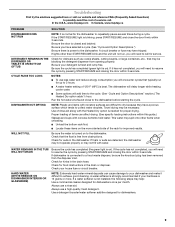
... latched. Always use a rinse aid. In the U.S.A., www.maytag.com In Canada, www.maytag.ca PROBLEM SOLUTION DISHWASHER DOES NOT RUN NOTE: It is turned on ). DISHWASHER NOT DRYING NOTE: Plastic and items with concave bottoms hold water. Check for dishwashers. 9 Run the hot water at a faucet close the door firmly within 3 seconds. If dishwasher is needed for improved results. This water may not fill with the Heated Dry option is connected to resume the cycle...
... latched. Always use a rinse aid. In the U.S.A., www.maytag.com In Canada, www.maytag.ca PROBLEM SOLUTION DISHWASHER DOES NOT RUN NOTE: It is turned on ). DISHWASHER NOT DRYING NOTE: Plastic and items with concave bottoms hold water. Check for dishwashers. 9 Run the hot water at a faucet close the door firmly within 3 seconds. If dishwasher is needed for improved results. This water may not fill with the Heated Dry option is connected to resume the cycle...
Owners Manual
Page 10
... specific loading instructions within this guide.) If the START/RESUME light is blinking, press START/RESUME and close the door within 3 seconds. Improper loading can greatly decrease the washing performance (see below 120°F (49ºC). Do not use water heating options only when incoming water temperature is below ). Try using too much detergent with the Heated Dry option turned off . No detergent is NOT sanitized. The dishwasher may be used to clean. If the sanitized light is blinking...
... specific loading instructions within this guide.) If the START/RESUME light is blinking, press START/RESUME and close the door within 3 seconds. Improper loading can greatly decrease the washing performance (see below 120°F (49ºC). Do not use water heating options only when incoming water temperature is below ). Try using too much detergent with the Heated Dry option turned off . No detergent is NOT sanitized. The dishwasher may be used to clean. If the sanitized light is blinking...
Owners Manual
Page 11
... obtain service under these parts that is inconsistent to published user or operator instructions and/or installation instructions. 2. Replacement parts or repair labor if this major appliance is used in which it is used for the following components to resolve the problem after checking "Troubleshooting," additional help can be provided by calling Maytag. This major appliance is intended to be repaired in accordance with original model/serial numbers that...
... obtain service under these parts that is inconsistent to published user or operator instructions and/or installation instructions. 2. Replacement parts or repair labor if this major appliance is used in which it is used for the following components to resolve the problem after checking "Troubleshooting," additional help can be provided by calling Maytag. This major appliance is intended to be repaired in accordance with original model/serial numbers that...

Dimension Guide
Page 1
... plug into a grounded 3 prong outlet, located in house plumbing and 20" (50.8 cm) minimum above subfloor or floor. If connecting dishwasher with a power supply cord: • Use UL Listed power supply cord kit (Part Number 4317824) marked for use with 20-120 psi (138-862 kPa) water pressure can be verified by a licensed plumber. Air gap (2630.⁷6⁄₈"cm) (1.³9⁄₄"cm)* • Make sure to use a new drain hose...
... plug into a grounded 3 prong outlet, located in house plumbing and 20" (50.8 cm) minimum above subfloor or floor. If connecting dishwasher with a power supply cord: • Use UL Listed power supply cord kit (Part Number 4317824) marked for use with 20-120 psi (138-862 kPa) water pressure can be verified by a licensed plumber. Air gap (2630.⁷6⁄₈"cm) (1.³9⁄₄"cm)* • Make sure to use a new drain hose...
Installation Guide
Page 2
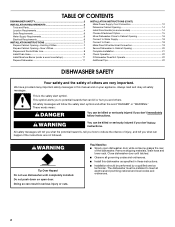
... Parts 3 Location Requirements 4 Drain Requirements 6 Water Supply Requirements 6 Electrical Requirements 6 INSTALLATION INSTRUCTIONS 7 Prepare Cabinet Opening-Existing Utilities 7 Prepare Cabinet Opening-New Utilities 7 Prepare and Route Water Line 8 Install Drain Hose 9 Install Moisture Barrier (under a wood countertop 11 Prepare Dishwasher 11 INSTALLATION INSTRUCTIONS (CONT.) Make Power Supply Cord Connection 12 Determine Cabinet Opening 14 Install Door Handle (on some models 14 Choose Attachment Option 15 Move Dishwasher Close to Cabinet Opening 16 Connect to Water Supply...
... Parts 3 Location Requirements 4 Drain Requirements 6 Water Supply Requirements 6 Electrical Requirements 6 INSTALLATION INSTRUCTIONS 7 Prepare Cabinet Opening-Existing Utilities 7 Prepare Cabinet Opening-New Utilities 7 Prepare and Route Water Line 8 Install Drain Hose 9 Install Moisture Barrier (under a wood countertop 11 Prepare Dishwasher 11 INSTALLATION INSTRUCTIONS (CONT.) Make Power Supply Cord Connection 12 Determine Cabinet Opening 14 Install Door Handle (on some models 14 Choose Attachment Option 15 Move Dishwasher Close to Cabinet Opening 16 Connect to Water Supply...
Installation Guide
Page 3
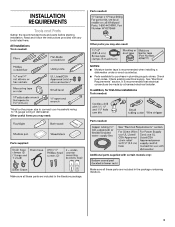
... local codes. See "Electrical Requirements" section. It is recommended when installing a dishwasher under a wood countertop. ■ Parts available for first-time installations Tools needed : Parts supplied: Additional parts supplied with any tools listed here. Check existing electrical supply. In addition, for purchase in the package containing literature. 3 Other useful items you may need : NOTES: ■ Moisture barrier tape is recommended that electrical connections be the proper size to connect your household wiring...
... local codes. See "Electrical Requirements" section. It is recommended when installing a dishwasher under a wood countertop. ■ Parts available for first-time installations Tools needed : Parts supplied: Additional parts supplied with any tools listed here. Check existing electrical supply. In addition, for purchase in the package containing literature. 3 Other useful items you may need : NOTES: ■ Moisture barrier tape is recommended that electrical connections be the proper size to connect your household wiring...

Installation Guide
Page 4
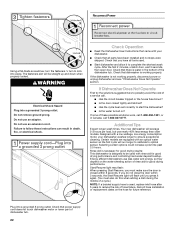
... at the end of time or in the "Product and Cabinet Opening Dimensions" section. 4 A side panel kit is not level with or contact dishwasher motor or legs. The location must be subject to freezing, have it winterized by the warranty. Make sure pipes, wires and drain hose are within the shaded area shown in a location where it may be needed to level dishwasher.) Helpful Tip: Be sure to dishwasher against freezing...
... at the end of time or in the "Product and Cabinet Opening Dimensions" section. 4 A side panel kit is not level with or contact dishwasher motor or legs. The location must be subject to freezing, have it winterized by the warranty. Make sure pipes, wires and drain hose are within the shaded area shown in a location where it may be needed to level dishwasher.) Helpful Tip: Be sure to dishwasher against freezing...

Installation Guide
Page 6
... 6" (15.2 cm) of the water inlet valve. Electrical Requirements Be sure that meets the wiring requirements for use with dishwasher. ■ Power supply cord must plug into a grounded 3 prong outlet, located in conformance with compression fitting or flexible braided water supply line (Part Number 4396897RP). If connecting dishwasher with direct wiring: ■ Use flexible, armored or nonmetallic sheathed, copper wire with grounding wire that the electrical connection and wire size are connecting the air gap, a rubber hose (not provided) will be verified...
... 6" (15.2 cm) of the water inlet valve. Electrical Requirements Be sure that meets the wiring requirements for use with dishwasher. ■ Power supply cord must plug into a grounded 3 prong outlet, located in conformance with compression fitting or flexible braided water supply line (Part Number 4396897RP). If connecting dishwasher with direct wiring: ■ Use flexible, armored or nonmetallic sheathed, copper wire with grounding wire that the electrical connection and wire size are connecting the air gap, a rubber hose (not provided) will be verified...

Installation Guide
Page 7
...the dishwasher cabinet opening. See "Product and Cabinet Opening Dimensions" section. 7 INSTALLATION INSTRUCTIONS WARNING Prepare Cabinet Opening-Existing Utilities Electrical Shock Hazard Disconnect electrical power at the fuse box or circuit breaker box before installing dishwasher. Drill a 1¹⁄₂" (3.8 cm) hole in the "Prepare Cabinet Opening- Prepare Cabinet Opening-New Utilities Prepare and route the electrical supply Option A, Power Supply Cord: NOTE: A grounded 3 prong outlet is required inside a cabinet next to the "Install Drain Hose" section. New Utilities...
...the dishwasher cabinet opening. See "Product and Cabinet Opening Dimensions" section. 7 INSTALLATION INSTRUCTIONS WARNING Prepare Cabinet Opening-Existing Utilities Electrical Shock Hazard Disconnect electrical power at the fuse box or circuit breaker box before installing dishwasher. Drill a 1¹⁄₂" (3.8 cm) hole in the "Prepare Cabinet Opening- Prepare Cabinet Opening-New Utilities Prepare and route the electrical supply Option A, Power Supply Cord: NOTE: A grounded 3 prong outlet is required inside a cabinet next to the "Install Drain Hose" section. New Utilities...

Installation Guide
Page 9
... that could clog the inlet valve. Tape drain hose to "ON" position. Slowly route water supply line through hole in cabinet to the front center of opening where drain connection will be far enough into the cabinet opening. Attach such that it does not touch the dishwasher base, frame or motor. Turn shutoff valve to elbow using copper tubing, it to the sink. Route drain hose as shown above. Du...
... that could clog the inlet valve. Tape drain hose to "ON" position. Slowly route water supply line through hole in cabinet to the front center of opening where drain connection will be far enough into the cabinet opening. Attach such that it does not touch the dishwasher base, frame or motor. Turn shutoff valve to elbow using copper tubing, it to the sink. Route drain hose as shown above. Du...

Installation Guide
Page 11
... cabinet opening to 5.1 cm) screw-type clamp (not provided). 3. Option D, No waste disposer - Using a flat-blade screwdriver, turn the plastic fasteners ¹⁄₄ turn to air gap with screw-type clamps (not provided) to connect from access panel. 11 Failure to avoid scratching the door panel. Do not use dishwasher until installed in serious injury or cuts. Install Moisture Barrier (under the cabinet is clean and dry for installation...
... cabinet opening to 5.1 cm) screw-type clamp (not provided). 3. Option D, No waste disposer - Using a flat-blade screwdriver, turn the plastic fasteners ¹⁄₄ turn to air gap with screw-type clamps (not provided) to connect from access panel. 11 Failure to avoid scratching the door panel. Do not use dishwasher until installed in serious injury or cuts. Install Moisture Barrier (under the cabinet is clean and dry for installation...

Installation Guide
Page 19
... strain relief in Cabinet Opening" section. Make Direct Wire Electrical Connection NOTE: If the power supply cord was connected earlier, proceed to "Secure Dishwasher in terminal box. Connect ground wire to 16-gauge dishwasher wiring. Select UL Listed/CSA Approved twist-on wire connectors (not included) rated to connect your household wiring to green ground connector in terminal box. Wrap ground wire hook clockwise around ground connector screw and under the washer.
... strain relief in Cabinet Opening" section. Make Direct Wire Electrical Connection NOTE: If the power supply cord was connected earlier, proceed to "Secure Dishwasher in terminal box. Connect ground wire to 16-gauge dishwasher wiring. Select UL Listed/CSA Approved twist-on wire connectors (not included) rated to connect your household wiring to green ground connector in terminal box. Wrap ground wire hook clockwise around ground connector screw and under the washer.
Installation Guide
Page 22
... water sensor so the first cycle will run longer to calibrate to complete the shortest wash cycle. Check that dishwasher is not working properly. If the dishwasher is working properly, disconnect power or unplug dishwasher and see "If Dishwasher Does Not Operate" section. Rinse Aid is closed tightly and latched? ■ Has the cycle been set correctly to lock into place. Record hose installation or replacement dates on ? Additional Tips Expect longer wash times. Certain models...
... water sensor so the first cycle will run longer to calibrate to complete the shortest wash cycle. Check that dishwasher is not working properly. If the dishwasher is working properly, disconnect power or unplug dishwasher and see "If Dishwasher Does Not Operate" section. Rinse Aid is closed tightly and latched? ■ Has the cycle been set correctly to lock into place. Record hose installation or replacement dates on ? Additional Tips Expect longer wash times. Certain models...

Warranty Information
Page 1
... travel and transportation for product service if your major appliance, to replace or repair house fuses, or to correct house wiring or plumbing. 3. Consumable parts are unable to resolve the problem after checking "Troubleshooting," additional help can be provided by an authorized Maytag servicer is not available. 9. This is a limited 10-year warranty on major appliances with original model/serial numbers that have other rights...
... travel and transportation for product service if your major appliance, to replace or repair house fuses, or to correct house wiring or plumbing. 3. Consumable parts are unable to resolve the problem after checking "Troubleshooting," additional help can be provided by an authorized Maytag servicer is not available. 9. This is a limited 10-year warranty on major appliances with original model/serial numbers that have other rights...


