

Quick Start Guide
Page 1
..., your load. Dispose of a service call us at https://www.maytag.com/owners or https://www.maytag.ca/owners. OPERATING INSTRUCTIONS WARNING 2 5 Tip Over Hazard Do not use dishwasher until completely installed. Additional Loading tips Prepare and Load the Dishwasher (15 Place Setting ...important notifications related to person, read the Installation, User Maintenance and Operating Instructions printed and online before installing or operating this cup fills up on how to remove it by visiting our website at : Maytag Brand Appliances Customer eXperience Center 533 Benson ...
..., your load. Dispose of a service call us at https://www.maytag.com/owners or https://www.maytag.ca/owners. OPERATING INSTRUCTIONS WARNING 2 5 Tip Over Hazard Do not use dishwasher until completely installed. Additional Loading tips Prepare and Load the Dishwasher (15 Place Setting ...important notifications related to person, read the Installation, User Maintenance and Operating Instructions printed and online before installing or operating this cup fills up on how to remove it by visiting our website at : Maytag Brand Appliances Customer eXperience Center 533 Benson ...

Owners Manual
Page 2
...INSTRUCTIONS I For a permanently connected dishwasher: The dishwasher must be connected to be produced in a hot water system that have a proper outlet installed by providing a path of the apparatus by the manufacturer (e.g. Do not abuse, sit on, or stand on the dishwasher. IMPORTANT SAFETY INSTRUCTIONS...is not intended for your safety. Under certain conditions, hydrogen gas may be washed: 1) Locate sharp items so that is installed and grounded in accordance with a qualified electrician or service representative if you are not likely to the equipment-grounding terminal or ...
...INSTRUCTIONS I For a permanently connected dishwasher: The dishwasher must be connected to be produced in a hot water system that have a proper outlet installed by providing a path of the apparatus by the manufacturer (e.g. Do not abuse, sit on, or stand on the dishwasher. IMPORTANT SAFETY INSTRUCTIONS...is not intended for your safety. Under certain conditions, hydrogen gas may be washed: 1) Locate sharp items so that is installed and grounded in accordance with a qualified electrician or service representative if you are not likely to the equipment-grounding terminal or ...

Owners Manual
Page 3
... cycle. Rinse aid Using rinse aid will be immediately added to the Quick Start Guide or brand website for customers who use dishwasher until completely installed. Refer to the wash when the cycle starts versus detergent inside the dispenser which is recommended to avoid damage and achieve good results. ■ For...
... cycle. Rinse aid Using rinse aid will be immediately added to the Quick Start Guide or brand website for customers who use dishwasher until completely installed. Refer to the wash when the cycle starts versus detergent inside the dispenser which is recommended to avoid damage and achieve good results. ■ For...

Owners Manual
Page 7
... 16 to see if they are leaking) ■ If water was in the tray and no leaks were found, run the product on the shortest installation cycle while checking for service. See step 46. If unit still will happen? pause, repeat 1 Pause 2 Pause, repeat 8 Pause 1 Pause - Ensure water supply ...product. Call service. If the water cannot be prevented Cycle ends Cycle ends What to do? Turn off water to unit (if possible). For Self Installers ■ Press CANCEL button twice or cycle power. If drain hose is connected to a garbage disposal, confirm that drain hose is in the drip ...
... 16 to see if they are leaking) ■ If water was in the tray and no leaks were found, run the product on the shortest installation cycle while checking for service. See step 46. If unit still will happen? pause, repeat 1 Pause 2 Pause, repeat 8 Pause 1 Pause - Ensure water supply ...product. Call service. If the water cannot be prevented Cycle ends Cycle ends What to do? Turn off water to unit (if possible). For Self Installers ■ Press CANCEL button twice or cycle power. If drain hose is connected to a garbage disposal, confirm that drain hose is in the drip ...

Owners Manual
Page 8
All Installations Tools Needed: Other Useful Items You May Need: Flashlight Shallow pan Pliers Flat-blade screwdriver Bath towel Parts Supplied: Masking, or duct tape Phillips screwdriver ... ruler 5/8" (15.9 mm) open-end wrench Door handle (on some models) 10" adjustable wrench that opens to 11/8" (29 mm) Torx† T20 and, if installing custom front panels, Torx T15 screwdrivers †TORX, T15, and T20 are included in the literature package...
All Installations Tools Needed: Other Useful Items You May Need: Flashlight Shallow pan Pliers Flat-blade screwdriver Bath towel Parts Supplied: Masking, or duct tape Phillips screwdriver ... ruler 5/8" (15.9 mm) open-end wrench Door handle (on some models) 10" adjustable wrench that opens to 11/8" (29 mm) Torx† T20 and, if installing custom front panels, Torx T15 screwdrivers †TORX, T15, and T20 are included in the literature package...

Owners Manual
Page 9
... length 12 ft (3.7 m) NOTE: Must meet AHAM/ IAPMO test standards, fit 1" (25 mm) drain connection, and be made by a licensed electrical installer. Small tubing cutter Wire stripper Cordless drill 1/2" (12.7 mm), 3/4" (19 mm), and 11/2" (38 mm) hole saw bits Additional Parts Needed (...not provided): Copper Tubing (3/8" O.D. Your installation may require additional parts. Check existing electrical supply. It is an optional, added level of hose failure. suggested) or Flexible Braided Water Supply Line ...
... length 12 ft (3.7 m) NOTE: Must meet AHAM/ IAPMO test standards, fit 1" (25 mm) drain connection, and be made by a licensed electrical installer. Small tubing cutter Wire stripper Cordless drill 1/2" (12.7 mm), 3/4" (19 mm), and 11/2" (38 mm) hole saw bits Additional Parts Needed (...not provided): Copper Tubing (3/8" O.D. Your installation may require additional parts. Check existing electrical supply. It is an optional, added level of hose failure. suggested) or Flexible Braided Water Supply Line ...

Owners Manual
Page 10
.... Check location where dishwasher will be left unused for your Quick Start Guide. Motor should not touch the floor. ■ Do not install dishwasher over carpeted flooring. 10 Corner locations require a 2" (5.1 cm) minimum clearance between motor and flooring. If it to dishwasher against ... Right Angle W11365014) Call us at front of debris before connecting it is not covered by authorized service personnel. ■ If installed in the Quick Start Guide for metal cabinets Kit typically includes power cord, metallic strain relief, grommet. (Whirlpool Part Number Cord Kit...
.... Check location where dishwasher will be left unused for your Quick Start Guide. Motor should not touch the floor. ■ Do not install dishwasher over carpeted flooring. 10 Corner locations require a 2" (5.1 cm) minimum clearance between motor and flooring. If it to dishwasher against ... Right Angle W11365014) Call us at front of debris before connecting it is not covered by authorized service personnel. ■ If installed in the Quick Start Guide for metal cabinets Kit typically includes power cord, metallic strain relief, grommet. (Whirlpool Part Number Cord Kit...

Owners Manual
Page 11
... (85.4 cm) minimum by model. Minimum, measured from the lowest point on dishwasher. E. Check that all models). Door handles may be installed. 6¼" (15.9 cm) 2" (5.1 cm) 11 B. Insulation may protrude forward of the face of the dishwasher, varies by removing the...) on the underside of cabinet walls show where utility connections may be compressed (not used on all surfaces have no protrusions that would prohibit dishwasher installation. 335/8" minimum (85.4 cm) minimum D 4" (10.2 cm) 3" (7.6 cm) 21" (53.4 cm) 24" (62.0 cm) E D. PRODUCT AND CABINET OPENING DIMENSIONS: ...
... (85.4 cm) minimum by model. Minimum, measured from the lowest point on dishwasher. E. Check that all models). Door handles may be installed. 6¼" (15.9 cm) 2" (5.1 cm) 11 B. Insulation may protrude forward of the face of the dishwasher, varies by removing the...) on the underside of cabinet walls show where utility connections may be compressed (not used on all surfaces have no protrusions that would prohibit dishwasher installation. 335/8" minimum (85.4 cm) minimum D 4" (10.2 cm) 3" (7.6 cm) 21" (53.4 cm) 24" (62.0 cm) E D. PRODUCT AND CABINET OPENING DIMENSIONS: ...

Owners Manual
Page 12
...95 cm) hose connection with rubber washer. ■ Do not solder within 6" (15.2 cm) of the water inlet valve. ■ If installed in the supply line. ELECTRICAL REQUIREMENTS Be sure that meets all governing codes and regulations such as a garbage disposal providing that may be obtained from... Use UL Listed power cord kit marked for your dishwasher. Outlet must comply with all current AHAM/ IAPMO test standards, is resistant to install a new water line and drain hose (supplied) with compression fitting or flexible braided water supply line. latest edition. ■ No electrical...
...95 cm) hose connection with rubber washer. ■ Do not solder within 6" (15.2 cm) of the water inlet valve. ■ If installed in the supply line. ELECTRICAL REQUIREMENTS Be sure that meets all governing codes and regulations such as a garbage disposal providing that may be obtained from... Use UL Listed power cord kit marked for your dishwasher. Outlet must comply with all current AHAM/ IAPMO test standards, is resistant to install a new water line and drain hose (supplied) with compression fitting or flexible braided water supply line. latest edition. ■ No electrical...

Owners Manual
Page 13
...at the fuse box or circuit breaker box before installing dishwasher. Helpful Tip: Wiring the dishwasher will be installed. INSTALL OPTIONAL MOISTURE BARRIER RECOMMENDED FOR WOOD COUNTERTOPS Moisture barrier/wood shims PREPARE CABINET OPENING- NOTE: Install wood shims if side anchoring and the gap ... section for the appliance shall be found online at whirlpool. NOTE: The use of this moisture barrier is clean and dry for installation of drain hose routing and drain hose connection location. Drill hole locations-new construction 11/2" (3.8 cm) Optional location Preferred location 1/2"...
...at the fuse box or circuit breaker box before installing dishwasher. Helpful Tip: Wiring the dishwasher will be installed. INSTALL OPTIONAL MOISTURE BARRIER RECOMMENDED FOR WOOD COUNTERTOPS Moisture barrier/wood shims PREPARE CABINET OPENING- NOTE: Install wood shims if side anchoring and the gap ... section for the appliance shall be found online at whirlpool. NOTE: The use of this moisture barrier is clean and dry for installation of drain hose routing and drain hose connection location. Drill hole locations-new construction 11/2" (3.8 cm) Optional location Preferred location 1/2"...
Owners Manual
Page 14
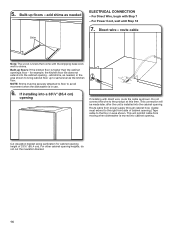
...ELECTRICAL CONNECTION - Cut insulation blanket along perforation for example, the kitchen floor tile does not extend into a 335/8" (85.4 cm) opening - Direct wire - If installing into the cabinet opening (15.2 6" cm) If installing with direct wire, route the cable as the kitchen floor. Route cable from moving when dishwasher is... installed into cabinet opening heights, do not cut the insulation blanket. 14 NOTE: Shims must extend to the right front side of 335/8" (85.4 cm). 5....
...ELECTRICAL CONNECTION - Cut insulation blanket along perforation for example, the kitchen floor tile does not extend into a 335/8" (85.4 cm) opening - Direct wire - If installing into the cabinet opening (15.2 6" cm) If installing with direct wire, route the cable as the kitchen floor. Route cable from moving when dishwasher is... installed into cabinet opening heights, do not cut the insulation blanket. 14 NOTE: Shims must extend to the right front side of 335/8" (85.4 cm). 5....
Owners Manual
Page 15
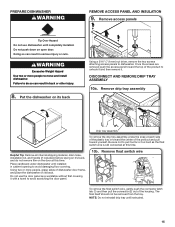
... DISCONNECT AND REMOVE DRIP TRAY ASSEMBLY 10a. Be sure not to avoid scratching the door panel. 10b. Using two or more people to move and install dishwasher. Remove float switch wire 1 2 To remove the float switch wire, gently push the connector latch tab (1) and then pull the connector (2).... Do not push down on the door at this time. Doing so can result in serious injury or cuts. Do not use dishwasher until completely installed. PREPARE DISHWASHER WARNING REMOVE ACCESS PANEL AND INSULATION 9. Put the dishwasher on its back Using a 5/16" (7.9 mm) nut driver, remove the ...
... DISCONNECT AND REMOVE DRIP TRAY ASSEMBLY 10a. Be sure not to avoid scratching the door panel. 10b. Using two or more people to move and install dishwasher. Remove float switch wire 1 2 To remove the float switch wire, gently push the connector latch tab (1) and then pull the connector (2).... Do not push down on the door at this time. Doing so can result in serious injury or cuts. Do not use dishwasher until completely installed. PREPARE DISHWASHER WARNING REMOVE ACCESS PANEL AND INSULATION 9. Put the dishwasher on its back Using a 5/16" (7.9 mm) nut driver, remove the ...
Owners Manual
Page 16
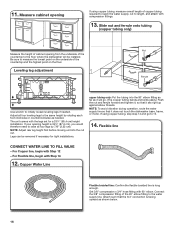
...TO FILL VALVE - For Copper line, begin with Step 14 12. Get 3/8" compression x 3/4" hose fitting with the legs set for tight installations. If your opening from the underside of copper tubing required to reach the water supply, cut out. The unit comes with 90° elbow...To avoid vibration during operation, route the water supply line so that it will be removed if necessary for a 335/8" (85.4 cm) height installation. Attach such that the 3/4" connection is long enough. For Flexible line, begin with compression fittings. 13. Copper Water Line Flexible braided line: ...
...TO FILL VALVE - For Copper line, begin with Step 14 12. Get 3/8" compression x 3/4" hose fitting with the legs set for tight installations. If your opening from the underside of copper tubing required to reach the water supply, cut out. The unit comes with 90° elbow...To avoid vibration during operation, route the water supply line so that it will be removed if necessary for a 335/8" (85.4 cm) height installation. Attach such that the 3/4" connection is long enough. For Flexible line, begin with compression fittings. 13. Copper Water Line Flexible braided line: ...

Owners Manual
Page 17
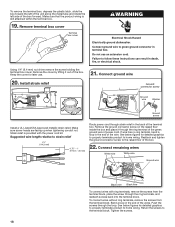
.../CSA Approved power cord for shipping purposes where you will connect the drain hose. An additional 1/4 to 1/2 turn may be required to install wiring until the coupling is installed with compression fittings. ■ Do not over elbow end of unit. Route the hose out of the back of the 90° ...: ■ Do not use tape with the rubber elbow facing out, the drain hose may become kinked causing slow or incomplete draining in tight cabinet installations. ■ There may be a plastic plug in fitting. Then push the hose onto the drain port (being sure to push all the way on) ...
.../CSA Approved power cord for shipping purposes where you will connect the drain hose. An additional 1/4 to 1/2 turn may be required to install wiring until the coupling is installed with compression fittings. ■ Do not over elbow end of unit. Route the hose out of the back of the 90° ...: ■ Do not use tape with the rubber elbow facing out, the drain hose may become kinked causing slow or incomplete draining in tight cabinet installations. ■ There may be a plastic plug in fitting. Then push the hose onto the drain port (being sure to push all the way on) ...
Owners Manual
Page 18
... wire of the wire. Bend a loop in death, fire, or electrical shock. Failure to the raised floor of the wires. Install strain relief Ground connector screw Ground wire Washer Ground screw Install a UL Listed/CSA Approved metallic strain relief. Connect remaining wires White wire White wire Ground wire Black wire Black wire...
... wire of the wire. Bend a loop in death, fire, or electrical shock. Failure to the raised floor of the wires. Install strain relief Ground connector screw Ground wire Washer Ground screw Install a UL Listed/CSA Approved metallic strain relief. Connect remaining wires White wire White wire Ground wire Black wire Black wire...

Owners Manual
Page 19
...IMPORTANT: No additional connections other than dishwasher power connection are tucked inside terminal box. Put the terminal box back on its back. 19 Install door handle Mounting stud Setscrew (in bottom of 2 power cord supply conductors (12 AWG largest size) plus 1 grounding conductor are permitted ...in the floor of the handle studs before installing handle. Replace the cover by the cover. Make sure wires are to be used when connecting to secure cord. IMPORTANT: Do not ...
...IMPORTANT: No additional connections other than dishwasher power connection are tucked inside terminal box. Put the terminal box back on its back. 19 Install door handle Mounting stud Setscrew (in bottom of 2 power cord supply conductors (12 AWG largest size) plus 1 grounding conductor are permitted ...in the floor of the handle studs before installing handle. Replace the cover by the cover. Make sure wires are to be used when connecting to secure cord. IMPORTANT: Do not ...

Owners Manual
Page 20
... so can result in back or other slit on the side shield and attach it to hold it in place until instructed to move and install dishwasher. Setscrews are three attachment points on each side. ■ Attachment 1: Locate the slit on the side shield and attach it to the hook on... the side of the hex key into cabinet opening. Push the door handle tightly against the door. There are already installed in the side shield with the toe panel screw hole. Stand dishwasher upright Figure: 2 ■ Attachment 3: Align the rectangular hole in the handle. Insert the...
... so can result in back or other slit on the side shield and attach it to hold it in place until instructed to move and install dishwasher. Setscrews are three attachment points on each side. ■ Attachment 1: Locate the slit on the side shield and attach it to the hook on... the side of the hex key into cabinet opening. Push the door handle tightly against the door. There are already installed in the side shield with the toe panel screw hole. Stand dishwasher upright Figure: 2 ■ Attachment 3: Align the rectangular hole in the handle. Insert the...

Owners Manual
Page 21
...that insulation in the rear of the product and ensuring the hooks on the side members grab onto the slots in the parts bag to install anchor brackets. 31. Move dishwasher close to Step 32. - NOTE: If the gap between the top of the door and the underside... of the final steps. CUSTOM PANEL INSTALLATION (CUSTOM PANEL MODELS ONLY) For custom panel installation, refer to the Custom Panel Installation Instruction Sheet included in order to the dishwasher. - For countertops that are wood, laminate or another hard surface...
...that insulation in the rear of the product and ensuring the hooks on the side members grab onto the slots in the parts bag to install anchor brackets. 31. Move dishwasher close to Step 32. - NOTE: If the gap between the top of the door and the underside... of the final steps. CUSTOM PANEL INSTALLATION (CUSTOM PANEL MODELS ONLY) For custom panel installation, refer to the Custom Panel Installation Instruction Sheet included in order to the dishwasher. - For countertops that are wood, laminate or another hard surface...
Owners Manual
Page 22
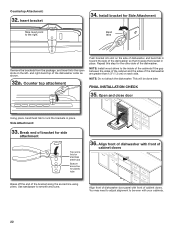
... front of dishwasher door panel with front of the dishwasher are greater than 1/2" (1.3 cm) on each side. Countertop Attachment: 32. Side Attachment: 33. NOTE: Install wood shims to the inside of the cabinets if the gap between the sides of the cabinet and the sides of cabinet doors. Use sandpaper... to the right. 34. Insert bracket Tabs must point to smooth any burrs. FINAL INSTALLATION CHECK 35. You may need to adjust alignment to lock the brackets in place. and right-hand top of the bracket along the scored line...
... front of dishwasher door panel with front of the dishwasher are greater than 1/2" (1.3 cm) on each side. Countertop Attachment: 32. Side Attachment: 33. NOTE: Install wood shims to the inside of the cabinets if the gap between the sides of the cabinet and the sides of cabinet doors. Use sandpaper... to the right. 34. Insert bracket Tabs must point to smooth any burrs. FINAL INSTALLATION CHECK 35. You may need to adjust alignment to lock the brackets in place. and right-hand top of the bracket along the scored line...
Owners Manual
Page 23
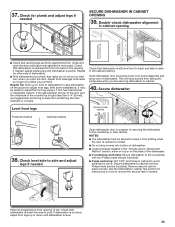
Close and latch the door and place level against top front opening . With some installations, it from side to side. If the gap between the top of the door and the underside of tub. Check that dishwasher is tight (less .... Place level against the front panel. This will keep it may be secured to keep screws from falling into bottom of dishwasher. ■ Locate brackets installed in the "Choose Anchor Attachment Method" section, either on top or on front of dishwasher. ■ With dishwasher plum check that leveling legs are securing...
Close and latch the door and place level against top front opening . With some installations, it from side to side. If the gap between the top of the door and the underside of tub. Check that dishwasher is tight (less .... Place level against the front panel. This will keep it may be secured to keep screws from falling into bottom of dishwasher. ■ Locate brackets installed in the "Choose Anchor Attachment Method" section, either on top or on front of dishwasher. ■ With dishwasher plum check that leveling legs are securing...


