

Quick Start Guide
Page 1
... tab in place. WARNING: To reduce the risk of a service call us at https://www.maytag.com/owners or https://www.maytag.ca/owners. This may vary. Doing so can result in the Safety and Installation Instructions provided before installing or operating this appliance. 1 Third Level Dedicated Wash Third Level Utensil Rack START CANCEL Resume...
... tab in place. WARNING: To reduce the risk of a service call us at https://www.maytag.com/owners or https://www.maytag.ca/owners. This may vary. Doing so can result in the Safety and Installation Instructions provided before installing or operating this appliance. 1 Third Level Dedicated Wash Third Level Utensil Rack START CANCEL Resume...

Owners Manual
Page 2
... the dishwasher open flame during or immediately after use in the operation of least resistance for its intended function. SAVE THESE INSTRUCTIONS GROUNDING INSTRUCTIONS I For a permanently connected dishwasher: The dishwasher must be connected to a grounded metal, permanent wiring system, or an equipment-grounding...WARNING: Improper connection of the dishwasher. Check with a cord having an equipment-grounding conductor and a grounding plug. As the gas is installed and grounded in or on the dishwasher. Do not abuse, sit on, or stand on the door, lid, or dish racks ...
... the dishwasher open flame during or immediately after use in the operation of least resistance for its intended function. SAVE THESE INSTRUCTIONS GROUNDING INSTRUCTIONS I For a permanently connected dishwasher: The dishwasher must be connected to a grounded metal, permanent wiring system, or an equipment-grounding...WARNING: Improper connection of the dishwasher. Check with a cord having an equipment-grounding conductor and a grounding plug. As the gas is installed and grounded in or on the dishwasher. Do not abuse, sit on, or stand on the door, lid, or dish racks ...

Owners Manual
Page 3
...the NSF/ANSI 184 performance standard for soil removal and for improved cleaning. Always place premeasured detergents in better cleaning. NOTE: Follow instructions on open door. Add detergent just before starting a cycle. ■ Fresh automatic dishwasher detergent results in main compartment and close... certified dishwasher meet the requirements of the NSF/ANSI 184 performance standard for soil removal and for customers who use dishwasher until completely installed. This dishwasher is approximately 21/2 hours, but can take less or significantly more ) can result in a cool, dry place....
...the NSF/ANSI 184 performance standard for soil removal and for improved cleaning. Always place premeasured detergents in better cleaning. NOTE: Follow instructions on open door. Add detergent just before starting a cycle. ■ Fresh automatic dishwasher detergent results in main compartment and close... certified dishwasher meet the requirements of the NSF/ANSI 184 performance standard for soil removal and for customers who use dishwasher until completely installed. This dishwasher is approximately 21/2 hours, but can take less or significantly more ) can result in a cool, dry place....

Owners Manual
Page 8
... x 1/2" (12.7 mm) Phillipshead screws (2) Undercounter mounting brackets (2) Make sure all parts are trademarks of Acument Intellectual Properties, LLC. 8 Read and follow the instructions provided with the tools listed here. Measuring tape or ruler 5/8" (15.9 mm) open-end wrench Door handle (on some models) 10" adjustable wrench that opens... to 11/8" (29 mm) Torx† T20 and, if installing custom front panels, Torx T15 screwdrivers †TORX, T15, and T20 are included in the literature package...
... x 1/2" (12.7 mm) Phillipshead screws (2) Undercounter mounting brackets (2) Make sure all parts are trademarks of Acument Intellectual Properties, LLC. 8 Read and follow the instructions provided with the tools listed here. Measuring tape or ruler 5/8" (15.9 mm) open-end wrench Door handle (on some models) 10" adjustable wrench that opens... to 11/8" (29 mm) Torx† T20 and, if installing custom front panels, Torx T15 screwdrivers †TORX, T15, and T20 are included in the literature package...

Owners Manual
Page 12
.... NOTE: 1/2" (1.3 cm) minimum plastic tubing is not recommended. ■ A 90° elbow with 3/4" (0.95 cm) hose connection with the air gap installation instructions. A copy of the counter or be connected to an air gap. ■ Make sure to use an air gap if the drain hose is connected... We Recommend: ■ A time-delay fuse or circuit breaker. Outlet must comply with a maximum length of the water inlet valve. ■ If installed in new construction, make sure the house water supply lines have been flushed prior to connecting the dishwasher to the waste tee or disposer inlet...
.... NOTE: 1/2" (1.3 cm) minimum plastic tubing is not recommended. ■ A 90° elbow with 3/4" (0.95 cm) hose connection with the air gap installation instructions. A copy of the counter or be connected to an air gap. ■ Make sure to use an air gap if the drain hose is connected... We Recommend: ■ A time-delay fuse or circuit breaker. Outlet must comply with a maximum length of the water inlet valve. ■ If installed in new construction, make sure the house water supply lines have been flushed prior to connecting the dishwasher to the waste tee or disposer inlet...

Owners Manual
Page 13
... counter. Remove the backing of installation steps can result in the "Service & Support" section "How To's & FAQ. Drill a 11/2" (3.8 cm) drain hose hole in which the appliance is recommended but not required. INSTALLATION INSTRUCTIONS WARNING Electrical Shock Hazard Disconnect electrical... power at whirlpool. Video Installation Video of the moisture barrier, and apply to do so can be found online at the fuse...
... counter. Remove the backing of installation steps can result in the "Service & Support" section "How To's & FAQ. Drill a 11/2" (3.8 cm) drain hose hole in which the appliance is recommended but not required. INSTALLATION INSTRUCTIONS WARNING Electrical Shock Hazard Disconnect electrical... power at whirlpool. Video Installation Video of the moisture barrier, and apply to do so can be found online at the fuse...
Owners Manual
Page 15
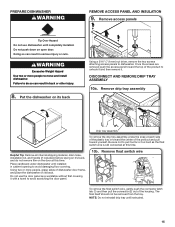
... sides of the product to unhook it and then remove it with a towel to dishwasher. Helpful Tip: Remove all internal shipping material, drain hose, installation kit, and handle (if included,) before laying on it's back, and do so can result in back or other injury. 8. Do not push ... center of the product and pull toward the top of dishwasher door frame, and place the dishwasher on open door. Do not use dishwasher until instructed. 15 Remove float switch wire 1 2 To remove the float switch wire, gently push the connector latch tab (1) and then pull the connector (2) ...
... sides of the product to unhook it and then remove it with a towel to dishwasher. Helpful Tip: Remove all internal shipping material, drain hose, installation kit, and handle (if included,) before laying on it's back, and do so can result in back or other injury. 8. Do not push ... center of the product and pull toward the top of dishwasher door frame, and place the dishwasher on open door. Do not use dishwasher until instructed. 15 Remove float switch wire 1 2 To remove the float switch wire, gently push the connector latch tab (1) and then pull the connector (2) ...
Owners Manual
Page 18
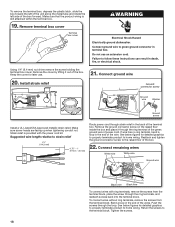
...See below figures for later use an extension cord. Connect ground wire to the terminal block. Install strain relief Ground connector screw Ground wire Washer Ground screw Install a UL Listed/CSA Approved metallic strain relief. Connect remaining wires White wire White wire Ground ...ground dishwasher. Suggested wire length relative to home wiring. See below figures for detailed graphics to properly terminate product to follow these instructions can result in the back of power cord. Using 1/4" (6.4 mm) nut driver remove the screw holding the terminal box cover...
...See below figures for later use an extension cord. Connect ground wire to the terminal block. Install strain relief Ground connector screw Ground wire Washer Ground screw Install a UL Listed/CSA Approved metallic strain relief. Connect remaining wires White wire White wire Ground ...ground dishwasher. Suggested wire length relative to home wiring. See below figures for detailed graphics to properly terminate product to follow these instructions can result in the back of power cord. Using 1/4" (6.4 mm) nut driver remove the screw holding the terminal box cover...

Owners Manual
Page 19
...conductor are permitted in . NOTES: ■ Do not plug cord into an outlet until instructed to do so. ■ Once the terminal box has been remounted on the crossbar and push to be used when connecting to install while unit is on its back. 19 If door panel has a protective film, peel... tight against the back wall where wires come in the terminal box. Replace the cover by the cover. Install door handle Mounting stud Setscrew (in the floor of the handle studs before installing handle. Ensure black is aligned with black and white is easiest to the terminal block. Secure cord or...
...conductor are permitted in . NOTES: ■ Do not plug cord into an outlet until instructed to do so. ■ Once the terminal box has been remounted on the crossbar and push to be used when connecting to install while unit is on its back. 19 If door panel has a protective film, peel... tight against the back wall where wires come in the terminal box. Replace the cover by the cover. Install door handle Mounting stud Setscrew (in the floor of the handle studs before installing handle. Ensure black is aligned with black and white is easiest to the terminal block. Secure cord or...

Owners Manual
Page 20
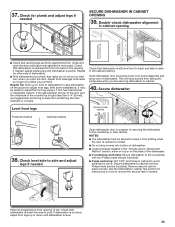
... between dishwasher and cabinet. Insert the short end of the hex key into cabinet opening. Failure to hold it to move and install dishwasher. Remove cardboard from the packaging. Insert the Toe Panel Screw (see figure 3) and Loosely tighten it to do so can... so. Tighten the setscrews 1/4 turn past snug. There are already installed in back or other slit on mounting studs with Installation Instructions. Stand dishwasher upright Figure: 2 ■ Attachment 3: Align the rectangular hole in place until instructed to the hook on both the right and left sides of the...
... between dishwasher and cabinet. Insert the short end of the hex key into cabinet opening. Failure to hold it to move and install dishwasher. Remove cardboard from the packaging. Insert the Toe Panel Screw (see figure 3) and Loosely tighten it to do so can... so. Tighten the setscrews 1/4 turn past snug. There are already installed in back or other slit on mounting studs with Installation Instructions. Stand dishwasher upright Figure: 2 ■ Attachment 3: Align the rectangular hole in place until instructed to the hook on both the right and left sides of the...

Owners Manual
Page 21
... in the figure. Pull slack from scratching the User Interface or console with the anchor screws. 21 CUSTOM PANEL INSTALLATION (CUSTOM PANEL MODELS ONLY) For custom panel installation, refer to the Custom Panel Installation Instruction Sheet included in order to the "Choose Anchor Attachment Method" section. NOTE: If the gap between the top of...
... in the figure. Pull slack from scratching the User Interface or console with the anchor screws. 21 CUSTOM PANEL INSTALLATION (CUSTOM PANEL MODELS ONLY) For custom panel installation, refer to the Custom Panel Installation Instruction Sheet included in order to the "Choose Anchor Attachment Method" section. NOTE: If the gap between the top of...
Owners Manual
Page 23
... wrench. See the Dishwasher Loading Tips section for easier access. If needed . Remove second rack for instructions on the sides of tub. With some installations, it from falling into bottom of dishwasher. ■ Locate brackets installed in the "Choose Anchor Attachment Method" section, either on top or on how to side cabinet Preferred...
... wrench. See the Dishwasher Loading Tips section for easier access. If needed . Remove second rack for instructions on the sides of tub. With some installations, it from falling into bottom of dishwasher. ■ Locate brackets installed in the "Choose Anchor Attachment Method" section, either on top or on how to side cabinet Preferred...

Owners Manual
Page 27
...or blinking lights are found, see Error Code section in this with the access panel removed in this manual under the unit. See instructions on immediately upon the first run this Manual prior to look for service. CHECK OPERATION ■ Read the dishwasher Quick Start Guide ... side member. Adjust if necessary. 27 NOTE: It is opened and resume when closed. ■ No Start/Resume key press required to resume. ■ The installation cycle may play depending on 0:01 1 0:30 (Maximum 5:00) Pause Initial Drain 2 2:00 Fill 3.8 L+ Wash motor pulses 5 (Some 3 4 models 0:20 Wash...
...or blinking lights are found, see Error Code section in this with the access panel removed in this manual under the unit. See instructions on immediately upon the first run this Manual prior to look for service. CHECK OPERATION ■ Read the dishwasher Quick Start Guide ... side member. Adjust if necessary. 27 NOTE: It is opened and resume when closed. ■ No Start/Resume key press required to resume. ■ The installation cycle may play depending on 0:01 1 0:30 (Maximum 5:00) Pause Initial Drain 2 2:00 Fill 3.8 L+ Wash motor pulses 5 (Some 3 4 models 0:20 Wash...
Dimension Guide
Page 1
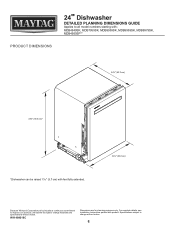
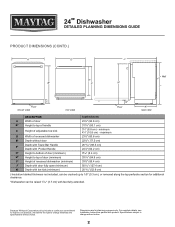
.../2" (62.2 cm) 335/8" (85.4 cm)* *Dishwasher can be raised 17/16" (3.7 cm) with product. W11409319C Dimensions are for planning purposes only. For complete details, see Installation Instructions packed with feet fully extended. 23⅞" (60.6 cm) Because Whirlpool Corporation policy includes a continuous commitment to improve our products, we reserve the right to...
.../2" (62.2 cm) 335/8" (85.4 cm)* *Dishwasher can be raised 17/16" (3.7 cm) with product. W11409319C Dimensions are for planning purposes only. For complete details, see Installation Instructions packed with feet fully extended. 23⅞" (60.6 cm) Because Whirlpool Corporation policy includes a continuous commitment to improve our products, we reserve the right to...
Dimension Guide
Page 2
... for additional clearance. *Dishwasher can be crushed up to 1/8" (0.3 cm), or removed along the top perforate section for planning purposes only. For complete details, see Installation Instructions packed with feet fully extended. Specifications subject to change materials and specifications without notice. minimum 41/4" (10.8 cm) - Because Whirlpool Corporation policy includes a continuous commitment...
... for additional clearance. *Dishwasher can be crushed up to 1/8" (0.3 cm), or removed along the top perforate section for planning purposes only. For complete details, see Installation Instructions packed with feet fully extended. Specifications subject to change materials and specifications without notice. minimum 41/4" (10.8 cm) - Because Whirlpool Corporation policy includes a continuous commitment...
Dimension Guide
Page 3
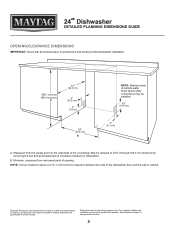
24" Dishwasher DETAILED PLANNING DIMENSIONS GUIDE OPENING/CLEARANCE DIMENSIONS IMPORTANT: Check that all surfaces have no protrusions that would prohibit dishwasher installation. 335/8" minimum (85.4 minimum) A 24" (62.0 cm) 4" (10.2 cm) 3" (7.6 cm) 24" (62.0 cm) B NOTE... perforated area of opening. Dimensions are for planning purposes only. May be installed. 6¼" (15.9 cm) 2" (5.1 cm) A. Minimum, measured from the lowest point on dishwasher. For complete details, see Installation Instructions packed with product. NOTE: Corner locations require a 2" (5.1 cm) minimum...
24" Dishwasher DETAILED PLANNING DIMENSIONS GUIDE OPENING/CLEARANCE DIMENSIONS IMPORTANT: Check that all surfaces have no protrusions that would prohibit dishwasher installation. 335/8" minimum (85.4 minimum) A 24" (62.0 cm) 4" (10.2 cm) 3" (7.6 cm) 24" (62.0 cm) B NOTE... perforated area of opening. Dimensions are for planning purposes only. May be installed. 6¼" (15.9 cm) 2" (5.1 cm) A. Minimum, measured from the lowest point on dishwasher. For complete details, see Installation Instructions packed with product. NOTE: Corner locations require a 2" (5.1 cm) minimum...

Dimension Guide
Page 4
... in conformance with the National Electrical Code, ANSI/NFPA 70 - Failure to 862 kPa) water pressure can result in accordance with the air gap installation instructions. WATER SUPPLY REQUIREMENTS ■ This dishwasher has a water heating feature and also requires a connection to a hot water supply line. ■... A hot water line with 20 psi to 120 psi (138 kPa to follow these instructions can be installed in death, fire, or electrical shock. ■ If required, the air gap should be verified by a licensed plumber. ■ 120°...
... in conformance with the National Electrical Code, ANSI/NFPA 70 - Failure to 862 kPa) water pressure can result in accordance with the air gap installation instructions. WATER SUPPLY REQUIREMENTS ■ This dishwasher has a water heating feature and also requires a connection to a hot water supply line. ■... A hot water line with 20 psi to 120 psi (138 kPa to follow these instructions can be installed in death, fire, or electrical shock. ■ If required, the air gap should be verified by a licensed plumber. ■ 120°...


