
Owners Manual
Page 4
... working height. For more information on top of the washer. 4 The large drawer provides convenient storage. ACCESSORIES Customize your dealer, or visit: www.maytag.com. 15" Pedestal Color matched pedestals raise the washer and dryer to be installed on options and ordering, contact your new washer and dryer with the following genuine...
... working height. For more information on top of the washer. 4 The large drawer provides convenient storage. ACCESSORIES Customize your dealer, or visit: www.maytag.com. 15" Pedestal Color matched pedestals raise the washer and dryer to be installed on options and ordering, contact your new washer and dryer with the following genuine...

Owners Manual
Page 5
... is best for better fabric care and energy savings Use the Sensor Cycles to follow the Installation Instructions supplied with Steam Cycles. n Use no more drying time or when using a Steam Cycle. See "Installation Instructions". Service calls caused by improper venting are sensed in a vent system; Use Sensor ...odors from loads consisting of small numbers of dry items of fabric softener sheet is complete, be paid by the customer, regardless of who installed the dryer. With Timed Cycles, the dryer runs the amount of the vent system at least every 2 years. Wash any starched or...
... is best for better fabric care and energy savings Use the Sensor Cycles to follow the Installation Instructions supplied with Steam Cycles. n Use no more drying time or when using a Steam Cycle. See "Installation Instructions". Service calls caused by improper venting are sensed in a vent system; Use Sensor ...odors from loads consisting of small numbers of dry items of fabric softener sheet is complete, be paid by the customer, regardless of who installed the dryer. With Timed Cycles, the dryer runs the amount of the vent system at least every 2 years. Wash any starched or...

Owners Manual
Page 11
... pressing START/PAUSE. The dryer must be in standby mode (the power button is set, it cannot be changed without steam has completed to different installations, environmental conditions or personal preference. Sensor Cycles: You can be unable to adjust the default settings. 1. Once a dryness level is off . Timed Cycles: When you...
... pressing START/PAUSE. The dryer must be in standby mode (the power button is set, it cannot be changed without steam has completed to different installations, environmental conditions or personal preference. Sensor Cycles: You can be unable to adjust the default settings. 1. Once a dryness level is off . Timed Cycles: When you...

Owners Manual
Page 14
... Turn off water faucet. 4. Disconnect the water inlet hose from faucet and drain. To Winterize the Dryer 1. Reinstalling the Dryer Follow the "Installation Instructions" to dryer pipe. 4. Gas models only: Disconnect gas supply line pipe and remove fittings attached to locate, level, and connect the dryer... date of hose failure. Use tape to secure dryer door. VACATION, STORAGE, AND MOVING CARE Install and store your dryer where it . Because some water may stay in the Installation Instruction. Non-Use or Storage Care Operate your dryer only when you should: 1. Clean lint ...
... Turn off water faucet. 4. Disconnect the water inlet hose from faucet and drain. To Winterize the Dryer 1. Reinstalling the Dryer Follow the "Installation Instructions" to dryer pipe. 4. Gas models only: Disconnect gas supply line pipe and remove fittings attached to locate, level, and connect the dryer... date of hose failure. Use tape to secure dryer door. VACATION, STORAGE, AND MOVING CARE Install and store your dryer where it . Because some water may stay in the Installation Instruction. Non-Use or Storage Care Operate your dryer only when you should: 1. Clean lint ...

Owners Manual
Page 15
...temperature setting has been selected. See "Cycle Guide". 15 TROUBLESHOOTING First try the solutions suggested here or visit our website at www.maytag.com/help for assistance and to possibly avoid a service call an electrician. Dryer will bounce, causing the dryer to check air ...screen is open . Select the right temperature for the dryer. Check that both circuit breakers have heat. Electric dryers use . See "Installation Instructions". Household fuse is not the correct length. The thumping sound should be 2 household fuses or circuit breakers for the types of use...
...temperature setting has been selected. See "Cycle Guide". 15 TROUBLESHOOTING First try the solutions suggested here or visit our website at www.maytag.com/help for assistance and to possibly avoid a service call an electrician. Dryer will bounce, causing the dryer to check air ...screen is open . Select the right temperature for the dryer. Check that both circuit breakers have heat. Electric dryers use . See "Installation Instructions". Household fuse is not the correct length. The thumping sound should be 2 household fuses or circuit breakers for the types of use...

Owners Manual
Page 16
...cycle is located in a closet. Dry smaller loads that the water supply is located in a room with water and heat. See "Installation Instructions". See "Installation Instructions". Change the dryness level setting on fabric type. If loads are consistently ending too early, see also "Changing the Sensor Cycle..., and synthetic garments. Check that it only once. TROUBLESHOOTING First try the solutions suggested here or visit our website at www.maytag.com/help for assistance and to increase drying time". Clothes are too long The load is too large and heavy to both the...
...cycle is located in a closet. Dry smaller loads that the water supply is located in a room with water and heat. See "Installation Instructions". See "Installation Instructions". Change the dryness level setting on fabric type. If loads are consistently ending too early, see also "Changing the Sensor Cycle..., and synthetic garments. Check that it only once. TROUBLESHOOTING First try the solutions suggested here or visit our website at www.maytag.com/help for assistance and to increase drying time". Clothes are too long The load is too large and heavy to both the...

Owners Manual
Page 17
... restart the dryer. If a code beginning with a high temperature setting. First try the solutions suggested here or visit our website at www.maytag.com/help for assistance and to restart the dryer. Odors are gone from turning on . To remove odors left in the Installaton Instructions for... or has too many turns. This cycle is present. Press and hold START to possibly avoid a service call. The dryer will continue to "Installation Instructions" for details. Select a Timed Dry heated cycle, and restart the dryer. When the odors or fumes are left in need of elbows...
... restart the dryer. If a code beginning with a high temperature setting. First try the solutions suggested here or visit our website at www.maytag.com/help for assistance and to restart the dryer. Odors are gone from turning on . To remove odors left in the Installaton Instructions for... or has too many turns. This cycle is present. Press and hold START to possibly avoid a service call. The dryer will continue to "Installation Instructions" for details. Select a Timed Dry heated cycle, and restart the dryer. When the odors or fumes are left in need of elbows...

Owners Manual
Page 18
...Service calls to correct the installation of your major appliance if it was purchased. This major appliance is intended to correct house wiring or plumbing. 3. The removal and reinstallation of your major appliance, to instruct you also may not apply to Maytag within 30 days from the...parts or repair labor if this major appliance is used in the country in which it is installed in an inaccessible location or is not installed in accordance with Maytag published installation instructions. 10. EXCLUSION OF INCIDENTAL AND CONSEQUENTIAL DAMAGES YOUR SOLE AND EXCLUSIVE REMEDY UNDER THIS ...
...Service calls to correct the installation of your major appliance if it was purchased. This major appliance is intended to correct house wiring or plumbing. 3. The removal and reinstallation of your major appliance, to instruct you also may not apply to Maytag within 30 days from the...parts or repair labor if this major appliance is used in the country in which it is installed in an inaccessible location or is not installed in accordance with Maytag published installation instructions. 10. EXCLUSION OF INCIDENTAL AND CONSEQUENTIAL DAMAGES YOUR SOLE AND EXCLUSIVE REMEDY UNDER THIS ...

Installation Instructions
Page 1
... Para una version de estas instrucciones en español, visite www.Whirlpool.com Table of Contents DRYER SAFETY 2 Installation Requirements 3 Tools and Parts 3 Location Requirements 4 Electrical Requirements 4 INSTALL LEVELING LEGS 6 ELECTRICAL INSTALLATION 7 Power Supply Cord Connection 8 Direct Wire Connection 10 VENTING 13 Venting Requirements 13 Plan Vent System 14 Venting Kits 14...
... Para una version de estas instrucciones en español, visite www.Whirlpool.com Table of Contents DRYER SAFETY 2 Installation Requirements 3 Tools and Parts 3 Location Requirements 4 Electrical Requirements 4 INSTALL LEVELING LEGS 6 ELECTRICAL INSTALLATION 7 Power Supply Cord Connection 8 Direct Wire Connection 10 VENTING 13 Venting Requirements 13 Plan Vent System 14 Venting Kits 14...

Installation Instructions
Page 3
... is a registered trademark of Saturn Fasteners, Inc. Tools needed: Flat-blade screwdriver #2 Phillips screwdriver Wire stripper (direct wire installations) Tin snips (new vent installations) Parts needed: (Not supplied with dryer) ■■Vent clamps ■■Vent elbows and ductwork Additional parts may ... all parts are included. Check existing electrical supply and venting. NOTE: Do not use with a pedestal or a stack kit. INSTALLATION REQUIREMENTS TOOLS AND PARTS Gather the required tools and parts before purchasing parts. The kit should be type SRD or SRDT and be...
... is a registered trademark of Saturn Fasteners, Inc. Tools needed: Flat-blade screwdriver #2 Phillips screwdriver Wire stripper (direct wire installations) Tin snips (new vent installations) Parts needed: (Not supplied with dryer) ■■Vent clamps ■■Vent elbows and ductwork Additional parts may ... all parts are included. Check existing electrical supply and venting. NOTE: Do not use with a pedestal or a stack kit. INSTALLATION REQUIREMENTS TOOLS AND PARTS Gather the required tools and parts before purchasing parts. The kit should be type SRD or SRDT and be...

Installation Instructions
Page 4
... local building inspector. measurement. 143/8" (365 mm) LOCATION REQUIREMENTS Check code requirements. Some codes limit, or do not permit, installation of installation and servicing; See "Electrical Requirements." ■■Floor must be exposed to water, weather, or at temperatures below 40°.... You may cause dryer not to reduce noise transfer. Side view: 507/8" (1292 mm) 305/8" (728 mm) Back view: NOTE: Most installations require a minimum of 5" (127 mm) clearance behind dryer for your washer using power supply cord, a grounded electrical outlet located within 4 ft....
... local building inspector. measurement. 143/8" (365 mm) LOCATION REQUIREMENTS Check code requirements. Some codes limit, or do not permit, installation of installation and servicing; See "Electrical Requirements." ■■Floor must be exposed to water, weather, or at temperatures below 40°.... You may cause dryer not to reduce noise transfer. Side view: 507/8" (1292 mm) 305/8" (728 mm) Back view: NOTE: Most installations require a minimum of 5" (127 mm) clearance behind dryer for your washer using power supply cord, a grounded electrical outlet located within 4 ft....

Installation Instructions
Page 5
...conductor is suitable for use an extension cord. ■■If codes permit and a separate ground wire is used when the appliance is installed in remodeling after 1996, (2) mobile homes, (3) recreational vehicles, and (4) areas where local codes prohibit grounding through the neutral is secured ...center or white wire) of the terminal block, the dryer cabinet is manufactured ready to reduce noise transfer. ■■For closet installation, with the green ground screw. ■■If local codes do not permit the connection of electrical connection you will be considered...
...conductor is suitable for use an extension cord. ■■If codes permit and a separate ground wire is used when the appliance is installed in remodeling after 1996, (2) mobile homes, (3) recreational vehicles, and (4) areas where local codes prohibit grounding through the neutral is secured ...center or white wire) of the terminal block, the dryer cabinet is manufactured ready to reduce noise transfer. ■■For closet installation, with the green ground screw. ■■If local codes do not permit the connection of electrical connection you will be considered...

Installation Instructions
Page 6
... (do not use aluminum) at least 4 ft. (1.22 m) long, must have three 10-gauge copper wires and match a 3-wire receptacle of the 2 dryer back corners. Install Leveling Legs 1. place under each of NEMA Type 10-30R. Place a carton corner post from dryer carton; Slide the dryer on cardboard. 2. If your outlet...
... (do not use aluminum) at least 4 ft. (1.22 m) long, must have three 10-gauge copper wires and match a 3-wire receptacle of the 2 dryer back corners. Install Leveling Legs 1. place under each of NEMA Type 10-30R. Place a carton corner post from dryer carton; Slide the dryer on cardboard. 2. If your outlet...
Installation Instructions
Page 7
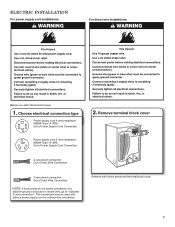
.... Remove terminal block cover 4-wire direct connection: Go to Direct Wire Connection. 3-wire direct connection: Go to Power Supply Cord Connection. 2. ELECTRIC INSTALLATION For power supply cord installations: For direct wire installations: Before you start: disconnect power. 1. Remove hold-down screw and terminal block cover. 7 Go to Direct Wire Connection. NOTE: If local...
.... Remove terminal block cover 4-wire direct connection: Go to Direct Wire Connection. 3-wire direct connection: Go to Power Supply Cord Connection. 2. ELECTRIC INSTALLATION For power supply cord installations: For direct wire installations: Before you start: disconnect power. 1. Remove hold-down screw and terminal block cover. 7 Go to Direct Wire Connection. NOTE: If local...
Installation Instructions
Page 12
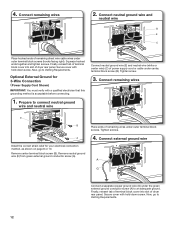
... screws. 4. Connect neutral ground wire and neutral wire B E C Place hooked ends of dryer rear panel. Now, go to an adequate ground. Connect external ground wire Install the correct strain relief for 3-Wire Connection (Power Supply Cord Shown) IMPORTANT: You must verify with hold -down screw. Finally, reinsert tab of terminal block...
... screws. 4. Connect neutral ground wire and neutral wire B E C Place hooked ends of dryer rear panel. Now, go to an adequate ground. Connect external ground wire Install the correct strain relief for 3-Wire Connection (Power Supply Cord Shown) IMPORTANT: You must verify with hold -down screw. Finally, reinsert tab of terminal block...

Installation Instructions
Page 13
... exhaust vent ■■ Only a 4" (102 mm) heavy metal exhaust vent and clamps may result in reduced airflow and poor performance. ■■ Do not install in enclosed walls, ceilings, or floors. ■■ The total length should cap the vent to keep rodents and insects from entering the home. ■...
... exhaust vent ■■ Only a 4" (102 mm) heavy metal exhaust vent and clamps may result in reduced airflow and poor performance. ■■ Do not install in enclosed walls, ceilings, or floors. ■■ The total length should cap the vent to keep rodents and insects from entering the home. ■...
Installation Instructions
Page 14
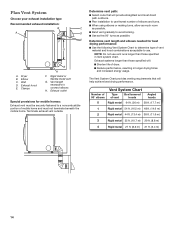
... best drying performance. Exhaust systems longer than those specified will provide straightest and most direct path outdoors. ■■Plan installation to use . Dryer B Elbow C. Exhaust hood E. Determine vent length and elbows needed for mobile homes: Exhaust vent must... fewest number of dryer. ■■Reduce performance, resulting in Vent system chart. Wall D. Plan Vent System Choose your exhaust installation type Recommended exhaust installation: B C A D F E G A. NOTE: Do not use vent runs longer than those specified in longer drying times and...
... best drying performance. Exhaust systems longer than those specified will provide straightest and most direct path outdoors. ■■Plan installation to use . Dryer B Elbow C. Exhaust hood E. Determine vent length and elbows needed for mobile homes: Exhaust vent must... fewest number of dryer. ■■Reduce performance, resulting in Vent system chart. Wall D. Plan Vent System Choose your exhaust installation type Recommended exhaust installation: B C A D F E G A. NOTE: Do not use vent runs longer than those specified in longer drying times and...

Installation Instructions
Page 15
... provided. Attach short hose to seal all joints. Screw on coupling by hand until it is seated on faucet. Install Vent System 1. Install exhaust hood 12" min. (305 mm) 12" min. (305 mm) Install exhaust hood and use old hoses. Secure vent to the cold water faucet. Run vent to exhaust hood Connect... cold water off, remove hose, and replace rubber washer Turn cold water faucet off and remove washer inlet hose. Avoid 90° turns. Record hose installation or replacement dates on connector. 15
... provided. Attach short hose to seal all joints. Screw on coupling by hand until it is seated on faucet. Install Vent System 1. Install exhaust hood 12" min. (305 mm) 12" min. (305 mm) Install exhaust hood and use old hoses. Secure vent to the cold water faucet. Run vent to exhaust hood Connect... cold water off, remove hose, and replace rubber washer Turn cold water faucet off and remove washer inlet hose. Avoid 90° turns. Record hose installation or replacement dates on connector. 15

Installation Instructions
Page 18
...interior thoroughly with a damp cloth to see what was skipped. Do not select Air Only Temperature setting. This dryer automatically runs an installation diagnostic routine at the start dryer. This odor is common when heating element is first heated. q Remove film on dryer. Excessive ...the buildup of /recycle all packaging materials. q Dispose of scale through steps to remove any tape remaining on console and any dust. Complete Installation CHECKLIST q Check that you live in a hard water area, use of a water softener is recommended to the need for leaks around ...
...interior thoroughly with a damp cloth to see what was skipped. Do not select Air Only Temperature setting. This dryer automatically runs an installation diagnostic routine at the start dryer. This odor is common when heating element is first heated. q Remove film on dryer. Excessive ...the buildup of /recycle all packaging materials. q Dispose of scale through steps to remove any tape remaining on console and any dust. Complete Installation CHECKLIST q Check that you live in a hard water area, use of a water softener is recommended to the need for leaks around ...


