Owners Manual
Page 14
...following information about your major appliance to better help can nd this book and your authorized Maytag dealer to determine if another warranty applies. Proof of the Use & Care Guide. Replacement parts or repair labor if this major appliance is used in the country in which it ...is installed in an inaccessible location or is not installed in accordance with Maytag published installation instructions. 10. Expenses for travel and transportation for factory speci ed parts and repair labor to correct defects in a manner that is inconsistent to published user or ...
...following information about your major appliance to better help can nd this book and your authorized Maytag dealer to determine if another warranty applies. Proof of the Use & Care Guide. Replacement parts or repair labor if this major appliance is used in the country in which it ...is installed in an inaccessible location or is not installed in accordance with Maytag published installation instructions. 10. Expenses for travel and transportation for factory speci ed parts and repair labor to correct defects in a manner that is inconsistent to published user or ...

Installation Instructions
Page 3
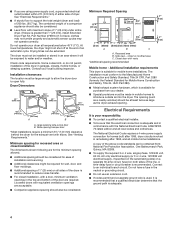
...here. The kit should be type SRD or SRDT and be at least 4 ft. (1.22 m) long. Putty knife 3 Parts needed : Flat-blade screwdriver #2 Phillips screwdriver Wire stripper (direct wire installations) Tin snips (new vent installations) 1/4" nut driver (recommended...the dealer from whom you purchased your dryer. Location Requirements Adjustable wrench that all parts are included. INSTALLATION REQUIREMENTS Tools and Parts Parts supplied: Gather the required tools and parts before purchasing parts. Check existing electrical supply and venting, and read "Electrical Requirements" and "...
...here. The kit should be type SRD or SRDT and be at least 4 ft. (1.22 m) long. Putty knife 3 Parts needed : Flat-blade screwdriver #2 Phillips screwdriver Wire stripper (direct wire installations) Tin snips (new vent installations) 1/4" nut driver (recommended...the dealer from whom you purchased your dryer. Location Requirements Adjustable wrench that all parts are included. INSTALLATION REQUIREMENTS Tools and Parts Parts supplied: Gather the required tools and parts before purchasing parts. Check existing electrical supply and venting, and read "Electrical Requirements" and "...
Installation Instructions
Page 4
... side of 200 lbs. (90.7 kg). A time-delay fuse or circuit breaker is greater than 1" [25 mm], install Extended Dryer Feet Kit, Part Number 279810.) If not level, clothes may not tumble properly and automatic sensor cycles may not operate correctly. See "Electrical Requirements." ■■ A ...to allow the dryer door to the Manufactured Home Construction and Safety Standard, Title 24 CFR, Part 3280 (formerly the Federal Standard for Mobile Home Construction and Safety, Title 24, HUD Part 280). ■■ Metal exhaust system hardware, which is suitable for homes built after 1996,...
... side of 200 lbs. (90.7 kg). A time-delay fuse or circuit breaker is greater than 1" [25 mm], install Extended Dryer Feet Kit, Part Number 279810.) If not level, clothes may not tumble properly and automatic sensor cycles may not operate correctly. See "Electrical Requirements." ■■ A ...to allow the dryer door to the Manufactured Home Construction and Safety Standard, Title 24 CFR, Part 3280 (formerly the Federal Standard for Mobile Home Construction and Safety, Title 24, HUD Part 280). ■■ Metal exhaust system hardware, which is suitable for homes built after 1996,...

Installation Instructions
Page 14
....whirlpoolparts.ca. In Canada, call 1-800-901-2042, or visit us at www.applianceaccessories.com. Other installations are shown. Refer to connect elbows H. Exhaust outlet I H F. Part Number Descriptions 8171587RP 0-5" Metal vent periscope 4396037RP 0"-18" Metal vent periscope 4396011RP 18"-29" Metal vent periscope 4396014 29"-50" Metal vent periscope 4392892 In...
....whirlpoolparts.ca. In Canada, call 1-800-901-2042, or visit us at www.applianceaccessories.com. Other installations are shown. Refer to connect elbows H. Exhaust outlet I H F. Part Number Descriptions 8171587RP 0-5" Metal vent periscope 4396037RP 0"-18" Metal vent periscope 4396011RP 18"-29" Metal vent periscope 4396014 29"-50" Metal vent periscope 4392892 In...

Installation Instructions
Page 16
.... Not Level LEVEL Not Level 16 If dryer is not level, prop up or down, and check again for levelness. Once dryer is an extra part, go away. If there is level, make sure all four legs are set in place, remove corner posts and cardboard from front to side. q Check... Installation Checklist q Check that both fuses are intact and tight, or that all packaging materials. Check that both circuit breakers have all of /recycle all parts are now installed. The odor will not start the dryer. After dryer is in a running for 5 minutes, open the dryer door and feel for 20...
.... Not Level LEVEL Not Level 16 If dryer is not level, prop up or down, and check again for levelness. Once dryer is an extra part, go away. If there is level, make sure all four legs are set in place, remove corner posts and cardboard from front to side. q Check... Installation Checklist q Check that both fuses are intact and tight, or that all packaging materials. Check that both circuit breakers have all of /recycle all parts are now installed. The odor will not start the dryer. After dryer is in a running for 5 minutes, open the dryer door and feel for 20...
Installation Instructions
Page 17
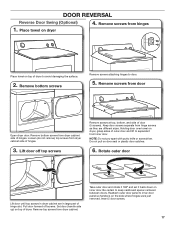
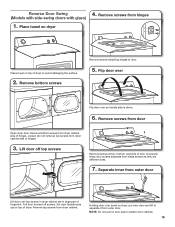
... door screws separate from hinge screws as they are in dryer cabinet are different sizes. Rotate outer door Lift door until top screws in large part of hinges. Remove top screws from dryer cabinet side of hinge slot. Remove bottom screws from dryer cabinet. Take outer door and rotate it 180...
... door screws separate from hinge screws as they are in dryer cabinet are different sizes. Rotate outer door Lift door until top screws in large part of hinges. Remove top screws from dryer cabinet side of hinge slot. Remove bottom screws from dryer cabinet. Take outer door and rotate it 180...
Installation Instructions
Page 19
.... 5. Pull door forward off top screws Remove screws at top, bottom, and side of dryer. Remove screws from hinge screws as they are in large part of hinges. Set door (handle side up) on door seal or plastic door catches. 19 Place towel on top of hinges. 3. Reverse Door Swing (Models...
.... 5. Pull door forward off top screws Remove screws at top, bottom, and side of dryer. Remove screws from hinge screws as they are in large part of hinges. Set door (handle side up) on door seal or plastic door catches. 19 Place towel on top of hinges. 3. Reverse Door Swing (Models...

Warranty Information
Page 1
...OR CONSEQUENTIAL DAMAGES. In the U.S.A., call . 6/08 Keep this major appliance was purchased. You must be provided by an authorized Maytag servicer is intended to instruct you . You will pay for inwarranty service. Dealer name Address Phone number Model number Serial number ...major appliance is operated and maintained according to instructions attached to or furnished with the product, Maytag brand of purchase or installation date for factory specified parts and repair labor to correct defects in accordance with original model/serial numbers that have other damage...
...OR CONSEQUENTIAL DAMAGES. In the U.S.A., call . 6/08 Keep this major appliance was purchased. You must be provided by an authorized Maytag servicer is intended to instruct you . You will pay for inwarranty service. Dealer name Address Phone number Model number Serial number ...major appliance is operated and maintained according to instructions attached to or furnished with the product, Maytag brand of purchase or installation date for factory specified parts and repair labor to correct defects in accordance with original model/serial numbers that have other damage...


