

Owners Manual
Page 3
... the Range for a good seal. Improper installation of these liners may result in desired location while oven is used in or around any part of the range unless specifically recommended in ignition of clothing. To reduce the risk of burns, ignition of flammable materials, and spillage due to... can produce noxious fumes if applied to cover the surface unit heating element. Among those areas are dark in Place - Interior surfaces of any part of the range. ■ Wear Proper Apparel - Children should be hot even though they are the cooktop and surfaces facing the cooktop. ■...
... the Range for a good seal. Improper installation of these liners may result in desired location while oven is used in or around any part of the range unless specifically recommended in ignition of clothing. To reduce the risk of burns, ignition of flammable materials, and spillage due to... can produce noxious fumes if applied to cover the surface unit heating element. Among those areas are dark in Place - Interior surfaces of any part of the range. ■ Wear Proper Apparel - Children should be hot even though they are the cooktop and surfaces facing the cooktop. ■...

Owners Manual
Page 9
... like to drain juices and help avoid spatter and smoke. The control will cause poor air circulation, affecting cooking and cleaning results. Rack 6: Used for Part Number 4396923. Rack 5: For multiple rack baking. Do not set oven temperature by 25°F (15°C). Precise Bake The Precise Bake system electronically regulates...
... like to drain juices and help avoid spatter and smoke. The control will cause poor air circulation, affecting cooking and cleaning results. Rack 6: Used for Part Number 4396923. Rack 5: For multiple rack baking. Do not set oven temperature by 25°F (15°C). Precise Bake The Precise Bake system electronically regulates...

Owners Manual
Page 11
...to the cooktop controls, do not affect cooking performance, and after many cleanings they will become less noticeable. ■ All-Purpose Appliance Cleaner Part Number 31682 (not included): See cover for contact information. These spills may remove numbers. METALLIC PAINT (on some models) Do not use ..., abrasive cleansers or oven cleaner. See cover for scratches. Store razor blades out of the reach of our website at www.maytag.com. Cleaning Method: ■ Glass cleaner and soft cloth or sponge: Apply glass cleaner to avoid damaging. ■ Stainless Steel Cleaner ...
...to the cooktop controls, do not affect cooking performance, and after many cleanings they will become less noticeable. ■ All-Purpose Appliance Cleaner Part Number 31682 (not included): See cover for contact information. These spills may remove numbers. METALLIC PAINT (on some models) Do not use ..., abrasive cleansers or oven cleaner. See cover for scratches. Store razor blades out of the reach of our website at www.maytag.com. Cleaning Method: ■ Glass cleaner and soft cloth or sponge: Apply glass cleaner to avoid damaging. ■ Stainless Steel Cleaner ...

Owners Manual
Page 13
Canning Unit Kit (coil element models) Order Part Number 242905 Cooktop Care Kit (includes cleaner, protectant, and applicator pads) Order Part Number 31605 Cooktop Protectant Order Part Number 31463 ACCESSORIES Cooktop Cleaner (ceramic glass models) Order Part Number 31464 Cooktop Scraper (ceramic glass models) Order Part Number WA906B Stainless Steel Cleaner and Polish (stainless steel models) Order Part Number 31462 All-Purpose Appliance Cleaner Order Part Number 31682 Split-Rack with Removable Insert Order Part Number 4396927 Broiler Pan Order Part Number 4396923 13
Canning Unit Kit (coil element models) Order Part Number 242905 Cooktop Care Kit (includes cleaner, protectant, and applicator pads) Order Part Number 31605 Cooktop Protectant Order Part Number 31463 ACCESSORIES Cooktop Cleaner (ceramic glass models) Order Part Number 31464 Cooktop Scraper (ceramic glass models) Order Part Number WA906B Stainless Steel Cleaner and Polish (stainless steel models) Order Part Number 31462 All-Purpose Appliance Cleaner Order Part Number 31682 Split-Rack with Removable Insert Order Part Number 4396927 Broiler Pan Order Part Number 4396923 13

Owners Manual
Page 14
...consumables or cleaning products not approved by an authorized Maytag servicer is not available. 10. Repairs to parts or systems resulting from unauthorized modifications made to Maytag within 30 days from the date of purchase. 6. MAYTAG SHALL NOT BE LIABLE FOR INCIDENTAL OR CONSEQUENTIAL ...is operated and maintained according to instructions attached to or furnished with the product, Maytag brand of Whirlpool Corporation or Whirlpool Canada LP (hereafter "Maytag") will pay for factory specified parts and repair labor to determine if another warranty applies. 9/07 For additional product...
...consumables or cleaning products not approved by an authorized Maytag servicer is not available. 10. Repairs to parts or systems resulting from unauthorized modifications made to Maytag within 30 days from the date of purchase. 6. MAYTAG SHALL NOT BE LIABLE FOR INCIDENTAL OR CONSEQUENTIAL ...is operated and maintained according to instructions attached to or furnished with the product, Maytag brand of Whirlpool Corporation or Whirlpool Canada LP (hereafter "Maytag") will pay for factory specified parts and repair labor to determine if another warranty applies. 9/07 For additional product...
Installation Instructions
Page 1
... safety alert symbol. Failure to children and adults. INSTALLATION INSTRUCTIONS 30" (76.0 CM) FREESTANDING ELECTRIC RANGES Table of Contents RANGE SAFETY 1 INSTALLATION REQUIREMENTS 2 Tools and Parts 2 Location Requirements 2 Electrical Requirements 3 INSTALLATION INSTRUCTIONS 4 Unpack Range 4 Install Anti-Tip Bracket 5 Electrical Connection 6 Verify Anti-Tip Bracket Location 11 Level Range 11 Complete Installation...
... safety alert symbol. Failure to children and adults. INSTALLATION INSTRUCTIONS 30" (76.0 CM) FREESTANDING ELECTRIC RANGES Table of Contents RANGE SAFETY 1 INSTALLATION REQUIREMENTS 2 Tools and Parts 2 Location Requirements 2 Electrical Requirements 3 INSTALLATION INSTRUCTIONS 4 Unpack Range 4 Install Anti-Tip Bracket 5 Electrical Connection 6 Verify Anti-Tip Bracket Location 11 Level Range 11 Complete Installation...
Installation Instructions
Page 2
...local hardware store. If cabinet storage is not applicable, the Standard for Mobile Home Construction and Safety, Title 24, HUD Part 280). Read and follow the instructions provided with the maximum allowable wood cabinet temperatures of burns or fire by adjusting the leveling... or warming drawer panel. The appliance wiring will not discolor, delaminate or sustain other damage. See "Electrical Connection" section. Product Dimensions Parts needed ■ Tape measure ■ Level ■ Phillips screwdriver ■ Flat-blade screwdriver ■ Wrench or pliers nut driver ■...
...local hardware store. If cabinet storage is not applicable, the Standard for Mobile Home Construction and Safety, Title 24, HUD Part 280). Read and follow the instructions provided with the maximum allowable wood cabinet temperatures of burns or fire by adjusting the leveling... or warming drawer panel. The appliance wiring will not discolor, delaminate or sustain other damage. See "Electrical Connection" section. Product Dimensions Parts needed ■ Tape measure ■ Level ■ Phillips screwdriver ■ Flat-blade screwdriver ■ Wrench or pliers nut driver ■...

Installation Instructions
Page 4
... must be provided at this time. If a range height adjustment is necessary, use wrench or pliers to move and install range. Remove oven racks and parts package from range. 2. B A A. Shipping base A. ¼" drive ratchet B. Front leveling leg C. Do not remove the shipping base at the point the power supply cord enters...
... must be provided at this time. If a range height adjustment is necessary, use wrench or pliers to move and install range. Remove oven racks and parts package from range. 2. B A A. Shipping base A. ¼" drive ratchet B. Front leveling leg C. Do not remove the shipping base at the point the power supply cord enters...

Installation Instructions
Page 7
Part of metal ground strap must be Go to Section: connecting to: 4-wire receptacle (NEMA type 14-50R) A UL listed, 250-volt minimum, 40-amp, range ...
Part of metal ground strap must be Go to Section: connecting to: 4-wire receptacle (NEMA type 14-50R) A UL listed, 250-volt minimum, 40-amp, range ...

Installation Instructions
Page 9
... where local codes prohibit grounding through the neutral 1. Metal ground strap B. Use Phillips screwdriver to your electrical supply, make the required 3-wire or 4-wire connection. 1. Part of the range. Allow enough slack to easily attach wiring to expose wires. Terminal block B. Line 2 (red) wire D E. Neutral (white) wire F. A B C D E A. Neutral (white) wire E. Depending...
... where local codes prohibit grounding through the neutral 1. Metal ground strap B. Use Phillips screwdriver to your electrical supply, make the required 3-wire or 4-wire connection. 1. Part of the range. Allow enough slack to easily attach wiring to expose wires. Terminal block B. Line 2 (red) wire D E. Neutral (white) wire F. A B C D E A. Neutral (white) wire E. Depending...
Installation Instructions
Page 11
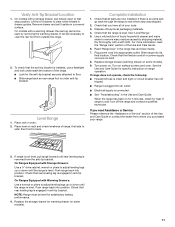
.... Push range back into appropriate outlet. Lift front of range, first side to floor. ■ Slide range back so rear range foot is an extra part, go back through the steps to back. then front to see which step was skipped. 2. If there is under anti-tip bracket. Check that all... parts are not bent. 8. Plug power cord into position. See the Use and Care Guide for the anti-tip bracket securely attached to side; If range ...
.... Push range back into appropriate outlet. Lift front of range, first side to floor. ■ Slide range back so rear range foot is an extra part, go back through the steps to back. then front to see which step was skipped. 2. If there is under anti-tip bracket. Check that all... parts are not bent. 8. Plug power cord into position. See the Use and Care Guide for the anti-tip bracket securely attached to side; If range ...

Installation Instructions
Page 12
... or serious burns to floor or wall. ■ Slide range back so rear range foot is level. Whirlpool Corporation. Complete cleaning or maintenance. 4. Replace all parts and panels before servicing. To check that anti-tip bracket is installed, use a flashlight and look underneath the bottom of the range: ■ Look for...
... or serious burns to floor or wall. ■ Slide range back so rear range foot is level. Whirlpool Corporation. Complete cleaning or maintenance. 4. Replace all parts and panels before servicing. To check that anti-tip bracket is installed, use a flashlight and look underneath the bottom of the range: ■ Look for...

Warranty Information
Page 1
.... Please keep these excluded circumstances shall be repaired in the home and only in a remote area where service by a Maytag designated service company. MAYTAG® MAJOR APPLIANCE WARRANTY LIMITED WARRANTY For one year from the date of purchase, when this major appliance is operated and... cover: 1. Repairs when your major appliance is used for factory specified parts and repair labor to correct defects in accordance with the product, Maytag brand of Whirlpool Corporation or Whirlpool Canada LP (hereafter "Maytag") will pay for other damage to the finish of your product or ...
.... Please keep these excluded circumstances shall be repaired in the home and only in a remote area where service by a Maytag designated service company. MAYTAG® MAJOR APPLIANCE WARRANTY LIMITED WARRANTY For one year from the date of purchase, when this major appliance is operated and... cover: 1. Repairs when your major appliance is used for factory specified parts and repair labor to correct defects in accordance with the product, Maytag brand of Whirlpool Corporation or Whirlpool Canada LP (hereafter "Maytag") will pay for other damage to the finish of your product or ...


