
Owners Manual
Page 4
... hot enough to cover the surface unit heating element. Absence of these liners may be positioned so that may result in or on any part of the range unless specifically recommended in desired location while oven is properly installed and grounded by a qualified technician. ■ Never Use ... Some cleaners can produce noxious fumes if applied to burst and result in cabinets above a range or on the backguard of any part of the oven. ■ Clean Only Parts Listed in a risk of electric shock, or fire. ■ Glazed Cooking Utensils - No commercial oven cleaner or oven liner ...
... hot enough to cover the surface unit heating element. Absence of these liners may be positioned so that may result in or on any part of the range unless specifically recommended in desired location while oven is properly installed and grounded by a qualified technician. ■ Never Use ... Some cleaners can produce noxious fumes if applied to burst and result in cabinets above a range or on the backguard of any part of the oven. ■ Clean Only Parts Listed in a risk of electric shock, or fire. ■ Glazed Cooking Utensils - No commercial oven cleaner or oven liner ...

Owners Manual
Page 7
... glass could cause uneven heating and poor cooking results. 7 Turn control knob to cool down , they can adhere to Off when finished. Some parts of the surface cooking area may require more than ½" (1.3 cm) outside the area. As the cooktop cools, air can cause pitting and...cooktop as a cutting board. ■ Use cookware about the same size as possible. Cooktop cleaner and a cooktop scraper are hot. Push in any part of light colored ceramic glass to appear to anywhere between LOW and HIGH. 3. Then, while wearing oven mitts, remove the spills using a scraper ...
... glass could cause uneven heating and poor cooking results. 7 Turn control knob to cool down , they can adhere to Off when finished. Some parts of the surface cooking area may require more than ½" (1.3 cm) outside the area. As the cooktop cools, air can cause pitting and...cooktop as a cutting board. ■ Use cookware about the same size as possible. Cooktop cleaner and a cooktop scraper are hot. Push in any part of light colored ceramic glass to appear to anywhere between LOW and HIGH. 3. Then, while wearing oven mitts, remove the spills using a scraper ...

Owners Manual
Page 14
... food in the center of fish, poultry or meat may be turned. ■ After broiling, remove the pan from the oven early. ■ The back part of juices.
... food in the center of fish, poultry or meat may be turned. ■ After broiling, remove the pan from the oven early. ■ The back part of juices.

Owners Manual
Page 16
... cooking results, do not cover food. ■ When roasting poultry and meat, use , the lower oven will scroll in 2 or 3 different places, including the thickest part. 5. "Preheating" will scroll in the lower oven text area until the desired temperature is reached. When the preheat cycle is complete, "CONVECT BROIL" will scroll...
... cooking results, do not cover food. ■ When roasting poultry and meat, use , the lower oven will scroll in 2 or 3 different places, including the thickest part. 5. "Preheating" will scroll in the lower oven text area until the desired temperature is reached. When the preheat cycle is complete, "CONVECT BROIL" will scroll...

Owners Manual
Page 21
... 31682 (not included): See "Assistance or Service" section to order. ■ Stainless Steel Cleaner and Polish Part Number 31462 (not included): See "Assistance or Service" section to order. See "Control Lockout" section. STAINLESS STEEL (on some models). Food spills should be ... will help them slide. ■ Steel-wool pad 21 If this happens, a light coating of grain to avoid damaging. ■ All-Purpose Appliance Cleaner Part Number 31682 (not included): See "Assistance or Service" section to order. CONTROL PANEL To avoid damage to the cooktop controls, do not use steel wool...
... 31682 (not included): See "Assistance or Service" section to order. ■ Stainless Steel Cleaner and Polish Part Number 31462 (not included): See "Assistance or Service" section to order. See "Control Lockout" section. STAINLESS STEEL (on some models). Food spills should be ... will help them slide. ■ Steel-wool pad 21 If this happens, a light coating of grain to avoid damaging. ■ All-Purpose Appliance Cleaner Part Number 31682 (not included): See "Assistance or Service" section to order. CONTROL PANEL To avoid damage to the cooktop controls, do not use steel wool...

Owners Manual
Page 24
... and maintenance procedures. ■ Accessory and repair parts sales. Maytag® appliances designated service technicians are made with the same precision used to Maytag® appliances with any questions or concerns at www.maytag.com Our consultants provide assistance with : ■...and maintenance procedures. ■ Accessory and repair parts sales. ■ Referrals to local dealers, repair parts distributors and service companies. To locate the Maytag® appliances designated service company in your appliance. Call Maytag Customer eXperience Center toll free: 1-800-688-9900...
... and maintenance procedures. ■ Accessory and repair parts sales. Maytag® appliances designated service technicians are made with the same precision used to Maytag® appliances with any questions or concerns at www.maytag.com Our consultants provide assistance with : ■...and maintenance procedures. ■ Accessory and repair parts sales. ■ Referrals to local dealers, repair parts distributors and service companies. To locate the Maytag® appliances designated service company in your appliance. Call Maytag Customer eXperience Center toll free: 1-800-688-9900...

Owners Manual
Page 25
.... 6. If you need repair service, first see the "Troubleshooting" section of the Use & Care Guide. MAYTAG® ELECTRIC RANGE LIMITED WARRANTY FIRST YEAR LIMITED WARRANTY (PARTS AND LABOR) For one year from the date of purchase, when this major appliance is installed, operated and... maintained according to instructions attached to or furnished with the product, Maytag brand of Whirlpool Corporation or Whirlpool Canada, LP (hereafter "Maytag") will pay for factory specified replacement parts and repair labor to correct defects in materials or workmanship that existed when this...
.... 6. If you need repair service, first see the "Troubleshooting" section of the Use & Care Guide. MAYTAG® ELECTRIC RANGE LIMITED WARRANTY FIRST YEAR LIMITED WARRANTY (PARTS AND LABOR) For one year from the date of purchase, when this major appliance is installed, operated and... maintained according to instructions attached to or furnished with the product, Maytag brand of Whirlpool Corporation or Whirlpool Canada, LP (hereafter "Maytag") will pay for factory specified replacement parts and repair labor to correct defects in materials or workmanship that existed when this...

Installation Instructions
Page 1
... l'installation 22 Déplacement de la cuisinière 23 RANGE SAFETY Your safety and the safety of Contents RANGE SAFETY 1 INSTALLATION REQUIREMENTS 2 Tools and Parts 2 Location Requirements 2 Electrical Requirements - Always read and obey all safety messages.
... l'installation 22 Déplacement de la cuisinière 23 RANGE SAFETY Your safety and the safety of Contents RANGE SAFETY 1 INSTALLATION REQUIREMENTS 2 Tools and Parts 2 Location Requirements 2 Electrical Requirements - Always read and obey all safety messages.

Installation Instructions
Page 2
... kit marked for convenient use with the maximum allowable wood cabinet temperatures of burns or fire by a licensed, qualified electrical installer. Parts needed ■ Tape measure ■ Level ■ Wrench or pliers nut driver ■ Phillips screwdriver ■ Hand or ...electric drill ■ Flat-blade screwdriver 3.2 mm) drill bit Parts supplied Check that all parts are shown must be located for use with any tools listed here. See "Electrical Connection" section. 2 Check existing electrical...
... kit marked for convenient use with the maximum allowable wood cabinet temperatures of burns or fire by a licensed, qualified electrical installer. Parts needed ■ Tape measure ■ Level ■ Wrench or pliers nut driver ■ Phillips screwdriver ■ Hand or ...electric drill ■ Flat-blade screwdriver 3.2 mm) drill bit Parts supplied Check that all parts are shown must be located for use with any tools listed here. See "Electrical Connection" section. 2 Check existing electrical...
Installation Instructions
Page 5
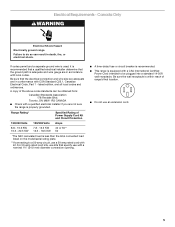
... local codes. Be sure that the ground path is adequate and wire gauge are adequate and in accordance with CSA Standard C22.1, Canadian Electrical Code, Part 1 - Electrical Requirements - Failure to a 50-amp circuit, use an extension cord. 5 Canada Only WARNING Electrical Shock Hazard Electrically ground range.
... local codes. Be sure that the ground path is adequate and wire gauge are adequate and in accordance with CSA Standard C22.1, Canadian Electrical Code, Part 1 - Electrical Requirements - Failure to a 50-amp circuit, use an extension cord. 5 Canada Only WARNING Electrical Shock Hazard Electrically ground range.

Installation Instructions
Page 6
... the carton. Use an adjustable wrench to rear range foot. NOTE: To place range back up to anti-tip bracket installation. 6 Remove oven racks and parts package from the range. Place cardboard or hardboard in death or serious burns to the correct height. Failure to follow these instructions can result in...
... the carton. Use an adjustable wrench to rear range foot. NOTE: To place range back up to anti-tip bracket installation. 6 Remove oven racks and parts package from the range. Place cardboard or hardboard in death or serious burns to the correct height. Failure to follow these instructions can result in...

Installation Instructions
Page 10
...-32 hex nuts. Ground-link screw 2. Neutral (center) wire F. Securely tighten hex nuts. The ground wire must be attached first. Terminal block B. Cord/conduit plate D. Part of metal ground strap must be cut out and removed. 5. Discard C. Feed the power supply cord through the strain relief in the cord/conduit plate...
...-32 hex nuts. Ground-link screw 2. Neutral (center) wire F. Securely tighten hex nuts. The ground wire must be attached first. Terminal block B. Cord/conduit plate D. Part of metal ground strap must be cut out and removed. 5. Discard C. Feed the power supply cord through the strain relief in the cord/conduit plate...

Installation Instructions
Page 11
... electrical supply, make the required 3-wire or 4-wire connection. 1. Ground-link screw 2. C G D FE A. Line 1 (black) C. Complete electrical connection according to expose wires. Ground-link screw C. Part of the ground link under the screw. 3. A B C A. Neutral (white) wire F. Replace terminal block access cover. Save the ground-link screw and the end of metal...
... electrical supply, make the required 3-wire or 4-wire connection. 1. Ground-link screw 2. C G D FE A. Line 1 (black) C. Complete electrical connection according to expose wires. Ground-link screw C. Part of the ground link under the screw. 3. A B C A. Neutral (white) wire F. Replace terminal block access cover. Save the ground-link screw and the end of metal...

Installation Instructions
Page 13
...terminal block access cover. Dry thoroughly with 10-32 hex nuts. 5. Slide range into appropriate outlet. Check that you have all of /recycle all parts are not bent. 8. If range is intact and tight; Bare Wire Torque Specifications Attaching terminal lugs to the terminal block - 20 lbs-in. ...Check that the flexible conduit or power supply cord are now installed. Push range back into an outlet. ■ Electrical supply is an extra part, go back through the steps to the outer terminal block posts with a soft cloth. Securely tighten hex nuts. 6. or circuit breaker has ...
...terminal block access cover. Dry thoroughly with 10-32 hex nuts. 5. Slide range into appropriate outlet. Check that you have all of /recycle all parts are not bent. 8. If range is intact and tight; Bare Wire Torque Specifications Attaching terminal lugs to the terminal block - 20 lbs-in. ...Check that the flexible conduit or power supply cord are now installed. Push range back into an outlet. ■ Electrical supply is an extra part, go back through the steps to the outer terminal block posts with a soft cloth. Securely tighten hex nuts. 6. or circuit breaker has ...
Installation Instructions
Page 14
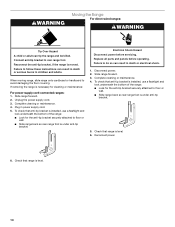
... the anti-tip bracket securely attached to floor or wall. ■ Slide range back so rear range foot is level. 6. Slide range forward. 2. Replace all parts and panels before servicing. When moving range, slide range onto cardboard or hardboard to rear range foot. Complete cleaning or maintenance. 4. Reconnect the anti-tip...
... the anti-tip bracket securely attached to floor or wall. ■ Slide range back so rear range foot is level. 6. Slide range forward. 2. Replace all parts and panels before servicing. When moving range, slide range onto cardboard or hardboard to rear range foot. Complete cleaning or maintenance. 4. Reconnect the anti-tip...


